
Users Manual - English and Spanish
Page 4
...Using the blind stitch foot 33 6. APPENDIX 34 MAINTENANCE 34 Restrictions on oiling 34 Precautions on plug. • Always replace the fuse cover. FOR USERS IN THE UK, EIRE, MALTA AND CYPRUS ONLY IMPORTANT • In the event of replacing the plug fuse, use plugs... selection dial 9 Patterns and stitch names 9 Reverse sewing lever 10 THREADING THE MACHINE 11 Winding the bobbin 11 Lower threading 13 Lower threading (for the plug supplied with a quick-set bobbin 14 Upper threading 15 Drawing up the lower thread 17 FABRIC, THREAD, AND NEEDLE COMBINATIONS 18 2.
...Using the blind stitch foot 33 6. APPENDIX 34 MAINTENANCE 34 Restrictions on oiling 34 Precautions on plug. • Always replace the fuse cover. FOR USERS IN THE UK, EIRE, MALTA AND CYPRUS ONLY IMPORTANT • In the event of replacing the plug fuse, use plugs... selection dial 9 Patterns and stitch names 9 Reverse sewing lever 10 THREADING THE MACHINE 11 Winding the bobbin 11 Lower threading 13 Lower threading (for the plug supplied with a quick-set bobbin 14 Upper threading 15 Drawing up the lower thread 17 FABRIC, THREAD, AND NEEDLE COMBINATIONS 18 2.
Users Manual - English and Spanish
Page 8
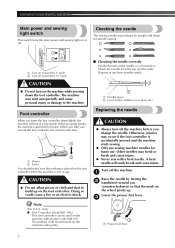
... machine starts sewing. ● Only use . Check the needle from the top and the sides. Dispose of any bent needles safely. 1 2 1 Parallel space 2 Level surface (bobbin cover, glass, etc.) Replacing the needle CAUTION ● Always turn on the machine rating plate. ■ Checking the needle correctly Put the flat side of cloth...
... machine starts sewing. ● Only use . Check the needle from the top and the sides. Dispose of any bent needles safely. 1 2 1 Parallel space 2 Level surface (bobbin cover, glass, etc.) Replacing the needle CAUTION ● Always turn on the machine rating plate. ■ Checking the needle correctly Put the flat side of cloth...
Users Manual - English and Spanish
Page 14
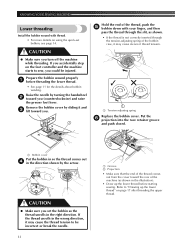
... properly 1 before starting sewing. Remove the bobbin cover by sliding it and 3 lift toward the rear of the bobbin case, it may cause incorrect thread tension. 1 1 Tension-adjusting spring Replace the bobbin cover. Put the 6 projection into the race retainer groove and push closed. 1 Bobbin cover Put the bobbin in so the thread comes out 4 in the direction...
... properly 1 before starting sewing. Remove the bobbin cover by sliding it and 3 lift toward the rear of the bobbin case, it may cause incorrect thread tension. 1 1 Tension-adjusting spring Replace the bobbin cover. Put the 6 projection into the race retainer groove and push closed. 1 Bobbin cover Put the bobbin in so the thread comes out 4 in the direction...
Users Manual - English and Spanish
Page 15
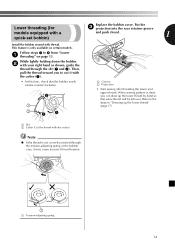
... may cause incorrect thread tension. 1 1 Tension-adjusting spring 14 Follow steps 1 to the steps in "Drawing up the lower thread by hand so that the bobbin easily rotates counterclockwise. 2 1 2 3 1 12 1 Groove 2 Projection • Start sewing after threading the lower and upper thread. Refer to 4 from "... with your right hand as shown, guide the thread through the tension-adjusting spring of the bobbin case, it with a quick-set bobbin) Replace the bobbin cover. Then, pull the thread toward you can draw up the lower thread" (page 17). 1 Slit 2 Cutter (Cut the thread ...
... may cause incorrect thread tension. 1 1 Tension-adjusting spring 14 Follow steps 1 to the steps in "Drawing up the lower thread by hand so that the bobbin easily rotates counterclockwise. 2 1 2 3 1 12 1 Groove 2 Projection • Start sewing after threading the lower and upper thread. Refer to 4 from "... with your right hand as shown, guide the thread through the tension-adjusting spring of the bobbin case, it with a quick-set bobbin) Replace the bobbin cover. Then, pull the thread toward you can draw up the lower thread" (page 17). 1 Slit 2 Cutter (Cut the thread ...
Users Manual - English and Spanish
Page 18
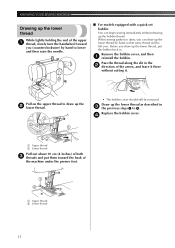
... the previous steps 1 to lower and then raise the needle. ■ For models equipped with a quick-set bobbin You can draw up the lower thread by hand to 3. Replace the bobbin cover. 4 2 1 Upper thread 2 Lower thread Pull out about 10 cm (4 inches) of both 3 threads and ...be removed. Draw up the 2 lower thread. 1 2 1 • The bobbin cover should still be left over. Before you can begin sewing immediately without cutting it. Remove the bobbin cover, and then 1 reinstall the bobbin. KNOWING YOUR SEWING MACHINE Drawing up the lower thread While lightly holding the end ...
... the previous steps 1 to lower and then raise the needle. ■ For models equipped with a quick-set bobbin You can draw up the lower thread by hand to 3. Replace the bobbin cover. 4 2 1 Upper thread 2 Lower thread Pull out about 10 cm (4 inches) of both 3 threads and ...be removed. Draw up the 2 lower thread. 1 2 1 • The bobbin cover should still be left over. Before you can begin sewing immediately without cutting it. Remove the bobbin cover, and then 1 reinstall the bobbin. KNOWING YOUR SEWING MACHINE Drawing up the lower thread While lightly holding the end ...


