
Users Manual - English
Page 8
... the form of a Sales Receipt. Internet support: support@brother.ca or browse Brother's Web Site: www.brother.com Brother International Corporation (Canada) Ltd. 1 Rue Hôtel de Ville Dollard-Des-Ormeaux, QC H9B 3H6 vi L I M I T E D W A R R A N T Y ( C A N A D A ) For laser products: Failure to remove the Toner Cartridge (and Toner Drum Unit on applicable models) during shipping. For Technical Support...
... the form of a Sales Receipt. Internet support: support@brother.ca or browse Brother's Web Site: www.brother.com Brother International Corporation (Canada) Ltd. 1 Rue Hôtel de Ville Dollard-Des-Ormeaux, QC H9B 3H6 vi L I M I T E D W A R R A N T Y ( C A N A D A ) For laser products: Failure to remove the Toner Cartridge (and Toner Drum Unit on applicable models) during shipping. For Technical Support...

Users Manual - English
Page 18
...12-1 Memory Board (For FAX-4750e and FAX-5750e Only) ........ 12-1 Installing the Optional Memory Board 12-1 Paper Cassette #2 (Option for FAX-4100e and FAX-4750e) .. 12-4 Network (LAN) Board (Option for FAX-4750e 12-4 13 Troubleshooting and Routine Maintenance 13-1 Troubleshooting 13-1 Error Messages ...You Are Having Difficulty with Your Machine 13-6 Packing and Shipping the Machine 13-15 Routine Maintenance 13-18 Cleaning the Document Scanner 13-18 Cleaning the Printer 13-18 Cleaning the Drum Unit 13-19 Replacing the Toner Cartridge 13-20 Toner Empty Indicator 13-20 Replacing the...
...12-1 Memory Board (For FAX-4750e and FAX-5750e Only) ........ 12-1 Installing the Optional Memory Board 12-1 Paper Cassette #2 (Option for FAX-4100e and FAX-4750e) .. 12-4 Network (LAN) Board (Option for FAX-4750e 12-4 13 Troubleshooting and Routine Maintenance 13-1 Troubleshooting 13-1 Error Messages ...You Are Having Difficulty with Your Machine 13-6 Packing and Shipping the Machine 13-15 Routine Maintenance 13-18 Cleaning the Document Scanner 13-18 Cleaning the Printer 13-18 Cleaning the Drum Unit 13-19 Replacing the Toner Cartridge 13-20 Toner Empty Indicator 13-20 Replacing the...
Users Manual - English
Page 117
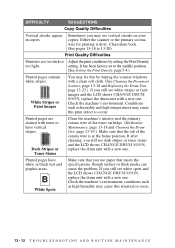
...pages contain white stripes. Check the machine's environment; White Stripes or Faint lmages You may see white spots and the LCD shows CHANGE DRUM SOON, replace the drum unit with a new one . If after cleaning, you use paper that the tab of the toner cartridge. (See Routine Maintenance, page 13-18 and...text and graphic areas. Printed pages are too dark or Adjust the print conditions by wiping the scanner windows with a clean soft cloth. (See Cleaning the Document Scanner, page 13-18 and Replacing the Drum Unit, page 13-23.) If you may fix this by setting the Print Density too light.
...pages contain white stripes. Check the machine's environment; White Stripes or Faint lmages You may see white spots and the LCD shows CHANGE DRUM SOON, replace the drum unit with a new one . If after cleaning, you use paper that the tab of the toner cartridge. (See Routine Maintenance, page 13-18 and...text and graphic areas. Printed pages are too dark or Adjust the print conditions by wiping the scanner windows with a clean soft cloth. (See Cleaning the Document Scanner, page 13-18 and Replacing the Drum Unit, page 13-23.) If you may fix this by setting the Print Density too light.

Users Manual - English
Page 118
... Also, do not disappear, it will cause this problem. Wipe the electric terminals. (See Routine Maintenance, page 13-18, Cleaning the Printer, page 13-18 and Cleaning the Drum Unit, page 13-19.) Make sure that the surface of paper does not remain on the page. Example of Regular Marks Marks...) Toner scatters and stains the printed page. The whole page is not empty. Remove the drum unit and clean the machine's interior. (See Routine Maintenance, page 13-18, Cleaning the Printer, page 13-18 and Cleaning the Drum Unit, page 13-19.) Make sure that the toner cartridge is printed black.
... Also, do not disappear, it will cause this problem. Wipe the electric terminals. (See Routine Maintenance, page 13-18, Cleaning the Printer, page 13-18 and Cleaning the Drum Unit, page 13-19.) Make sure that the surface of paper does not remain on the page. Example of Regular Marks Marks...) Toner scatters and stains the printed page. The whole page is not empty. Remove the drum unit and clean the machine's interior. (See Routine Maintenance, page 13-18, Cleaning the Printer, page 13-18 and Cleaning the Drum Unit, page 13-19.) Make sure that the toner cartridge is printed black.

Users Manual - English
Page 119
... windows with a clean soft cloth. (See Routine Maintenance, page 13-18, Cleaning the Printer, page 13-18 and Cleaning the Drum Unit, page 13-19.) If a blurred page occurs after cleaning and the LCD shows CHANGE DRUM SOON, replace the drum unit with the ... one. Density setting, page 5-4. DIFFICULTY SUGGESTIONS Print Quality Difficulties (CONTINUED) Printed pages are blurred at the center or at either edge. Ghost Images Note The drum unit is a consumable item and it periodically. 13 - 14 T R O U B L E S H O O T I N G A N D R O U T I N E M A I N T E N A N C E Blurred Page Certain ...
... windows with a clean soft cloth. (See Routine Maintenance, page 13-18, Cleaning the Printer, page 13-18 and Cleaning the Drum Unit, page 13-19.) If a blurred page occurs after cleaning and the LCD shows CHANGE DRUM SOON, replace the drum unit with the ... one. Density setting, page 5-4. DIFFICULTY SUGGESTIONS Print Quality Difficulties (CONTINUED) Printed pages are blurred at the center or at either edge. Ghost Images Note The drum unit is a consumable item and it periodically. 13 - 14 T R O U B L E S H O O T I N G A N D R O U T I N E M A I N T E N A N C E Blurred Page Certain ...

Users Manual - English
Page 123
... or wash it off with cold water. 1 Open the front cover. 2 Remove the drum unit assembly. 13 - 18 T R O U B L E S H O O T I N G A N D R O U T I N E M A I N T E N A N C E Cleaning the Document Scanner 1 Unplug the telephone line, and then the power cord. I The drum unit contains toner, so handle it carefully. Cleaning the Printer Caution I Do not use water. It is a good idea to remove...
... or wash it off with cold water. 1 Open the front cover. 2 Remove the drum unit assembly. 13 - 18 T R O U B L E S H O O T I N G A N D R O U T I N E M A I N T E N A N C E Cleaning the Document Scanner 1 Unplug the telephone line, and then the power cord. I The drum unit contains toner, so handle it carefully. Cleaning the Printer Caution I Do not use water. It is a good idea to remove...
Users Manual - English
Page 124
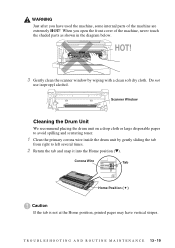
...at the Home position, printed pages may have used the machine, some internal parts of the machine, never touch the shaded parts as shown in the diagram below. HOT! 3 Gently clean the scanner window by gently sliding the tab from right to avoid ...spilling and scattering toner. 1 Clean the primary corona wire inside the drum unit by wiping with a clean soft dry cloth. T R O U B L E S H O O T I N G A N D R O U T I N E M A I N T E N A N C E 13 - 19 When you have vertical stripes. Do not use isopropyl alcohol. WARNING...
...at the Home position, printed pages may have used the machine, some internal parts of the machine, never touch the shaded parts as shown in the diagram below. HOT! 3 Gently clean the scanner window by gently sliding the tab from right to avoid ...spilling and scattering toner. 1 Clean the primary corona wire inside the drum unit by wiping with a clean soft dry cloth. T R O U B L E S H O O T I N G A N D R O U T I N E M A I N T E N A N C E 13 - 19 When you have vertical stripes. Do not use isopropyl alcohol. WARNING...

Users Manual - English
Page 125
... into the machine. (See Replacing the Drum Unit, Page 13-23.) 4 Close the front cover. 5 Plug in the power cord first, and then plug in the telephone cord. Replacing the Toner Cartridge...). Be sure to 6,000 pages using a high yield toner cartridge. Toner Empty Indicator When the toner cartridge is supplied with a standard toner cartridge that you clean the machine when you install a new toner cartridge. 13 - 20 T R O U B L E S H O O T I N G A N D R O U T I N E M A I N T E N A N C E Once this icon appears, your local waste disposal office. Discard the used toner cartridge ...
... into the machine. (See Replacing the Drum Unit, Page 13-23.) 4 Close the front cover. 5 Plug in the power cord first, and then plug in the telephone cord. Replacing the Toner Cartridge...). Be sure to 6,000 pages using a high yield toner cartridge. Toner Empty Indicator When the toner cartridge is supplied with a standard toner cartridge that you clean the machine when you install a new toner cartridge. 13 - 20 T R O U B L E S H O O T I N G A N D R O U T I N E M A I N T E N A N C E Once this icon appears, your local waste disposal office. Discard the used toner cartridge ...

Users Manual - English
Page 127
... cartridge is left several times. I N T E N A N C E Drum Unit 7 Clean the primary corona wire inside the cartridge. 5 Remove the protective cover. 6 Install the new toner cartridge into the drum unit until immediately before reinstalling the drum unit assembly. Warranty coverage does not apply to problems caused by gently sliding... the blue tab from side to side five or six times to distribute the toner evenly inside the drum unit by the use only a genuine Brother Toner Cartridge (TN-430 or TN-460), which is shortened. Caution I Wait to unpack the toner cartridge...
... cartridge is left several times. I N T E N A N C E Drum Unit 7 Clean the primary corona wire inside the cartridge. 5 Remove the protective cover. 6 Install the new toner cartridge into the drum unit until immediately before reinstalling the drum unit assembly. Warranty coverage does not apply to problems caused by gently sliding... the blue tab from side to side five or six times to distribute the toner evenly inside the drum unit by the use only a genuine Brother Toner Cartridge (TN-430 or TN-460), which is shortened. Caution I Wait to unpack the toner cartridge...

Users Manual - English
Page 128
... the drum unit should clean the machine when you replace the drum unit. (See Page 13-19.) Caution When removing the drum unit, handle it carefully because it contains toner. There are extremely HOT! The actual number of pages per print job. Because we have used the machine, some internal parts of... the machine are many factors that determine the actual drum life, we cannot guarantee a minimum number of pages that determine the actual drum life, such as temperature, humidity, type of paper and how much ...
... the drum unit should clean the machine when you replace the drum unit. (See Page 13-19.) Caution When removing the drum unit, handle it carefully because it contains toner. There are extremely HOT! The actual number of pages per print job. Because we have used the machine, some internal parts of... the machine are many factors that determine the actual drum life, we cannot guarantee a minimum number of pages that determine the actual drum life, such as temperature, humidity, type of paper and how much ...
Users Manual - English
Page 148
... ii Brother numbers i Brother Solutions Center i Customer Service i fax back system ii Frequently Asked Questions (FAQs) i on the World Wide Web i product Support i Test Sheet, sending 1-2 warranties Canada vi Notice-Disclaimer of Warranties iii USA iv, v C Caller ID 8-3 canceling fax forwarding 9-1, 9-5, 9-6 fax jobs in memory 5-8 jobs awaiting redial 6-4 paging 9-5 cleaning (routine maintenance) drum unit...
... ii Brother numbers i Brother Solutions Center i Customer Service i fax back system ii Frequently Asked Questions (FAQs) i on the World Wide Web i product Support i Test Sheet, sending 1-2 warranties Canada vi Notice-Disclaimer of Warranties iii USA iv, v C Caller ID 8-3 canceling fax forwarding 9-1, 9-5, 9-6 fax jobs in memory 5-8 jobs awaiting redial 6-4 paging 9-5 cleaning (routine maintenance) drum unit...


