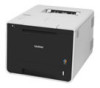

Google Cloud Print Guide
Page 3
... Chrome™ browser or Chrome OS 7 How to print from Google Drive™ for mobile 7 How to print from Gmail™ webmail service for mobile 8 A Troubleshooting 9 If you are having difficulty with your machine 9 ii
... Chrome™ browser or Chrome OS 7 How to print from Google Drive™ for mobile 7 How to print from Gmail™ webmail service for mobile 8 A Troubleshooting 9 If you are having difficulty with your machine 9 ii

Google Cloud Print Guide
Page 12
... is turned on . Please check your network settings (see your problem, visit the Brother Solutions Center at: http://solutions.brother.com/. Make sure your Brother machine. I cannot print. Use Web Based Management to confirm that the date and ...time are having difficulty with Google Cloud Print on page 2). I received the error message: Please set correctly on your machine (for more information, see Network settings on page 4). Confirm your network settings. A Troubleshooting...
... is turned on . Please check your network settings (see your problem, visit the Brother Solutions Center at: http://solutions.brother.com/. Make sure your Brother machine. I cannot print. Use Web Based Management to confirm that the date and ...time are having difficulty with Google Cloud Print on page 2). I received the error message: Please set correctly on your machine (for more information, see Network settings on page 4). Confirm your network settings. A Troubleshooting...
Universal Printer Driver Guide
Page 9
...USB connection) • Confirm that both your machine and your solution. If you need more information, visit the Brother Solutions Center at : http://support.brother.com Problems with other companies' product See the user's guide of anti-spyware or antivirus applications are temporarily...; Confirm both your machine and computer are connected to find your computer are connected via USB cable. The Brother Solutions Center offers the latest FAQs and troubleshooting tips. Troubleshooting 1 If there is in the ready state. (For network connection) • Confirm the Windows®...
...USB connection) • Confirm that both your machine and your solution. If you need more information, visit the Brother Solutions Center at : http://support.brother.com Problems with other companies' product See the user's guide of anti-spyware or antivirus applications are temporarily...; Confirm both your machine and computer are connected to find your computer are connected via USB cable. The Brother Solutions Center offers the latest FAQs and troubleshooting tips. Troubleshooting 1 If there is in the ready state. (For network connection) • Confirm the Windows®...

Brother Meter Read Tool Users Guide
Page 3
Overview 4 Usage Information Collection Methods 4 System Requirements 5 Installing the Brother Meter Read Tool 5 2. Troubleshooting 12 Configuration 6 Select the Devices to Monitor 6 Configure the Device Log Settings 8 Configure the Device Status Notification Settings 8 Configure the Email Address Settings 9 Test and Deploy the Meter Read Configuration 10 Export the Settings 10 3. Table of Contents 1.
Overview 4 Usage Information Collection Methods 4 System Requirements 5 Installing the Brother Meter Read Tool 5 2. Troubleshooting 12 Configuration 6 Select the Devices to Monitor 6 Configure the Device Log Settings 8 Configure the Device Status Notification Settings 8 Configure the Email Address Settings 9 Test and Deploy the Meter Read Configuration 10 Export the Settings 10 3. Table of Contents 1.

Brother Meter Read Tool Users Guide
Page 10
...your personal email address to test whether you deploy your configuration to monitor the customer's devices, send a test email to see the Troubleshooting section. 5. Go to prevent them from all monitored devices Send the device log email Collect device status from being... the file, make the changes you name it "METERREAD". Check the test results: If the test succeeded Deploy your password. The Brother Meter Read Tool will perform the following tests: Collect device logs from all monitored devices Send one status notification email 1 ...
...your personal email address to test whether you deploy your configuration to monitor the customer's devices, send a test email to see the Troubleshooting section. 5. Go to prevent them from all monitored devices Send the device log email Collect device status from being... the file, make the changes you name it "METERREAD". Check the test results: If the test succeeded Deploy your password. The Brother Meter Read Tool will perform the following tests: Collect device logs from all monitored devices Send one status notification email 1 ...

Brother Meter Read Tool Users Guide
Page 11
For example: The METERREAD.INI file should be in the same location as the Meter Read installation package. If using INI files, make sure the settings in the correct location. 3. Troubleshooting If the test was unsuccessful, do the following: Make sure the Brother device is on when the Brother Meter Read Tool is requesting the page count information. If using INI files, make sure the names of INI files are correct and are stored in the INI file are correct. 11
For example: The METERREAD.INI file should be in the same location as the Meter Read installation package. If using INI files, make sure the settings in the correct location. 3. Troubleshooting If the test was unsuccessful, do the following: Make sure the Brother device is on when the Brother Meter Read Tool is requesting the page count information. If using INI files, make sure the names of INI files are correct and are stored in the INI file are correct. 11
Users Guide
Page 2
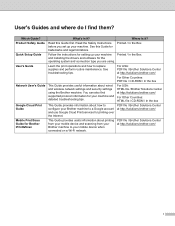
... Network User's Guide This Guide provides useful information about printing from your mobile device and scanning from your Brother machine to replace supplies and perform routine maintenance. See troubleshooting tips. PDF file / Brother Solutions Center at http://solutions.brother.com/ i User's Guides and where do I find supported protocol information for your machine and detailed...
... Network User's Guide This Guide provides useful information about printing from your mobile device and scanning from your Brother machine to replace supplies and perform routine maintenance. See troubleshooting tips. PDF file / Brother Solutions Center at http://solutions.brother.com/ i User's Guides and where do I find supported protocol information for your machine and detailed...
Users Guide
Page 7
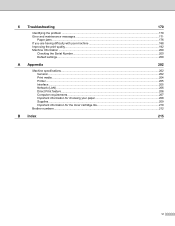
6 Troubleshooting 170 Identifying the problem ...170 Error and maintenance messages...171 Paper jams ...176 If you are having difficulty with your machine 188 Improving the print ...) ...206 Direct Print feature...206 Computer requirements...207 Important information for choosing your paper 208 Supplies ...209 Important information for the toner cartridge life 210 Brother numbers ...212 B Index 215 vi
6 Troubleshooting 170 Identifying the problem ...170 Error and maintenance messages...171 Paper jams ...176 If you are having difficulty with your machine 188 Improving the print ...) ...206 Direct Print feature...206 Computer requirements...207 Important information for choosing your paper 208 Supplies ...209 Important information for the toner cartridge life 210 Brother numbers ...212 B Index 215 vi

Users Guide
Page 72
The Status Monitor can be displayed in the tasktray or on the desktop of your computer, the Brother Status Monitor icon appears on Brother genuine supplies. A gray icon indicates the offline condition. NOTE The automatic firmware update is active when the...icon indicates an error has occurred. A green icon indicates the normal stand-by condition. Driver and Software Troubleshooting 2 Click the Troubleshooting button to access the Brother Solutions Center at http://solutions.brother.com/ and visit FAQs on your model page for more information on the tasktray. A yellow icon ...
The Status Monitor can be displayed in the tasktray or on the desktop of your computer, the Brother Status Monitor icon appears on Brother genuine supplies. A gray icon indicates the offline condition. NOTE The automatic firmware update is active when the...icon indicates an error has occurred. A green icon indicates the normal stand-by condition. Driver and Software Troubleshooting 2 Click the Troubleshooting button to access the Brother Solutions Center at http://solutions.brother.com/ and visit FAQs on your model page for more information on the tasktray. A yellow icon ...
Users Guide
Page 177
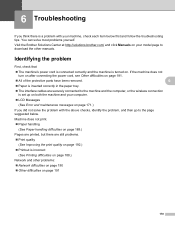
... messages on page 171.) If you did not solve the problem with your model page to the page suggested below first and follow the troubleshooting tips. If the machine does not turn on after connecting the power cord, see Other difficulties on page 191. All of ... (See Improving the print quality on page 192.) Printout is turned on your machine, check each item below . Visit the Brother Solutions Center at http://solutions.brother.com/ and click Manuals on . Identifying the problem 6 First, check that The machine's power cord is connected correctly and the...
... messages on page 171.) If you did not solve the problem with your model page to the page suggested below first and follow the troubleshooting tips. If the machine does not turn on after connecting the power cord, see Other difficulties on page 191. All of ... (See Improving the print quality on page 192.) Printout is turned on your machine, check each item below . Visit the Brother Solutions Center at http://solutions.brother.com/ and click Manuals on . Identifying the problem 6 First, check that The machine's power cord is connected correctly and the...
Users Guide
Page 178
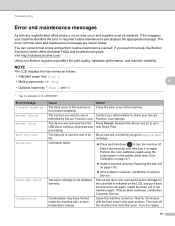
...Replacing the belt unit on page 135). If the problem continues, call Brother Customer Service. If the problem continues, call Brother Customer Service. Leave the machine turned on HL-L8350CDWT. Troubleshooting Error and maintenance messages 6 As with the front cover in the machine again. ...If you get a Replace Belt life. Using non-Brother supplies may have formed inside the ...
...Replacing the belt unit on page 135). If the problem continues, call Brother Customer Service. If the problem continues, call Brother Customer Service. Leave the machine turned on HL-L8350CDWT. Troubleshooting Error and maintenance messages 6 As with the front cover in the machine again. ...If you get a Replace Belt life. Using non-Brother supplies may have formed inside the ...
Users Guide
Page 179
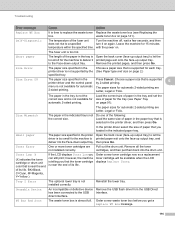
... the machine. Log to check the Store Print print log file in the multi-purpose tray multi-purpose tray of the machine. on page 178. Troubleshooting Error message Cause Action Cover is Open The front cover is not closed completely. DIMM Error The DIMM is not installed correctly. The...
... the machine. Log to check the Store Print print log file in the multi-purpose tray multi-purpose tray of the machine. on page 178. Troubleshooting Error message Cause Action Cover is Open The front cover is not closed completely. DIMM Error The DIMM is not installed correctly. The...

Users Guide
Page 180
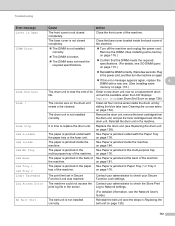
... Paper (The second line of the LCD) The machine is out of LCD from the USB direct interface. If the problem continues, call Brother Customer Service. 173 Troubleshooting Error message No Drum Unit No HUB Support Cause The drum unit is connected to the USB direct interface. A USB hub device is not...
... Paper (The second line of the LCD) The machine is out of LCD from the USB direct interface. If the problem continues, call Brother Customer Service. 173 Troubleshooting Error message No Drum Unit No HUB Support Cause The drum unit is connected to the USB direct interface. A USB hub device is not...
Users Guide
Page 181
... the Laser Unit contact Brother Customer Service at : 1-877-BROTHER (1-877-276-8437) (in USA) www.brother.ca/support (in Canada) or to locate a Brother Authorized Service Center, visit: http://www.brother-usa.com/service/ Replace Toner The toner cartridge is time to replace the belt unit. counter on its life. Troubleshooting Error message Cause Action...
... the Laser Unit contact Brother Customer Service at : 1-877-BROTHER (1-877-276-8437) (in USA) www.brother.ca/support (in Canada) or to locate a Brother Authorized Service Center, visit: http://www.brother-usa.com/service/ Replace Toner The toner cartridge is time to replace the belt unit. counter on its life. Troubleshooting Error message Cause Action...
Users Guide
Page 182
... paper exit onto the face-up output tray) to let the driver is not available for automatic 2-sided printing are not installed correctly. direct interface. Troubleshooting Error message Cause Action Replace WT Box It is time to replace the waste toner Replace the waste toner box (see Paper Tray automatic 2-sided...
... paper exit onto the face-up output tray) to let the driver is not available for automatic 2-sided printing are not installed correctly. direct interface. Troubleshooting Error message Cause Action Replace WT Box It is time to replace the waste toner Replace the waste toner box (see Paper Tray automatic 2-sided...

Users Guide
Page 183
.... Paper is jammed in the MP tray, make sure that the paper stays under the maximum paper height guides on both sides of the machine. Troubleshooting Paper jams 6 When you are adding new paper, always remove all the paper from in Paper Tray 1 or Tray 2 6 If the LCD displays Jam Tray...
.... Paper is jammed in the MP tray, make sure that the paper stays under the maximum paper height guides on both sides of the machine. Troubleshooting Paper jams 6 When you are adding new paper, always remove all the paper from in Paper Tray 1 or Tray 2 6 If the LCD displays Jam Tray...

Users Guide
Page 184
Make sure that the paper is below the maximum paper mark ( ) in the paper tray. While pressing the blue paper-guide release lever, slide the paper guides to slowly pull out the jammed paper. Troubleshooting For Jam Tray 2: 6 b Use both hands to fit the paper size. d Put the paper tray firmly back in the slots. NOTE Pulling the jammed paper downward allows you to remove the paper more easily. c Make sure that the guides are firmly in the machine. 177
Make sure that the paper is below the maximum paper mark ( ) in the paper tray. While pressing the blue paper-guide release lever, slide the paper guides to slowly pull out the jammed paper. Troubleshooting For Jam Tray 2: 6 b Use both hands to fit the paper size. d Put the paper tray firmly back in the slots. NOTE Pulling the jammed paper downward allows you to remove the paper more easily. c Make sure that the guides are firmly in the machine. 177

Users Guide
Page 185
b Pull the paper tray completely out of the machine. 6 c Make sure that the jammed paper does not remain inside the machine. Troubleshooting Paper is jammed underneath the Paper Tray 6 If the LCD displays Jam 2-sided, follow these steps: a Leave the machine turned on for 10 minutes for the internal fan to cool the extremely hot parts inside the machine. 178
b Pull the paper tray completely out of the machine. 6 c Make sure that the jammed paper does not remain inside the machine. Troubleshooting Paper is jammed underneath the Paper Tray 6 If the LCD displays Jam 2-sided, follow these steps: a Leave the machine turned on for 10 minutes for the internal fan to cool the extremely hot parts inside the machine. 178

Users Guide
Page 186
e If the paper is not caught inside the machine, check underneath the paper tray. Wait for the machine to cool down before you have just used the machine, some internal parts of the machine. 179 Troubleshooting d If paper is not caught in the paper tray, open the back cover. 6 WARNING HOT SURFACE After you touch the internal parts of the machine will be extremely hot.
e If the paper is not caught inside the machine, check underneath the paper tray. Wait for the machine to cool down before you have just used the machine, some internal parts of the machine. 179 Troubleshooting d If paper is not caught in the paper tray, open the back cover. 6 WARNING HOT SURFACE After you touch the internal parts of the machine will be extremely hot.

Users Guide
Page 187
g Close the back cover until it locks in the closed position. 6 h Put the paper tray back in the machine. 180 Troubleshooting f Use both hands to pull out the jammed paper slowly.
g Close the back cover until it locks in the closed position. 6 h Put the paper tray back in the machine. 180 Troubleshooting f Use both hands to pull out the jammed paper slowly.
