Quick Setup Guide - English
Page 1
They are useful when shipping the printer. The product names in China UL7487001 Printed in this guidebook first to change without notice. ©1996 Brother Industries Ltd. The specifications are subject to set up your printer and prepare your computer for the printer. Laser Printer HL-760 Series Quick Setup Guide Read this guidebook are trademarks or registered trade marks of each manufacturer. Save all packing materials and outer carton.
They are useful when shipping the printer. The product names in China UL7487001 Printed in this guidebook first to change without notice. ©1996 Brother Industries Ltd. The specifications are subject to set up your printer and prepare your computer for the printer. Laser Printer HL-760 Series Quick Setup Guide Read this guidebook are trademarks or registered trade marks of each manufacturer. Save all packing materials and outer carton.

Quick Setup Guide - English
Page 2
...make sure that the following items are not damaged and none are missing: • Printer • Paper support • Drum unit assembly (with Toner cartridge included) • 3.5" floppy disks for Windows® printer driver and fonts • Quick setup guide (this guidebook) • User's ...guide • Plastic Bag (for transporting the drum unit assembly) • Dust Cover NOTE You will need , consult your computer. English: HL-YL Quick Setup Guide, Body Action ...
...make sure that the following items are not damaged and none are missing: • Printer • Paper support • Drum unit assembly (with Toner cartridge included) • 3.5" floppy disks for Windows® printer driver and fonts • Quick setup guide (this guidebook) • User's ...guide • Plastic Bag (for transporting the drum unit assembly) • Dust Cover NOTE You will need , consult your computer. English: HL-YL Quick Setup Guide, Body Action ...
Quick Setup Guide - English
Page 3
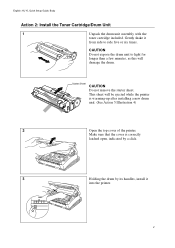
... from side to light for longer than a few minutes, as this will be ejected while the printer is correctly latched open, indicated by a click. 3 Holding the drum by its handles, install it into the printer. 2 Make sure that the cover is warming-up after installing a new drum unit. (See ...Action 5 Illustration 4) 2 Open the top cover of the printer. English: HL-YL Quick Setup Guide, Body Action 2: Install the Toner Cartridge/Drum Unit 1 Unpack the drum unit assembly with the toner cartridge included. Starter...
... from side to light for longer than a few minutes, as this will be ejected while the printer is correctly latched open, indicated by a click. 3 Holding the drum by its handles, install it into the printer. 2 Make sure that the cover is warming-up after installing a new drum unit. (See ...Action 5 Illustration 4) 2 Open the top cover of the printer. English: HL-YL Quick Setup Guide, Body Action 2: Install the Toner Cartridge/Drum Unit 1 Unpack the drum unit assembly with the toner cartridge included. Starter...

Quick Setup Guide - English
Page 5
CAUTION Failure to set the paper guide to fit the paper width. Excessive sheets may cause paper jams. Make sure that the paper is stacked below the v mark. 4 Move the paper guide to the paper width may cause paper skew and jam. 4 NOTE The feeder can hold up to 200 sheets of plain paper or up to 10 envelopes. purpose sheet feeder. 2 Open the multi-purpose sheet feeder cover. 3 Load paper in the multi-purpose sheet feeder. English: HL-YL Quick Setup Guide, Body Action 3: Load Paper into Your Printer 1 Install the paper support onto the multi-
CAUTION Failure to set the paper guide to fit the paper width. Excessive sheets may cause paper jams. Make sure that the paper is stacked below the v mark. 4 Move the paper guide to the paper width may cause paper skew and jam. 4 NOTE The feeder can hold up to 200 sheets of plain paper or up to 10 envelopes. purpose sheet feeder. 2 Open the multi-purpose sheet feeder cover. 3 Load paper in the multi-purpose sheet feeder. English: HL-YL Quick Setup Guide, Body Action 3: Load Paper into Your Printer 1 Install the paper support onto the multi-

Quick Setup Guide - English
Page 6
English: HL-YL Quick Setup Guide, Body 5 Close the multi-purpose sheet feeder cover. 6 Open the output tray. ( x ) Extend the extension support wire. ( y ) The printer can handle paper within the following specifications: Paper Type Cut sheets Envelopes Post Card Organizer Labels and Transparencies Paper Size A4, Letter, Legal, B5, A5, 3"x 5", Executive, Custom size (70-216 x 127-356 mm) DL, C5, COM-10, Monarch, 9" x 12", C4 70-216 x 127-356 mm Day-Timer® J, K, L, M, 70-216 x 127-356 mm 70-216 x 127-356 mm See "CHAPTER 2 PAPER HANDLING" in the User's Guide for more information. 5
English: HL-YL Quick Setup Guide, Body 5 Close the multi-purpose sheet feeder cover. 6 Open the output tray. ( x ) Extend the extension support wire. ( y ) The printer can handle paper within the following specifications: Paper Type Cut sheets Envelopes Post Card Organizer Labels and Transparencies Paper Size A4, Letter, Legal, B5, A5, 3"x 5", Executive, Custom size (70-216 x 127-356 mm) DL, C5, COM-10, Monarch, 9" x 12", C4 70-216 x 127-356 mm Day-Timer® J, K, L, M, 70-216 x 127-356 mm 70-216 x 127-356 mm See "CHAPTER 2 PAPER HANDLING" in the User's Guide for more information. 5

Quick Setup Guide - English
Page 7
.... In some countries it might be used for this connection, unless you are using the optional interface board) printer port, refer to the User's Guide of the printer. ( x ) Secure the connection with an RS-232C/RS-422A serial interface by installing the optional serial .... Also, make sure that the printer power switch is turned off before connecting or disconnecting the interface cable. A bi-directional IEEE 1284 compliant parallel cable should be pre-installed. English: HL-YL Quick Setup Guide, Body Action 4: Connect Your Printer to Your Computer You must connect ...
.... In some countries it might be used for this connection, unless you are using the optional interface board) printer port, refer to the User's Guide of the printer. ( x ) Secure the connection with an RS-232C/RS-422A serial interface by installing the optional serial .... Also, make sure that the printer power switch is turned off before connecting or disconnecting the interface cable. A bi-directional IEEE 1284 compliant parallel cable should be pre-installed. English: HL-YL Quick Setup Guide, Body Action 4: Connect Your Printer to Your Computer You must connect ...

Quick Setup Guide - English
Page 8
...HL-YL Quick Setup Guide, Body Action 5: Plug in and Turn on the left side of destination. 2 Turn on the power switch that the printer automatically ejects the starter sheet while the printer is lit after the printer has warmed up immediately after it is automatically ejected. 7 Make sure that is located on Your Printer... the power cord into the AC power outlet. NOTE The shape of the power cord varies according to the country of your printer. 3 Drum Alarm PaRpeeardy ToDnaetra 4 Starter Sheet Make sure that the READY lamp is warming-up (approximately 20 seconds). You may ...
...HL-YL Quick Setup Guide, Body Action 5: Plug in and Turn on the left side of destination. 2 Turn on the power switch that the printer automatically ejects the starter sheet while the printer is lit after the printer has warmed up immediately after it is automatically ejected. 7 Make sure that is located on Your Printer... the power cord into the AC power outlet. NOTE The shape of the power cord varies according to the country of your printer. 3 Drum Alarm PaRpeeardy ToDnaetra 4 Starter Sheet Make sure that the READY lamp is warming-up (approximately 20 seconds). You may ...

Quick Setup Guide - English
Page 9
... prepare your dealer. NOTE • The following section: Action 6-1: Prepare Windows 95 for the Printer Action 6-2: Prepare Windows 3.1 for the Printer Action 6-3: Prepare DOS for the Printer Action 6-4: Prepare Macintosh for the Printer 8 If you print a test page. English: HL-YL Quick Setup Guide, Body Printing a Test Sample Page We recommend that you are ready...
... prepare your dealer. NOTE • The following section: Action 6-1: Prepare Windows 95 for the Printer Action 6-2: Prepare Windows 3.1 for the Printer Action 6-3: Prepare DOS for the Printer Action 6-4: Prepare Macintosh for the Printer 8 If you print a test page. English: HL-YL Quick Setup Guide, Body Printing a Test Sample Page We recommend that you are ready...
Quick Setup Guide - English
Page 10
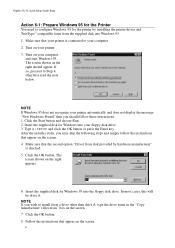
... "Copy manufacturer's files from the supplied disk into Windows 95. 1. The screen shown on the right should follow the instructions that your printer is checked. 5. In most cases, this will be drive A. Follow the instructions that the second option "Driver from disk provided by ... 4. Click the OK button. Insert the supplied disk for Windows 95 into your floppy disk drive. 3. English: HL-YL Quick Setup Guide, Body Action 6-1: Prepare Windows 95 for the Printer You need to your computer. 2. Click the Start button and choose Run. 2. Make sure that appear on the...
... "Copy manufacturer's files from the supplied disk into Windows 95. 1. The screen shown on the right should follow the instructions that your printer is checked. 5. In most cases, this will be drive A. Follow the instructions that the second option "Driver from disk provided by ... 4. Click the OK button. Insert the supplied disk for Windows 95 into your floppy disk drive. 3. English: HL-YL Quick Setup Guide, Body Action 6-1: Prepare Windows 95 for the Printer You need to your computer. 2. Click the Start button and choose Run. 2. Make sure that appear on the...

Quick Setup Guide - English
Page 11
... by this new driver. However, re-installing the previous driver will make the HL-760 series driver inactive. • The installer makes the installed printer driver the Windows default. • The installer automatically sets the printer port to the parallel interface, LPT1. • If you will install the...instructions on the disk, be deactivated by adding DEVICE=bi-di.386 under the [386Enh] section. English: HL-YL Quick Setup Guide, Body Action 6-2: Prepare Windows 3.1 for the Printer You need to install them. If you should re-install your floppy disk drive. 3. If any bi-...
... by this new driver. However, re-installing the previous driver will make the HL-760 series driver inactive. • The installer makes the installed printer driver the Windows default. • The installer automatically sets the printer port to the parallel interface, LPT1. • If you will install the...instructions on the disk, be deactivated by adding DEVICE=bi-di.386 under the [386Enh] section. English: HL-YL Quick Setup Guide, Body Action 6-2: Prepare Windows 3.1 for the Printer You need to install them. If you should re-install your floppy disk drive. 3. If any bi-...
Quick Setup Guide - English
Page 12
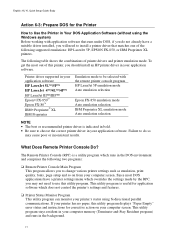
... (RPC) is indicated in bold. • Be sure to choose the correct printer driver in your application software. Printer driver supported in your computer screen. English: HL-YL Quick Setup Guide, Body Action 6-3: Prepare DOS for the Printer How to Use the Printer in Your DOS Application Software (without using bi-directional parallel communications. To...
... (RPC) is indicated in bold. • Be sure to choose the correct printer driver in your application software. Printer driver supported in your computer screen. English: HL-YL Quick Setup Guide, Body Action 6-3: Prepare DOS for the Printer How to Use the Printer in Your DOS Application Software (without using bi-directional parallel communications. To...

Quick Setup Guide - English
Page 13
...: HL-YL Quick Setup Guide, Body Installing the Remote Printer Console Before you install the program, make the selected setting valid. If you want to change the setting. 12 Select drive A or B to install the remote printer console program: 1. C:\>A: 5. Using the Remote Printer Console...current settings information from your computer. directional communication is ready (On-line). 2. Insert the supplied disk into your computer and printer. Make sure your computer screen as shown on the screen. If you have the following hardware and software: DOS Monitor Option...
...: HL-YL Quick Setup Guide, Body Installing the Remote Printer Console Before you install the program, make the selected setting valid. If you want to change the setting. 12 Select drive A or B to install the remote printer console program: 1. C:\>A: 5. Using the Remote Printer Console...current settings information from your computer. directional communication is ready (On-line). 2. Insert the supplied disk into your computer and printer. Make sure your computer screen as shown on the screen. If you have the following hardware and software: DOS Monitor Option...

Quick Setup Guide - English
Page 14
... your computer, you are using the keys shown below . Using the Printer Status Monitor Program Type C:\RPCX>STMX and press the Enter key to the printer status, it is directly connected to the sub menus. English: HL-YL Quick Setup Guide, Body Additionally, there are four sub-menus as... Print Form, Self Print, Reset Printer, Sleep Control. Menu Direct Access Printer Setup Console Config Guide Help Press the ...
... your computer, you are using the keys shown below . Using the Printer Status Monitor Program Type C:\RPCX>STMX and press the Enter key to the printer status, it is directly connected to the sub menus. English: HL-YL Quick Setup Guide, Body Additionally, there are four sub-menus as... Print Form, Self Print, Reset Printer, Sleep Control. Menu Direct Access Printer Setup Console Config Guide Help Press the ...
Quick Setup Guide - English
Page 15
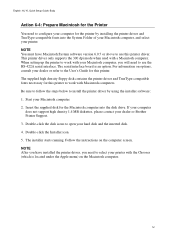
... Macintosh computer, you need to work with your printer. When setting up the printer to work with Macintosh computers. Double-click the Installer icon. 5. English: HL-YL Quick Setup Guide, Body Action 6-4: Prepare Macintosh for the Printer You need to use this printer driver. Start your dealer or Brother Printer Support. 3. If your computer does not support...
... Macintosh computer, you need to work with your printer. When setting up the printer to work with Macintosh computers. Double-click the Installer icon. 5. English: HL-YL Quick Setup Guide, Body Action 6-4: Prepare Macintosh for the Printer You need to use this printer driver. Start your dealer or Brother Printer Support. 3. If your computer does not support...
Quick Setup Guide - English
Page 16
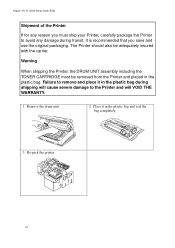
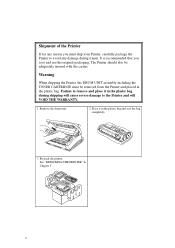
...1 Remove the drum unit. 2 Place it in the plastic bag during transit. Warning When shipping the Printer, the DRUM UNIT assembly including the TONER CARTRIDGE must ship your Printer, carefully package the Printer to avoid any damage during shipping will cause severe damage to remove and place it in the plastic... bag. The Printer should also be removed from the Printer and placed in the plastic bag and seal the bag completely. 3 Re-pack the printer. 15 English: HL-YL Quick Setup Guide, Body Shipment of the Printer If for any reason you save and use the...
...1 Remove the drum unit. 2 Place it in the plastic bag during transit. Warning When shipping the Printer, the DRUM UNIT assembly including the TONER CARTRIDGE must ship your Printer, carefully package the Printer to avoid any damage during shipping will cause severe damage to remove and place it in the plastic... bag. The Printer should also be removed from the Printer and placed in the plastic bag and seal the bag completely. 3 Re-pack the printer. 15 English: HL-YL Quick Setup Guide, Body Shipment of the Printer If for any reason you save and use the...
Users Manual - English
Page 1
I Please read this manual in a convenient place for quick and easy reference at all times. Brother Laser Printer HL-760 Series User's Guide Keep this manual thoroughly before using the printer.
I Please read this manual in a convenient place for quick and easy reference at all times. Brother Laser Printer HL-760 Series User's Guide Keep this manual thoroughly before using the printer.
Users Manual - English
Page 2
...severe damage to remove and place it in the plastic bag. II Warning When shipping the Printer, the DRUM UNIT assembly including the TONER CARTRIDGE must ship your Printer, carefully package the Printer to avoid any damage during shipping will VOID THE WARRANTY. 1 Remove the drum unit. 2...be adequately insured with the carrier. See "REPACKING THE PRINTER" in Chapter 5. The Printer should also be removed from the Printer and placed in the plastic bag and seal the bag completely. 3 Re-pack the printer. Shipment of the Printer If for any reason you save and use the original...
...severe damage to remove and place it in the plastic bag. II Warning When shipping the Printer, the DRUM UNIT assembly including the TONER CARTRIDGE must ship your Printer, carefully package the Printer to avoid any damage during shipping will VOID THE WARRANTY. 1 Remove the drum unit. 2...be adequately insured with the carrier. See "REPACKING THE PRINTER" in Chapter 5. The Printer should also be removed from the Printer and placed in the plastic bag and seal the bag completely. 3 Re-pack the printer. Shipment of the Printer If for any reason you save and use the original...
Users Manual - English
Page 3
..., not just the one you have comments or suggestions, please write us at: In USA In CANADA Printer Customer Support Brother International Corporation 15 Musick Irvine, CA 92718 Brother International Corporation (Canada), Ltd. - DEALERS/SERVICE CENTERS (USA only) For the name of Fax-Back subjects....technical questions and downloading drivers: http://www.brother.com i This is available 24 hours a day, 7 days a week. Marketing Dept. 1, rue Hôtel de Ville Dollard-des-Ormeaux, PQ, Canada H9B 3H6 BBS For downloading drivers from . Laser Printer HL-760 Series User's Guide (For USA & ...
..., not just the one you have comments or suggestions, please write us at: In USA In CANADA Printer Customer Support Brother International Corporation 15 Musick Irvine, CA 92718 Brother International Corporation (Canada), Ltd. - DEALERS/SERVICE CENTERS (USA only) For the name of Fax-Back subjects....technical questions and downloading drivers: http://www.brother.com i This is available 24 hours a day, 7 days a week. Marketing Dept. 1, rue Hôtel de Ville Dollard-des-Ormeaux, PQ, Canada H9B 3H6 BBS For downloading drivers from . Laser Printer HL-760 Series User's Guide (For USA & ...

Users Manual - English
Page 5
... that must be observed to remember when using the printer. When you have just used in the following conventions are used the printer, some internal parts of the printer are high voltage electrodes inside the printer. To Use the Printer Safely Warning After you open the top cover of the... printer, never touch the shaded parts shown in this User's Guide:...
... that must be observed to remember when using the printer. When you have just used in the following conventions are used the printer, some internal parts of the printer are high voltage electrodes inside the printer. To Use the Printer Safely Warning After you open the top cover of the... printer, never touch the shaded parts shown in this User's Guide:...
Users Manual - English
Page 6
... REGULATIONS ...vi CHAPTER 1 INTRODUCTION 1-1 ABOUT THE GUIDEBOOKS 1-1 Finding Out How to Use the Printer 1-1 ABOUT YOUR PRINTER 1-2 Printer Overview ...1-2 System Requirements in the Brother Printing Solution for Windows 1-3 Features ...1-3 OPERATING AND STORAGE ENVIRONMENT 1-6 Power Supply ...1-6 Environment ...1-6... Lamp ...3-2 Alarm Lamp ...3-2 Switch...3-3 Other Control Features 3-3 Sleep Mode...3-3 Test Print Mode ...3-4 Control Features Set by the Brother Driver 3-5 Page Protection...3-5 CHAPTER 4 OPTIONS 4-1 SERIAL INTERFACE BOARD RS-100M 4-1 Selecting the RS-422A (Apple) or RS...
... REGULATIONS ...vi CHAPTER 1 INTRODUCTION 1-1 ABOUT THE GUIDEBOOKS 1-1 Finding Out How to Use the Printer 1-1 ABOUT YOUR PRINTER 1-2 Printer Overview ...1-2 System Requirements in the Brother Printing Solution for Windows 1-3 Features ...1-3 OPERATING AND STORAGE ENVIRONMENT 1-6 Power Supply ...1-6 Environment ...1-6... Lamp ...3-2 Alarm Lamp ...3-2 Switch...3-3 Other Control Features 3-3 Sleep Mode...3-3 Test Print Mode ...3-4 Control Features Set by the Brother Driver 3-5 Page Protection...3-5 CHAPTER 4 OPTIONS 4-1 SERIAL INTERFACE BOARD RS-100M 4-1 Selecting the RS-422A (Apple) or RS...


