
Users Manual - English
Page 34
... MP tray, remember the following: • Put the leading edge (top of the envelope in first, then print again. • When you have finished printing, reset the two gray levers which are pulled down at once after printing, choose DL Long Edge in Paper Size, from the Basic tab.
... MP tray, remember the following: • Put the leading edge (top of the envelope in first, then print again. • When you have finished printing, reset the two gray levers which are pulled down at once after printing, choose DL Long Edge in Paper Size, from the Basic tab.
Users Manual - English
Page 98
... / HL-5370DW only) 4 a Turn off the printer. Make sure that all information such as you turn on the power switch. b Make sure that the front cover is closed and the power cord is plugged in . The printer will restart. The printer will reset all the LEDs light up and then Status LED... to its factory default settings. Keep Go pressed down until all the LEDs light up to indicate the print server has been reset to its default printer settings. Keep Go pressed down until all the LEDs light up and then Status LED turns off . Control Panel Default settings ...
... / HL-5370DW only) 4 a Turn off the printer. Make sure that all information such as you turn on the power switch. b Make sure that the front cover is closed and the power cord is plugged in . The printer will restart. The printer will reset all the LEDs light up and then Status LED... to its factory default settings. Keep Go pressed down until all the LEDs light up to indicate the print server has been reset to its default printer settings. Keep Go pressed down until all the LEDs light up and then Status LED turns off . Control Panel Default settings ...
Users Manual - English
Page 112
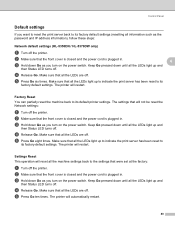
Routine Maintenance Replacing the drum unit 6 IMPORTANT While removing the drum unit, handle it carefully because it may contain toner. When you replace the drum unit with a new one, you replace the drum unit, clean the inside of the printer.See Cleaning on page 106. Every time you need to reset the drum counter by completing the following steps: a Press the front cover release button and then open the front cover. 6 b Take out the drum unit and toner cartridge assembly. 102
Routine Maintenance Replacing the drum unit 6 IMPORTANT While removing the drum unit, handle it carefully because it may contain toner. When you replace the drum unit with a new one, you replace the drum unit, clean the inside of the printer.See Cleaning on page 106. Every time you need to reset the drum counter by completing the following steps: a Press the front cover release button and then open the front cover. 6 b Take out the drum unit and toner cartridge assembly. 102
Users Manual - English
Page 115
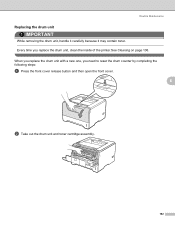
Once all the LEDs light up. h Close the front cover. Routine Maintenance g Press and hold down the Go for about 4 seconds until all four LEDs are lit, release Go. 6 IMPORTANT Do not reset the drum counter when you only replace the toner cartridge. f Put the drum unit and toner cartridge assembly back in the printer. i Make sure that the Drum LED is now off. 105
Once all the LEDs light up. h Close the front cover. Routine Maintenance g Press and hold down the Go for about 4 seconds until all four LEDs are lit, release Go. 6 IMPORTANT Do not reset the drum counter when you only replace the toner cartridge. f Put the drum unit and toner cartridge assembly back in the printer. i Make sure that the Drum LED is now off. 105
Users Manual - English
Page 143
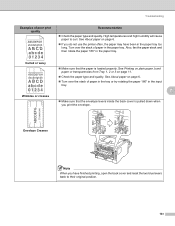
... the paper is pulled down when you print the envelope. Envelope Creases Note When you do not use the printer often, the paper may have finished printing, open the back cover and reset the two blue levers back to curl. Troubleshooting Examples of paper in the tray or try rotating the paper...
... the paper is pulled down when you print the envelope. Envelope Creases Note When you do not use the printer often, the paper may have finished printing, open the back cover and reset the two blue levers back to curl. Troubleshooting Examples of paper in the tray or try rotating the paper...
Quick Setup Guide - English
Page 24
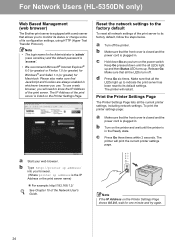
... the IP Address of the print server. b Type http://printer ip address/ into your web browser. For Network Users (HL-5350DN only) Web Based Management (web browser) The Brother print server is in the Ready state. Reset the network settings to its factory default, follow the steps ...below. Print the Printer Settings Page The Printer Settings Page lists all LEDs light up...
... the IP Address of the print server. b Type http://printer ip address/ into your web browser. For Network Users (HL-5350DN only) Web Based Management (web browser) The Brother print server is in the Ready state. Reset the network settings to its factory default, follow the steps ...below. Print the Printer Settings Page The Printer Settings Page lists all LEDs light up...


