
Users Manual - English
Page 3
... cover of the printer will be extremely hot. Doing this might cause an electrical shock. After you have turned off the power switch and unplugged the printer from the AC power outlet. Inside the printer (Front View) Open the back cover (Back View) ii DO NOT handle the plug with wet... hands. Safety precautions To use the printer safely WARNING There are high voltage electrodes inside of the printer, make sure that you have just used the printer, some internal ...
... cover of the printer will be extremely hot. Doing this might cause an electrical shock. After you have turned off the power switch and unplugged the printer from the AC power outlet. Inside the printer (Front View) Open the back cover (Back View) ii DO NOT handle the plug with wet... hands. Safety precautions To use the printer safely WARNING There are high voltage electrodes inside of the printer, make sure that you have just used the printer, some internal ...

Users Manual - English
Page 4
... with a dry, lint-free cloth and dispose of the printer. • DO NOT use cleaning materials that you have unplugged the printer from the AC power outlet. • Use neutral detergents. DO NOT use a vacuum cleaner to local regulations. iii DO NOT use flammable substances near the printer. CAUTION Cleaning the...
... with a dry, lint-free cloth and dispose of the printer. • DO NOT use cleaning materials that you have unplugged the printer from the AC power outlet. • Use neutral detergents. DO NOT use a vacuum cleaner to local regulations. iii DO NOT use flammable substances near the printer. CAUTION Cleaning the...

Users Manual - English
Page 6
...Contents 1 About this Printer What is in the box? ...1 Interface cable ...1 Front view ...2 Back view ...3 Positioning the printer ...4 Power supply ...4 Environment ...4 2 Printing Methods About paper ...5 Type and size of paper ...5 Recommended paper ...6 Printable area ...8 Printing methods...9 ...;)......34 Features in the printer driver (For Macintosh 37 Uninstalling the printer driver...40 Software ...42 Software for networks (For HL-5250DN only 42 About emulation modes...43 Automatic emulation selection...43 Automatic interface selection...44 Remote Printer Console ...44 4 Control Panel ...
...Contents 1 About this Printer What is in the box? ...1 Interface cable ...1 Front view ...2 Back view ...3 Positioning the printer ...4 Power supply ...4 Environment ...4 2 Printing Methods About paper ...5 Type and size of paper ...5 Recommended paper ...6 Printable area ...8 Printing methods...9 ...;)......34 Features in the printer driver (For Macintosh 37 Uninstalling the printer driver...40 Software ...42 Software for networks (For HL-5250DN only 42 About emulation modes...43 Automatic emulation selection...43 Automatic interface selection...44 Remote Printer Console ...44 4 Control Panel ...
Users Manual - English
Page 9
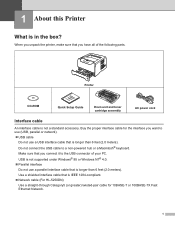
... is longer than 6 feet (2.0 meters). Use a shielded interface cable that you connect it to a non-powered hub or a Macintosh® keyboard. Printer CD-ROM Quick Setup Guide Drum unit and toner cartridge assembly AC power cord Interface cable An interface cable is in the box? Do not connect the USB cable...® 95 or Windows NT® 4.0. „ Parallel interface Do not use a USB interface cable that is IEEE 1284-compliant. „ Network cable (For HL-5250DN) Use a straight-through Category5 (or greater) twisted-pair cable for the interface you have all of your PC.
... is longer than 6 feet (2.0 meters). Use a shielded interface cable that you connect it to a non-powered hub or a Macintosh® keyboard. Printer CD-ROM Quick Setup Guide Drum unit and toner cartridge assembly AC power cord Interface cable An interface cable is in the box? Do not connect the USB cable...® 95 or Windows NT® 4.0. „ Parallel interface Do not use a USB interface cable that is IEEE 1284-compliant. „ Network cable (For HL-5250DN) Use a straight-through Category5 (or greater) twisted-pair cable for the interface you have all of your PC.

Users Manual - English
Page 10
About this Printer 2 Front view 1 2 3 4 7 6 5 8 1 Front cover release button 2 Control panel 3 Face-down output tray support flap (support flap) 4 Front cover 5 Paper tray 6 Power switch 7 Face-down output tray 8 Multi-purpose Tray (MP Tray) 1.
About this Printer 2 Front view 1 2 3 4 7 6 5 8 1 Front cover release button 2 Control panel 3 Face-down output tray support flap (support flap) 4 Front cover 5 Paper tray 6 Power switch 7 Face-down output tray 8 Multi-purpose Tray (MP Tray) 1.
Users Manual - English
Page 11
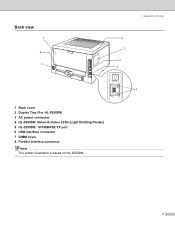
About this Printer 8 7 6 5 4 1 Back cover 2 Duplex Tray (For HL-5250DN) 3 AC power connector 4 HL-5250DN: Network status LEDs (Light Emitting Diodes) 5 HL-5250DN: 10/100BASE-TX port 6 USB interface connector 7 DIMM cover 8 Parallel interface connector Note The printer illustration is based on HL-5250DN. 3 Back view 1 2 3 1.
About this Printer 8 7 6 5 4 1 Back cover 2 Duplex Tray (For HL-5250DN) 3 AC power connector 4 HL-5250DN: Network status LEDs (Light Emitting Diodes) 5 HL-5250DN: 10/100BASE-TX port 6 USB interface connector 7 DIMM cover 8 Parallel interface connector Note The printer illustration is based on HL-5250DN. 3 Back view 1 2 3 1.

Users Manual - English
Page 12
... refrigerators. „ Keep the printer horizontal when you carry it can be no longer than 5 meters (16.5 feet). Do not share the same power circuit with these appliances, we recommend that contain magnets or produce magnetic fields. „ DO NOT expose the printer to 240 V, 50/60 Hz The... the printer. „ DO NOT put objects on . Keep a gap of the printer is blocked. If you cannot avoid using the printer with other high-power appliances, such as a desk that it . 4 Environment „ Put your printer on a flat, stable surface such as an air conditioner, copier, shredder and...
... refrigerators. „ Keep the printer horizontal when you carry it can be no longer than 5 meters (16.5 feet). Do not share the same power circuit with these appliances, we recommend that contain magnets or produce magnetic fields. „ DO NOT expose the printer to 240 V, 50/60 Hz The... the printer. „ DO NOT put objects on . Keep a gap of the printer is blocked. If you cannot avoid using the printer with other high-power appliances, such as a desk that it . 4 Environment „ Put your printer on a flat, stable surface such as an air conditioner, copier, shredder and...
Users Manual - English
Page 38
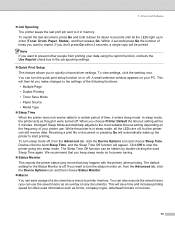
... icon and choose Sleep Time. Double-click the word Sleep Time, and the Sleep Time Off function will save a page of time, it down for power saving. „ Status Monitor This reports the printer status (any documents). The default setting for often used information such as a macro to quickly choose driver...
... icon and choose Sleep Time. Double-click the word Sleep Time, and the Sleep Time Off function will save a page of time, it down for power saving. „ Status Monitor This reports the printer status (any documents). The default setting for often used information such as a macro to quickly choose driver...
Users Manual - English
Page 53
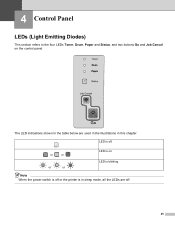
LED is blinking. LED is off. The LED indications shown in this chapter. 4 Control Panel LEDs (Light Emitting Diodes) This section refers to the four LEDs Toner, Drum, Paper and Status, and two buttons Go and Job Cancel on . Note When the power switch is off . 45 or or or or LED is in sleep mode, all the LEDs are used in the illustrations in the table below are off or the printer is on the control panel.
LED is blinking. LED is off. The LED indications shown in this chapter. 4 Control Panel LEDs (Light Emitting Diodes) This section refers to the four LEDs Toner, Drum, Paper and Status, and two buttons Go and Job Cancel on . Note When the power switch is off . 45 or or or or LED is in sleep mode, all the LEDs are used in the illustrations in the table below are off or the printer is on the control panel.

Users Manual - English
Page 54
Warming up The printer is in memory or printing the data. 46 Control Panel Printer status Sleep mode The power switch is off or the printer is warming up the printer from the computer, processing data in sleep mode. Ready to print The printer is cooling down. Cooling down . Pressing Go wakes up . Wait for a few seconds until inside of the printer has cooled down The printer is ready to ready mode. LED 4. Receiving data The printer is either receiving data from sleep mode to print.
Warming up The printer is in memory or printing the data. 46 Control Panel Printer status Sleep mode The power switch is off or the printer is warming up the printer from the computer, processing data in sleep mode. Ready to print The printer is cooling down. Cooling down . Pressing Go wakes up . Wait for a few seconds until inside of the printer has cooled down The printer is ready to ready mode. LED 4. Receiving data The printer is either receiving data from sleep mode to print.
Users Manual - English
Page 57
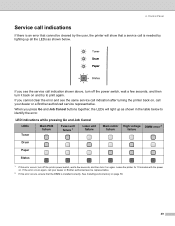
...error occurs again, call your dealer or a Brother authorized service representative. If you cannot clear the error and see the service call indications If there is installed correctly. Control Panel Service call indication shown above, turn off the printer power switch, wait a few seconds, and then...error 2 failure failure Drum Paper Status 1 If this error occurs, ensure that a service call your dealer or Brother authorized service representative. 2 If this error occurs, turn off the power switch, wait a few seconds, and then turn it on , call is needed by the user, the ...
...error occurs again, call your dealer or a Brother authorized service representative. If you cannot clear the error and see the service call indications If there is installed correctly. Control Panel Service call indication shown above, turn off the printer power switch, wait a few seconds, and then...error 2 failure failure Drum Paper Status 1 If this error occurs, ensure that a service call your dealer or Brother authorized service representative. 2 If this error occurs, turn off the power switch, wait a few seconds, and then turn it on , call is needed by the user, the ...

Users Manual - English
Page 60
... the Status LED will print a test page. The printer will turn on the power switch. First all the LEDs have turned off. Using the printer driver If you turn off the printer. c Hold down Go as you are using Brother's Windows® printer driver, click the Print Test Page button in . d... Press Go again. 4. Release Go. Make sure that the front cover is closed and the power cord is plugged in the General tab of the Windows® printer...
... the Status LED will print a test page. The printer will turn on the power switch. First all the LEDs have turned off. Using the printer driver If you turn off the printer. c Hold down Go as you are using Brother's Windows® printer driver, click the Print Test Page button in . d... Press Go again. 4. Release Go. Make sure that the front cover is closed and the power cord is plugged in the General tab of the Windows® printer...

Users Manual - English
Page 61
... the Print Settings button in the ready state. The printer will print the current printer settings page. Using the printer driver If you are using Brother's Windows® printer driver, you can print the current settings using the control panel button or printer driver. Using the control panel button a Make sure...
... the Print Settings button in the ready state. The printer will print the current printer settings page. Using the printer driver If you are using Brother's Windows® printer driver, you can print the current settings using the control panel button or printer driver. Using the control panel button a Make sure...

Users Manual - English
Page 62
...driver. Release Go. Using the printer driver If you are using Brother's Windows® printer driver, you turn off the printer. 4. b Make sure that all the LEDs will light up, and then the Status LED will print a list of the internal fonts by clicking the Print Fonts button in . d Press Go... twice. The printer will turn on the power switch. Using the control panel button a Turn off . First all the LEDs have turned off. ...
...driver. Release Go. Using the printer driver If you are using Brother's Windows® printer driver, you turn off the printer. 4. b Make sure that all the LEDs will light up, and then the Status LED will print a list of the internal fonts by clicking the Print Fonts button in . d Press Go... twice. The printer will turn on the power switch. Using the control panel button a Turn off . First all the LEDs have turned off. ...

Users Manual - English
Page 63
...six times. Make sure that all the LEDs will light up, and then the Status LED will turn on the power switch. 4. b Make sure that the front cover is closed and the power cord is plugged in . First all the LEDs light up , and then the Status LED will turn on the...Web BRAdmin. 55 First all information such as you want to reset the print server back to its default settings with APIPA protocol disabled (For HL-5250DN) If you turn off . Control Panel Network default setting (For HL-5250DN) If you want to reset the print server back to its default settings.
...six times. Make sure that all the LEDs will light up, and then the Status LED will turn on the power switch. 4. b Make sure that the front cover is closed and the power cord is plugged in . First all the LEDs light up , and then the Status LED will turn on the...Web BRAdmin. 55 First all information such as you want to reset the print server back to its default settings with APIPA protocol disabled (For HL-5250DN) If you turn off . Control Panel Network default setting (For HL-5250DN) If you want to reset the print server back to its default settings.

Users Manual - English
Page 66
.... Disconnect the interface cable from static electricity, DO NOT touch the memory chips or the board surface. Options Installing extra memory a Turn off the printer power switch before you install or remove the DIMM. b Remove the DIMM cover. c Unpack the DIMM and hold it click into place (2). 1 2 58 CAUTION To prevent...
.... Disconnect the interface cable from static electricity, DO NOT touch the memory chips or the board surface. Options Installing extra memory a Turn off the printer power switch before you install or remove the DIMM. b Remove the DIMM cover. c Unpack the DIMM and hold it click into place (2). 1 2 58 CAUTION To prevent...

Users Manual - English
Page 67
Plug the printer back in, and then turn on . 5. Options f Reconnect the interface cable to your printer. e Put the DIMM cover back on the power switch. Note To make sure that you have installed the DIMM properly, you can print the printer settings page that shows the current memory size. See Print a Printer Settings page on page 53. 59
Plug the printer back in, and then turn on . 5. Options f Reconnect the interface cable to your printer. e Put the DIMM cover back on the power switch. Note To make sure that you have installed the DIMM properly, you can print the printer settings page that shows the current memory size. See Print a Printer Settings page on page 53. 59
Users Manual - English
Page 81
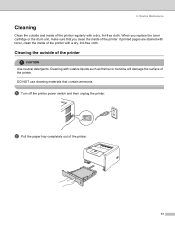
... and inside of the printer. Routine Maintenance Cleaning Clean the outside of the printer. 73 Cleaning with a dry, lint-free cloth. a Turn off the printer power switch and then unplug the printer. When you replace the toner cartridge or the drum unit, make sure that contain ammonia. If printed pages are...
... and inside of the printer. Routine Maintenance Cleaning Clean the outside of the printer. 73 Cleaning with a dry, lint-free cloth. a Turn off the printer power switch and then unplug the printer. When you replace the toner cartridge or the drum unit, make sure that contain ammonia. If printed pages are...

Users Manual - English
Page 82
f Put the paper tray back in , and then turn on the power switch. Routine Maintenance d Remove anything that is stuck inside of the printer a Turn off the printer power switch and then unplug the printer. 74 Cleaning the inside the paper tray. g Plug the printer back in the printer. e Wipe the inside of the paper tray with a dry, lint-free cloth to remove dust. c Wipe the outside of the printer with a dry, lint-free cloth to remove dust. 6.
f Put the paper tray back in , and then turn on the power switch. Routine Maintenance d Remove anything that is stuck inside of the printer a Turn off the printer power switch and then unplug the printer. 74 Cleaning the inside the paper tray. g Plug the printer back in the printer. e Wipe the inside of the paper tray with a dry, lint-free cloth to remove dust. c Wipe the outside of the printer with a dry, lint-free cloth to remove dust. 6.
Users Manual - English
Page 84
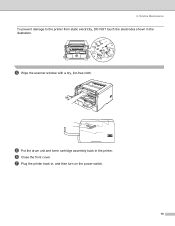
f Close the front cover. e Put the drum unit and toner cartridge assembly back in , and then turn on the power switch. 76 g Plug the printer back in the printer. Routine Maintenance To prevent damage to the printer from static electricity, DO NOT touch the electrodes shown in the illustration. d Wipe the scanner window with a dry, lint-free cloth. 6.
f Close the front cover. e Put the drum unit and toner cartridge assembly back in , and then turn on the power switch. 76 g Plug the printer back in the printer. Routine Maintenance To prevent damage to the printer from static electricity, DO NOT touch the electrodes shown in the illustration. d Wipe the scanner window with a dry, lint-free cloth. 6.


