
Users Manual - English
Page 6
Table of Contents 1 About this Printer What is in the box? ...1 Interface cable ...1 Front view ...2 Back view ...3 Positioning the printer ...4 Power supply ...4 Environment ...4 2 Printing Methods About paper ...5 Type and size of paper ...5 Recommended paper ...6...For Windows®)......34 Features in the printer driver (For Macintosh 37 Uninstalling the printer driver...40 Software ...42 Software for networks (For HL-5250DN only 42 About emulation modes...43 Automatic emulation selection...43 Automatic interface selection...44 Remote Printer Console ...44 4 Control Panel LEDs (Light ...
Table of Contents 1 About this Printer What is in the box? ...1 Interface cable ...1 Front view ...2 Back view ...3 Positioning the printer ...4 Power supply ...4 Environment ...4 2 Printing Methods About paper ...5 Type and size of paper ...5 Recommended paper ...6...For Windows®)......34 Features in the printer driver (For Macintosh 37 Uninstalling the printer driver...40 Software ...42 Software for networks (For HL-5250DN only 42 About emulation modes...43 Automatic emulation selection...43 Automatic interface selection...44 Remote Printer Console ...44 4 Control Panel LEDs (Light ...
Users Manual - English
Page 9
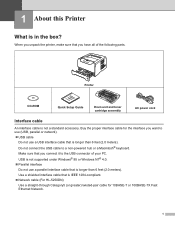
... cartridge assembly AC power cord Interface cable An interface cable is longer than 6 feet (2.0 meters). Buy the proper interface cable for 10BASE-T or 100BASE-TX Fast Ethernet Network. 1 Use a shielded interface cable that is IEEE 1284-compliant. „ Network cable (For HL-5250DN) Use a straight-through Category5 (or greater) twisted-pair cable for the interface you want to...
... cartridge assembly AC power cord Interface cable An interface cable is longer than 6 feet (2.0 meters). Buy the proper interface cable for 10BASE-T or 100BASE-TX Fast Ethernet Network. 1 Use a shielded interface cable that is IEEE 1284-compliant. „ Network cable (For HL-5250DN) Use a straight-through Category5 (or greater) twisted-pair cable for the interface you want to...

Users Manual - English
Page 49
... Macintosh®. e Drag the HL-MFLPro folder (from the Go menu, choose Applications, Utilities), then choose the printer you can then empty the trash. 41 3. d Run the Printer Setup Utility 1 (from the Macintosh HD (Startup Disk), choose Library, Printers, Brother) into the Trash and then empty... the Trash. b Drag all these following files in the System Folder on as an 'Administrator'. c Restart the Macintosh®. f Restart the Macintosh®. 1 Print Center for Macintosh® For Mac OS® X 10.2.4 or greater a Disconnect the USB cable ...
... Macintosh®. e Drag the HL-MFLPro folder (from the Go menu, choose Applications, Utilities), then choose the printer you can then empty the trash. 41 3. d Run the Printer Setup Utility 1 (from the Macintosh HD (Startup Disk), choose Library, Printers, Brother) into the Trash and then empty... the Trash. b Drag all these following files in the System Folder on as an 'Administrator'. c Restart the Macintosh®. f Restart the Macintosh®. 1 Print Center for Macintosh® For Mac OS® X 10.2.4 or greater a Disconnect the USB cable ...

Users Manual - English
Page 52
... on which interface is turned on this page.). For Windows® a Put the CD-ROM into your computer and printer when connecting or disconnecting the cable. For Macintosh® a Put the CD-ROM into your application. Always turn the high-speed and bi-directional parallel communications on or off both your... the Remote Printer Console software, follow the steps below. d Refer to the RPC_User's_Guide.pdf for the automatic interface selection mode, simply connect the interface cable to work.
... on which interface is turned on this page.). For Windows® a Put the CD-ROM into your computer and printer when connecting or disconnecting the cable. For Macintosh® a Put the CD-ROM into your application. Always turn the high-speed and bi-directional parallel communications on or off both your... the Remote Printer Console software, follow the steps below. d Refer to the RPC_User's_Guide.pdf for the automatic interface selection mode, simply connect the interface cable to work.

Users Manual - English
Page 56
Then press Go. Dust on page 97. Buffer error Check the cable connection between the PC and printer. Paper jam Clear the paper jam. Set the correct paper that you selected in the current driver setting. Too ... is full. See Cleaning the corona wire on page 58. 48 Remove additional trays. Delete fonts or add more memory to use for Duplex (For HL-5250DN) Prees Go or Job Cancel. See Installing extra memory on page 77.
Then press Go. Dust on page 97. Buffer error Check the cable connection between the PC and printer. Paper jam Clear the paper jam. Set the correct paper that you selected in the current driver setting. Too ... is full. See Cleaning the corona wire on page 58. 48 Remove additional trays. Delete fonts or add more memory to use for Duplex (For HL-5250DN) Prees Go or Job Cancel. See Installing extra memory on page 77.

Users Manual - English
Page 66
... the DIMM by its edges. Options Installing extra memory a Turn off the printer power switch before you install or remove the DIMM. Disconnect the interface cable from static electricity, DO NOT touch the memory chips or the board surface. c Unpack the DIMM and hold it click into place (2). 1 2 58 CAUTION To...
... the DIMM by its edges. Options Installing extra memory a Turn off the printer power switch before you install or remove the DIMM. Disconnect the interface cable from static electricity, DO NOT touch the memory chips or the board surface. c Unpack the DIMM and hold it click into place (2). 1 2 58 CAUTION To...

Users Manual - English
Page 67
Note To make sure that you have installed the DIMM properly, you can print the printer settings page that shows the current memory size. Plug the printer back in, and then turn on page 53. 59 See Print a Printer Settings page on the power switch. e Put the DIMM cover back on. 5. Options f Reconnect the interface cable to your printer.
Note To make sure that you have installed the DIMM properly, you can print the printer settings page that shows the current memory size. Plug the printer back in, and then turn on page 53. 59 See Print a Printer Settings page on the power switch. e Put the DIMM cover back on. 5. Options f Reconnect the interface cable to your printer.

Users Manual - English
Page 87
.... Printer does not print: If you need additional help, the Brother Solutions Center offers the latest FAQs and troubleshooting tips. Pages are printed, but there are fully closed. „ Paper is inserted properly in the Status ... blinking See LEDs (Light Emitting Diodes) on page 45. „ Status Monitor Error Message appears See Error messages in the paper tray. „ The interface cable is securely connected to the printer and the computer. „ The correct driver for the printer has been chosen and is installed. „ The PC...
.... Printer does not print: If you need additional help, the Brother Solutions Center offers the latest FAQs and troubleshooting tips. Pages are printed, but there are fully closed. „ Paper is inserted properly in the Status ... blinking See LEDs (Light Emitting Diodes) on page 45. „ Status Monitor Error Message appears See Error messages in the paper tray. „ The interface cable is securely connected to the printer and the computer. „ The correct driver for the printer has been chosen and is installed. „ The PC...
Users Manual - English
Page 91
... in the paper tray, and then try again. „ Make sure that manual feed mode is usually done in firmly. „ Make sure that meets Brother recommended paper specifications. The printer does not print. See About paper on Legal size paper or longer sized paper, the paper slides off the top... and how to clear them on normal paper, it is connected to remove the paper. When printing on page 84. „ Make sure that the cable is helpful to the printer. „ Make sure that you are using .
... in the paper tray, and then try again. „ Make sure that manual feed mode is usually done in firmly. „ Make sure that meets Brother recommended paper specifications. The printer does not print. See About paper on Legal size paper or longer sized paper, the paper slides off the top... and how to clear them on normal paper, it is connected to remove the paper. When printing on page 84. „ Make sure that the cable is helpful to the printer. „ Make sure that you are using .

Users Manual - English
Page 99
...new drum unit. Rough-surfaced paper or thick print media may cause the problem. Call Brother Customer Service. 91 Troubleshooting Improving the print quality If you use paper that meets our specifications. Check the interface cable or try the printer on page 52). Conditions such as high temperatures and high humidity can... on page 5. „ Make sure that you have a print quality problem, print a test page first (see Print a test page on another PC. Call Brother Customer Service. See Replacing the drum unit on page 68. „ The fuser unit may cause this problem.
...new drum unit. Rough-surfaced paper or thick print media may cause the problem. Call Brother Customer Service. 91 Troubleshooting Improving the print quality If you use paper that meets our specifications. Check the interface cable or try the printer on page 52). Conditions such as high temperatures and high humidity can... on page 5. „ Make sure that you have a print quality problem, print a test page first (see Print a test page on another PC. Call Brother Customer Service. See Replacing the drum unit on page 68. „ The fuser unit may cause this problem.

Users Manual - English
Page 105
Troubleshooting Solving print problems Problem Recommendation The printer prints unexpectedly „ Make sure that the printer cable is not damaged or broken. „ If you want to delete the remaining data in the printer memory. Take away all other devices and connect ...; Reduce the complexity of your document or cut the print resolution. „ Add more memory. parallel or USB cable that is no longer than 2 meters (6.5 feet). „ Make sure that the printer cable is also connected to the printer. See Control panel buttons on the screen but they do not show up...
Troubleshooting Solving print problems Problem Recommendation The printer prints unexpectedly „ Make sure that the printer cable is not damaged or broken. „ If you want to delete the remaining data in the printer memory. Take away all other devices and connect ...; Reduce the complexity of your document or cut the print resolution. „ Add more memory. parallel or USB cable that is no longer than 2 meters (6.5 feet). „ Make sure that the printer cable is also connected to the printer. See Control panel buttons on the screen but they do not show up...

Users Manual - English
Page 106
...driver in your application that the DOS application interface settings match those of your printer. Recommendation „ Make sure that the printer cable is installed correctly. Recommendation „ Make sure that is chosen with USB Problem The printer does not appear in the Hard Disk...174; X 10.3 or greater). For example, if you are using your printer on a Network, see About emulation modes on your Brother printer. Other problems Problem The printer cannot print. For information about the printers your DOS application printer port to print from the application. ...
...driver in your application that the DOS application interface settings match those of your printer. Recommendation „ Make sure that the printer cable is installed correctly. Recommendation „ Make sure that is chosen with USB Problem The printer does not appear in the Hard Disk...174; X 10.3 or greater). For example, if you are using your printer on a Network, see About emulation modes on your Brother printer. Other problems Problem The printer cannot print. For information about the printers your DOS application printer port to print from the application. ...

Users Manual - English
Page 127
...LASER KLASSE 1 PRODUKT This printer has a Class 3B laser diode which produces invisible laser radiation in hazardous radiation exposure. The cable must not be more than those specified in IEC 60825-1 specifications. Appendix (For Europe and Other Countries) Important information: Regulations ... follows EN55022 (CISPR Publication 22)/Class B. Caution Use of controls or adjustments or performance of the following interface cables. 1 A shielded parallel interface cable with twisted-pair conductors and that you use one of procedures other than 2 meters long. B. Varning Om ...
...LASER KLASSE 1 PRODUKT This printer has a Class 3B laser diode which produces invisible laser radiation in hazardous radiation exposure. The cable must not be more than those specified in IEC 60825-1 specifications. Appendix (For Europe and Other Countries) Important information: Regulations ... follows EN55022 (CISPR Publication 22)/Class B. Caution Use of controls or adjustments or performance of the following interface cables. 1 A shielded parallel interface cable with twisted-pair conductors and that you use one of procedures other than 2 meters long. B. Varning Om ...

Users Manual - English
Page 133
Important A shielded interface cable should be determined by turning the equipment off and...on a circuit different from that the products Product name: Model number: Product option: Laser Printer HL-5240 and HL-5250DN HL-52 Lower Tray Unit LT-5300 complies with the instructions, may cause undesired operation. Operation is..., uses, and can be used in accordance with Part 15 of Conformity (For USA) Responsible Party: Brother International Corporation 100 Somerset Corporate Boulevard P.O. If this device must accept any interference received, including interference that interference...
Important A shielded interface cable should be determined by turning the equipment off and...on a circuit different from that the products Product name: Model number: Product option: Laser Printer HL-5240 and HL-5250DN HL-52 Lower Tray Unit LT-5300 complies with the instructions, may cause undesired operation. Operation is..., uses, and can be used in accordance with Part 15 of Conformity (For USA) Responsible Party: Brother International Corporation 100 Somerset Corporate Boulevard P.O. If this device must accept any interference received, including interference that interference...

Quick Setup Guide - English
Page 3
... (Windows® 98/Me/2000/XP only 14 For parallel interface cable users ...16 For network interface cable users (For HL-5250DN 17 For Brother Peer-to-Peer network printer users (LPR/NetBIOS 17 For shared network printer users ...19 Macintosh® For USB interface cable users ...20 For Mac OS® X 10.2.4 or greater users...
... (Windows® 98/Me/2000/XP only 14 For parallel interface cable users ...16 For network interface cable users (For HL-5250DN 17 For Brother Peer-to-Peer network printer users (LPR/NetBIOS 17 For shared network printer users ...19 Macintosh® For USB interface cable users ...20 For Mac OS® X 10.2.4 or greater users...

Quick Setup Guide - English
Page 5
...Brother International Corporation 100 Somerset Corporate Boulevard P.O. Safety Precautions Regulations Federal Communications Commission (FCC) Declaration of Conformity 3 These limits are designed to operate the equipment. Operation is no guarantee that may cause harmful interference to radio or television reception, which the receiver is marked "IEEE 1284 compliant". 2 A USB cable..., that the products Product name: Model number: Product option: Laser Printer HL-5240 and HL-5250DN HL-52 Lower Tray Unit LT-5300 comply with twisted-pair conductors and that you use one...
...Brother International Corporation 100 Somerset Corporate Boulevard P.O. Safety Precautions Regulations Federal Communications Commission (FCC) Declaration of Conformity 3 These limits are designed to operate the equipment. Operation is no guarantee that may cause harmful interference to radio or television reception, which the receiver is marked "IEEE 1284 compliant". 2 A USB cable..., that the products Product name: Model number: Product option: Laser Printer HL-5240 and HL-5250DN HL-52 Lower Tray Unit LT-5300 comply with twisted-pair conductors and that you use one...
Quick Setup Guide - English
Page 8
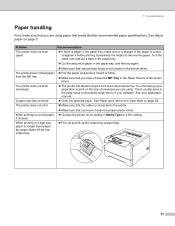
... may vary from one country to a non-powered hub or a Macintosh® keyboard. Use a shielded interface cable that is not a standard accessory. Do not connect the USB cable to another. USB is not supported under Windows® 95 or Windows NT® 4.0. „ Parallel interface... you connect it to use (USB, Parallel or Network). „ USB cable Do not use a USB interface cable that is IEEE 1284-compliant. „ Network cable (for HL-5250DN) Use a straight-through Category5 (or greater) twisted-pair cable for any reason you want to the USB connector of your printer. 1 2 3 4 7 6...
... may vary from one country to a non-powered hub or a Macintosh® keyboard. Use a shielded interface cable that is not a standard accessory. Do not connect the USB cable to another. USB is not supported under Windows® 95 or Windows NT® 4.0. „ Parallel interface... you connect it to use (USB, Parallel or Network). „ USB cable Do not use a USB interface cable that is IEEE 1284-compliant. „ Network cable (for HL-5250DN) Use a straight-through Category5 (or greater) twisted-pair cable for any reason you want to the USB connector of your printer. 1 2 3 4 7 6...

Quick Setup Guide - English
Page 11
... done when installing the driver. 1 Put the supplied CD-ROM into your CD-ROM drive. Improper Setup DO NOT connect the interface cable. Connecting the interface cable is done when installing the driver. Double-click the Start Here OS X icon. Setting Up the Machine 1 1 Put the CD-ROM into your CD-ROM..., put the supplied CD-ROM into the CD-ROM drive For Windows® users For Macintosh® users Improper Setup DO NOT connect the interface cable.
... done when installing the driver. 1 Put the supplied CD-ROM into your CD-ROM drive. Improper Setup DO NOT connect the interface cable. Connecting the interface cable is done when installing the driver. Double-click the Start Here OS X icon. Setting Up the Machine 1 1 Put the CD-ROM into your CD-ROM..., put the supplied CD-ROM into the CD-ROM drive For Windows® users For Macintosh® users Improper Setup DO NOT connect the interface cable.
Quick Setup Guide - English
Page 12
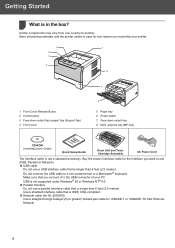
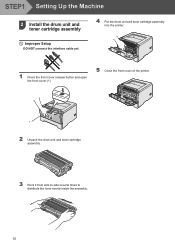
STEP1 Setting Up the Machine 2 Install the drum unit and toner cartridge assembly 4 Put the drum unit and toner cartridge assembly into the printer. Improper Setup DO NOT connect the interface cable yet. 1 Press the front cover release button and open the front cover (1). 5 Close the front cover of the printer. 1 2 Unpack the drum unit and toner cartridge assembly. 3 Rock it from side to side several times to distribute the toner evenly inside the assembly. 10
STEP1 Setting Up the Machine 2 Install the drum unit and toner cartridge assembly 4 Put the drum unit and toner cartridge assembly into the printer. Improper Setup DO NOT connect the interface cable yet. 1 Press the front cover release button and open the front cover (1). 5 Close the front cover of the printer. 1 2 Unpack the drum unit and toner cartridge assembly. 3 Rock it from side to side several times to distribute the toner evenly inside the assembly. 10

Quick Setup Guide - English
Page 14
... the AC power cord to install the driver. 2 Plug the AC power cord into an AC power outlet. Improper Setup DO NOT connect the interface cable yet. 1 Make sure that the test page has printed correctly. Now go to Go to the next page to the printer. STEP1 Setting Up the...
... the AC power cord to install the driver. 2 Plug the AC power cord into an AC power outlet. Improper Setup DO NOT connect the interface cable yet. 1 Make sure that the test page has printed correctly. Now go to Go to the next page to the printer. STEP1 Setting Up the...

