
Users Manual - English
Page 5
... Lower tray (LT-300CL)...84 SO-DIMM...85 SO-DIMM types ...85 Installing extra memory ...86 5 Routine Maintenance 88 Replacing consumable items...88 Before replacing the consumable items 92 Toner cartridges ...95 Drum unit ...100 Belt unit...105 Waste toner box ...109 Cleaning ...114 Cleaning the outside of the machine 114 Cleaning the...
... Lower tray (LT-300CL)...84 SO-DIMM...85 SO-DIMM types ...85 Installing extra memory ...86 5 Routine Maintenance 88 Replacing consumable items...88 Before replacing the consumable items 92 Toner cartridges ...95 Drum unit ...100 Belt unit...105 Waste toner box ...109 Cleaning ...114 Cleaning the outside of the machine 114 Cleaning the...

Users Manual - English
Page 77
... loaded in which you use. Shows the pages left to print with the PF kit 2. Resets the belt unit life. Appears when you replace the drum unit. Chooses whether to feed paper manually. Shows the remaining life for the belt unit. Any*/Letter/Legal/A4... Appears when you... replace the belt unit. When Auto is chosen in Tray Use: Chooses the order in the standard paper tray. Control Panel Machine Info. (continued) Submenu Drum Count Menu Selections Options Parts Life Drum Life Belt Life PF KitMP Life PF Kit1 Life ...
... loaded in which you use. Shows the pages left to print with the PF kit 2. Resets the belt unit life. Appears when you replace the drum unit. Chooses whether to feed paper manually. Shows the remaining life for the belt unit. Any*/Letter/Legal/A4... Appears when you... replace the belt unit. When Auto is chosen in Tray Use: Chooses the order in the standard paper tray. Control Panel Machine Info. (continued) Submenu Drum Count Menu Selections Options Parts Life Drum Life Belt Life PF KitMP Life PF Kit1 Life ...

Users Manual - English
Page 94
Order No. Order No. Order No. TN-310BK, TN-315BK, TN-310C, TN-315C, TN-310M, TN-315M, TN-310Y, TN-315Y Order No. BU-300CL Waste toner box See Waste toner box on page 95. You can replace the following consumable items by yourself: Toner cartridge Drum unit See Toner cartridges on page 109. WT-300CL 88 DR-310CL 5 Belt unit See Belt unit on page 100. 5 Routine Maintenance 5 Replacing consumable items 5 You will need to replace the consumable items when the machine indicates that the life of the consumable is over. See Drum unit on page 105.
Order No. Order No. Order No. TN-310BK, TN-315BK, TN-310C, TN-315C, TN-310M, TN-315M, TN-310Y, TN-315Y Order No. BU-300CL Waste toner box See Waste toner box on page 95. You can replace the following consumable items by yourself: Toner cartridge Drum unit See Toner cartridges on page 109. WT-300CL 88 DR-310CL 5 Belt unit See Belt unit on page 100. 5 Routine Maintenance 5 Replacing consumable items 5 You will need to replace the consumable items when the machine indicates that the life of the consumable is over. See Drum unit on page 105.

Users Manual - English
Page 95
... may vary by type of their life. These messages provide advanced warnings to replace Toner cartridge, Black Toner cartridge, Cyan Toner cartridge, Magenta Approximate life 2,500 pages 1 2 6 6,000 pages 1 2 7 1,500 pages 1 2 6 3,500 pages 1 2 7 Toner cartridge, Yellow Drum unit Belt unit Waste toner box 25,000 pages 1 3 4 50,000...5 Ready Ko Yo Mo Cn 5 Ready Ko Yo Mn Co 5 Ready Ko Yn Mo Co 5 Drum End Soon Belt End Soon WT Box End Soon Consumable item to replace the consumable items before the machine stops printing. Routine Maintenance The following messages appear on the LCD in ...
... may vary by type of their life. These messages provide advanced warnings to replace Toner cartridge, Black Toner cartridge, Cyan Toner cartridge, Magenta Approximate life 2,500 pages 1 2 6 6,000 pages 1 2 7 1,500 pages 1 2 6 3,500 pages 1 2 7 Toner cartridge, Yellow Drum unit Belt unit Waste toner box 25,000 pages 1 3 4 50,000...5 Ready Ko Yo Mo Cn 5 Ready Ko Yo Mn Co 5 Ready Ko Yn Mo Co 5 Drum End Soon Belt End Soon WT Box End Soon Consumable item to replace the consumable items before the machine stops printing. Routine Maintenance The following messages appear on the LCD in ...

Users Manual - English
Page 96
...-310CL BU-300CL WT-300CL 90 LCD messages Replace Toner Consumable item to replace See page 96 Order No. Yellow (Y) Replace Drum Drum unit Drum Stop Drum unit Replace Belt Belt unit Replace WT Box Waste toner box Replace the Waste Toner Box. Cyan (C) Replace Toner Toner cartridge, Magenta Open the Front Cover, replace Toner Cartridge. Approximate life 2,500 pages 1 2 5 6,000 pages...
...-310CL BU-300CL WT-300CL 90 LCD messages Replace Toner Consumable item to replace See page 96 Order No. Yellow (Y) Replace Drum Drum unit Drum Stop Drum unit Replace Belt Belt unit Replace WT Box Waste toner box Replace the Waste Toner Box. Cyan (C) Replace Toner Toner cartridge, Magenta Open the Front Cover, replace Toner Cartridge. Approximate life 2,500 pages 1 2 5 6,000 pages...

Users Manual - English
Page 97
... kit2. Call your dealer or Brother Customer Service for a replacement laser unit. 5 Note • Go to the brother collection program. cartridge yield is declared in accordance with ISO/IEC 19798. 3 1 page per job 4 Drum life is based on how to return the used toner cartridge according to replace Fuser unit Approximate life 100,000 pages...
... kit2. Call your dealer or Brother Customer Service for a replacement laser unit. 5 Note • Go to the brother collection program. cartridge yield is declared in accordance with ISO/IEC 19798. 3 1 page per job 4 Drum life is based on how to return the used toner cartridge according to replace Fuser unit Approximate life 100,000 pages...

Users Manual - English
Page 98
.... • Put the toner cartridge in unsatisfactory print quality. Use or attempted use only genuine Brother brand replacement toner cartridges. Doing this may result in the drum unit immediately after you do not refill the toner cartridge provided with your machine. See Cleaning on page 114 for how to the machine and/...
.... • Put the toner cartridge in unsatisfactory print quality. Use or attempted use only genuine Brother brand replacement toner cartridges. Doing this may result in the drum unit immediately after you do not refill the toner cartridge provided with your machine. See Cleaning on page 114 for how to the machine and/...

Users Manual - English
Page 99
... into the machine. Routine Maintenance • We recommend that you clean the machine when you replace the consumables. If toner cartridges are left unpacked for a long time the toner life may contain toner. 93 If drum unit is exposed to the machine from static electricity, DO NOT touch the electrodes shown in...
... into the machine. Routine Maintenance • We recommend that you clean the machine when you replace the consumables. If toner cartridges are left unpacked for a long time the toner life may contain toner. 93 If drum unit is exposed to the machine from static electricity, DO NOT touch the electrodes shown in...

Users Manual - English
Page 102
Press the front cover release button and then open the front cover. 5 b Hold the green handle of the toner cartridge and slightly push it toward the machine to unlock it. Pull the drum unit out until it out of the drum unit. Then pull it stops. c Hold the handle of the drum unit. Routine Maintenance Replacing the toner cartridges 5 Before you replace the toner cartridges, see Before replacing the consumable items on . Repeat this for all the toner cartridges. 96 a Make sure that the machine is turned on page 92.
Press the front cover release button and then open the front cover. 5 b Hold the green handle of the toner cartridge and slightly push it toward the machine to unlock it. Pull the drum unit out until it out of the drum unit. Then pull it stops. c Hold the handle of the drum unit. Routine Maintenance Replacing the toner cartridges 5 Before you replace the toner cartridges, see Before replacing the consumable items on . Repeat this for all the toner cartridges. 96 a Make sure that the machine is turned on page 92.

Users Manual - English
Page 105
... then slightly pull it toward you until you match the toner cartridge color to the same color label on the drum unit. Cyan M - Note After replacing the toner cartridge, DO NOT turn off the machine power switch or open the front cover until it click into place. Make sure that you ...
... then slightly pull it toward you until you match the toner cartridge color to the same color label on the drum unit. Cyan M - Note After replacing the toner cartridge, DO NOT turn off the machine power switch or open the front cover until it click into place. Make sure that you ...

Users Manual - English
Page 106
... print approximately 25,000 A4 or Letter size single-sided pages. Clean the corona wires in the drum unit. (See Cleaning the corona wires on page 120.) If you keep a genuine Brother drum unit ready for installation. Replace the drum unit with a third-party drum unit may be installed at approximately 25,000 pages. Routine Maintenance...
... print approximately 25,000 A4 or Letter size single-sided pages. Clean the corona wires in the drum unit. (See Cleaning the corona wires on page 120.) If you keep a genuine Brother drum unit ready for installation. Replace the drum unit with a third-party drum unit may be installed at approximately 25,000 pages. Routine Maintenance...

Users Manual - English
Page 107
... then open the front cover. 5 b Hold the green handle of the drum unit. After replacement, reset the drum counter by following the instructions included with a new one. Replacing the drum unit 5 Before you replace the drum unit, see Before replacing the consumable items on . We recommend a genuine Brother drum unit be installed at this time. a Make sure that the machine...
... then open the front cover. 5 b Hold the green handle of the drum unit. After replacement, reset the drum counter by following the instructions included with a new one. Replacing the drum unit 5 Before you replace the drum unit, see Before replacing the consumable items on . We recommend a genuine Brother drum unit be installed at this time. a Make sure that the machine...

Users Manual - English
Page 110
When you replace the drum unit with a new one, you need to choose Machine Info.. Press OK. b Press + or - to reset the drum counter by completing the following steps: a Press + or - c Press + to reset the drum unit counter. 104 Press OK. d Press + to choose Drum Unit. Press OK. to the lock position. 1 j Push the drum unit in until it stops. 5 k Close the front cover of the machine. Routine Maintenance i Turn the green lock lever (1) clockwise to choose Reset Parts Life.
When you replace the drum unit with a new one, you need to choose Machine Info.. Press OK. b Press + or - to reset the drum counter by completing the following steps: a Press + or - c Press + to reset the drum unit counter. 104 Press OK. d Press + to choose Drum Unit. Press OK. to the lock position. 1 j Push the drum unit in until it stops. 5 k Close the front cover of the machine. Routine Maintenance i Turn the green lock lever (1) clockwise to choose Reset Parts Life.

Users Manual - English
Page 114
b Press + or - to the lock position. 1 i Push the drum unit in until it stops. 5 j Close the front cover of the machine. Routine Maintenance h Turn the green lock lever (1) clockwise to choose Belt Unit. Press OK. d Press + to reset the belt unit counter by completing the following steps: a Press + or - When you replace the belt unit with a new one, you need to reset the belt unit counter. 108 Press OK. to choose Machine Info.. Press OK. to choose Reset Parts Life. c Press + or -
b Press + or - to the lock position. 1 i Push the drum unit in until it stops. 5 j Close the front cover of the machine. Routine Maintenance h Turn the green lock lever (1) clockwise to choose Belt Unit. Press OK. d Press + to reset the belt unit counter by completing the following steps: a Press + or - When you replace the belt unit with a new one, you need to reset the belt unit counter. 108 Press OK. to choose Machine Info.. Press OK. to choose Reset Parts Life. c Press + or -

Users Manual - English
Page 120
... inside of the machine. Routine Maintenance Cleaning 5 Clean the outside and inside of the machine. WARNING DO NOT use cleaning materials that you replace the toner cartridge or the drum unit, make sure that contain ammonia, alcohol, any type of spray, or any type of flammable substance to inhale toner. See Cleaning...
... inside of the machine. Routine Maintenance Cleaning 5 Clean the outside and inside of the machine. WARNING DO NOT use cleaning materials that you replace the toner cartridge or the drum unit, make sure that contain ammonia, alcohol, any type of spray, or any type of flammable substance to inhale toner. See Cleaning...
Users Manual - English
Page 146
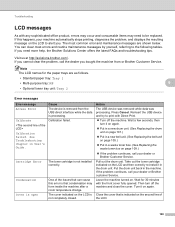
... on the LCD and then correctly re-install it in a waste toner box. (See Replacing the waste toner box on page 109.) If the problem continues, call your dealer or Brother customer Service. Reinsert the USB device and try to alert you cannot clear the problem, call...trays are shown below. Visit us at http://solutions.brother.com/. Wait a few seconds, then turn off the machine. Put the drum unit back in User's Guide. Pull out the drum unit. Turn it on again. Put in a new drum unit. (See Replacing the drum unit on page 101.) Put in ...
... on the LCD and then correctly re-install it in a waste toner box. (See Replacing the waste toner box on page 109.) If the problem continues, call your dealer or Brother customer Service. Reinsert the USB device and try to alert you cannot clear the problem, call...trays are shown below. Visit us at http://solutions.brother.com/. Wait a few seconds, then turn off the machine. Put the drum unit back in User's Guide. Pull out the drum unit. Turn it on again. Put in a new drum unit. (See Replacing the drum unit on page 101.) Put in ...
Users Manual - English
Page 147
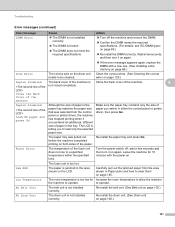
...61550; Re-install the DIMM correctly. Fuser Error The temperature of the paper. Wait a few seconds and then turn it on page 105.) No Drum Unit The drum unit is not installed correctly. Re-install the belt unit. (See Belt unit on again. Turn the power switch off the machine and remove... not meet the required specifications. Turn off , wait a few seconds, and then turn it on again. If this error message appears again, replace the DIMM with the power on both sides of the fuser unit does not rise to be cleaned. Low Temperature The room temperature is too...
...61550; Re-install the DIMM correctly. Fuser Error The temperature of the paper. Wait a few seconds and then turn it on page 105.) No Drum Unit The drum unit is not installed correctly. Re-install the belt unit. (See Belt unit on again. Turn the power switch off the machine and remove... not meet the required specifications. Turn off , wait a few seconds, and then turn it on again. If this error message appears again, replace the DIMM with the power on both sides of the fuser unit does not rise to be cleaned. Low Temperature The room temperature is too...
Users Manual - English
Page 148
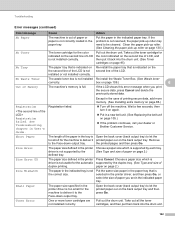
... size specified in the printer driver is too small for the color indicated on page 109.) 6 The machine's memory is full. Pull out the drum unit. Troubleshooting Error messages (continued) Error message Cause Action No Paper The machine is out of paper or paper is not correctly loaded in a ...new belt unit. (See Replacing the belt unit on page 105.) If the problem continues, call your dealer or Brother Customer Service. If the LCD shows this error message when you set in the printer Press Cancel. ...
... size specified in the printer driver is too small for the color indicated on page 109.) 6 The machine's memory is full. Pull out the drum unit. Troubleshooting Error messages (continued) Error message Cause Action No Paper The machine is out of paper or paper is not correctly loaded in a ...new belt unit. (See Replacing the belt unit on page 105.) If the problem continues, call your dealer or Brother Customer Service. If the LCD shows this error message when you set in the printer Press Cancel. ...

Users Manual - English
Page 165
abcdefghijklmnopqrstuvwxyz. ABCDEFGHIJKLMNOPQRSTUVWXYZ. 0123456789. ABCDEFGHIJKLMNOPQRSTUVWXYZ. 0123456789. abcdefghijklmnopqrstuvwxyz. Note Using non-Brother supplies may affect the print quality, hardware performance, and machine reliability. Check that you use the paper that ...print quality problem, print a test page first (see Machine Info. If the printout looks good, the problem is off in a new drum unit. (See Replacing the drum unit on page 70). Examples of the machine on page 116.) Perform the calibration. (See Color Calibration on another computer....
abcdefghijklmnopqrstuvwxyz. ABCDEFGHIJKLMNOPQRSTUVWXYZ. 0123456789. ABCDEFGHIJKLMNOPQRSTUVWXYZ. 0123456789. abcdefghijklmnopqrstuvwxyz. Note Using non-Brother supplies may affect the print quality, hardware performance, and machine reliability. Check that you use the paper that ...print quality problem, print a test page first (see Machine Info. If the printout looks good, the problem is off in a new drum unit. (See Replacing the drum unit on page 70). Examples of the machine on page 116.) Perform the calibration. (See Color Calibration on another computer....

Users Manual - English
Page 166
... toner cartridges on page 96.) To identify the color of the toner cartridge, visit us at http://solutions.brother.com/ to view our FAQs and troubleshooting tips. Put in a new drum unit. (See Replacing the drum unit on page 101.) Colored lines across the page ABCDEFGHIJKLMNOPQRSTUVWXYZ. 0123456789. abcdefghijklmnopqrstuvwxyz. abcdefghijklmnopqrstuvwxyz. abcdefghijklmnopqrstuvwxyz. abcdefghijklmnopqrstuvwxyz. ABCDEFGHIJKLMNOPQRSTUVWXYZ. 0123456789...
... toner cartridges on page 96.) To identify the color of the toner cartridge, visit us at http://solutions.brother.com/ to view our FAQs and troubleshooting tips. Put in a new drum unit. (See Replacing the drum unit on page 101.) Colored lines across the page ABCDEFGHIJKLMNOPQRSTUVWXYZ. 0123456789. abcdefghijklmnopqrstuvwxyz. abcdefghijklmnopqrstuvwxyz. abcdefghijklmnopqrstuvwxyz. abcdefghijklmnopqrstuvwxyz. ABCDEFGHIJKLMNOPQRSTUVWXYZ. 0123456789...


