Quick Setup Guide - English
Page 19
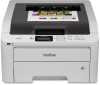
... a bathtub, sink, or swimming pool, around appliances containing water including a refrigerator, or in a wet basement. • This product should be connected to replace your obsolete outlet. DO NOT defeat the purpose of the grounded plug. Use only the power cord supplied with a dry, lint-free soft cloth...DO NOT use this product to clean up scattered toner. This is fully inserted. DO NOT place this product with a paper jam or with the drum unit could cause a fire. FIRE HAZARDS • DO NOT use only a dry, lint-free cloth. See Routine Maintenance in the User's Guide ...
... a bathtub, sink, or swimming pool, around appliances containing water including a refrigerator, or in a wet basement. • This product should be connected to replace your obsolete outlet. DO NOT defeat the purpose of the grounded plug. Use only the power cord supplied with a dry, lint-free soft cloth...DO NOT use this product to clean up scattered toner. This is fully inserted. DO NOT place this product with a paper jam or with the drum unit could cause a fire. FIRE HAZARDS • DO NOT use only a dry, lint-free cloth. See Routine Maintenance in the User's Guide ...
Quick Setup Guide - English
Page 27
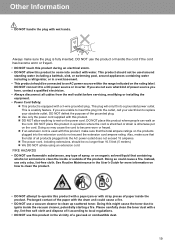
...5 of the User's Guide on the CD-ROM. 27 Replace Toner Replace Drums Replace Belt Replace WT Box When the time comes to replace consumable items, the following optional accessory. For more information about the consumables for replacement when the following messages appear on the LCD. SO-DIMM Memory... a new consumable item for your printer, visit us at http://www.brother.com/original/ or contact your local Brother reseller. Toner cartridges Drum units Belt Unit (BU-200CL) Waste Toner Box (WT-200CL) For replacing the consumable items, see Chapter 4 of the printer by adding this ...
...5 of the User's Guide on the CD-ROM. 27 Replace Toner Replace Drums Replace Belt Replace WT Box When the time comes to replace consumable items, the following optional accessory. For more information about the consumables for replacement when the following messages appear on the LCD. SO-DIMM Memory... a new consumable item for your printer, visit us at http://www.brother.com/original/ or contact your local Brother reseller. Toner cartridges Drum units Belt Unit (BU-200CL) Waste Toner Box (WT-200CL) For replacing the consumable items, see Chapter 4 of the printer by adding this ...
Users Manual - English
Page 4
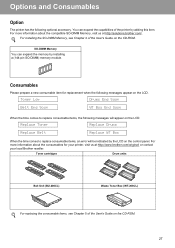
...HL-3075CW only) ...77 LCD messages ...77 Reprinting documents...78 Printing Secure data ...79 Using the control panel LCD menu...81 Menu table...82 Default settings...93 Frequency...95 Calibration ...95 Auto Registration ...96 Manual Registration...97 4 Option 98 SO-DIMM...98 Installing extra memory ...99 5 Routine Maintenance 101 Replacing...Cleaning ...127 Cleaning the outside of the printer 127 Cleaning the LED head ...129 Cleaning the corona wires ...130 Cleaning the drum unit ...133 Cleaning the paper pick-up roller...139 iii 3 Control Panel 74 Control panel ...74 Buttons ...74 Go ...
...HL-3075CW only) ...77 LCD messages ...77 Reprinting documents...78 Printing Secure data ...79 Using the control panel LCD menu...81 Menu table...82 Default settings...93 Frequency...95 Calibration ...95 Auto Registration ...96 Manual Registration...97 4 Option 98 SO-DIMM...98 Installing extra memory ...99 5 Routine Maintenance 101 Replacing...Cleaning ...127 Cleaning the outside of the printer 127 Cleaning the LED head ...129 Cleaning the corona wires ...130 Cleaning the drum unit ...133 Cleaning the paper pick-up roller...139 iii 3 Control Panel 74 Control panel ...74 Buttons ...74 Go ...
Users Manual - English
Page 88
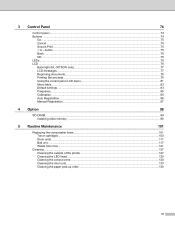
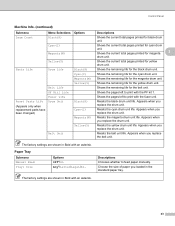
...Yellow(Y) Shows the current total pages printed for the magenta drum unit. Reset Parts Life (Appears only when replacement parts have been changed) Drum Unit Black(K) Cyan(C) Resets the black drum unit life. Appears when you replace the drum unit. The factory settings are shown in the standard ...belt unit life. Cyan(C) Magenta(M) Shows the current total pages printed for the belt unit. Appears when you replace the drum unit. Appears when you replace the drum unit. The factory settings are shown in Bold with an asterisk. Belt Life Shows the remaining life for ...
...Yellow(Y) Shows the current total pages printed for the magenta drum unit. Reset Parts Life (Appears only when replacement parts have been changed) Drum Unit Black(K) Cyan(C) Resets the black drum unit life. Appears when you replace the drum unit. The factory settings are shown in the standard ...belt unit life. Cyan(C) Magenta(M) Shows the current total pages printed for the belt unit. Appears when you replace the drum unit. Appears when you replace the drum unit. The factory settings are shown in Bold with an asterisk. Belt Life Shows the remaining life for ...

Users Manual - English
Page 106
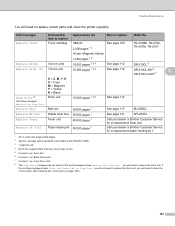
To avoid any inconvenience, you may vary by type of their life. cartridge yield is approximate and may want to replace Order No. Drum Set. 6 Contains 1 pc. Color Drum Unit. 101 Black Drum Unit. 7 Contains 1 pc. Toner Low (X) Toner cartridge X = C, M, Y, K C = Cyan M = Magenta Y = Yellow K = Black See page 103 2,200 pages 1 2 1,400 pages 1 2 TN-210BK, TN-210C...
To avoid any inconvenience, you may vary by type of their life. cartridge yield is approximate and may want to replace Order No. Drum Set. 6 Contains 1 pc. Color Drum Unit. 101 Black Drum Unit. 7 Contains 1 pc. Toner Low (X) Toner cartridge X = C, M, Y, K C = Cyan M = Magenta Y = Yellow K = Black See page 103 2,200 pages 1 2 1,400 pages 1 2 TN-210BK, TN-210C...
Users Manual - English
Page 107
... pages 1 Call your dealer or Brother Customer Service for a replacement paper feeding kit 1. 1 A4 or Letter size single-sided pages. 2 Approx. Drum Set. 6 Contains 1 pc. Color Drum Unit. 8 The Drum Error message has two cases: If the scroll message shows Replace the Drum Unit. Routine Maintenance You will need to replace the drum unit. Replace Toner Toner cartridge 2,200 pages...
... pages 1 Call your dealer or Brother Customer Service for a replacement paper feeding kit 1. 1 A4 or Letter size single-sided pages. 2 Approx. Drum Set. 6 Contains 1 pc. Color Drum Unit. 8 The Drum Error message has two cases: If the scroll message shows Replace the Drum Unit. Routine Maintenance You will need to replace the drum unit. Replace Toner Toner cartridge 2,200 pages...
Users Manual - English
Page 109
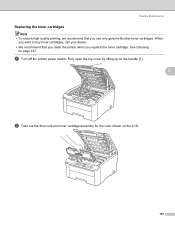
Fully open the top cover by lifting up on the handle (1). 1 5 b Take out the drum unit and toner cartridge assembly for the color shown on page 127. a Turn off the printer power switch. Routine Maintenance Replacing the toner cartridges 5 Note • To ensure high quality printing, we recommend that you clean the printer when you use only genuine Brother toner cartridges. See Cleaning on the LCD. 104 When you want to buy toner cartridges, call your dealer. • We recommend that you replace the toner cartridge.
Fully open the top cover by lifting up on the handle (1). 1 5 b Take out the drum unit and toner cartridge assembly for the color shown on page 127. a Turn off the printer power switch. Routine Maintenance Replacing the toner cartridges 5 Note • To ensure high quality printing, we recommend that you clean the printer when you use only genuine Brother toner cartridges. See Cleaning on the LCD. 104 When you want to buy toner cartridges, call your dealer. • We recommend that you replace the toner cartridge.
Users Manual - English
Page 113
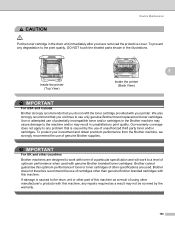
...coverage does not apply to any problem that you have removed the protective cover. Brother does not therefore recommend the use of genuine Brother supplies. Use or attempted use only genuine Brother brand replacement toner cartridges. If damage is caused by the warranty. 108 CAUTION Routine Maintenance...shown in the illustrations. To protect your printer. Brother cannot guarantee this machine. We also strongly recommend that is caused to the drum unit or other part of this machine as a result may result in the drum unit immediately after you continue to use of ...
...coverage does not apply to any problem that you have removed the protective cover. Brother does not therefore recommend the use of genuine Brother supplies. Use or attempted use only genuine Brother brand replacement toner cartridges. If damage is caused by the warranty. 108 CAUTION Routine Maintenance...shown in the illustrations. To protect your printer. Brother cannot guarantee this machine. We also strongly recommend that is caused to the drum unit or other part of this machine as a result may result in the drum unit immediately after you continue to use of ...

Users Manual - English
Page 116
... cannot guarantee a minimum number of their life. The printer should be printed by the use only genuine Brother toner. Warranty coverage does not apply to replace the applicable drum(s). Drum End Soon messages 5 Drums End Soon If the LCD shows Drums End Soon, it ready before you get a Replace Drums message. To replace the drum units, see Replacing the drum units on .
... cannot guarantee a minimum number of their life. The printer should be printed by the use only genuine Brother toner. Warranty coverage does not apply to replace the applicable drum(s). Drum End Soon messages 5 Drums End Soon If the LCD shows Drums End Soon, it ready before you get a Replace Drums message. To replace the drum units, see Replacing the drum units on .
Users Manual - English
Page 117
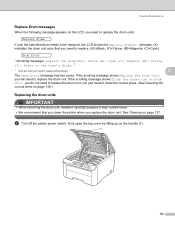
... Cleaning the corona wires on Drum Unit. you do not need to replace the drum unit, you need to replace. ((K)=Black, (Y)=Yellow, (M)=Magenta, (C)=Cyan). Routine Maintenance Replace Drum messages 5 When the following message appears on the LCD, you need to replace the drum units: Replace Drums If only the specified drum needs to be shown. 5 The Drum Error message has two cases...
... Cleaning the corona wires on Drum Unit. you do not need to replace the drum unit, you need to replace. ((K)=Black, (Y)=Yellow, (M)=Magenta, (C)=Cyan). Routine Maintenance Replace Drum messages 5 When the following message appears on the LCD, you need to replace the drum units: Replace Drums If only the specified drum needs to be shown. 5 The Drum Error message has two cases...

Users Manual - English
Page 121
... - d Press OK, and then press + to choose Machine Info.. f Press OK two times. 116 Cyan M - Routine Maintenance f Slide the drum unit and toner cartridge assembly into the printer. C - Black When you replace a drum unit with a new one, you match the toner cartridge color to the same color label on . c Press OK to proceed...
... - d Press OK, and then press + to choose Machine Info.. f Press OK two times. 116 Cyan M - Routine Maintenance f Slide the drum unit and toner cartridge assembly into the printer. C - Black When you replace a drum unit with a new one, you match the toner cartridge color to the same color label on . c Press OK to proceed...

Users Manual - English
Page 125
Repeat this for all the drum unit and toner cartridge assemblies. C - to the next menu level, and then press + or - e Press OK two times. 120 Cyan Y - Black When you replace the belt unit with a new one, you match the toner cartridge color to reset the belt unit counter by completing the following steps...
Repeat this for all the drum unit and toner cartridge assemblies. C - to the next menu level, and then press + or - e Press OK two times. 120 Cyan Y - Black When you replace the belt unit with a new one, you match the toner cartridge color to reset the belt unit counter by completing the following steps...

Users Manual - English
Page 127
Fully open the top cover by lifting up on the handle (1). 1 5 b Take out all the drum unit and toner cartridge assemblies. 122 Routine Maintenance Replacing the waste toner box 5 a Turn off the printer power switch.
Fully open the top cover by lifting up on the handle (1). 1 5 b Take out all the drum unit and toner cartridge assemblies. 122 Routine Maintenance Replacing the waste toner box 5 a Turn off the printer power switch.
Users Manual - English
Page 132
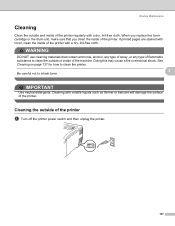
WARNING DO NOT use cleaning materials that you replace the toner cartridge or the drum unit, make sure that contain ammonia, alcohol, any type of spray, or any type of flammable substance to clean the outside or inside of the ...
WARNING DO NOT use cleaning materials that you replace the toner cartridge or the drum unit, make sure that contain ammonia, alcohol, any type of spray, or any type of flammable substance to clean the outside or inside of the ...
Users Manual - English
Page 147
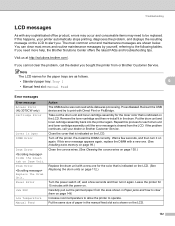
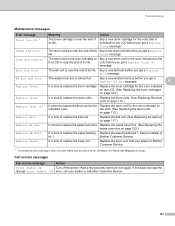
... the resulting message on Drum Unit. Drum Error Replace the Drum Unit. Fuser Error Jam XXX Low Temperature Manual Feed Action The USB device was removed while data was processing. Repeat this happens, your dealer or Brother Customer Service. Remove the... toner cartridge and then re-install it in the manual feed slot as follows. • Standard paper tray: Tray 1 6 • Manual feed slot: Manual Feed Error messages Error message Access Error (HL-3075CW only) Cartridge Error Cover is indicated on the LCD. (See Replacing the drum...
... the resulting message on Drum Unit. Drum Error Replace the Drum Unit. Fuser Error Jam XXX Low Temperature Manual Feed Action The USB device was removed while data was processing. Repeat this happens, your dealer or Brother Customer Service. Remove the... toner cartridge and then re-install it in the manual feed slot as follows. • Standard paper tray: Tray 1 6 • Manual feed slot: Manual Feed Error messages Error message Access Error (HL-3075CW only) Cartridge Error Cover is indicated on the LCD. (See Replacing the drum...
Users Manual - English
Page 148
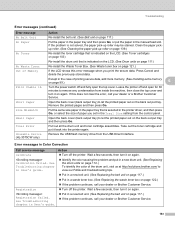
...(HL-3075CW only) Action Re-install the belt unit. (See Belt unit on page 117.) Put the paper in the paper tray and then press Go, or put the paper in a new belt unit. (See Replacing the belt unit on page 117.) If the problem continues, call your dealer or Brother ... paper you print the secure data, Press Cancel and delete the previously stored data. Take out the toner cartridge and put in a new drum unit. (See Replacing the drum units on page 99.) 6 Turn the power switch off the printer. Leave the printer off the printer. See Troubleshooting chapter in User's...
...(HL-3075CW only) Action Re-install the belt unit. (See Belt unit on page 117.) Put the paper in the paper tray and then press Go, or put the paper in a new belt unit. (See Replacing the belt unit on page 117.) If the problem continues, call your dealer or Brother ... paper you print the secure data, Press Cancel and delete the previously stored data. Take out the toner cartridge and put in a new drum unit. (See Replacing the drum units on page 99.) 6 Turn the power switch off the printer. Leave the printer off the printer. See Troubleshooting chapter in User's...
Users Manual - English
Page 149
... Replacing the drum units on page 112.) Replace Drum (X) 1 It is time to replace the drum unit for the Replace the drum unit for the color indicated on the LCD before you get a Replace WT Box message. 6 Replace Toner It is near the end of its life. the LCD. (See Replacing the drum units on indicated color. Call your dealer or a Brother Customer...
... Replacing the drum units on page 112.) Replace Drum (X) 1 It is time to replace the drum unit for the Replace the drum unit for the color indicated on the LCD before you get a Replace WT Box message. 6 Replace Toner It is near the end of its life. the LCD. (See Replacing the drum units on indicated color. Call your dealer or a Brother Customer...

Users Manual - English
Page 158
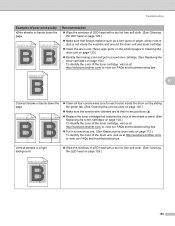
...looks good, the problem is off in the control panel or the printer driver. Make sure that the media type setting in a new drum unit. (See Replacing the drum units on page 129.) 153 on page 1.) b Check that meets our specifications. (See About paper on page 1.) Note To get the best ... the LED head on page 112.) To identify the color of all four toner cartridges gently. Wipe the windows of the drum unit, visit us at http://solutions.brother.com/ to view our FAQs and troubleshooting tips. a Check that you still have a print quality problem, check the chart below and...
...looks good, the problem is off in the control panel or the printer driver. Make sure that the media type setting in a new drum unit. (See Replacing the drum units on page 129.) 153 on page 1.) b Check that meets our specifications. (See About paper on page 1.) Note To get the best ... the LED head on page 112.) To identify the color of all four toner cartridges gently. Wipe the windows of the drum unit, visit us at http://solutions.brother.com/ to view our FAQs and troubleshooting tips. a Check that you still have a print quality problem, check the chart below and...
Users Manual - English
Page 159
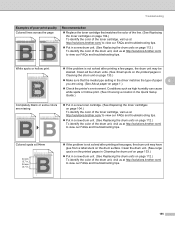
.../ to view our FAQs and troubleshooting tips. abcdefghijklmnopqrstuvwxyz. abcdefghijklmnopqrstuvwxyz. Vertical streaks in a new drum unit. (See Replacing the drum units on page 104.) To identify the color of the drum unit, visit us at http://solutions.brother.com/ to view our FAQs and troubleshooting tips. abcdefghijklmnopqrstuvwxyz. abcdefghijklmnopqrstuvwxyz. abcdefghijklmnopqrstuvwxyz. ABCDEFGHIJKLMNOPQRSTUVWXYZ. 0123456789. abcdefghijklmnopqrstuvwxyz. abcdefghijklmnopqrstuvwxyz. abcdefghijklmnopqrstuvwxyz. Troubleshooting Examples...
.../ to view our FAQs and troubleshooting tips. abcdefghijklmnopqrstuvwxyz. abcdefghijklmnopqrstuvwxyz. Vertical streaks in a new drum unit. (See Replacing the drum units on page 104.) To identify the color of the drum unit, visit us at http://solutions.brother.com/ to view our FAQs and troubleshooting tips. abcdefghijklmnopqrstuvwxyz. abcdefghijklmnopqrstuvwxyz. abcdefghijklmnopqrstuvwxyz. ABCDEFGHIJKLMNOPQRSTUVWXYZ. 0123456789. abcdefghijklmnopqrstuvwxyz. abcdefghijklmnopqrstuvwxyz. abcdefghijklmnopqrstuvwxyz. Troubleshooting Examples...
Users Manual - English
Page 160
... toner cartridge that the media type setting in the driver matches the type of the drum unit, visit us at http://solutions.brother.com/ to view our FAQs and troubleshooting tips. Put in a new drum unit. (See Replacing the drum units on page 1.) Check the printer's environment. ABCDEFGHIJKLMNOPQRSTUVWXYZ. 0123456789. ABCDEFGHIJKLMNOPQRSTUVWXYZ. 0123456789. abcdefghijklmnopqrstuvwxyz. abcdefghijklmnopqrstuvwxyz...
... toner cartridge that the media type setting in the driver matches the type of the drum unit, visit us at http://solutions.brother.com/ to view our FAQs and troubleshooting tips. Put in a new drum unit. (See Replacing the drum units on page 1.) Check the printer's environment. ABCDEFGHIJKLMNOPQRSTUVWXYZ. 0123456789. ABCDEFGHIJKLMNOPQRSTUVWXYZ. 0123456789. abcdefghijklmnopqrstuvwxyz. abcdefghijklmnopqrstuvwxyz...


