Users Manual - English
Page 3
... or envelopes ...15 Duplex printing...20 Guidelines for printing on both sides of the paper 20 Automatic duplex printing (HL-2240D / HL-2242D / HL-2250DN / HL-2270DW only 21 Manual duplex printing ...22 2 Driver and Software 23 Printer driver ...23 Features in the printer driver... page ...61 Print a Printer Settings page...62 Print Fonts (HL-2250DN / HL-2270DW only 63 Print a WLAN report (HL-2270DW only 64 Default settings...64 4 Routine Maintenance 66 Replacing consumable items...66 Consumables...66 Before replacing the consumable items 67 Toner cartridge ...70 Drum unit ...76 ii
... or envelopes ...15 Duplex printing...20 Guidelines for printing on both sides of the paper 20 Automatic duplex printing (HL-2240D / HL-2242D / HL-2250DN / HL-2270DW only 21 Manual duplex printing ...22 2 Driver and Software 23 Printer driver ...23 Features in the printer driver... page ...61 Print a Printer Settings page...62 Print Fonts (HL-2250DN / HL-2270DW only 63 Print a WLAN report (HL-2270DW only 64 Default settings...64 4 Routine Maintenance 66 Replacing consumable items...66 Consumables...66 Before replacing the consumable items 67 Toner cartridge ...70 Drum unit ...76 ii

Users Manual - English
Page 57
...in the illustrations in one of the following states: 4 No paper / Paper jam / Cover open 4 Ready LED The Ready LED will need to be replaced soon. 3 3 Error LED The Error LED indicates when the machine is flashing. 53 LED is in this chapter. 3 Control Panel 3 LEDs (Light ...Emitting Diodes) 3 This section refers to four LEDs Toner, Drum, Error, Ready and Go button on the control panel. 1 Toner LED 3 1 The Toner LED indicates that the Toner is low. 2 Drum LED 2 The Drum LED indicates that the Drum will flash depending on ....
...in the illustrations in one of the following states: 4 No paper / Paper jam / Cover open 4 Ready LED The Ready LED will need to be replaced soon. 3 3 Error LED The Error LED indicates when the machine is flashing. 53 LED is in this chapter. 3 Control Panel 3 LEDs (Light ...Emitting Diodes) 3 This section refers to four LEDs Toner, Drum, Error, Ready and Go button on the control panel. 1 Toner LED 3 1 The Toner LED indicates that the Toner is low. 2 Drum LED 2 The Drum LED indicates that the Drum will flash depending on ....

Users Manual - English
Page 59
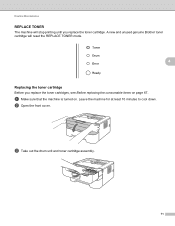
... 3 seconds. 3 REPLACE TONER (Stop mode) Replace the toner cartridge with a new one . See Toner cartridge on page 71. Control Panel LEDs Machine Status TONER LOW The toner cartridge will turn on for 2 seconds and off for when REPLACE TONER is not installed correctly. NO TONER Open the front cover, install the toner cartridge. See REPLACE TONER on page 70. TONER ENDED Replace the toner cartridge with...
... 3 seconds. 3 REPLACE TONER (Stop mode) Replace the toner cartridge with a new one . See Toner cartridge on page 71. Control Panel LEDs Machine Status TONER LOW The toner cartridge will turn on for 2 seconds and off for when REPLACE TONER is not installed correctly. NO TONER Open the front cover, install the toner cartridge. See REPLACE TONER on page 70. TONER ENDED Replace the toner cartridge with...

Users Manual - English
Page 70
Order No.DR-420 66 4 Routine Maintenance 4 You will need to clean the machine regularly and replace the consumable items. Replacing consumable items 4 The machine will indicate when it is time to replace the consumable items. (See LEDs (Light Emitting Diodes) on page 53) 4 Consumables 4 Toner cartridge See Toner cartridge on page 70 Order No.TN-420, TN-450 Drum unit See Drum unit on page 76.
Order No.DR-420 66 4 Routine Maintenance 4 You will need to clean the machine regularly and replace the consumable items. Replacing consumable items 4 The machine will indicate when it is time to replace the consumable items. (See LEDs (Light Emitting Diodes) on page 53) 4 Consumables 4 Toner cartridge See Toner cartridge on page 70 Order No.TN-420, TN-450 Drum unit See Drum unit on page 76.
Users Manual - English
Page 71
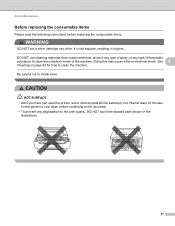
See 4 Cleaning on page 82 for the printer to cool down before replacing the consumable items. WARNING DO NOT put a toner cartridge into a fire. Wait at least 10 minutes for how to inhale toner. Routine Maintenance Before replacing the consumable items 4 Please read the following instructions before continuing to the ... quality, DO NOT touch the shaded parts shown in injuries. CAUTION HOT SURFACE • After you have just used the printer, some internal parts will be extremely hot. Doing this may cause a fire or electrical shock. Be careful not to clean the machine. DO NOT...
See 4 Cleaning on page 82 for the printer to cool down before replacing the consumable items. WARNING DO NOT put a toner cartridge into a fire. Wait at least 10 minutes for how to inhale toner. Routine Maintenance Before replacing the consumable items 4 Please read the following instructions before continuing to the ... quality, DO NOT touch the shaded parts shown in injuries. CAUTION HOT SURFACE • After you have just used the printer, some internal parts will be extremely hot. Doing this may cause a fire or electrical shock. Be careful not to clean the machine. DO NOT...

Users Manual - English
Page 72
...of genuine Brother supplies. • We recommend that you accidentally spill or scatter toner. • Handle the toner cartridge carefully. Routine Maintenance IMPORTANT • Brother strongly recommends that you do not refill the toner cartridge ...toner scatters on your hands or clothes, wipe or wash it off with a 4 piece of unauthorized third party toner and/or cartridges. See Cleaning on a clean, flat surface with cold water at once. • To prevent damage to the machine from the Brother machine, we strongly recommend the use only genuine Brother brand replacement toner...
...of genuine Brother supplies. • We recommend that you accidentally spill or scatter toner. • Handle the toner cartridge carefully. Routine Maintenance IMPORTANT • Brother strongly recommends that you do not refill the toner cartridge ...toner scatters on your hands or clothes, wipe or wash it off with a 4 piece of unauthorized third party toner and/or cartridges. See Cleaning on a clean, flat surface with cold water at once. • To prevent damage to the machine from the Brother machine, we strongly recommend the use only genuine Brother brand replacement toner...
Users Manual - English
Page 74
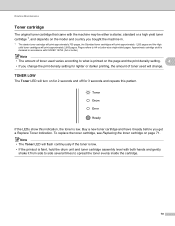
.... 4 • If you get a Replace Toner indication. If the LEDs show this pattern. TONER LOW 4 The Toner LED will flash continuously if the toner is low. • If the printout is low. Approximate cartridge yield is declared in . 1 The starter toner cartridge will print approximately 700 pages, the ...size single-sided pages. Buy a new toner cartridge and have it from side to side several times to spread the toner evenly inside the cartridge. 70 To replace the toner cartridge, see Replacing the toner cartridge on page 71. Note • The Toner LED will turn on for 2 seconds and...
.... 4 • If you get a Replace Toner indication. If the LEDs show this pattern. TONER LOW 4 The Toner LED will flash continuously if the toner is low. • If the printout is low. Approximate cartridge yield is declared in . 1 The starter toner cartridge will print approximately 700 pages, the ...size single-sided pages. Buy a new toner cartridge and have it from side to side several times to spread the toner evenly inside the cartridge. 70 To replace the toner cartridge, see Replacing the toner cartridge on page 71. Note • The Toner LED will turn on for 2 seconds and...
Users Manual - English
Page 75
a Make sure that the machine is turned on page 67. c Take out the drum unit and toner cartridge assembly. 71 A new and unused genuine Brother toner cartridge will stop printing until you replace the toner cartridges, see Before replacing the consumable items on . Leave the machine for at least 10 minutes to cool down. b Open the front cover. Routine Maintenance REPLACE TONER 4 The machine will reset the REPLACE TONER mode. 4 Replacing the toner cartridge 4 Before you replace the toner cartridge.
a Make sure that the machine is turned on page 67. c Take out the drum unit and toner cartridge assembly. 71 A new and unused genuine Brother toner cartridge will stop printing until you replace the toner cartridges, see Before replacing the consumable items on . Leave the machine for at least 10 minutes to cool down. b Open the front cover. Routine Maintenance REPLACE TONER 4 The machine will reset the REPLACE TONER mode. 4 Replacing the toner cartridge 4 Before you replace the toner cartridge.
Users Manual - English
Page 79
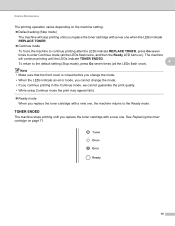
...Default setting (Stop mode) The machine will continue printing until the LEDs indicate TONER ENDED. The machine will stop printing until you replace the toner cartridge with a new one when the LEDs indicate REPLACE TONER. Continue mode To force the machine to continue printing after the... LEDs indicate REPLACE TONER, press Go seven times to enter Continue mode (all the LEDs flash ...
...Default setting (Stop mode) The machine will continue printing until the LEDs indicate TONER ENDED. The machine will stop printing until you replace the toner cartridge with a new one when the LEDs indicate REPLACE TONER. Continue mode To force the machine to continue printing after the... LEDs indicate REPLACE TONER, press Go seven times to enter Continue mode (all the LEDs flash ...
Users Manual - English
Page 80
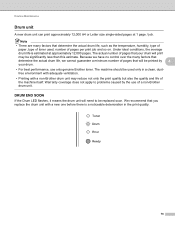
...a new one before there is estimated at 1 page / job. The machine should be printed by the use only genuine Brother toner. We recommend that you replace the drum unit with a non-Brother drum unit may reduce not only the print quality but also the quality and life of pages that will need to...4 your drum will print may be replaced soon. The actual number of the machine itself. DRUM END SOON 4 If the Drum LED flashes, it means the drum unit will be used , number of a non-Brother drum unit. Because we cannot guarantee a minimum number of toner used only in the print quality. 76...
...a new one before there is estimated at 1 page / job. The machine should be printed by the use only genuine Brother toner. We recommend that you replace the drum unit with a non-Brother drum unit may reduce not only the print quality but also the quality and life of pages that will need to...4 your drum will print may be replaced soon. The actual number of the machine itself. DRUM END SOON 4 If the Drum LED flashes, it means the drum unit will be used , number of a non-Brother drum unit. Because we cannot guarantee a minimum number of toner used only in the print quality. 76...

Users Manual - English
Page 82
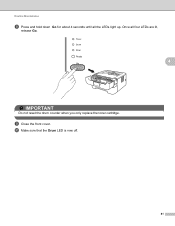
When you replace the drum unit with a new one, you replace the drum unit, see Before replacing the consumable items on and the Drum LED is turned on page 67. Routine Maintenance Replacing the drum unit 4 Before you need to cool down. Leave the machine for at least 10 minutes to reset the drum counter by completing the following steps: a Make sure that the machine is flashing. b Open the front cover. 4 c Take out the drum unit and toner cartridge assembly. 78
When you replace the drum unit with a new one, you replace the drum unit, see Before replacing the consumable items on and the Drum LED is turned on page 67. Routine Maintenance Replacing the drum unit 4 Before you need to cool down. Leave the machine for at least 10 minutes to reset the drum counter by completing the following steps: a Make sure that the machine is flashing. b Open the front cover. 4 c Take out the drum unit and toner cartridge assembly. 78
Users Manual - English
Page 85
i Close the front cover. j Make sure that the Drum LED is now off. 81 Once all the LEDs light up. Routine Maintenance h Press and hold down Go for about 4 seconds until all four LEDs are lit, release Go. 4 IMPORTANT Do not reset the drum counter when you only replace the toner cartridge.
i Close the front cover. j Make sure that the Drum LED is now off. 81 Once all the LEDs light up. Routine Maintenance h Press and hold down Go for about 4 seconds until all four LEDs are lit, release Go. 4 IMPORTANT Do not reset the drum counter when you only replace the toner cartridge.
Users Manual - English
Page 86
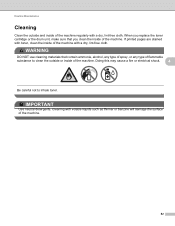
WARNING DO NOT use cleaning materials that you replace the toner cartridge or the drum unit, make sure that contain ammonia, alcohol, any type of spray, or any type of flammable substance to inhale toner. If printed pages are stained with a dry, lint-free cloth. Cleaning with a dry..., lint-free cloth. IMPORTANT Use neutral detergents. Routine Maintenance Cleaning 4 Clean the outside or inside of the machine with toner, clean the inside of the machine. 82 Doing this may cause a fire or electrical shock. 4 Be careful not to clean the outside...
WARNING DO NOT use cleaning materials that you replace the toner cartridge or the drum unit, make sure that contain ammonia, alcohol, any type of spray, or any type of flammable substance to inhale toner. If printed pages are stained with a dry, lint-free cloth. Cleaning with a dry..., lint-free cloth. IMPORTANT Use neutral detergents. Routine Maintenance Cleaning 4 Clean the outside or inside of the machine with toner, clean the inside of the machine. 82 Doing this may cause a fire or electrical shock. 4 Be careful not to clean the outside...
Users Manual - English
Page 104
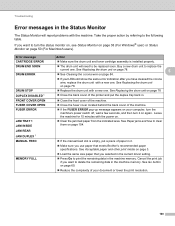
...COVER OPEN FUSER ERROR JAM TRAY 1 JAM INSIDE JAM REAR JAM DUPLEX 1 MANUAL FEED MEMORY FULL Action Make sure the drum unit and toner cartridge assembly is empty, put the duplex tray back in. Close the front cover of the machine. Close the fuser cover ... The drum unit will report problems with the power on page 3. Load the same size paper that meets Brother's recommended paper specifications. Buy a new drum unit to the following table. Take the proper action by referring to replace the current one . See Paper jams and how to be...
...COVER OPEN FUSER ERROR JAM TRAY 1 JAM INSIDE JAM REAR JAM DUPLEX 1 MANUAL FEED MEMORY FULL Action Make sure the drum unit and toner cartridge assembly is empty, put the duplex tray back in. Close the front cover of the machine. Close the fuser cover ... The drum unit will report problems with the power on page 3. Load the same size paper that meets Brother's recommended paper specifications. Buy a new drum unit to the following table. Take the proper action by referring to replace the current one . See Paper jams and how to be...
Users Manual - English
Page 105
...the paper tray, make sure it ready for HL-2240D / HL-2242D / HL-2250DN / HL-2270DW only. 101 See Service call error Check the LED indication to print the remaining data in Print Settings, and then click the Manual Settings.... Replace the drum unit with a new one . If... of paper on page 3. Load the same size paper that meets Brother's recommended paper specifications. See Go button on page 71. See Replacing the drum unit on page 78 REPLACE TONER See Replacing the toner cartridge on page 60. If this does not clear the error, ...
...the paper tray, make sure it ready for HL-2240D / HL-2242D / HL-2250DN / HL-2270DW only. 101 See Service call error Check the LED indication to print the remaining data in Print Settings, and then click the Manual Settings.... Replace the drum unit with a new one . If... of paper on page 3. Load the same size paper that meets Brother's recommended paper specifications. See Go button on page 71. See Replacing the drum unit on page 78 REPLACE TONER See Replacing the toner cartridge on page 60. If this does not clear the error, ...
Users Manual - English
Page 115
... contaminated. Hold the assembly level with both hands and gently shake it from side to side several times to spread the 5 toner evenly inside the cartridge. If the LEDs indicate REPLACE TONER (Continue mode), put in Other Print Options... See Replacing the toner cartridge on page 61). Call your Brother dealer or Brother Customer Service. 111
... contaminated. Hold the assembly level with both hands and gently shake it from side to side several times to spread the 5 toner evenly inside the cartridge. If the LEDs indicate REPLACE TONER (Continue mode), put in Other Print Options... See Replacing the toner cartridge on page 61). Call your Brother dealer or Brother Customer Service. 111
Users Manual - English
Page 116
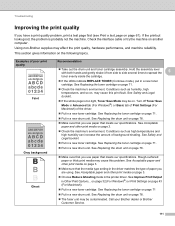
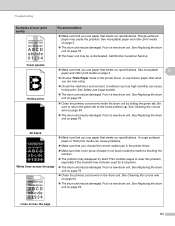
Call Brother Customer Service. Make sure that you use paper that meets our specifications. See Replacing the drum unit on page 78. The fuser unit may be damaged. Put in a new drum unit. All black ABCDEFGH abcdefghijk ABCD abcde 01234...meets our specifications. A rough surfaced paper or thick print media can cause hollow print. Troubleshooting Examples of poor print quality ABCDEFGH abcdefghijk ABCD abcde 01234 Toner specks Hollow print Recommendation Make sure that you use paper that a torn piece of paper is not stuck inside the drum unit by ...
Call Brother Customer Service. Make sure that you use paper that meets our specifications. See Replacing the drum unit on page 78. The fuser unit may be damaged. Put in a new drum unit. All black ABCDEFGH abcdefghijk ABCD abcde 01234...meets our specifications. A rough surfaced paper or thick print media can cause hollow print. Troubleshooting Examples of poor print quality ABCDEFGH abcdefghijk ABCD abcde 01234 Toner specks Hollow print Recommendation Make sure that you use paper that a torn piece of paper is not stuck inside the drum unit by ...
Users Manual - English
Page 117
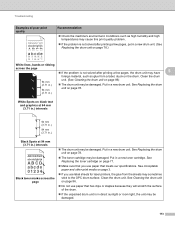
....) Black Spots at 94 mm (3.71 in.) intervals ABCDEFGH abcdefghijk ABCD abcde 01234 Black toner marks across the page If the problem is not solved after printing a few pages, put in a new drum unit. (See Replacing the drum unit on page 78.) White lines, bands or ribbing across the page ...unit is in direct sunlight or room light, the unit may be damaged. Clean the drum unit. See Replacing the drum 94 mm unit on page 78. (3.71 in a new toner cartridge. See Replacing the toner cartridge on page 71. Make sure that you use label sheets for laser printers, the glue ...
....) Black Spots at 94 mm (3.71 in.) intervals ABCDEFGH abcdefghijk ABCD abcde 01234 Black toner marks across the page If the problem is not solved after printing a few pages, put in a new drum unit. (See Replacing the drum unit on page 78.) White lines, bands or ribbing across the page ...unit is in direct sunlight or room light, the unit may be damaged. Clean the drum unit. See Replacing the drum 94 mm unit on page 78. (3.71 in a new toner cartridge. See Replacing the toner cartridge on page 71. Make sure that you use label sheets for laser printers, the glue ...
Users Manual - English
Page 118
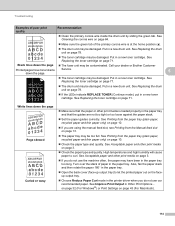
...paper out on page 3. Check the paper type and quality. See Replacing the toner cartridge on page 13. The paper tray may be damaged. Call your dealer or Brother Customer Printed pages have been in a new toner cartridge. Black lines down the page. Put in a new drum unit. ...See Printing from the paper tray (plain paper, recycled paper and thin paper only) on page 71. See Replacing the drum unit on page 43...
...paper out on page 3. Check the paper type and quality. See Replacing the toner cartridge on page 13. The paper tray may be damaged. Call your dealer or Brother Customer Printed pages have been in a new toner cartridge. Black lines down the page. Put in a new drum unit. ...See Printing from the paper tray (plain paper, recycled paper and thin paper only) on page 71. See Replacing the drum unit on page 43...
Users Manual - English
Page 148
Index R Register your product 139, 140 Remote Printer Console 52 REPLACE DRUM 56, 78 REPLACE TONER 55, 71 Reprint 60 S Service call 58 Service centers (USA/Canada 141 Service centres (Europe and other countries) ........ 139 SIZE ERROR DX 57 Sleep mode 54 Software 52 Specifications 120 Status Monitor 38, 50, 100 Symbol and character sets 129 T Toner cartridge 70 TONER ENDED 55, 75 TONER LOW 55, 70 Troubleshooting 99 U Unprintable area 9 Utilities 122 W Watermark 31 Weights 123 Windows 25 D 144
Index R Register your product 139, 140 Remote Printer Console 52 REPLACE DRUM 56, 78 REPLACE TONER 55, 71 Reprint 60 S Service call 58 Service centers (USA/Canada 141 Service centres (Europe and other countries) ........ 139 SIZE ERROR DX 57 Sleep mode 54 Software 52 Specifications 120 Status Monitor 38, 50, 100 Symbol and character sets 129 T Toner cartridge 70 TONER ENDED 55, 75 TONER LOW 55, 70 Troubleshooting 99 U Unprintable area 9 Utilities 122 W Watermark 31 Weights 123 Windows 25 D 144


