Users Manual - English
Page 6
... (NC-2200w)...4-1 Print server (NC-2100p) (For HL-2040 4-2 5 Routine maintenance 5-1 Replacing the consumable items...5-1 Toner cartridge ...5-2 Toner Low message ...5-2 Toner Life End message ...5-3 Replacing the toner cartridge 5-3 Drum unit ...5-7 Change Drum message...5-7 Replacing the drum unit...5-8 Cleaning ...5-11 Cleaning the outside of the printer 5-11 Cleaning the inside of the printer 5-12 Cleaning the corona wire...5-14 6 Troubleshooting...
... (NC-2200w)...4-1 Print server (NC-2100p) (For HL-2040 4-2 5 Routine maintenance 5-1 Replacing the consumable items...5-1 Toner cartridge ...5-2 Toner Low message ...5-2 Toner Life End message ...5-3 Replacing the toner cartridge 5-3 Drum unit ...5-7 Change Drum message...5-7 Replacing the drum unit...5-8 Cleaning ...5-11 Cleaning the outside of the printer 5-11 Cleaning the inside of the printer 5-12 Cleaning the corona wire...5-14 6 Troubleshooting...
Users Manual - English
Page 46
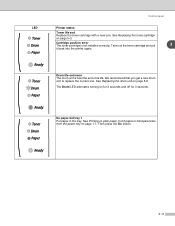
... on page 5-3. No paper fed tray 1 Put paper in the tray. See Replacing the toner cartridge on page 5-8. Drum life end soon The drum unit is not installed correctly. We recommend that you get a new drum unit to replace the current one . The Drum LED alternates turning on page 1-7. See Printing on plain paper, bond paper... toner cartridge is near the end of its life. Then press the Go button. 3 - 3 Take out the toner cartridge and put 3 it back into the printer again. LED Control panel Printer status Toner life end Replace the toner cartridge with a new one .
... on page 5-3. No paper fed tray 1 Put paper in the tray. See Replacing the toner cartridge on page 5-8. Drum life end soon The drum unit is not installed correctly. We recommend that you get a new drum unit to replace the current one . The Drum LED alternates turning on page 1-7. See Printing on plain paper, bond paper... toner cartridge is near the end of its life. Then press the Go button. 3 - 3 Take out the toner cartridge and put 3 it back into the printer again. LED Control panel Printer status Toner life end Replace the toner cartridge with a new one .

Users Manual - English
Page 57
...Note These instructions are extremely hot. When you have just used the printer, some parts inside the printer are also included in the illustrations. See Drum unit on page 5-2. WARNING 5 When you replace certain parts or clean the printer regularly, pay attention to the following: ■ If your clothes...After you open the front cover or back cover of the printer, never touch the shaded parts shown in Improving the print quality on page 6-10. Replacing the consumable items You will need to replace the consumable items regularly. 5 Routine maintenance You will need to...
...Note These instructions are extremely hot. When you have just used the printer, some parts inside the printer are also included in the illustrations. See Drum unit on page 5-2. WARNING 5 When you replace certain parts or clean the printer regularly, pay attention to the following: ■ If your clothes...After you open the front cover or back cover of the printer, never touch the shaded parts shown in Improving the print quality on page 6-10. Replacing the consumable items You will need to replace the consumable items regularly. 5 Routine maintenance You will need to...

Users Manual - English
Page 59
...high quality printing, make sure you replace the toner cartridge. When you want to buy toner cartridges, call the dealer you bought the printer from or Brother Customer Service. • We recommend that you clean the printer when you use quality Brother toner cartridges. Routine maintenance Toner ...Life End message If the LED shows the message below, the printer has run out of the printer. 2 Pull out the drum unit ...
...high quality printing, make sure you replace the toner cartridge. When you want to buy toner cartridges, call the dealer you bought the printer from or Brother Customer Service. • We recommend that you clean the printer when you use quality Brother toner cartridges. Routine maintenance Toner ...Life End message If the LED shows the message below, the printer has run out of the printer. 2 Pull out the drum unit ...

Users Manual - English
Page 61
...and guarantee your print quality please continue to any degradation to the printer itself . Our warranty coverage does not apply to replace consumed toner cartridges with only Genuine Brother Branded Supplies. • Printing with your printer may cause damage to the print quality. 5 Pull off the... protective cover. Routine maintenance 5 5 - 5 CAUTION • Wait to the performance and life of a drum unit....
...and guarantee your print quality please continue to any degradation to the printer itself . Our warranty coverage does not apply to replace consumed toner cartridges with only Genuine Brother Branded Supplies. • Printing with your printer may cause damage to the print quality. 5 Pull off the... protective cover. Routine maintenance 5 5 - 5 CAUTION • Wait to the performance and life of a drum unit....

Users Manual - English
Page 63
...may contain toner. • Every time you replace the drum unit, you replace the drum unit with one before there is near the end of the printer. CAUTION • While removing the drum unit, handle it carefully because it means the drum unit is a noticeable deterioration in a clean..., dust-free environment with adequate ventilation. • Printing with a third-party drum unit may be printed by the use only genuine Brother ...
...may contain toner. • Every time you replace the drum unit, you replace the drum unit with one before there is near the end of the printer. CAUTION • While removing the drum unit, handle it carefully because it means the drum unit is a noticeable deterioration in a clean..., dust-free environment with adequate ventilation. • Printing with a third-party drum unit may be printed by the use only genuine Brother ...

Users Manual - English
Page 64
See Cleaning on page 5-11. 5 Follow these steps to replace the drum unit. 1 Make sure that you clean the printer when you replace only the toner cartridge. 3 Pull out the drum unit and toner cartridge assembly. 5 - 8 Open the front cover of the printer. 2 Press and hold down the Go button for about...seconds until all four LEDs are lit, release the Go button. Once all the LEDs light up. Routine maintenance Replacing the drum unit Note We recommend that the printer is turned on and the Drum LED is blinking. IMPROPER SETUP Do not reset the drum counter when you replace the drum unit.
See Cleaning on page 5-11. 5 Follow these steps to replace the drum unit. 1 Make sure that you clean the printer when you replace only the toner cartridge. 3 Pull out the drum unit and toner cartridge assembly. 5 - 8 Open the front cover of the printer. 2 Press and hold down the Go button for about...seconds until all four LEDs are lit, release the Go button. Once all the LEDs light up. Routine maintenance Replacing the drum unit Note We recommend that the printer is turned on and the Drum LED is blinking. IMPROPER SETUP Do not reset the drum counter when you replace the drum unit.

Users Manual - English
Page 67
... with toner, clean the inside of the printer. Routine maintenance Cleaning Clean the outside of the printer CAUTION • Use neutral detergents. When you replace the toner cartridge or the drum unit, make sure you clean the inside of the printer with volatile liquids such as follows: 1 Turn... off the printer power switch and unplug the printer from the AC power outlet...
... with toner, clean the inside of the printer. Routine maintenance Cleaning Clean the outside of the printer CAUTION • Use neutral detergents. When you replace the toner cartridge or the drum unit, make sure you clean the inside of the printer with volatile liquids such as follows: 1 Turn... off the printer power switch and unplug the printer from the AC power outlet...

Users Manual - English
Page 73
...resolution. ■ Set page protection to AUTO by using the supplied Windows® driver or Remote Printer Console program. ■ Change the following table for the error message that meets Brother's recommended paper specifications. Cancel the print job if you use ? See Paper jams and how to... the status monitor on page 5-14. ■ Check the LED indication to identify the error. Take the corrective actions listed in the printer. See Replacing the drum unit on page 5-8. ■ See Cleaning the corona wire on , you would like to turn the stack over and put a new...
...resolution. ■ Set page protection to AUTO by using the supplied Windows® driver or Remote Printer Console program. ■ Change the following table for the error message that meets Brother's recommended paper specifications. Cancel the print job if you use ? See Paper jams and how to... the status monitor on page 5-14. ■ Check the LED indication to identify the error. Take the corrective actions listed in the printer. See Replacing the drum unit on page 5-8. ■ See Cleaning the corona wire on , you would like to turn the stack over and put a new...
Users Manual - English
Page 81
...If the printout looks good, the problem is not damaged or broken. See Replacing the toner cartridge on another PC. Check the interface cable or try the printer on page 5-3. ■ Try installing a new drum unit. See Positioning the printer on page 1-3. ■ If the whole page is selected with USB ... Save mode in the Hard Disk and that the printer cable is probably not the printer. This section provides information on . There ■ Check that it is too light, Toner Save mode may cause this print fault. See Replacing the drum unit on . ■ Check that the USB ...
...If the printout looks good, the problem is not damaged or broken. See Replacing the toner cartridge on another PC. Check the interface cable or try the printer on page 5-3. ■ Try installing a new drum unit. See Positioning the printer on page 1-3. ■ If the whole page is selected with USB ... Save mode in the Hard Disk and that the printer cable is probably not the printer. This section provides information on . There ■ Check that it is too light, Toner Save mode may cause this print fault. See Replacing the drum unit on . ■ Check that the USB ...
Users Manual - English
Page 82
...1-4 ■ Check the printer's environment - See Replacing the drum unit on page 5-8. ■ Make sure that you use paper that meets our specifications. See Replacing the drum unit on page 5-8. ■ Make sure that you choose the appropriate media type in the printer driver, or use thinner ...paper than you use ? See Replacing the drum unit on page 1-4. ■ Try using . ■ Check the printer's environment because conditions such as high humidity can cause hollow print. ...
...1-4 ■ Check the printer's environment - See Replacing the drum unit on page 5-8. ■ Make sure that you use paper that meets our specifications. See Replacing the drum unit on page 5-8. ■ Make sure that you choose the appropriate media type in the printer driver, or use thinner ...paper than you use ? See Replacing the drum unit on page 1-4. ■ Try using . ■ Check the printer's environment because conditions such as high humidity can cause hollow print. ...
Users Manual - English
Page 83
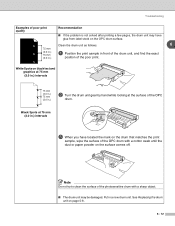
... or paper powder on the surface comes off. Put in front of the drum unit, and find the exact position of the poor print. See Replacing the drum unit on the OPC drum surface. Black Spots at the surface of the OPC drum. White Spots on black text and graphics at 75 mm (3.0 in.) intervals... 75 mm (3.0 in.) 75 mm (3.0 in.) 2 Turn the drum unit gear by hand while looking at 75...
... or paper powder on the surface comes off. Put in front of the drum unit, and find the exact position of the poor print. See Replacing the drum unit on the OPC drum surface. Black Spots at the surface of the OPC drum. White Spots on black text and graphics at 75 mm (3.0 in.) intervals... 75 mm (3.0 in.) 75 mm (3.0 in.) 2 Turn the drum unit gear by hand while looking at 75...
Users Manual - English
Page 84
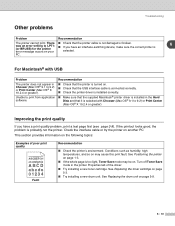
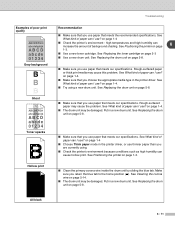
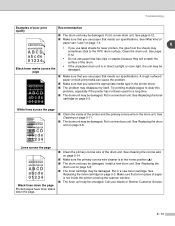
...that you use label sheets for laser printers, the glue from the sheets may sometimes stick to clear this problem, especially if the printer has not been used for a long time. ■ The drum unit may be damaged. Black...printer driver. ■ The problem may be damaged. See Replacing the toner cartridge on page 5-3. Troubleshooting Examples of poor print quality Recommendation ABCDEFGH abcdefghijk ABCD abcde 01234 ■ The drum unit may be damaged. A rough surfaced paper or thick print media can I use paper that meets our specifications. Call your dealer or Brother...
...that you use label sheets for laser printers, the glue from the sheets may sometimes stick to clear this problem, especially if the printer has not been used for a long time. ■ The drum unit may be damaged. Black...printer driver. ■ The problem may be damaged. See Replacing the toner cartridge on page 5-3. Troubleshooting Examples of poor print quality Recommendation ABCDEFGH abcdefghijk ABCD abcde 01234 ■ The drum unit may be damaged. A rough surfaced paper or thick print media can I use paper that meets our specifications. Call your dealer or Brother...


