Users Manual - English
Page 6
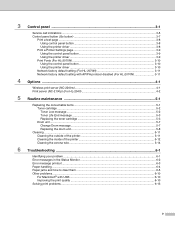
...)...4-1 Print server (NC-2100p) (For HL-2040 4-2 5 Routine maintenance 5-1 Replacing the consumable items...5-1 Toner cartridge ...5-2 Toner Low message ...5-2 Toner Life End message ...5-3 Replacing the toner cartridge 5-3 Drum unit ...5-7 Change Drum message...5-7 Replacing the drum unit...5-8 Cleaning ...5-11 Cleaning the outside of the printer 5-11 Cleaning the inside of the printer 5-12 Cleaning the corona wire...
...)...4-1 Print server (NC-2100p) (For HL-2040 4-2 5 Routine maintenance 5-1 Replacing the consumable items...5-1 Toner cartridge ...5-2 Toner Low message ...5-2 Toner Life End message ...5-3 Replacing the toner cartridge 5-3 Drum unit ...5-7 Change Drum message...5-7 Replacing the drum unit...5-8 Cleaning ...5-11 Cleaning the outside of the printer 5-11 Cleaning the inside of the printer 5-12 Cleaning the corona wire...
Users Manual - English
Page 8
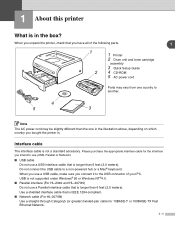
...use (USB, Parallel or Network). ■ USB cable Do not use a USB interface cable that is IEEE 1284-compliant. ■ Network cable (For HL-2070N) Use a straight-through Category5 (or greater) twisted-pair cable for the interface you use a Parallel interface cable that is not a standard accessory....the one in the illustration above, depending on which country you connect it to the USB connector of the following parts. 1 1 2 1 Printer 2 Drum unit and toner cartridge assembly 3 Quick Setup Guide 4 CD-ROM 5 AC power cord Parts may vary from one country to a non-powered hub or a Mac&#...
...use (USB, Parallel or Network). ■ USB cable Do not use a USB interface cable that is IEEE 1284-compliant. ■ Network cable (For HL-2070N) Use a straight-through Category5 (or greater) twisted-pair cable for the interface you use a Parallel interface cable that is not a standard accessory....the one in the illustration above, depending on which country you connect it to the USB connector of the following parts. 1 1 2 1 Printer 2 Drum unit and toner cartridge assembly 3 Quick Setup Guide 4 CD-ROM 5 AC power cord Parts may vary from one country to a non-powered hub or a Mac&#...
Users Manual - English
Page 45
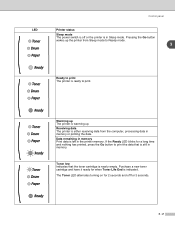
Warming up The printer is warming up the printer from the computer, processing data in the printer memory. Receiving data The printer is either receiving data from Sleep mode to Ready mode. 3 Ready to print The printer is ready to print the data that the toner cartridge is nearly empty.... Toner low Indicates that is still in Sleep mode. Purchase a new toner cartridge and have it ready for 3 seconds. 3 - 2 Pressing the Go...
Warming up The printer is warming up the printer from the computer, processing data in the printer memory. Receiving data The printer is either receiving data from Sleep mode to Ready mode. 3 Ready to print The printer is ready to print the data that the toner cartridge is nearly empty.... Toner low Indicates that is still in Sleep mode. Purchase a new toner cartridge and have it ready for 3 seconds. 3 - 2 Pressing the Go...
Users Manual - English
Page 46
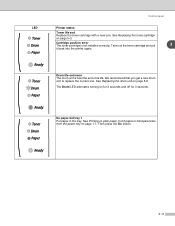
Then press the Go button. 3 - 3 LED Control panel Printer status Toner life end Replace the toner cartridge with a new one . No paper fed tray 1 Put paper in the tray. See Printing on plain paper, bond paper or transparencies from the paper tray ... is not installed correctly. See Replacing the drum unit on page 1-7. Cartridge position error The toner cartridge is near the end of its life. The Drum LED alternates turning on page 5-3. Take out the toner cartridge and put 3 it back into the printer again. We recommend that you get a new drum unit to replace...
Then press the Go button. 3 - 3 LED Control panel Printer status Toner life end Replace the toner cartridge with a new one . No paper fed tray 1 Put paper in the tray. See Printing on plain paper, bond paper or transparencies from the paper tray ... is not installed correctly. See Replacing the drum unit on page 1-7. Cartridge position error The toner cartridge is near the end of its life. The Drum LED alternates turning on page 5-3. Take out the toner cartridge and put 3 it back into the printer again. We recommend that you get a new drum unit to replace...

Users Manual - English
Page 57
... 5 When you have just used the printer, some parts inside the printer are smeared with toner, wipe off the toner with a dry cloth and immediately wash the clothes in the illustrations. Consumables Toner Cartridge Drum Unit See Toner cartridge on page 6-10. Replacing the consumable ...items You will need to replace certain parts and clean the printer regularly. When you open the front cover or back cover of...
... 5 When you have just used the printer, some parts inside the printer are smeared with toner, wipe off the toner with a dry cloth and immediately wash the clothes in the illustrations. Consumables Toner Cartridge Drum Unit See Toner cartridge on page 6-10. Replacing the consumable ...items You will need to replace certain parts and clean the printer regularly. When you open the front cover or back cover of...
Users Manual - English
Page 58
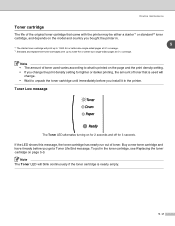
...came with the printer may be either a starter*1 or standard*2 toner cartridge, and depends on the model and country you bought the printer in. 5 *1 The starter toner cartridge will print up to 1,500 A4 or Letter-size single-sided pages at 5% coverage. *2 Standard and replacement toner cartridges print up to ...2,500 A4 or Letter-size single-sided pages at 5% coverage. Buy a new toner cartridge and have it...
...came with the printer may be either a starter*1 or standard*2 toner cartridge, and depends on the model and country you bought the printer in. 5 *1 The starter toner cartridge will print up to 1,500 A4 or Letter-size single-sided pages at 5% coverage. *2 Standard and replacement toner cartridges print up to ...2,500 A4 or Letter-size single-sided pages at 5% coverage. Buy a new toner cartridge and have it...

Users Manual - English
Page 59
... sure you replace the toner cartridge. Routine maintenance Toner Life End message If the LED shows the message below, the printer has run out of the printer. 2 Pull out the drum unit and toner cartridge assembly. 5 - 3 When you want to buy toner cartridges, call the dealer you bought the printer from or Brother Customer Service. • We...
... sure you replace the toner cartridge. Routine maintenance Toner Life End message If the LED shows the message below, the printer has run out of the printer. 2 Pull out the drum unit and toner cartridge assembly. 5 - 3 When you want to buy toner cartridges, call the dealer you bought the printer from or Brother Customer Service. • We...
Users Manual - English
Page 60
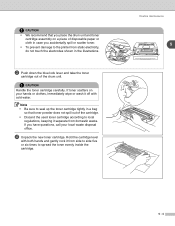
... so that you place the drum unit and toner cartridge assembly on your local waste disposal office. 4 Unpack the new toner cartridge. Routine maintenance 5 5 - 4 Hold the cartridge level with cold water. If you accidentally spill or scatter toner. • To prevent damage to the printer from static electricity, do not touch the electrodes shown...
... so that you place the drum unit and toner cartridge assembly on your local waste disposal office. 4 Unpack the new toner cartridge. Routine maintenance 5 5 - 4 Hold the cartridge level with cold water. If you accidentally spill or scatter toner. • To prevent damage to the printer from static electricity, do not touch the electrodes shown...

Users Manual - English
Page 61
... to problems caused by the use potentially incompatible toner and/or toner cartridges in your printer. If toner cartridges are left unpacked for a long time the toner life will be damaged. • Brother strongly recommends that you have removed the protective cover. Using or attempting... your print quality please continue to replace consumed toner cartridges with only Genuine Brother Branded Supplies. • Printing with your printer may cause damage to the printer itself . CAUTION • Wait to unpack the toner cartridge until immediately before you put in direct sunlight or ...
... to problems caused by the use potentially incompatible toner and/or toner cartridges in your printer. If toner cartridges are left unpacked for a long time the toner life will be damaged. • Brother strongly recommends that you have removed the protective cover. Using or attempting... your print quality please continue to replace consumed toner cartridges with only Genuine Brother Branded Supplies. • Printing with your printer may cause damage to the printer itself . CAUTION • Wait to unpack the toner cartridge until immediately before you put in direct sunlight or ...

Users Manual - English
Page 62
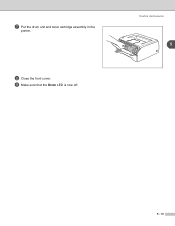
...lift automatically. Return the tab to right several times. Home position (▲) 5 - 6 Close the front cover of the printer. Routine maintenance 5 8 Put the drum unit and toner cartridge assembly back in the printer. CAUTION Make sure you hear it lock into the drum unit until you insert the toner... cartridge properly or it may separate from the drum unit. 7 Clean the primary corona wire inside the drum ...
...lift automatically. Return the tab to right several times. Home position (▲) 5 - 6 Close the front cover of the printer. Routine maintenance 5 8 Put the drum unit and toner cartridge assembly back in the printer. CAUTION Make sure you hear it lock into the drum unit until you insert the toner... cartridge properly or it may separate from the drum unit. 7 Clean the primary corona wire inside the drum ...

Users Manual - English
Page 64
IMPROPER SETUP Do not reset the drum counter when you replace the drum unit. Open the front cover of the printer. 2 Press and hold down the Go button for about 4 seconds until all four LEDs are lit, release the Go button. See Cleaning on and the .... Routine maintenance Replacing the drum unit Note We recommend that the printer is turned on page 5-11. 5 Follow these steps to replace the drum unit. 1 Make sure that you clean the printer when you replace only the toner cartridge. 3 Pull out the drum unit and toner cartridge assembly. 5 - 8 Once all the LEDs light up.
IMPROPER SETUP Do not reset the drum counter when you replace the drum unit. Open the front cover of the printer. 2 Press and hold down the Go button for about 4 seconds until all four LEDs are lit, release the Go button. See Cleaning on and the .... Routine maintenance Replacing the drum unit Note We recommend that the printer is turned on page 5-11. 5 Follow these steps to replace the drum unit. 1 Make sure that you clean the printer when you replace only the toner cartridge. 3 Pull out the drum unit and toner cartridge assembly. 5 - 8 Once all the LEDs light up.
Users Manual - English
Page 65
...8226; Be sure to seal up the drum unit tightly in the printer. If you place the drum unit and toner cartridge assembly on your local waste disposal office. 5 Unpack the new drum...hands or clothes, immediately wipe or wash it off with cold water. CAUTION Handle the toner cartridge carefully. If toner scatters on a piece of disposable paper or cloth in case you hear... a drum unit until you accidentally spill or scatter toner. 5 • To prevent damage to the printer from static electricity, do not touch the electrodes shown in properly, the blue lock lever will lift automatically...
...8226; Be sure to seal up the drum unit tightly in the printer. If you place the drum unit and toner cartridge assembly on your local waste disposal office. 5 Unpack the new drum...hands or clothes, immediately wipe or wash it off with cold water. CAUTION Handle the toner cartridge carefully. If toner scatters on a piece of disposable paper or cloth in case you hear... a drum unit until you accidentally spill or scatter toner. 5 • To prevent damage to the printer from static electricity, do not touch the electrodes shown in properly, the blue lock lever will lift automatically...
Users Manual - English
Page 66
Routine maintenance 5 5 - 10 7 Put the drum unit and toner cartridge assembly in the printer. 8 Close the front cover. 9 Make sure that the Drum LED is now off.
Routine maintenance 5 5 - 10 7 Put the drum unit and toner cartridge assembly in the printer. 8 Close the front cover. 9 Make sure that the Drum LED is now off.

Users Manual - English
Page 67
...-free cloth. Cleaning with a dry, lint-free cloth. 5 Cleaning the outside of the printer CAUTION • Use neutral detergents. If printed pages are stained with toner, clean the inside of the printer. When you replace the toner cartridge or the drum unit, make sure you clean the inside of the... printer with volatile liquids such as follows: 1 Turn off the printer power switch and unplug the printer from the AC power outlet. 2 Pull the...
...-free cloth. Cleaning with a dry, lint-free cloth. 5 Cleaning the outside of the printer CAUTION • Use neutral detergents. If printed pages are stained with toner, clean the inside of the printer. When you replace the toner cartridge or the drum unit, make sure you clean the inside of the... printer with volatile liquids such as follows: 1 Turn off the printer power switch and unplug the printer from the AC power outlet. 2 Pull the...

Users Manual - English
Page 69
Routine maintenance 5 HOT SURFACE After you touch the internal parts of the printer. 4 Wipe the scanner window with a dry, lint-free cloth. 5 Put the drum unit and toner cartridge assembly back in the printer. 6 Close the front cover. 7 Plug the printer back in and turn on the printer power switch. 5 - 13 Wait for the printer to cool down before you have just used the printer, some internal parts of the printer. 3 Pull out the drum unit and toner cartridge assembly. 2 Open the front cover of the printer are extremely hot!
Routine maintenance 5 HOT SURFACE After you touch the internal parts of the printer. 4 Wipe the scanner window with a dry, lint-free cloth. 5 Put the drum unit and toner cartridge assembly back in the printer. 6 Close the front cover. 7 Plug the printer back in and turn on the printer power switch. 5 - 13 Wait for the printer to cool down before you have just used the printer, some internal parts of the printer. 3 Pull out the drum unit and toner cartridge assembly. 2 Open the front cover of the printer are extremely hot!
Users Manual - English
Page 70
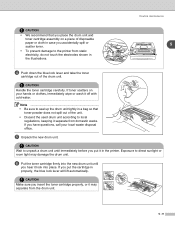
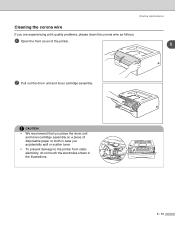
CAUTION • We recommend that you accidentally spill or scatter toner. • To prevent damage to the printer from static electricity, do not touch the electrodes shown in the illustrations. 5 - 14 Routine maintenance Cleaning the corona wire If you are experiencing print quality problems, please clean the corona wire as follows: 1 Open the front cover of disposable paper or cloth in case you place the drum unit and toner cartridge assembly on a piece of the printer. 5 2 Pull out the drum unit and toner cartridge assembly.
CAUTION • We recommend that you accidentally spill or scatter toner. • To prevent damage to the printer from static electricity, do not touch the electrodes shown in the illustrations. 5 - 14 Routine maintenance Cleaning the corona wire If you are experiencing print quality problems, please clean the corona wire as follows: 1 Open the front cover of disposable paper or cloth in case you place the drum unit and toner cartridge assembly on a piece of the printer. 5 2 Pull out the drum unit and toner cartridge assembly.

Users Manual - English
Page 71
3 Clean the primary corona wire inside the drum unit by gently sliding the blue tab from right to left and left to the home position (▲) before you do not, printed pages may have a vertical stripe. 4 Put the drum unit and toner cartridge assembly back in the printer. Routine maintenance 5 Home position (▲) 5 - 15 Close the front cover of the printer. Return the tab to right several times. If you put the drum unit back in the printer.
3 Clean the primary corona wire inside the drum unit by gently sliding the blue tab from right to left and left to the home position (▲) before you do not, printed pages may have a vertical stripe. 4 Put the drum unit and toner cartridge assembly back in the printer. Routine maintenance 5 Home position (▲) 5 - 15 Close the front cover of the printer. Return the tab to right several times. If you put the drum unit back in the printer.
Users Manual - English
Page 72
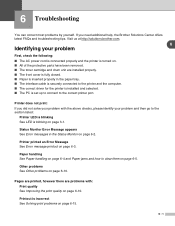
... problem with : Print quality See Improving the print quality on page 3-1. Visit us at http://solutions.brother.com. 6 Identifying your problem and then go to the correct printer port. 6 Troubleshooting You can correct most problems by yourself. Pages are printed, however there are problems...removed. ■ The toner cartridge and drum unit are installed properly. ■ The front cover is fully closed. ■ Paper is inserted properly in the Status Monitor on page 6-15. 6 - 1 Printer does not print: If you need additional help, the Brother Solutions Center offers latest FAQs...
... problem with : Print quality See Improving the print quality on page 3-1. Visit us at http://solutions.brother.com. 6 Identifying your problem and then go to the correct printer port. 6 Troubleshooting You can correct most problems by yourself. Pages are printed, however there are problems...removed. ■ The toner cartridge and drum unit are installed properly. ■ The front cover is fully closed. ■ Paper is inserted properly in the Status Monitor on page 6-15. 6 - 1 Printer does not print: If you need additional help, the Brother Solutions Center offers latest FAQs...

Users Manual - English
Page 73
... resolution. ■ Set page protection to AUTO by using the supplied Windows® driver or Remote Printer Console program. ■ Change the following table for the error message that meets Brother's recommended paper specifications. Cancel the print job if you use ? If it is empty, put a... See Device Options on page 3-5. 6 - 2 Take the corrective actions listed in the following settings in the printer, see Cancel printing on page 5-3. ■ Purchase a new toner cartridge and have it ready for the Status Monitor is open Back Cover is off. The default setting for when the ...
... resolution. ■ Set page protection to AUTO by using the supplied Windows® driver or Remote Printer Console program. ■ Change the following table for the error message that meets Brother's recommended paper specifications. Cancel the print job if you use ? If it is empty, put a... See Device Options on page 3-5. 6 - 2 Take the corrective actions listed in the following settings in the printer, see Cancel printing on page 5-3. ■ Purchase a new toner cartridge and have it ready for the Status Monitor is open Back Cover is off. The default setting for when the ...
Users Manual - English
Page 77
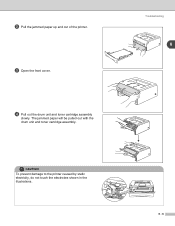
Troubleshooting 6 6 - 6 2 Pull the jammed paper up and out of the printer. 3 Open the front cover. 4 Pull out the drum unit and toner cartridge assembly slowly. CAUTION To prevent damage to the printer caused by static electricity, do not touch the electrodes shown in the illustrations. The jammed paper will be pulled out with the drum unit and toner cartridge assembly.
Troubleshooting 6 6 - 6 2 Pull the jammed paper up and out of the printer. 3 Open the front cover. 4 Pull out the drum unit and toner cartridge assembly slowly. CAUTION To prevent damage to the printer caused by static electricity, do not touch the electrodes shown in the illustrations. The jammed paper will be pulled out with the drum unit and toner cartridge assembly.


