

Product Information - English
Page 12
...-shi, Aichi 448-0803, Japan. Please read instruction manual before using VEGETABLE OIL INK. Phone: 81-566-95-0088 Fax: 81-566-25-3721 http://www. http://www.brother.com.hk/ +852-3589-9040 ASIA BROTHER INTERNATIONAL SINGAPORE PTE LTD. m. Printed in Japan 2011.3. http://www.brother-cn.net/ +86-21-3135-3355 HONG KONG...
...-shi, Aichi 448-0803, Japan. Please read instruction manual before using VEGETABLE OIL INK. Phone: 81-566-95-0088 Fax: 81-566-25-3721 http://www. http://www.brother.com.hk/ +852-3589-9040 ASIA BROTHER INTERNATIONAL SINGAPORE PTE LTD. m. Printed in Japan 2011.3. http://www.brother-cn.net/ +86-21-3135-3355 HONG KONG...
Instruction Manual - English
Page 2
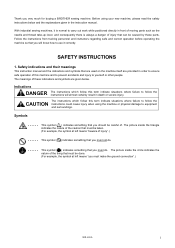
... and consequently there is normal to carry out work while positioned directly in the instruction manual. The picture inside the triangle indicates the nature of the caution that must be careful... be done. (For example, the symbol at left means "you very much for buying a BROTHER sewing machine. The instructions which follow this machine and to prevent accidents and injury to follow the... damage to ensure safe operation of injury that you must make the ground connection".) HE-800A i This symbol ( ) indicates something that must be caused by these indications and symbols...
... and consequently there is normal to carry out work while positioned directly in the instruction manual. The picture inside the triangle indicates the nature of the caution that must be careful... be done. (For example, the symbol at left means "you very much for buying a BROTHER sewing machine. The instructions which follow this machine and to prevent accidents and injury to follow the... damage to ensure safe operation of injury that you must make the ground connection".) HE-800A i This symbol ( ) indicates something that must be caused by these indications and symbols...
Instruction Manual - English
Page 6
...Lubricating the bed base 24 4-17-2. Program setting examples 33 5-4-2. Setting the knife length 46 5-5-3. Using the program memos 53 5-13. Manual mode 56 7. SPECIFICATIONS 2 2-1. PD-8000, Programmer 6 4. Connecting the standing operation pedal harness (option 16 4-11-6. Installing the ... machine head harness 13 4-11-3. Installing the eye guard 23 4-17. Installing the belt cover 26 5. Thread tension 61 HE-800A Standard sewing pattern list 3 3. Rear tack vector shape programs 48 5-7. Installing the needle 57 7-2. Table processing diagram 7 4-2. ...
...Lubricating the bed base 24 4-17-2. Program setting examples 33 5-4-2. Setting the knife length 46 5-5-3. Using the program memos 53 5-13. Manual mode 56 7. SPECIFICATIONS 2 2-1. PD-8000, Programmer 6 4. Connecting the standing operation pedal harness (option 16 4-11-6. Installing the ... machine head harness 13 4-11-3. Installing the eye guard 23 4-17. Installing the belt cover 26 5. Thread tension 61 HE-800A Standard sewing pattern list 3 3. Rear tack vector shape programs 48 5-7. Installing the needle 57 7-2. Table processing diagram 7 4-2. ...
Instruction Manual - English
Page 7
...thread trimmer assembly 101 16-15. Uneven seams (2) ...... Needle strikes upper thread trimmer ........102 16-17. Needle breakage 103 HE-800A Adjusting the inner rotary hook and rotary hook holder overlap 74 10-5. Adjusting the upper thread scissors opening timing 76 10-8. Poor ...rounding of seam 96 16-8. Thread sticking out at end backtack 97 16-10. Sticking in test feed mode or manual mode 68 9. Sewing 64 8-2. Cleaning the eye guard 70 9-5. TROUBLESHOOTING 92 16-1. Cleaning 69 9-2. STANDARD ADJUSTMENTS 72 10-1. Adjusting ...
...thread trimmer assembly 101 16-15. Uneven seams (2) ...... Needle strikes upper thread trimmer ........102 16-17. Needle breakage 103 HE-800A Adjusting the inner rotary hook and rotary hook holder overlap 74 10-5. Adjusting the upper thread scissors opening timing 76 10-8. Poor ...rounding of seam 96 16-8. Thread sticking out at end backtack 97 16-10. Sticking in test feed mode or manual mode 68 9. Sewing 64 8-2. Cleaning the eye guard 70 9-5. TROUBLESHOOTING 92 16-1. Cleaning 69 9-2. STANDARD ADJUSTMENTS 72 10-1. Adjusting ...

Instruction Manual - English
Page 31
... the eye guard (1) with the screw SM4.76-32x6 (7) and the flat washer (8). [Horizontal positioning] 3896Q 23 HE-800A INSTALLATION 4-15. Install the eye guard support (4) to the spool stand instruction manual, and then install the spool stand (1) at the left side of the work table. 3894Q 4-16...
... the eye guard (1) with the screw SM4.76-32x6 (7) and the flat washer (8). [Horizontal positioning] 3896Q 23 HE-800A INSTALLATION 4-15. Install the eye guard support (4) to the spool stand instruction manual, and then install the spool stand (1) at the left side of the work table. 3894Q 4-16...
Instruction Manual - English
Page 35
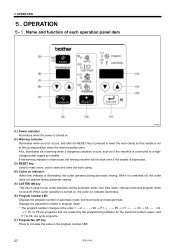
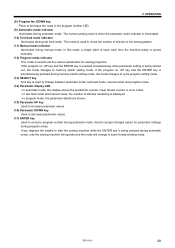
...pressed to lower the work clamp. (4) Cutter on indicator When this indicator is illuminated, the cutter operates during automatic mode, test feed mode, manual mode and program mode on and off , the cutter does not operate during automatic sewing. (5) CUTTER ON key This key is connected to ... pulley turns. are created by mistake. Displays the parameter number in program mode. * The program number changes in the program number LED. 27 HE-800A OPERATION 5. When it is depressed. (3) RESET key Used to reset errors, and to increase the value in the order 1 → 2 ...
...pressed to lower the work clamp. (4) Cutter on indicator When this indicator is illuminated, the cutter operates during automatic mode, test feed mode, manual mode and program mode on and off , the cutter does not operate during automatic sewing. (5) CUTTER ON key This key is connected to ... pulley turns. are created by mistake. Displays the parameter number in program mode. * The program number changes in the program number LED. 27 HE-800A OPERATION 5. When it is depressed. (3) RESET key Used to reset errors, and to increase the value in the order 1 → 2 ...
Instruction Manual - English
Page 36
... is illuminated. (10) Test feed mode indicator Illuminates during automatic mode. Used to memory switch setting mode. OPERATION (8) Program No. HE-800A 28 This mode is used to check the number of stitches in the program number LED. (9) Automatic mode indicator Illuminates during test feed mode...• In automatic mode, this display shows the production counter, lower thread counter or error codes. • In test feed mode and manual mode, the number of stitches remaining is being carried out, the mode changes to accept changed values for sewing programs. If the program no...
... is illuminated. (10) Test feed mode indicator Illuminates during automatic mode. Used to memory switch setting mode. OPERATION (8) Program No. HE-800A 28 This mode is used to check the number of stitches in the program number LED. (9) Automatic mode indicator Illuminates during test feed mode...• In automatic mode, this display shows the production counter, lower thread counter or error codes. • In test feed mode and manual mode, the number of stitches remaining is being carried out, the mode changes to accept changed values for sewing programs. If the program no...
Instruction Manual - English
Page 37
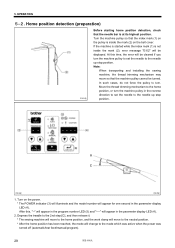
... to turn the machine pulley to set the needle to the mode which was active when the power was turned off (automatic/test feed/manual/program). 29 HE-800A Home position detection (preparation) 3903Q Before starting home position detection, check that the needle bar is not inside the mark (2) on the power...
... to turn the machine pulley to set the needle to the mode which was active when the power was turned off (automatic/test feed/manual/program). 29 HE-800A Home position detection (preparation) 3903Q Before starting home position detection, check that the needle bar is not inside the mark (2) on the power...
Instruction Manual - English
Page 40
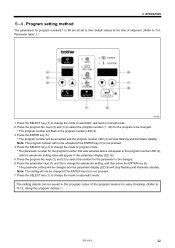
... 1. OPERATION 5-4. Press the SELECT key (1) to change the mode to program mode. * The parameter number for the parameter to automatic, test feed or manual mode. 2. Press the program No. Using the program memos".) HE...
... 1. OPERATION 5-4. Press the SELECT key (1) to change the mode to program mode. * The parameter number for the parameter to automatic, test feed or manual mode. 2. Press the program No. Using the program memos".) HE...
Instruction Manual - English
Page 41
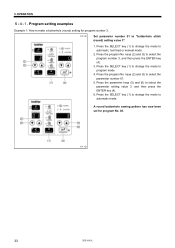
OPERATION Program setting examples Example 1: How to make a buttonhole (round) setting for program No. 03. 3911Q 33 HE-800A Press the parameter keys (5) and (6) to "buttonhole stitch (round) setting value 3". 1. keys (2) and (3) to select the parameter number 01. 5. A round ...(3) to select the program number 3, and then press the ENTER key (4). 3. Press the SELECT key (1) to change the mode to automatic, test feed or manual mode. 2. Press the SELECT key (1) to change the mode to program mode. 4. Press the SELECT key (1) to change the mode to automatic mode. 5....
OPERATION Program setting examples Example 1: How to make a buttonhole (round) setting for program No. 03. 3911Q 33 HE-800A Press the parameter keys (5) and (6) to "buttonhole stitch (round) setting value 3". 1. keys (2) and (3) to select the parameter number 01. 5. A round ...(3) to select the program number 3, and then press the ENTER key (4). 3. Press the SELECT key (1) to change the mode to automatic, test feed or manual mode. 2. Press the SELECT key (1) to change the mode to program mode. 4. Press the SELECT key (1) to change the mode to automatic mode. 5....
Instruction Manual - English
Page 42
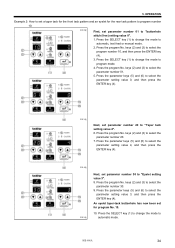
... select the parameter number 20. 7. keys (2) and (3) to select the parameter number 01. 5. Press the program No. keys (2) and (3) to automatic, test feed or manual mode. 2. HE-800A 34 Press the program No. Press the SELECT key (1) to change the mode to "buttonhole stitch (free) setting value 0". 1. Press the parameter keys (5) and...
... select the parameter number 20. 7. keys (2) and (3) to select the parameter number 01. 5. Press the program No. keys (2) and (3) to automatic, test feed or manual mode. 2. HE-800A 34 Press the program No. Press the SELECT key (1) to change the mode to "buttonhole stitch (free) setting value 0". 1. Press the parameter keys (5) and...
Instruction Manual - English
Page 43
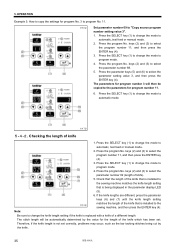
... parameter keys (5) and (6) to select the parameter number 69. 5. The stitch length will then be automatically determined by the knife. 35 HE-800A Press the SELECT key (1) to change the mode to program mode. 4. Press the SELECT key (1) to change the mode to automatic mode. 3917Q... Checking the length of a different length. Press the program No. Note: Be sure to change the mode to automatic, test feed or manual mode. 2. Therefore, if the knife length is replaced with a knife of knife 1. OPERATION Example 3: How to change the knife length setting if...
... parameter keys (5) and (6) to select the parameter number 69. 5. The stitch length will then be automatically determined by the knife. 35 HE-800A Press the SELECT key (1) to change the mode to program mode. 4. Press the SELECT key (1) to change the mode to automatic mode. 3917Q... Checking the length of a different length. Press the program No. Note: Be sure to change the mode to automatic, test feed or manual mode. 2. Therefore, if the knife length is replaced with a knife of knife 1. OPERATION Example 3: How to change the knife length setting if...
Instruction Manual - English
Page 63
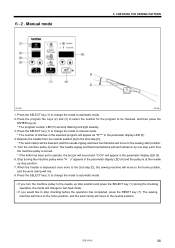
...you press the parameter DOWN key (8). * If the knife has been set to operate, the buzzer will sound and "C-On" will move to manual mode. The needle zigzag and feed mechanisms will each advance by one step while the treadle is being depressed. * The needle zigzag and feed ... (6). 7. Depress the treadle from the neutral position [A] to the 2nd step [C]. * The work clamp will change to the neutral position. 55 HE-800A The needle zigzag and feed mechanisms will stop flashing and light steadily. 3. Return the treadle to the neutral position [A], and then depress it once more...
...you press the parameter DOWN key (8). * If the knife has been set to operate, the buzzer will sound and "C-On" will move to manual mode. The needle zigzag and feed mechanisms will each advance by one step while the treadle is being depressed. * The needle zigzag and feed ... (6). 7. Depress the treadle from the neutral position [A] to the 2nd step [C]. * The work clamp will change to the neutral position. 55 HE-800A The needle zigzag and feed mechanisms will stop flashing and light steadily. 3. Return the treadle to the neutral position [A], and then depress it once more...
Instruction Manual - English
Page 64
...clamp will appear as "H***" in the parameter display LED (6) and the pulley is turned. * If the knife has been set to the neutral position. Manual mode 6. Press the SELECT key (1) to change the mode to stop position and press the SELECT key (1) during the checking operation, the mode will... stop flashing and light steadily. 3. The needle zigzag and feed mechanisms will appear in the selected program will move to automatic mode. 2. HE-800A 56 Press the program No. Press the SELECT key (1) to change the mode to the home position, and the work clamp will change the...
...clamp will appear as "H***" in the parameter display LED (6) and the pulley is turned. * If the knife has been set to the neutral position. Manual mode 6. Press the SELECT key (1) to change the mode to stop position and press the SELECT key (1) during the checking operation, the mode will... stop flashing and light steadily. 3. The needle zigzag and feed mechanisms will appear in the selected program will move to automatic mode. 2. HE-800A 56 Press the program No. Press the SELECT key (1) to change the mode to the home position, and the work clamp will change the...
Instruction Manual - English
Page 76
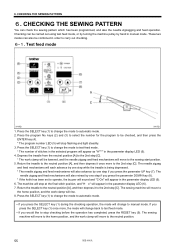
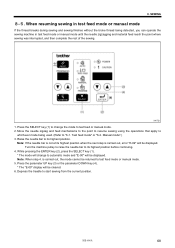
Turn the machine pulley to raise the needle bar to its highest position. HE-800A 68 Raise the needle bar to its highest position when the next step is carried out, error "E-02" will change the mode to "6-1. While pressing ... If the thread breaks during sewing and sewing finishes without the broke thread being used. (Refer to test feed or manual mode. 2. When resuming sewing in test feed mode or manual mode until the needle zigzagging and material feed reach the point where sewing was interrupted, and then complete the rest of...
Turn the machine pulley to raise the needle bar to its highest position. HE-800A 68 Raise the needle bar to its highest position when the next step is carried out, error "E-02" will change the mode to "6-1. While pressing ... If the thread breaks during sewing and sewing finishes without the broke thread being used. (Refer to test feed or manual mode. 2. When resuming sewing in test feed mode or manual mode until the needle zigzagging and material feed reach the point where sewing was interrupted, and then complete the rest of...
Instruction Manual - English
Page 107
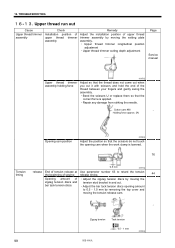
... amount to 0.5 - 1.0 mm by moving the setting plate assembly. Upper thread trimmer longitudinal position adjustment Upper thread trimmer cutting depth adjustment Page Service manual Upper thread trimmer assembly holding force 4005Q Adjust so that the thread does not come out when you cut it with scissors and hold the... thread trimmer assembly by removing the top cover and moving the tension release cam. - Cotton yarn #60 - Zigzag tension Tack tension 0.5 - 1 mm 4008Q 99 HE-800A 16.
... amount to 0.5 - 1.0 mm by moving the setting plate assembly. Upper thread trimmer longitudinal position adjustment Upper thread trimmer cutting depth adjustment Page Service manual Upper thread trimmer assembly holding force 4005Q Adjust so that the thread does not come out when you cut it with scissors and hold the... thread trimmer assembly by removing the top cover and moving the tension release cam. - Cotton yarn #60 - Zigzag tension Tack tension 0.5 - 1 mm 4008Q 99 HE-800A 16.
Instruction Manual - English
Page 109
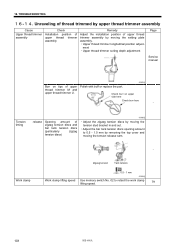
... out. Adjust the bar tack tension discs opening amount to retard the work clamp lifting speed. 79 101 HE-800A ment Upper thread trimmer cutting depth adjustment Page Service manual 4005Q Burr on upper side here Check burr here - Polish with buff or replace the part. Tension timing release Opening...
... out. Adjust the bar tack tension discs opening amount to retard the work clamp lifting speed. 79 101 HE-800A ment Upper thread trimmer cutting depth adjustment Page Service manual 4005Q Burr on upper side here Check burr here - Polish with buff or replace the part. Tension timing release Opening...
Instruction Manual - English
Page 110
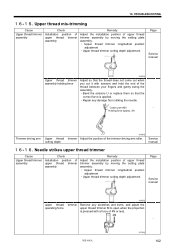
...the setting plate assembly. Upper thread trimmer longitudinal position adjustment Upper thread trimmer cutting depth adjustment Page Service manual upper thread operating force 4005Q trimmer Remove any scratches and burrs, and adjust the upper thread trimmer M to open when the...force approx. 2N Trimmer driving arm Upper thread cutting depth 4006Q trimmer Adjust the position of 4N or less. - HE-800A 4010Q 102 TROUBLESHOOTING Upper thread mis-trimming Cause Upper thread trimmer assembly Check Installation position of upper thread trimmer assembly Remedy Adjust ...
...the setting plate assembly. Upper thread trimmer longitudinal position adjustment Upper thread trimmer cutting depth adjustment Page Service manual upper thread operating force 4005Q trimmer Remove any scratches and burrs, and adjust the upper thread trimmer M to open when the...force approx. 2N Trimmer driving arm Upper thread cutting depth 4006Q trimmer Adjust the position of 4N or less. - HE-800A 4010Q 102 TROUBLESHOOTING Upper thread mis-trimming Cause Upper thread trimmer assembly Check Installation position of upper thread trimmer assembly Remedy Adjust ...
Instruction Manual - English
Page 118
INSTRUCTION MANUAL □ http://www.brother.com/ HE-800A SA2978-001 2003.12.B(2)
INSTRUCTION MANUAL □ http://www.brother.com/ HE-800A SA2978-001 2003.12.B(2)
Instruction Manual - Spanish
Page 122
MANUAL DE INSTRUCCIONES □ http://www.brother.com/ HE-800A SA9162-001 2007.11.B(1)
MANUAL DE INSTRUCCIONES □ http://www.brother.com/ HE-800A SA9162-001 2007.11.B(1)


