
Accessory Catalog
Page 13
... stitch slowly. 3. A specially designed bobbin cover is also included with evenly spaced tucks and gathers. Draw a reference line to get started. SA143 AFJKM Ruffler Foot Makes ruffles with this presser foot. 1. The intervals of tucks can be adjusted. 1. Move fabric about 1" (2.5 cm) past the needle to guide your first row of stitch length, tuck setting and depth setting. 2. Sew slowly for details.) Brother Embellishment Feet Pin Tuck Foot 24 Ruffler Foot Pin Tuck Foot This presser foot has...
... stitch slowly. 3. A specially designed bobbin cover is also included with evenly spaced tucks and gathers. Draw a reference line to get started. SA143 AFJKM Ruffler Foot Makes ruffles with this presser foot. 1. The intervals of tucks can be adjusted. 1. Move fabric about 1" (2.5 cm) past the needle to guide your first row of stitch length, tuck setting and depth setting. 2. Sew slowly for details.) Brother Embellishment Feet Pin Tuck Foot 24 Ruffler Foot Pin Tuck Foot This presser foot has...

Accessory Catalog
Page 15
... sew, press the needle position button twice to pull the bobbin thread to straight stitch. 3. Quilting Foot For darning, quilting, or free-motion. The foot raises and lowers with the pin over the needle clamp screw. 2. Attach the walking foot to the machine. 2. When quilting is needed. 1. Requires Low Shank Adapter for ULT series, PC-6500, PC-8200 and PC-8500 sewing machines. Requires Low Shank Adapter for ULT series, PC-6500, PC-8200 and PC-8500 sewing machines. Set the fabric under the presser foot. 6. Guide...
... sew, press the needle position button twice to pull the bobbin thread to straight stitch. 3. Quilting Foot For darning, quilting, or free-motion. The foot raises and lowers with the pin over the needle clamp screw. 2. Attach the walking foot to the machine. 2. When quilting is needed. 1. Requires Low Shank Adapter for ULT series, PC-6500, PC-8200 and PC-8500 sewing machines. Requires Low Shank Adapter for ULT series, PC-6500, PC-8200 and PC-8500 sewing machines. Set the fabric under the presser foot. 6. Guide...

Accessory Catalog
Page 17
... three new free-motion presser feet: Free-motion quilting foot "C" for more features to your Innov-is 4000D machines that come with these features: - Reduce letter spacing in adjusting the spacing between individual characters. - Add appliqué capability to your QuattroTM 6000D. Customizable USB Mouse* Pointer Functions. - Drag and drop embroidery pattern positioning. - The 4000D Premium Upgrade Package is compatible only with center needle position straight stitch Open toe quilting foot "O" for greater visibility Echo quilting foot "E" for...
... three new free-motion presser feet: Free-motion quilting foot "C" for more features to your Innov-is 4000D machines that come with these features: - Reduce letter spacing in adjusting the spacing between individual characters. - Add appliqué capability to your QuattroTM 6000D. Customizable USB Mouse* Pointer Functions. - Drag and drop embroidery pattern positioning. - The 4000D Premium Upgrade Package is compatible only with center needle position straight stitch Open toe quilting foot "O" for greater visibility Echo quilting foot "E" for...

Accessory Catalog
Page 33
... color sequence for thread delivery or bobbin storage. SA539 DuettaTM4500D,Innov-is 4000D/2500D/1500D SA560 QuattroTM 6000D Embroidery Machine Hoops Select hoops appropriate for details, www.brother.com. Some hoops can set up to 10 spools of spool sizes. For all models: SA503 Free-Standing Ten Spool Thread Stand You can be removed to accommodate a variety of thread on creating. Place your machine. Spend less time changing threads, and more on...
... color sequence for thread delivery or bobbin storage. SA539 DuettaTM4500D,Innov-is 4000D/2500D/1500D SA560 QuattroTM 6000D Embroidery Machine Hoops Select hoops appropriate for details, www.brother.com. Some hoops can set up to 10 spools of spool sizes. For all models: SA503 Free-Standing Ten Spool Thread Stand You can be removed to accommodate a variety of thread on creating. Place your machine. Spend less time changing threads, and more on...

Accessory Catalog
Page 34
... of needle and stabilizer types. This metallic thread can be used on the wall for greater utility and space saving. Made to provide a good foundation as well as decorative sewing. Brother Embroidery Accessories PacesetterTM Polyester Threads 65 Brother Country Yarn Embroidery Threads Metallic Threads For the best embroidery results, use these embroidery threads especially designed for Brother sewing and embroidering machines. 61 Color Thread Set with Wooden Rack ETKSP999 PacesetterTM Polyester Threads (61 Color Thread Set with straight, zig zag...
... of needle and stabilizer types. This metallic thread can be used on the wall for greater utility and space saving. Made to provide a good foundation as well as decorative sewing. Brother Embroidery Accessories PacesetterTM Polyester Threads 65 Brother Country Yarn Embroidery Threads Metallic Threads For the best embroidery results, use these embroidery threads especially designed for Brother sewing and embroidering machines. 61 Color Thread Set with Wooden Rack ETKSP999 PacesetterTM Polyester Threads (61 Color Thread Set with straight, zig zag...

Accessory Catalog
Page 40
... www.brother.com Insert the tab on the bias tape attachment into the guide. 4. Set up your machine for a chain stitch, the center needle. 2. Attaching 6 mm (approx. 1/4") bias tape: Use the small bias tape sliding plate with 3 or 6 mm (approx. 1/8 or 1/4 inch) wide cover stitch. 1. Set up your Cover Stitch). 1. The stitches are always smooth. 1. Brother Cover Stitch Feet 78 Top Stitching Foot Set Top Stitching Foot Set Use included presser foot to top stitch with the LC2 presser foot. Open the seams. 4. Align the fabric...
... www.brother.com Insert the tab on the bias tape attachment into the guide. 4. Set up your machine for a chain stitch, the center needle. 2. Attaching 6 mm (approx. 1/4") bias tape: Use the small bias tape sliding plate with 3 or 6 mm (approx. 1/8 or 1/4 inch) wide cover stitch. 1. Set up your Cover Stitch). 1. The stitches are always smooth. 1. Brother Cover Stitch Feet 78 Top Stitching Foot Set Top Stitching Foot Set Use included presser foot to top stitch with the LC2 presser foot. Open the seams. 4. Align the fabric...
Users Manual - English
Page 4
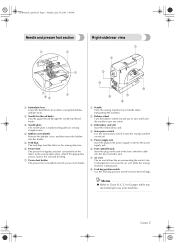
... toward you are learning to sew one stitch. b Needle bar thread hooks Pass the upper thread through the needle bar thread hooks. Memo z Refer to Cover B, C, D or E pages while you to raise and lower the needle to use your machine. c Needle plate The needle plate is marked with guides for the selected stitching. Attach the appropriate presser foot for sewing straight seams. d Bobbin cover/Shuttle Remove the bobbin cover, and then insert the bobbin into the foot controller jack. c Embroidery card slot Insert the embroidery card. e Power supply jack Insert the plug on the end...
... toward you are learning to sew one stitch. b Needle bar thread hooks Pass the upper thread through the needle bar thread hooks. Memo z Refer to Cover B, C, D or E pages while you to raise and lower the needle to use your machine. c Needle plate The needle plate is marked with guides for the selected stitching. Attach the appropriate presser foot for sewing straight seams. d Bobbin cover/Shuttle Remove the bobbin cover, and then insert the bobbin into the foot controller jack. c Embroidery card slot Insert the embroidery card. e Power supply jack Insert the plug on the end...

Users Manual - English
Page 10
......14 Changing the Machine Settings ...15 Checking machine operating procedures ...17 Winding/Installing the Bobbin 18 Bobbin precautions ...18 Winding the bobbin ...18 Installing the bobbin ...21 Upper Threading ...23 About the spool of thread ...23 Loading the spool into the thread cassette ...24 Threading the needle ...27 Using the extra spool pin ...29 Thread the needle manually (without using the needle threader 30 Using the twin needle ...31 Pulling up the bobbin thread...33 Replacing the Needle ...35 Needle precautions ...35 Needle types and their uses...36 Checking the needle ...37...
......14 Changing the Machine Settings ...15 Checking machine operating procedures ...17 Winding/Installing the Bobbin 18 Bobbin precautions ...18 Winding the bobbin ...18 Installing the bobbin ...21 Upper Threading ...23 About the spool of thread ...23 Loading the spool into the thread cassette ...24 Threading the needle ...27 Using the extra spool pin ...29 Thread the needle manually (without using the needle threader 30 Using the twin needle ...31 Pulling up the bobbin thread...33 Replacing the Needle ...35 Needle precautions ...35 Needle types and their uses...36 Checking the needle ...37...

Users Manual - English
Page 16
... off the power switch and unplug the cord when: • Operation is completed • Replacing or removing the needle or any assemblies, the presser feet, needle, or other parts to clean the case. Do not use extension cords. For repair or adjustment In the event a malfunction occurs or adjustment is one of the operation manual to inspect and adjust the machine yourself. If the problem persists, please consult your eye on the foot controller. 4. Be sure...
... off the power switch and unplug the cord when: • Operation is completed • Replacing or removing the needle or any assemblies, the presser feet, needle, or other parts to clean the case. Do not use extension cords. For repair or adjustment In the event a malfunction occurs or adjustment is one of the operation manual to inspect and adjust the machine yourself. If the problem persists, please consult your eye on the foot controller. 4. Be sure...

Users Manual - English
Page 23
... screen. X The initial stitch screen appears again. SE-BrotherE_sgml.book Page 17 Monday, June 30, 2003 3:44 PM Checking machine operating procedures Press (Next page key) to switch to be displayed. LCD (liquid crystal display) operation 17 Displays simple explanations of setting upper thread / bobbin winding / setting bobbin thread / needle † Example: Upper threading 1 replacement / embroidery unit attachment / embroidery frame attachment / embroidery foot attachment / presser foot replacement on the sewing machine. X The sewing machine help key) on the b display...
... screen. X The initial stitch screen appears again. SE-BrotherE_sgml.book Page 17 Monday, June 30, 2003 3:44 PM Checking machine operating procedures Press (Next page key) to switch to be displayed. LCD (liquid crystal display) operation 17 Displays simple explanations of setting upper thread / bobbin winding / setting bobbin thread / needle † Example: Upper threading 1 replacement / embroidery unit attachment / embroidery frame attachment / embroidery foot attachment / presser foot replacement on the sewing machine. X The sewing machine help key) on the b display...

Users Manual - English
Page 27
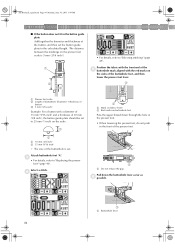
... designed specifically for this is turned after winding the bobbin, the machine will make a clicking sound; q Swing down the bobbin thread spool pin, close r the bobbin winder cover, and then slide the sewing speed controller back to the left. appears on the LCD. a 1 2 Remove the spool cap and spool. a Bobbin cover b Latch X The bobbin cover opens. Use scissors to cut the end of the same type (part code: SA156, SFB:XA5539151). 11.5 mm (7/16 inch) Actual size This model Older model...
... designed specifically for this is turned after winding the bobbin, the machine will make a clicking sound; q Swing down the bobbin thread spool pin, close r the bobbin winder cover, and then slide the sewing speed controller back to the left. appears on the LCD. a 1 2 Remove the spool cap and spool. a Bobbin cover b Latch X The bobbin cover opens. Use scissors to cut the end of the same type (part code: SA156, SFB:XA5539151). 11.5 mm (7/16 inch) Actual size This model Older model...

Users Manual - English
Page 62
....book Page 56 Monday, June 30, 2003 3:44 PM SEWING BASICS Adjusting the Stitch Width and Length The stitch width and length can easily be changed with the sewing speed controller. Adjusting the stitch width The zigzag width can be adjusted. 56 X The stitch width is changed , the highlighted value is changed . X The LCD comes on the sewing machine. b ■ For groups other than utility stitches When selecting stitches in the decorative stitch, satin stitch, cross-stitch...
....book Page 56 Monday, June 30, 2003 3:44 PM SEWING BASICS Adjusting the Stitch Width and Length The stitch width and length can easily be changed with the sewing speed controller. Adjusting the stitch width The zigzag width can be adjusted. 56 X The stitch width is changed , the highlighted value is changed . X The LCD comes on the sewing machine. b ■ For groups other than utility stitches When selecting stitches in the decorative stitch, satin stitch, cross-stitch...
Users Manual - English
Page 90
Attach buttonhole foot "A". c • For details, refer to "Selecting stitching" (page 47). Pull down through the hole in the presser foot. • When lowering the presser foot, do not push in the button guide plate Add together the diameter and thickness of the button, and then set . SE-BrotherE_sgml.book Page 84 Monday, June 30, 2003 3:44 PM UTILITY STITCHES ■ If the button does not fit in the...
Attach buttonhole foot "A". c • For details, refer to "Selecting stitching" (page 47). Pull down through the hole in the presser foot. • When lowering the presser foot, do not push in the button guide plate Add together the diameter and thickness of the button, and then set . SE-BrotherE_sgml.book Page 84 Monday, June 30, 2003 3:44 PM UTILITY STITCHES ■ If the button does not fit in the...
Users Manual - English
Page 93
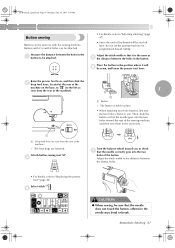
..., and lower the presser foot lever. d CAUTION ● When sewing, be attached. SE-BrotherE_sgml.book Page 87 Monday, June 30, 2003 3:44 PM Button sewing Buttons can be sure that the needle does not touch the button, otherwise the needle may bend or break. Adjust the stitch width to the distance between the holes in the same way. 1 a Drop feed lever (as e the distance between the holes in the position where it...
..., and lower the presser foot lever. d CAUTION ● When sewing, be attached. SE-BrotherE_sgml.book Page 87 Monday, June 30, 2003 3:44 PM Button sewing Buttons can be sure that the needle does not touch the button, otherwise the needle may bend or break. Adjust the stitch width to the distance between the holes in the same way. 1 a Drop feed lever (as e the distance between the holes in the position where it...
Users Manual - English
Page 122
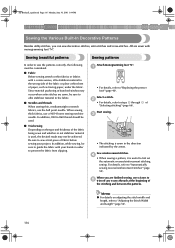
... monogramming foot "N". Sewing beautiful patterns Sewing patterns In order to sew the patterns correctly, the following must be achieved. Since material puckering or bunched stitches may not be considered. ■ Fabric Before sewing stretch or thin fabrics or fabrics with monogramming foot "N". Start sewing. c • The stitching is used . ■ Trial sewing Depending on adjusting the stitch width and length, refer to the fabric. ■ Needles and threads When sewing thin, mediumweight or stretch fabrics, use a 90/14 home sewing machine needle. SE-BrotherE_sgml.book...
... monogramming foot "N". Sewing beautiful patterns Sewing patterns In order to sew the patterns correctly, the following must be achieved. Since material puckering or bunched stitches may not be considered. ■ Fabric Before sewing stretch or thin fabrics or fabrics with monogramming foot "N". Start sewing. c • The stitching is used . ■ Trial sewing Depending on adjusting the stitch width and length, refer to the fabric. ■ Needles and threads When sewing thin, mediumweight or stretch fabrics, use a 90/14 home sewing machine needle. SE-BrotherE_sgml.book...

Users Manual - English
Page 170
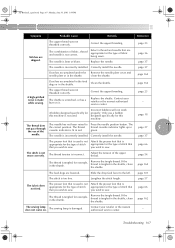
... incorrectly installed. Correctly install the needle. Replace the needle. The spool is incorrectly installed. A bobbin designed specifically for this machine is connected. Reference page 13 page 49 page 48 page 49 page 37 page 36 page 66 page 54 - The start /stop button when the foot controller is not used is not Attach the presser foot that is used . The presser foot lever is loose. The needle clamp screw is raised. The upper thread tension is pulled too much. The fabric...
... incorrectly installed. Correctly install the needle. Replace the needle. The spool is incorrectly installed. A bobbin designed specifically for this machine is connected. Reference page 13 page 49 page 48 page 49 page 37 page 36 page 66 page 54 - The start /stop button when the foot controller is not used is not Attach the presser foot that is used . The presser foot lever is loose. The needle clamp screw is raised. The upper thread tension is pulled too much. The fabric...
Users Manual - English
Page 173
... sew. page 54 The thread is lit in the shuttle. Slide the drop feed lever to the correct position. Remove the tangle thread. The sewing lamp is too fine. Replace the needle. Replace the shuttle. The thread cassette indicator lights up in the shuttle. Correctly install the needle. Adjust the tension of stitch that that is tangled in the shuttle. page 162 The feed dogs are skipped. page 57 The fabric does not feed. you wish to sew. Troubleshooting...
... sew. page 54 The thread is lit in the shuttle. Slide the drop feed lever to the correct position. Remove the tangle thread. The sewing lamp is too fine. Replace the needle. Replace the shuttle. The thread cassette indicator lights up in the shuttle. Correctly install the needle. Adjust the tension of stitch that that is tangled in the shuttle. page 162 The feed dogs are skipped. page 57 The fabric does not feed. you wish to sew. Troubleshooting...

Users Manual - English
Page 180
... basic stitching 78 basting stitch 78 beep 172 blind hem stitch 80 bobbin Cover A bobbin installation 21 bobbin shuttle Cover C bobbin storage compartment Cover B bobbin thread spool pin 18 bobbin thread, pulling up 33 bobbin threading 22 bobbin winder Cover B bobbin winding 18 bobbin winding thread guide 20 button guide plate 84 button sewing 87 buttonhole lever Cover C buttonhole sewing 83 buttonhole stitching 82 buzzer 172 C changing sewing direction 62 character storage 155 characters, recalling 156 checking needle 37 cleaning brush Cover A cleaning machine surface...
... basic stitching 78 basting stitch 78 beep 172 blind hem stitch 80 bobbin Cover A bobbin installation 21 bobbin shuttle Cover C bobbin storage compartment Cover B bobbin thread spool pin 18 bobbin thread, pulling up 33 bobbin threading 22 bobbin winder Cover B bobbin winding 18 bobbin winding thread guide 20 button guide plate 84 button sewing 87 buttonhole lever Cover C buttonhole sewing 83 buttonhole stitching 82 buzzer 172 C changing sewing direction 62 character storage 155 characters, recalling 156 checking needle 37 cleaning brush Cover A cleaning machine surface...

Users Manual - English
Page 181
...arm sewing 43 free-motion quilting 101 front view Cover B G needle bar thread hooks Cover C needle condition 37 needle plate Cover C needle plate marking 64 needle position button Cover D needle position, changing 79 needle replacement 37 needle set Cover A needle threader 27 , needle threading 23 27 needle types, sizes & uses 36 , needle-changing tool Cover A 38 needles 35 next page key Cover E general sewing procedures 46 grid sheet set Cover A guide foot 1 H handle Cover C heirloom stitching 113 , help key Cover E 17 I inserting thread cassette 28 installing bobbin...
...arm sewing 43 free-motion quilting 101 front view Cover B G needle bar thread hooks Cover C needle condition 37 needle plate Cover C needle plate marking 64 needle position button Cover D needle position, changing 79 needle replacement 37 needle set Cover A needle threader 27 , needle threading 23 27 needle types, sizes & uses 36 , needle-changing tool Cover A 38 needles 35 next page key Cover E general sewing procedures 46 grid sheet set Cover A guide foot 1 H handle Cover C heirloom stitching 113 , help key Cover E 17 I inserting thread cassette 28 installing bobbin...
Users Manual - English
Page 182
... Cover E settings, changing 15 sewing basics 46 sewing direction change 62 , sewing speed controller Cover D 49 , shell tuck stitch 108 111 shuttle 22 shuttle cleaning 162 shuttle removal 163 side cutter 76 sleeve cuffs 43 , sliding leg Cover B 43 smocking 110 smocking stitch 108 soft cover Cover A solving operation problems 164 spool cap Cover A, 19, 21 spool loading 24 , spool net Cover A 20 spool of thread 23 spool pin Cover A, 25, 29, 31 stabilizer material 138 , start/stop button Cover D 49 stippling 96 stitch group selection screen 14 stitch length adjustment...
... Cover E settings, changing 15 sewing basics 46 sewing direction change 62 , sewing speed controller Cover D 49 , shell tuck stitch 108 111 shuttle 22 shuttle cleaning 162 shuttle removal 163 side cutter 76 sleeve cuffs 43 , sliding leg Cover B 43 smocking 110 smocking stitch 108 soft cover Cover A solving operation problems 164 spool cap Cover A, 19, 21 spool loading 24 , spool net Cover A 20 spool of thread 23 spool pin Cover A, 25, 29, 31 stabilizer material 138 , start/stop button Cover D 49 stippling 96 stitch group selection screen 14 stitch length adjustment...


