
Users Manual - English
Page 6
... 1 Supplies ...2 Basic supplies ...2 Optional supplies...2 Important parts 3 Machine ...3 Operation keys ...3 LCD display ...4 Design frame ...4 Thread cartridge...4 Useful vocabulary 5 Chapter 2 Overview and Patterns 7 Overview 7 Types of patterns 8 Reading the pattern list 8 Chapter 3 Making an Embroidered Appliqu 9 Making an embroidered appliqué from a one-point pattern 9 Step 1 Getting ready 9 Step 2 Starting up the machine 11 Step...
... 1 Supplies ...2 Basic supplies ...2 Optional supplies...2 Important parts 3 Machine ...3 Operation keys ...3 LCD display ...4 Design frame ...4 Thread cartridge...4 Useful vocabulary 5 Chapter 2 Overview and Patterns 7 Overview 7 Types of patterns 8 Reading the pattern list 8 Chapter 3 Making an Embroidered Appliqu 9 Making an embroidered appliqué from a one-point pattern 9 Step 1 Getting ready 9 Step 2 Starting up the machine 11 Step...
Users Manual - English
Page 9
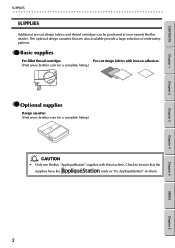
...-filled thread cartridges Pre-cut design fabrics and thread cartridges can be sure that are also available provide a large selection of embroidery patterns. CONTENTS Chapter 1 Chapter 2 SUPPLIES G G G G G G G G G G G G G G G G G G G G G G G G G G G G G G G G G G G G G G G G G G G G G G G G G G G G G G G G G SUPPLIES Additional pre-cut design fabrics with this machine. The optional design cassettes that the supplies have the mark or "for a complete listing.) CAUTION • Only use Brother "Appliqu...
...-filled thread cartridges Pre-cut design fabrics and thread cartridges can be sure that are also available provide a large selection of embroidery patterns. CONTENTS Chapter 1 Chapter 2 SUPPLIES G G G G G G G G G G G G G G G G G G G G G G G G G G G G G G G G G G G G G G G G G G G G G G G G G G G G G G G G G SUPPLIES Additional pre-cut design fabrics with this machine. The optional design cassettes that the supplies have the mark or "for a complete listing.) CAUTION • Only use Brother "Appliqu...
Users Manual - English
Page 14
.... 4 Use the operation keys to select the pattern. 5 Insert the thread cartridge and design frame following is finished, remove the thread cartridge. 8 Remove the design frame from the mounting bracket, and then take the appliqué out of patterns that can be embroidered. Follow the instructions in any... of the frame. 9 Use the iron-on -screen instructions. 6 Embroider the appliqué, changing the thread cartridge for each color. 7 After the embroidery is a general description of how to secure the threads in the appliqué fabric. 0 Cut off any shape you want. Place the pre-cut...
.... 4 Use the operation keys to select the pattern. 5 Insert the thread cartridge and design frame following is finished, remove the thread cartridge. 8 Remove the design frame from the mounting bracket, and then take the appliqué out of patterns that can be embroidered. Follow the instructions in any... of the frame. 9 Use the iron-on -screen instructions. 6 Embroider the appliqué, changing the thread cartridge for each color. 7 After the embroidery is a general description of how to secure the threads in the appliqué fabric. 0 Cut off any shape you want. Place the pre-cut...
Users Manual - English
Page 20
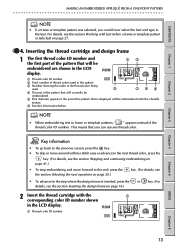
... Chapter 3 MAKING AN EMBROIDERED APPLIQUÉ FROM A ONE-POINT PATTERN G G G G G G G G G G G G G G G G G G G G G G G G G G G G G G G G G G G G G G G G G G G G G G G G G G G G G G G G G NOTE • If a frame or template pattern was selected, you can use any thread color. Inserting the thread cartridge and design frame 1 The first thread color ID number and the ... type in the pattern 3 Number showing the order of the thread color ID number. This means that is selected) on page 16.) 2 Insert the thread cartridge with the 1 corresponding color ID number shown in frame or ...
... Chapter 3 MAKING AN EMBROIDERED APPLIQUÉ FROM A ONE-POINT PATTERN G G G G G G G G G G G G G G G G G G G G G G G G G G G G G G G G G G G G G G G G G G G G G G G G G G G G G G G G G NOTE • If a frame or template pattern was selected, you can use any thread color. Inserting the thread cartridge and design frame 1 The first thread color ID number and the ... type in the pattern 3 Number showing the order of the thread color ID number. This means that is selected) on page 16.) 2 Insert the thread cartridge with the 1 corresponding color ID number shown in frame or ...
Users Manual - English
Page 21
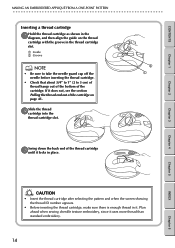
... standard embroidery. 14 Plan ahead when sewing chenille texture embroidery, since it . CONTENTS Chapter 1 MAKING AN EMBROIDERED APPLIQUÉ FROM A ONE-POINT PATTERN G G G G G G G G G G G G G G G G G G G G G G G G G G G G G G G G G G G G G G G G G G G G G G G G G G G G G G G G G Inserting a thread cartridge 1Hold the thread cartridge as shown in the diagram, and then align the guide on page 45. 2Slide the thread cartridge into the thread cartridge slot. 2 1 3Swing down the back end of the...
... standard embroidery. 14 Plan ahead when sewing chenille texture embroidery, since it . CONTENTS Chapter 1 MAKING AN EMBROIDERED APPLIQUÉ FROM A ONE-POINT PATTERN G G G G G G G G G G G G G G G G G G G G G G G G G G G G G G G G G G G G G G G G G G G G G G G G G G G G G G G G G Inserting a thread cartridge 1Hold the thread cartridge as shown in the diagram, and then align the guide on page 45. 2Slide the thread cartridge into the thread cartridge slot. 2 1 3Swing down the back end of the...
Users Manual - English
Page 22
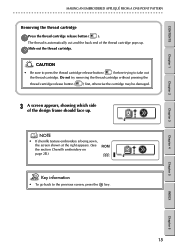
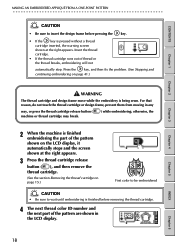
... information • To go back to take out the thread cartridge. CAUTION • Be sure to press the thread cartridge release button ( ) before trying to the previous screen, press the key. 15 Chapter 4 Chapter 5 INDEX Chapter 6 CONTENTS Chapter 1 Chapter 2 Chapter 3 MAKING AN EMBROIDERED APPLIQUÉ FROM A ONE-POINT PATTERN G G G G G G G G G G G G G G G G G G G G G G G G G G G G G G G G G G G G G G G G G G G G G G G G G G G G G G G G G Removing the thread cartridge 1Press the thread cartridge release button ( ).
... information • To go back to take out the thread cartridge. CAUTION • Be sure to press the thread cartridge release button ( ) before trying to the previous screen, press the key. 15 Chapter 4 Chapter 5 INDEX Chapter 6 CONTENTS Chapter 1 Chapter 2 Chapter 3 MAKING AN EMBROIDERED APPLIQUÉ FROM A ONE-POINT PATTERN G G G G G G G G G G G G G G G G G G G G G G G G G G G G G G G G G G G G G G G G G G G G G G G G G G G G G G G G G Removing the thread cartridge 1Press the thread cartridge release button ( ).
Users Manual - English
Page 23
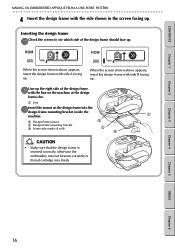
...4 CAUTION • Make sure that the design frame is inserted correctly, otherwise the embroidery may not be sewn correctly or thread cartridge may break. Chapter 3 Chapter 4 Chapter 5 INDEX Chapter 6 16 When the screen shown above appears, insert the design ... . Inserting the design frame 1Check the screen to see which side of the design frame with side A facing up. CONTENTS Chapter 1 Chapter 2 MAKING AN EMBROIDERED APPLIQUÉ FROM A ONE-POINT PATTERN G G G G G G G G G G G G G G G G G G G G G G G G G G G G G G G G G G G G G G G G G G G G G G G G G G G...
...4 CAUTION • Make sure that the design frame is inserted correctly, otherwise the embroidery may not be sewn correctly or thread cartridge may break. Chapter 3 Chapter 4 Chapter 5 INDEX Chapter 6 16 When the screen shown above appears, insert the design ... . Inserting the design frame 1Check the screen to see which side of the design frame with side A facing up. CONTENTS Chapter 1 Chapter 2 MAKING AN EMBROIDERED APPLIQUÉ FROM A ONE-POINT PATTERN G G G G G G G G G G G G G G G G G G G G G G G G G G G G G G G G G G G G G G G G G G G G G G G G G G G...
Users Manual - English
Page 24
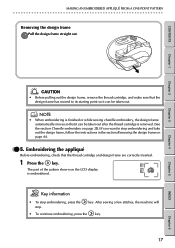
... chenille embroidery, the design frame automatically moves so that the thread cartridge and design frame are correctly inserted. 1 Press the key. key. After sewing a few stitches, the machine will • To continue embroidering, press the key. 17 INDEX Chapter 6 MAKING AN EMBROIDERED APPLIQUÉ FROM A ONE-POINT PATTERN G G G G G G G G G G G G G G G G G G G G G G G G G G G G G G G G G G G G G G G G G G G G G G G G G G G G G G G G G Removing the design frame 1Pull...
... chenille embroidery, the design frame automatically moves so that the thread cartridge and design frame are correctly inserted. 1 Press the key. key. After sewing a few stitches, the machine will • To continue embroidering, press the key. 17 INDEX Chapter 6 MAKING AN EMBROIDERED APPLIQUÉ FROM A ONE-POINT PATTERN G G G G G G G G G G G G G G G G G G G G G G G G G G G G G G G G G G G G G G G G G G G G G G G G G G G G G G G G G Removing the design frame 1Pull...
Users Manual - English
Page 25
..., prevent them from moving in the LCD display. Chapter 4 Chapter 5 INDEX Chapter 6 18 Insert the thread cartridge. • If the thread cartridge runs out of thread or the thread breaks, embroidering will not automatically stop. CONTENTS Chapter 1 Chapter 2 Chapter 3 MAKING AN EMBROIDERED APPLIQUÉ FROM A ONE-POINT PATTERN G G G G G G G G G G G G G G G G G G G G G G G G G G G G G G G G G G G G G G G G G G G G G G G G G G G G G G G G G CAUTION • Be sure to insert the design frame...
..., prevent them from moving in the LCD display. Chapter 4 Chapter 5 INDEX Chapter 6 18 Insert the thread cartridge. • If the thread cartridge runs out of thread or the thread breaks, embroidering will not automatically stop. CONTENTS Chapter 1 Chapter 2 Chapter 3 MAKING AN EMBROIDERED APPLIQUÉ FROM A ONE-POINT PATTERN G G G G G G G G G G G G G G G G G G G G G G G G G G G G G G G G G G G G G G G G G G G G G G G G G G G G G G G G G CAUTION • Be sure to insert the design frame...

Users Manual - English
Page 26
After the thread cartridge is removed, the design frame automatically moves to its starting point so that the design frame is inserted with the side ... frame, and then insert it can be taken out. 2. CONTENTS Chapter 1 Chapter 2 Chapter 3 MAKING AN EMBROIDERED APPLIQUÉ FROM A ONE-POINT PATTERN G G G G G G G G G G G G G G G G G G G G G G G G G G G G G G G G G G G G G G G G G G G G G G G G G G G G G G G G G 5 Insert the next thread cartridge. If the pattern uses many thread colors, repeat steps 2 through 6 until all parts of the design frame should face up . (See the section ...
After the thread cartridge is removed, the design frame automatically moves to its starting point so that the design frame is inserted with the side ... frame, and then insert it can be taken out. 2. CONTENTS Chapter 1 Chapter 2 Chapter 3 MAKING AN EMBROIDERED APPLIQUÉ FROM A ONE-POINT PATTERN G G G G G G G G G G G G G G G G G G G G G G G G G G G G G G G G G G G G G G G G G G G G G G G G G G G G G G G G G 5 Insert the next thread cartridge. If the pattern uses many thread colors, repeat steps 2 through 6 until all parts of the design frame should face up . (See the section ...
Users Manual - English
Page 27
... Inserting the thread cartridge and design frame appears. CONTENTS MAKING AN EMBROIDERED APPLIQUÉ FROM A ONE-POINT PATTERN G G G G G G G G G G G G G G G G G G G G G G G G G G G G G G G G G G G G G G G G G G G G G G G G G G G G G G G G G 7 When the machine is finished embroidering, it can be damaged. (See the section Removing the thread cartridge on page ..., the screen shown at the right appears. 8 Remove the thread cartridge. Repeat the steps to follow the correct procedure for removing the thread cartridge before removing the design frame, otherwise the stitching may be removed...
... Inserting the thread cartridge and design frame appears. CONTENTS MAKING AN EMBROIDERED APPLIQUÉ FROM A ONE-POINT PATTERN G G G G G G G G G G G G G G G G G G G G G G G G G G G G G G G G G G G G G G G G G G G G G G G G G G G G G G G G G 7 When the machine is finished embroidering, it can be damaged. (See the section Removing the thread cartridge on page ..., the screen shown at the right appears. 8 Remove the thread cartridge. Repeat the steps to follow the correct procedure for removing the thread cartridge before removing the design frame, otherwise the stitching may be removed...
Users Manual - English
Page 33
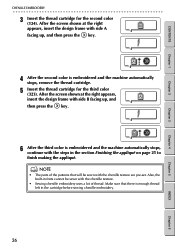
... Chapter 6 Make sure that will be sewn with side A facing up , and then press the key. 6 After the third color is enough thread left in the section Finishing the appliqué on page 21 to finish making the appliqué. CONTENTS Chapter 1 Chapter 2 Chapter 3 CHENILLE EMBROIDERY G G G G G G G G G G G G G G G G G G G G G G G G G G G G G G G G G G G G G G G G G G G G G G G G G G G G G G G G G 3 Insert the thread cartridge for the third color (323).
... Chapter 6 Make sure that will be sewn with side A facing up , and then press the key. 6 After the third color is enough thread left in the section Finishing the appliqué on page 21 to finish making the appliqué. CONTENTS Chapter 1 Chapter 2 Chapter 3 CHENILLE EMBROIDERY G G G G G G G G G G G G G G G G G G G G G G G G G G G G G G G G G G G G G G G G G G G G G G G G G G G G G G G G G 3 Insert the thread cartridge for the third color (323).


