
Users Manual - English
Page 5
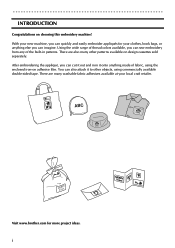
Visit www.brother.com for your clothes, book bags, or anything made of the built-in patterns. Using the wide range of thread colors available, you can sew ... on choosing this embroidery machine! There are many other objects, using the enclosed iron-on adhesive film. With your local craft retailer. After embroidering the appliqué, you can also attach it onto anything else you can imagine. There are also many washable fabric adhesives available at your new machine, you...
Visit www.brother.com for your clothes, book bags, or anything made of the built-in patterns. Using the wide range of thread colors available, you can sew ... on choosing this embroidery machine! There are many other objects, using the enclosed iron-on adhesive film. With your local craft retailer. After embroidering the appliqué, you can also attach it onto anything else you can imagine. There are also many washable fabric adhesives available at your new machine, you...
Users Manual - English
Page 6
... Useful vocabulary 5 Chapter 2 Overview and Patterns 7 Overview 7 Types of patterns 8 Reading the pattern list 8 Chapter 3 Making an Embroidered Appliqu 9 Making an embroidered appliqué from a one-point pattern 9 Step 1 Getting ready 9 Step 2 Starting up the machine 11 Step 3 Selecting the pattern 11... Step 4 Inserting the thread cartridge and design frame 13 Step 5 Embroidering the appliqu 17 Step 6 Selecting the next operation 20 Step 7 Finishing the appliqu 21 Step 8 Attaching the appliqu 23 Chenille embroidery 25 ii Chapter 5 INDEX Chapter 6
... Useful vocabulary 5 Chapter 2 Overview and Patterns 7 Overview 7 Types of patterns 8 Reading the pattern list 8 Chapter 3 Making an Embroidered Appliqu 9 Making an embroidered appliqué from a one-point pattern 9 Step 1 Getting ready 9 Step 2 Starting up the machine 11 Step 3 Selecting the pattern 11... Step 4 Inserting the thread cartridge and design frame 13 Step 5 Embroidering the appliqu 17 Step 6 Selecting the next operation 20 Step 7 Finishing the appliqu 21 Step 8 Attaching the appliqu 23 Chenille embroidery 25 ii Chapter 5 INDEX Chapter 6
Users Manual - English
Page 9
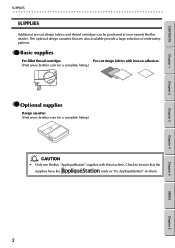
... 6 2 The optional design cassettes that the supplies have the mark or "for AppliquéStation" on adhesives (Visit www.brother.com for a complete listing.) GG Optional supplies Design cassettes (Visit www.brother.com for a complete listing.) CAUTION • Only use Brother "AppliquéStation" supplies with this machine. GG Basic supplies Pre-filled thread cartridges...
... 6 2 The optional design cassettes that the supplies have the mark or "for AppliquéStation" on adhesives (Visit www.brother.com for a complete listing.) GG Optional supplies Design cassettes (Visit www.brother.com for a complete listing.) CAUTION • Only use Brother "AppliquéStation" supplies with this machine. GG Basic supplies Pre-filled thread cartridges...
Users Manual - English
Page 14
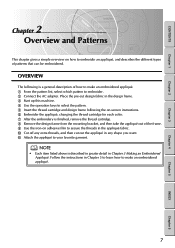
... 6 CONTENTS Chapter 1 Chapter 2 Chapter 3 2 Chapter 2Overview and Patterns This chapter gives a simple overview on adhesive film to secure the threads in the appliqué fabric. 0 Cut off any extra threads, and then cut design fabric in the design frame. 3 Start up this machine. 4 Use the operation... is a general description of patterns that can be embroidered. OVERVIEW The following the on-screen instructions. 6 Embroider the appliqué, changing the thread cartridge for each color. 7 After the embroidery is described in greater detail in Chapter 3 Making an Embroidered...
... 6 CONTENTS Chapter 1 Chapter 2 Chapter 3 2 Chapter 2Overview and Patterns This chapter gives a simple overview on adhesive film to secure the threads in the appliqué fabric. 0 Cut off any extra threads, and then cut design fabric in the design frame. 3 Start up this machine. 4 Use the operation... is a general description of patterns that can be embroidered. OVERVIEW The following the on-screen instructions. 6 Embroider the appliqué, changing the thread cartridge for each color. 7 After the embroidery is described in greater detail in Chapter 3 Making an Embroidered...
Users Manual - English
Page 16
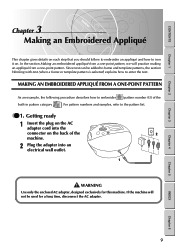
... iron it on the back of the built-in pattern category . Since text can be used for this machine. MAKING AN EMBROIDERED APPLIQUÉ FROM A ONE-POINT PATTERN As an example, the following procedure describes how to the pattern list. For pattern numbers and...9 CONTENTS Chapter 1 Chapter 2 Chapter 3 3 Chapter 3Making an Embroidered Appliqué This chapter gives details on each step that you should follow to embroider an appliqué and how to enter the text. In the section Making an embroidered appliqué from a one-point pattern. GG 1. Getting ready 1 Insert...
... iron it on the back of the built-in pattern category . Since text can be used for this machine. MAKING AN EMBROIDERED APPLIQUÉ FROM A ONE-POINT PATTERN As an example, the following procedure describes how to the pattern list. For pattern numbers and...9 CONTENTS Chapter 1 Chapter 2 Chapter 3 3 Chapter 3Making an Embroidered Appliqué This chapter gives details on each step that you should follow to embroider an appliqué and how to enter the text. In the section Making an embroidered appliqué from a one-point pattern. GG 1. Getting ready 1 Insert...
Users Manual - English
Page 17
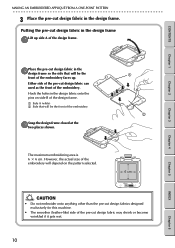
...) 2 Side that will be the front of the embroidery 3Snap the design frame closed at the two places shown. CONTENTS Chapter 1 Chapter 2 MAKING AN EMBROIDERED APPLIQUÉ FROM A ONE-POINT PATTERN G G G G G G G G G G G G G G G G G G G G G G G G G G G G G G G G G G G G G G G G G G G G G G G G G G G G G G G G G 3 Place the pre-cut design fabric in the design frame so the side that will be the front of the...
...) 2 Side that will be the front of the embroidery 3Snap the design frame closed at the two places shown. CONTENTS Chapter 1 Chapter 2 MAKING AN EMBROIDERED APPLIQUÉ FROM A ONE-POINT PATTERN G G G G G G G G G G G G G G G G G G G G G G G G G G G G G G G G G G G G G G G G G G G G G G G G G G G G G G G G G 3 Place the pre-cut design fabric in the design frame so the side that will be the front of the...
Users Manual - English
Page 18
CONTENTS Chapter 1 Chapter 2 MAKING AN EMBROIDERED APPLIQUÉ FROM A ONE-POINT PATTERN G G G G G G G G G G G G G G G G G G G G G G G G G G G G G G G G G G G G G G G G G G G G G G G G G G G G G G G G G GG 2. NOTE • The design frame holder will make an obvious noise while moving. GG 3. The screen shown at the ...
CONTENTS Chapter 1 Chapter 2 MAKING AN EMBROIDERED APPLIQUÉ FROM A ONE-POINT PATTERN G G G G G G G G G G G G G G G G G G G G G G G G G G G G G G G G G G G G G G G G G G G G G G G G G G G G G G G G G GG 2. NOTE • The design frame holder will make an obvious noise while moving. GG 3. The screen shown at the ...
Users Manual - English
Page 19
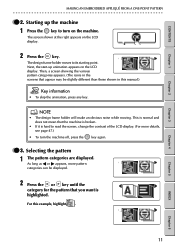
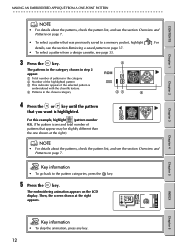
... the category 2 Number of patterns that appear may be slightly different than the one shown at the right appears. CONTENTS Chapter 1 Chapter 2 MAKING AN EMBROIDERED APPLIQUÉ FROM A ONE-POINT PATTERN G G G G G G G G G G G G G G G G G G G G G G G G G G G G G G G G G G G G G G G G G G G G G G G G G G G G G G G G G NOTE • For details about the patterns, check the pattern list, and see the section Overview and Patterns on page...
... the category 2 Number of patterns that appear may be slightly different than the one shown at the right appears. CONTENTS Chapter 1 Chapter 2 MAKING AN EMBROIDERED APPLIQUÉ FROM A ONE-POINT PATTERN G G G G G G G G G G G G G G G G G G G G G G G G G G G G G G G G G G G G G G G G G G G G G G G G G G G G G G G G G NOTE • For details about the patterns, check the pattern list, and see the section Overview and Patterns on page...
Users Manual - English
Page 20
... the the section Selecting the next operation on page 27. NOTE • When embroidering text in the text. CONTENTS Chapter 1 Chapter 2 Chapter 3 MAKING AN EMBROIDERED APPLIQUÉ FROM A ONE-POINT PATTERN G G G G G G G G G G G G G G G G G G G G G G G G G G G G G G G G G G G G G G G G G G G G G G G G G G G G G G G G G NOTE • If a frame or template pattern was selected, you can use any thread color...
... the the section Selecting the next operation on page 27. NOTE • When embroidering text in the text. CONTENTS Chapter 1 Chapter 2 Chapter 3 MAKING AN EMBROIDERED APPLIQUÉ FROM A ONE-POINT PATTERN G G G G G G G G G G G G G G G G G G G G G G G G G G G G G G G G G G G G G G G G G G G G G G G G G G G G G G G G G NOTE • If a frame or template pattern was selected, you can use any thread color...
Users Manual - English
Page 21
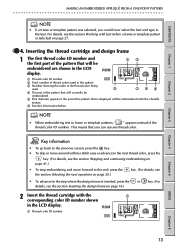
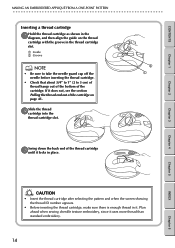
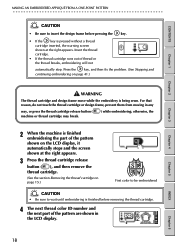
...; Before inserting the thread cartridge, make sure there is enough thread in it uses more thread than standard embroidery. 14 CONTENTS Chapter 1 MAKING AN EMBROIDERED APPLIQUÉ FROM A ONE-POINT PATTERN G G G G G G G G G G G G G G G G G G G G G G G G G G G G G G G G G G G G G G G G G G G G G G G G G G G G G G G G G Inserting a thread cartridge 1Hold the thread cartridge as shown in the diagram, and then align the guide on page 45...
...; Before inserting the thread cartridge, make sure there is enough thread in it uses more thread than standard embroidery. 14 CONTENTS Chapter 1 MAKING AN EMBROIDERED APPLIQUÉ FROM A ONE-POINT PATTERN G G G G G G G G G G G G G G G G G G G G G G G G G G G G G G G G G G G G G G G G G G G G G G G G G G G G G G G G G Inserting a thread cartridge 1Hold the thread cartridge as shown in the diagram, and then align the guide on page 45...
Users Manual - English
Page 22
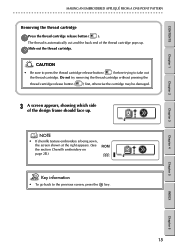
... section Chenille embroidery on page 25.) Key information • To go back to take out the thread cartridge. CONTENTS Chapter 1 Chapter 2 Chapter 3 MAKING AN EMBROIDERED APPLIQUÉ FROM A ONE-POINT PATTERN G G G G G G G G G G G G G G G G G G G G G G G G G G G G G G G G G G G G G G G G G G G G G G G G G G G G G G G G G Removing the thread cartridge 1Press the thread cartridge release button ( ). Do not try removing the thread cartridge without pressing the...
... section Chenille embroidery on page 25.) Key information • To go back to take out the thread cartridge. CONTENTS Chapter 1 Chapter 2 Chapter 3 MAKING AN EMBROIDERED APPLIQUÉ FROM A ONE-POINT PATTERN G G G G G G G G G G G G G G G G G G G G G G G G G G G G G G G G G G G G G G G G G G G G G G G G G G G G G G G G G Removing the thread cartridge 1Press the thread cartridge release button ( ). Do not try removing the thread cartridge without pressing the...
Users Manual - English
Page 23
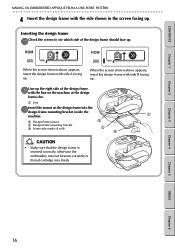
... . Inserting the design frame 1Check the screen to see which side of the design frame with side A facing up. CONTENTS Chapter 1 Chapter 2 MAKING AN EMBROIDERED APPLIQUÉ FROM A ONE-POINT PATTERN G G G G G G G G G G G G G G G G G G G G G G G G G G G G G G G G G G G G G G G G G G G G G G G G G G G G G G G G G 4 Insert the design frame with the side shown in the screen facing up...
... . Inserting the design frame 1Check the screen to see which side of the design frame with side A facing up. CONTENTS Chapter 1 Chapter 2 MAKING AN EMBROIDERED APPLIQUÉ FROM A ONE-POINT PATTERN G G G G G G G G G G G G G G G G G G G G G G G G G G G G G G G G G G G G G G G G G G G G G G G G G G G G G G G G G 4 Insert the design frame with the side shown in the screen facing up...
Users Manual - English
Page 24
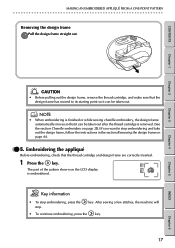
GG 5. Embroidering the appliqué Before embroidering, check that the design frame has moved to stop . Key information • To stop ... the thread cartridge is embroidered. After sewing a few stitches, the machine will • To continue embroidering, press the key. 17 INDEX Chapter 6 MAKING AN EMBROIDERED APPLIQUÉ FROM A ONE-POINT PATTERN G G G G G G G G G G G G G G G G G G G G G G G G G G G G G G G G G G G G G G G G G G G G G G G G G G G G G G G G G Removing the design frame 1Pull the design frame straight out. key. CONTENTS Chapter 1 Chapter 2 Chapter 3...
GG 5. Embroidering the appliqué Before embroidering, check that the design frame has moved to stop . Key information • To stop ... the thread cartridge is embroidered. After sewing a few stitches, the machine will • To continue embroidering, press the key. 17 INDEX Chapter 6 MAKING AN EMBROIDERED APPLIQUÉ FROM A ONE-POINT PATTERN G G G G G G G G G G G G G G G G G G G G G G G G G G G G G G G G G G G G G G G G G G G G G G G G G G G G G G G G G Removing the design frame 1Pull the design frame straight out. key. CONTENTS Chapter 1 Chapter 2 Chapter 3...
Users Manual - English
Page 25
... color ID number and the next part of thread or the thread breaks, embroidering will not automatically stop. CONTENTS Chapter 1 Chapter 2 Chapter 3 MAKING AN EMBROIDERED APPLIQUÉ FROM A ONE-POINT PATTERN G G G G G G G G G G G G G G G G G G G G G G G G G G G G G G G G G G G G G G G G G G G G G G G G G G G G G G G G G CAUTION • Be sure to wait until embroidering is finished before pressing the key. • If the key is being...
... color ID number and the next part of thread or the thread breaks, embroidering will not automatically stop. CONTENTS Chapter 1 Chapter 2 Chapter 3 MAKING AN EMBROIDERED APPLIQUÉ FROM A ONE-POINT PATTERN G G G G G G G G G G G G G G G G G G G G G G G G G G G G G G G G G G G G G G G G G G G G G G G G G G G G G G G G G CAUTION • Be sure to wait until embroidering is finished before pressing the key. • If the key is being...

Users Manual - English
Page 26
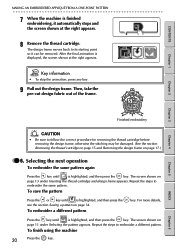
CONTENTS Chapter 1 Chapter 2 Chapter 3 MAKING AN EMBROIDERED APPLIQUÉ FROM A ONE-POINT PATTERN G G G G G G G G G G G G G G G G G G G G G G G G G G G G G G G G G G G G G G G G G G G G G G G G G G G G G G G G G 5 Insert the next thread cartridge. If the pattern uses many thread colors, repeat steps 2 through 6 until all parts of the ...
CONTENTS Chapter 1 Chapter 2 Chapter 3 MAKING AN EMBROIDERED APPLIQUÉ FROM A ONE-POINT PATTERN G G G G G G G G G G G G G G G G G G G G G G G G G G G G G G G G G G G G G G G G G G G G G G G G G G G G G G G G G 5 Insert the next thread cartridge. If the pattern uses many thread colors, repeat steps 2 through 6 until all parts of the ...
Users Manual - English
Page 27
... the key until is highlighted, and then press the key. Then, take the pre-cut design fabric out of the frame. CONTENTS MAKING AN EMBROIDERED APPLIQUÉ FROM A ONE-POINT PATTERN G G G G G G G G G G G G G G G G G G G G G G G G G G G G G G G G G G G G G G G G G G G G G G G G G G G G G G G G G 7 When the machine is finished embroidering, it can be damaged. (See the section Removing the thread cartridge on page 15...
... the key until is highlighted, and then press the key. Then, take the pre-cut design fabric out of the frame. CONTENTS MAKING AN EMBROIDERED APPLIQUÉ FROM A ONE-POINT PATTERN G G G G G G G G G G G G G G G G G G G G G G G G G G G G G G G G G G G G G G G G G G G G G G G G G G G G G G G G G 7 When the machine is finished embroidering, it can be damaged. (See the section Removing the thread cartridge on page 15...
Users Manual - English
Page 28
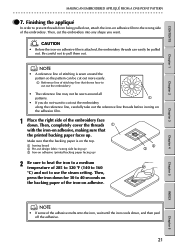
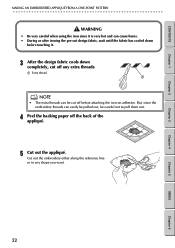
Finishing the appliqué In order to cut the embroidery into any shape you want. NOTE • A reference line of stitching is sewn around the pattern ... patterns. 1 • If you do not want to prevent threads from being pulled out, attach the iron-on adhesive. CONTENTS Chapter 1 Chapter 2 MAKING AN EMBROIDERED APPLIQUÉ FROM A ONE-POINT PATTERN G G G G G G G G G G G G G G G G G G G G G G G G G G G G G G G G G G G G G G G G G G G G G G G G G G G G G G G G G GG 7. Then, completely cover the threads 1 with the iron-on adhesive, making sure that the backing paper is ...
Finishing the appliqué In order to cut the embroidery into any shape you want. NOTE • A reference line of stitching is sewn around the pattern ... patterns. 1 • If you do not want to prevent threads from being pulled out, attach the iron-on adhesive. CONTENTS Chapter 1 Chapter 2 MAKING AN EMBROIDERED APPLIQUÉ FROM A ONE-POINT PATTERN G G G G G G G G G G G G G G G G G G G G G G G G G G G G G G G G G G G G G G G G G G G G G G G G G G G G G G G G G GG 7. Then, completely cover the threads 1 with the iron-on adhesive, making sure that the backing paper is ...
Users Manual - English
Page 29
... extra threads can be careful not to pull them out. 4 Peel the backing paper off the back of the appliqué. 5 Cut out the appliqué. CONTENTS Chapter 1 Chapter 2 Chapter 3 MAKING AN EMBROIDERED APPLIQUÉ FROM A ONE-POINT PATTERN G G G G G G G G G G G G G G G G G G G G G G G G G G G G G G G G G G G G G G G G G G G G G G G G G G G G G G G G G WARNING • Be very careful when using the iron since the embroidery threads can...
... extra threads can be careful not to pull them out. 4 Peel the backing paper off the back of the appliqué. 5 Cut out the appliqué. CONTENTS Chapter 1 Chapter 2 Chapter 3 MAKING AN EMBROIDERED APPLIQUÉ FROM A ONE-POINT PATTERN G G G G G G G G G G G G G G G G G G G G G G G G G G G G G G G G G G G G G G G G G G G G G G G G G G G G G G G G G WARNING • Be very careful when using the iron since the embroidery threads can...
Users Manual - English
Page 30
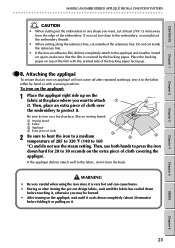
...facing up on again, make sure that an iron-on the extra piece of cloth covering the appliqué. WARNING • Be very careful when using the iron since it or pulling on a hard... surface, like an ironing board. 1 Ironing board 2 Fabric 3 Appliqué 4 Extra piece of cloth 2 Be sure to heat the iron to a medium 3 4 2 temperature of 285..., iron it . Place the backing paper on top of the film with a sewing machine. Attaching the appliqué To ensure that the film is very hot and can cause burns. • During or after ...
...facing up on again, make sure that an iron-on the extra piece of cloth covering the appliqué. WARNING • Be very careful when using the iron since it or pulling on a hard... surface, like an ironing board. 1 Ironing board 2 Fabric 3 Appliqué 4 Extra piece of cloth 2 Be sure to heat the iron to a medium 3 4 2 temperature of 285..., iron it . Place the backing paper on top of the film with a sewing machine. Attaching the appliqué To ensure that the film is very hot and can cause burns. • During or after ...
Users Manual - English
Page 31
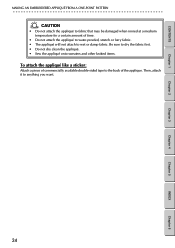
...be damaged when ironed at a medium temperature for a certain amount of time. • Do not attach the appliqué to water-proofed, stretch or furry fabric. • The appliqué will not attach to the back of commercially available double-sided tape to wet or damp fabric. Be... sure to dry the fabric first. • Do not dry clean the appliqué. • Sew the appliqué onto sweaters and other knitted items. To attach the appliqué like a sticker: Attach a piece of the applique. Then, attach it to anything you want. 24 Chapter 4 Chapter 5 INDEX Chapter ...
...be damaged when ironed at a medium temperature for a certain amount of time. • Do not attach the appliqué to water-proofed, stretch or furry fabric. • The appliqué will not attach to the back of commercially available double-sided tape to wet or damp fabric. Be... sure to dry the fabric first. • Do not dry clean the appliqué. • Sew the appliqué onto sweaters and other knitted items. To attach the appliqué like a sticker: Attach a piece of the applique. Then, attach it to anything you want. 24 Chapter 4 Chapter 5 INDEX Chapter ...


