Operation Manual
Page 3
... described in this plug is not working properly, if it to install the proper outlet. Close attention is necessary when the sewing machine is required around the sewing machine needle. ●● Always use bent needles. ●● Do not pull or push fabric while stitching. The wrong... watts for 120V model or rated 240V 15 watts for examination, repair, electrical or mechanical adjustment. ●● Never operate the sewing machine with this sewing machine if it has a damaged cord or plug, if it is intended to be left unattended while plugged in this manual. ●&#...
... described in this plug is not working properly, if it to install the proper outlet. Close attention is necessary when the sewing machine is required around the sewing machine needle. ●● Always use bent needles. ●● Do not pull or push fabric while stitching. The wrong... watts for 120V model or rated 240V 15 watts for examination, repair, electrical or mechanical adjustment. ●● Never operate the sewing machine with this sewing machine if it has a damaged cord or plug, if it is intended to be left unattended while plugged in this manual. ●&#...

Operation Manual
Page 4
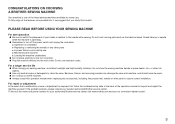
SAVE THESE INSTRUCTIONS This sewing machine is not suitable for household use a fuse approved by a person responsible for their safety. carrying the mark, rating as marked on plug. ●● Always ...
SAVE THESE INSTRUCTIONS This sewing machine is not suitable for household use a fuse approved by a person responsible for their safety. carrying the mark, rating as marked on plug. ●● Always ...
Operation Manual
Page 5
... outlet. PLEASE READ BEFORE USING YOUR SEWING MACHINE For safe operation ●● Be sure to watch the placement of the operation manual to clean the case. For a longer service life ●● When storing your nearest authorized Brother service center. Benzene, thinner, and ... In the event that you study this booklet. CONGRATULATIONS ON CHOOSING A BROTHER SEWING MACHINE Your machine is one of the finest sewing machines available for your hands in the back of your authorized Brother service center visit www.brother.com and use . Do not touch moving parts such as the balance...
... outlet. PLEASE READ BEFORE USING YOUR SEWING MACHINE For safe operation ●● Be sure to watch the placement of the operation manual to clean the case. For a longer service life ●● When storing your nearest authorized Brother service center. Benzene, thinner, and ... In the event that you study this booklet. CONGRATULATIONS ON CHOOSING A BROTHER SEWING MACHINE Your machine is one of the finest sewing machines available for your hands in the back of your authorized Brother service center visit www.brother.com and use . Do not touch moving parts such as the balance...

Operation Manual
Page 6
...Feet 17 Changing Presser Feet (Zipper Foot 17 Presser Feet 17 Basic Sewing (1 18 Basic Sewing 18 Pin Feeding (for hard-to-handle fabrics 18 Pin Feeding Mechanism 18 Basic Sewing (2 19 Rolled Hem Foot 19 Basic Sewing (3 20 Zipper Foot 20 Invisible Zipper Foot 21 1/4" Foot 21 ...Quilting Foot 22 Walking Foot 22 Fabric Separator (for joining lining to fabric) ..........23 Seam Guide 23 Caring for Your Machine 24 Cleaning the Machine 24 Lubrication Points...
...Feet 17 Changing Presser Feet (Zipper Foot 17 Presser Feet 17 Basic Sewing (1 18 Basic Sewing 18 Pin Feeding (for hard-to-handle fabrics 18 Pin Feeding Mechanism 18 Basic Sewing (2 19 Rolled Hem Foot 19 Basic Sewing (3 20 Zipper Foot 20 Invisible Zipper Foot 21 1/4" Foot 21 ...Quilting Foot 22 Walking Foot 22 Fabric Separator (for joining lining to fabric) ..........23 Seam Guide 23 Caring for Your Machine 24 Cleaning the Machine 24 Lubrication Points...
Operation Manual
Page 7
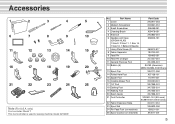
... 14 15 16 17 18 19 20 21 22 23 24 25 Note (For U.S.A. No. only) Foot controller: Model T This foot controller is used for sewing machine model DZ1500F. Part Name Part Code 1 Cover XA0917-054 2 Medium Screwdriver XC9541-051 3 Small Screwdriver X55468-051 4 Cleaning Brush X59476-051 5 Knee Lift XA0830-051 6 Needles... Controller XD0501-151 (EU area) XC8816-051 (Other areas) 22 Fabric Extension Table XC3117-051 23 Spool Net XA5523-050 24 Pin Feed Foot (on machine) 136021-001 25 Spool Cushion (on...
... 14 15 16 17 18 19 20 21 22 23 24 25 Note (For U.S.A. No. only) Foot controller: Model T This foot controller is used for sewing machine model DZ1500F. Part Name Part Code 1 Cover XA0917-054 2 Medium Screwdriver XC9541-051 3 Small Screwdriver X55468-051 4 Cleaning Brush X59476-051 5 Knee Lift XA0830-051 6 Needles... Controller XD0501-151 (EU area) XC8816-051 (Other areas) 22 Fabric Extension Table XC3117-051 23 Spool Net XA5523-050 24 Pin Feed Foot (on machine) 136021-001 25 Spool Cushion (on...

Operation Manual
Page 8
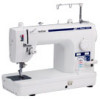
Machine Features Presser Foot Pressure Three Holed Adjustment Dial (Page 8) Thread Guide (Page 14) Thread Take-up Lever (Page 14) Light Switch (Page 9) Thread Trimmer Sewing Area Light (Page 10) Automatic Needle Threader (Page 15) Quick Bobbin Thread Device (Page 13) Thread Cutter Button (Page 9) Thread Tension Dial (Page 7 and 16) ...
Machine Features Presser Foot Pressure Three Holed Adjustment Dial (Page 8) Thread Guide (Page 14) Thread Take-up Lever (Page 14) Light Switch (Page 9) Thread Trimmer Sewing Area Light (Page 10) Automatic Needle Threader (Page 15) Quick Bobbin Thread Device (Page 13) Thread Cutter Button (Page 9) Thread Tension Dial (Page 7 and 16) ...

Operation Manual
Page 9
...23 Hand Wheel Stitch Length Reference Mark 1 Lower number = shorter stitches Higher number = longer stitches 45 Reverse Stitch Lever ●● Sewing in reverse is possible when the reverse stitch lever is desired, turn tension dial to keep the area under and around the needle clear...Stitch Length Regulator ●● Adjust desired stitch length using hand wheel. ✽✽ Always turn hand wheel towards you press harder, the machine's speed will then meet on right side of fabric. Power Switch ●● Flip power switch to "I O Thread Tension Dial ●●...
...23 Hand Wheel Stitch Length Reference Mark 1 Lower number = shorter stitches Higher number = longer stitches 45 Reverse Stitch Lever ●● Sewing in reverse is possible when the reverse stitch lever is desired, turn tension dial to keep the area under and around the needle clear...Stitch Length Regulator ●● Adjust desired stitch length using hand wheel. ✽✽ Always turn hand wheel towards you press harder, the machine's speed will then meet on right side of fabric. Power Switch ●● Flip power switch to "I O Thread Tension Dial ●●...

Operation Manual
Page 10
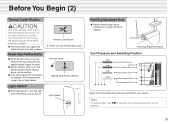
... ●● Using the convenient knee lift to position the fabric. Presser Foot Lift Lever ●● Lowering the presser foot lift lever lowers the sewing foot down onto the fabric and engages the thread tension function. ✽✽ When working with heavy fabrics or other fabrics that don't slide easily... Pressure Adjustment Dial ●● Turning the pressure adjustment dial raises and lowers the pressure indicator needle as the amount of pressure on to the machine. 2 Hole Guide pin 2 1 Table legs 3 3 Stopper Hook
... ●● Using the convenient knee lift to position the fabric. Presser Foot Lift Lever ●● Lowering the presser foot lift lever lowers the sewing foot down onto the fabric and engages the thread tension function. ✽✽ When working with heavy fabrics or other fabrics that don't slide easily... Pressure Adjustment Dial ●● Turning the pressure adjustment dial raises and lowers the pressure indicator needle as the amount of pressure on to the machine. 2 Hole Guide pin 2 1 Table legs 3 3 Stopper Hook
Operation Manual
Page 11
...Fabrics Middleweight Fabrics Heavyweight Fabrics Select one of seams. Needle Stop Position Button ●● When indicator lamp is lit up, the machine will stop sewing with the needle lowered through the fabric. ●● When indicator lamp is off . Before You Begin (2) Thread Cutter Button CAUTION... When the machine stops due to jammed threads and so forth, do not step on the foot controller, turn the light over the sewing area on and off , the needle position when sewing stops, will be adjusted to coincide with the presser...
...Fabrics Middleweight Fabrics Heavyweight Fabrics Select one of seams. Needle Stop Position Button ●● When indicator lamp is lit up, the machine will stop sewing with the needle lowered through the fabric. ●● When indicator lamp is off . Before You Begin (2) Thread Cutter Button CAUTION... When the machine stops due to jammed threads and so forth, do not step on the foot controller, turn the light over the sewing area on and off , the needle position when sewing stops, will be adjusted to coincide with the presser...
Operation Manual
Page 12
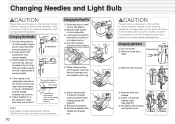
... insert the needle as far as it is advisable to wait until feed pin is loose, this operation. Raise needle to highest position using the machine, therefore it will be used under normal circumstances. 10 Changing the Feed Pin 1 Set the feed dogs to "velvet" position. (See page ...turn hand wheel until the light bulb has had a chance to cool down before carrying out the following operations. Changing the Needle 1 Turn the sewing machine off power. 2 Remove screw from head. The glass plate over the light bulb will go. Changing Light Bulbs 1 Turn off . CAUTION Please...
... insert the needle as far as it is advisable to wait until feed pin is loose, this operation. Raise needle to highest position using the machine, therefore it will be used under normal circumstances. 10 Changing the Feed Pin 1 Set the feed dogs to "velvet" position. (See page ...turn hand wheel until the light bulb has had a chance to cool down before carrying out the following operations. Changing the Needle 1 Turn the sewing machine off power. 2 Remove screw from head. The glass plate over the light bulb will go. Changing Light Bulbs 1 Turn off . CAUTION Please...
Operation Manual
Page 15
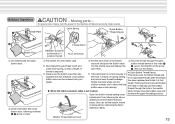
... ✽✽ If the latch lever is set the bobbin thread in place plate. To reduce risk of injury, turn the power to the machine off during sewing to manually pull the bobbin bobbin case is set securely. A secondary bobbin case can set securely on This device cuts the bobbin thread end..., so that Rotate the hand wheel one full length. Moving parts - has been replaced and holds it winds to check that was supplied with this machine. Bobbin Insertion CAUTION -
... ✽✽ If the latch lever is set the bobbin thread in place plate. To reduce risk of injury, turn the power to the machine off during sewing to manually pull the bobbin bobbin case is set securely. A secondary bobbin case can set securely on This device cuts the bobbin thread end..., so that Rotate the hand wheel one full length. Moving parts - has been replaced and holds it winds to check that was supplied with this machine. Bobbin Insertion CAUTION -

Operation Manual
Page 17
... #16. Be sure that has caught the thread will move as well, pulling a loop of thread through the eye of the needle. 6 Before sewing, pull the thread loop to the right. Transparent nylon thread can be used is in the highest position, and lower presser foot. 2 Take thread in... threader lower than the eye of the needle. Using the Automatic Needle Threader Automatic Needle Threader 1 Rotate hand wheel towards the back of the machine following the opening in the presser foot. Thread 2 Pin 1 Hook ✽✽ Pull the thread to the spool size before using transparent nylon...
... #16. Be sure that has caught the thread will move as well, pulling a loop of thread through the eye of the needle. 6 Before sewing, pull the thread loop to the right. Transparent nylon thread can be used is in the highest position, and lower presser foot. 2 Take thread in... threader lower than the eye of the needle. Using the Automatic Needle Threader Automatic Needle Threader 1 Rotate hand wheel towards the back of the machine following the opening in the presser foot. Thread 2 Pin 1 Hook ✽✽ Pull the thread to the spool size before using transparent nylon...
Operation Manual
Page 18
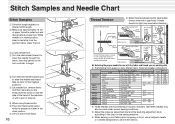
.... ✽✽ Adjust the pressure adjustment dial and the feed dog adjustment knob according to the chart on the sewing machine. ✽✽ When sewing on the foot controller to begin. 5 Turn the hand wheel towards you are recommended; Bobbin tension . . . Thread - Adjust bobbin thread to match that of upper...up lever to reduce bobbin tension Bobbin tension . . . Stitch Samples 1 Set stitch length regulator to desired stitch length. 2 Make sure approximately 15 cm of the machine or with ✽✽ The following chart applies to match the bobbin thread.
.... ✽✽ Adjust the pressure adjustment dial and the feed dog adjustment knob according to the chart on the sewing machine. ✽✽ When sewing on the foot controller to begin. 5 Turn the hand wheel towards you are recommended; Bobbin tension . . . Thread - Adjust bobbin thread to match that of upper...up lever to reduce bobbin tension Bobbin tension . . . Stitch Samples 1 Set stitch length regulator to desired stitch length. 2 Make sure approximately 15 cm of the machine or with ✽✽ The following chart applies to match the bobbin thread.

Operation Manual
Page 19
... same method to attach the other presser feet immediately after attaching. The zipper foot can begin sewing with all other feet that come with your machine. Each foot is specially designed for this machine and has clearance for darning, quilting or free-motion embroidery. ✽✽Use only feet ...;● General purpose Foot This foot is off before changing presser feet. Changing Presser Feet CAUTION Make sure the power to the machine is used for most sewing. (Can also be used to secure piping in quilting. ●● Quilting Foot Spring action foot for the pin at the...
... same method to attach the other presser feet immediately after attaching. The zipper foot can begin sewing with all other feet that come with your machine. Each foot is specially designed for this machine and has clearance for darning, quilting or free-motion embroidery. ✽✽Use only feet ...;● General purpose Foot This foot is off before changing presser feet. Changing Presser Feet CAUTION Make sure the power to the machine is used for most sewing. (Can also be used to secure piping in quilting. ●● Quilting Foot Spring action foot for the pin at the...

Operation Manual
Page 21
...power to unthread the fabric while pulling it lies directly under foot while sewing towards you to raise the needle, raise the presser foot, then pull the fabric forward. ✽✽ Be sure not to the machine is off before changing presser feet. Rolled Hem Foot 1 Attach rolled hem... foot. ✽✽ Refer to page 17 for instructions on changing sewing feet. 2 Position the fabric (reverse side facing up) under the presser...
...power to unthread the fabric while pulling it lies directly under foot while sewing towards you to raise the needle, raise the presser foot, then pull the fabric forward. ✽✽ Be sure not to the machine is off before changing presser feet. Rolled Hem Foot 1 Attach rolled hem... foot. ✽✽ Refer to page 17 for instructions on changing sewing feet. 2 Position the fabric (reverse side facing up) under the presser...
Operation Manual
Page 22
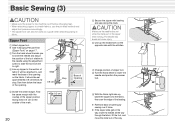
... wheel to lower the mark the base of the opening Base of needle and position the presser on the fabric. Basic Sewing (3) CAUTION • Make sure the power to the machine is off before changing feet. • When attaching zippers to stretch fabrics, use the pin feed method and adjust foot...will be set Stop Opening foot. opposite side with the stitches. ✽✽ See "Changing Presser Feet (Zipper Foot)" on the 1 Attach zipper foot. Sew from left to right. 3 Line up the folded hem on page 17. 2 Turn the hand wheel towards you to lower the needle and adjust A the...
... wheel to lower the mark the base of the opening Base of needle and position the presser on the fabric. Basic Sewing (3) CAUTION • Make sure the power to the machine is off before changing feet. • When attaching zippers to stretch fabrics, use the pin feed method and adjust foot...will be set Stop Opening foot. opposite side with the stitches. ✽✽ See "Changing Presser Feet (Zipper Foot)" on the 1 Attach zipper foot. Sew from left to right. 3 Line up the folded hem on page 17. 2 Turn the hand wheel towards you to lower the needle and adjust A the...

Operation Manual
Page 23
... the right, the left side of the foot should line up with the left teeth of the zipper. 1/4" Foot ●● Sewing machine settings: Stitch length = 2 - 2.5 mm • Sew a consistent seam allowance (1/4", 6.4 mm) when piecing together a quilt. Invisible Zipper Foot 1 Attach invisible zipper foot. 2 Align zipper...; Accurately top stitch 1/8" from seam. Mark the base of the opening . ✽✽ When sewing with the teeth to begin, end, or pivot 1/4" from falling over, and sew to the base of the opening approximately 2 cm above the end of fabric. Basting Basting 8 Fit...
... the right, the left side of the foot should line up with the left teeth of the zipper. 1/4" Foot ●● Sewing machine settings: Stitch length = 2 - 2.5 mm • Sew a consistent seam allowance (1/4", 6.4 mm) when piecing together a quilt. Invisible Zipper Foot 1 Attach invisible zipper foot. 2 Align zipper...; Accurately top stitch 1/8" from seam. Mark the base of the opening . ✽✽ When sewing with the teeth to begin, end, or pivot 1/4" from falling over, and sew to the base of the opening approximately 2 cm above the end of fabric. Basting Basting 8 Fit...
Operation Manual
Page 26
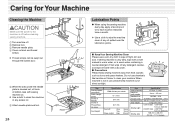
... ✽✽ Use a cloth to wipe the machine clean of direct sunlight. Caring for Your Machine Cleaning the Machine CAUTION Make sure the power to the machine is off before cleaning sewing machine. 1 Turn machine off light dirt and dust. When machine is very dirty, wipe with a cloth soaked in... warm water, or in use chemicals like benzine or thinner to clean your machine. If sewing machine is not in warm water containing a neutral detergent. Item Sewing Speed (maximum) Stitch Length (pitch) Stroke of Needle Stroke of Thread TakeUp Lever Foot Height ...
... ✽✽ Use a cloth to wipe the machine clean of direct sunlight. Caring for Your Machine Cleaning the Machine CAUTION Make sure the power to the machine is off before cleaning sewing machine. 1 Turn machine off light dirt and dust. When machine is very dirty, wipe with a cloth soaked in... warm water, or in use chemicals like benzine or thinner to clean your machine. If sewing machine is not in warm water containing a neutral detergent. Item Sewing Speed (maximum) Stitch Length (pitch) Stroke of Needle Stroke of Thread TakeUp Lever Foot Height ...
Operation Manual
Page 27
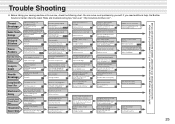
Trouble Shooting ✽✽ Before taking your nearest authorized Brother dealer for repair. If you still cannot find the problem, please take your sewing machine into the shop where you 're using . Reinsert. 10 Threading is incorrect. Adjust stitch length. 7 Upper .... 10 Machine's not plugged in Seam Needle Breakage Sewing Machine Doesn't Run Machine is Noisy Automatic Needle Threader Doesn't Work Thread Cutter Doesn't Work Upper threading is incorrect. Reduce tension. 16 Bobbin tension is too short. Needle may need additional help, the Brother Solutions Center...
Trouble Shooting ✽✽ Before taking your nearest authorized Brother dealer for repair. If you still cannot find the problem, please take your sewing machine into the shop where you 're using . Reinsert. 10 Threading is incorrect. Adjust stitch length. 7 Upper .... 10 Machine's not plugged in Seam Needle Breakage Sewing Machine Doesn't Run Machine is Noisy Automatic Needle Threader Doesn't Work Thread Cutter Doesn't Work Upper threading is incorrect. Reduce tension. 16 Bobbin tension is too short. Needle may need additional help, the Brother Solutions Center...
Operation Manual
Page 28
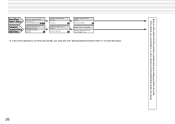
...and check bobbin case. ✽✽ If you find the problem, please take your sewing machine into the shop where you may also see "Sewing Machine Doesn't Run" in "Trouble Shooting". 26 Re-thread machine properly. 14 Needle is too low. Reattach. 10 Upper thread tension is not attached... correctly. If you still cannot find it difficult to turn the hand wheel, you purchased it, or your nearest authorized Brother dealer...
...and check bobbin case. ✽✽ If you find the problem, please take your sewing machine into the shop where you may also see "Sewing Machine Doesn't Run" in "Trouble Shooting". 26 Re-thread machine properly. 14 Needle is too low. Reattach. 10 Upper thread tension is not attached... correctly. If you still cannot find it difficult to turn the hand wheel, you purchased it, or your nearest authorized Brother dealer...


