
Network Users Manual - English
Page 131
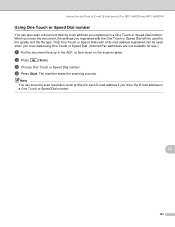
j Press OK. b Enter the fax number. How to operate Fax to the fax server. Note You can enter the prefix and suffix address using dial pad. c The machine will send the message over a TCP/IP network to Server a Place the document in the ADF or on the scanner glass. i Enter the suffix using up to a total of 40 characters. k Press Stop/Exit. Control panel setup 6 6 121
j Press OK. b Enter the fax number. How to operate Fax to the fax server. Note You can enter the prefix and suffix address using dial pad. c The machine will send the message over a TCP/IP network to Server a Place the document in the ADF or on the scanner glass. i Enter the suffix using up to a total of 40 characters. k Press Stop/Exit. Control panel setup 6 6 121

Network Users Manual - English
Page 172
... and white or color document and send it directly to an E-mail address from the dial pad or use the One Touch key or Speed Dial number. You can only choose a One Touch key or Speed Dial number that has an E-mail address registered as the scan profile. 162 Press OK. If... on page 165.) How to operate Scan to E-mail (E-mail server) 13 a Put the document face up in the ADF, or face down on the scanner glass. Note Scan to choose Color 100 dpi, Color 200 dpi, Color 300 dpi, Color 600 dpi, Gray 100 dpi, Gray 200 dpi, Gray 300...
... and white or color document and send it directly to an E-mail address from the dial pad or use the One Touch key or Speed Dial number. You can only choose a One Touch key or Speed Dial number that has an E-mail address registered as the scan profile. 162 Press OK. If... on page 165.) How to operate Scan to E-mail (E-mail server) 13 a Put the document face up in the ADF, or face down on the scanner glass. Note Scan to choose Color 100 dpi, Color 200 dpi, Color 300 dpi, Color 600 dpi, Gray 100 dpi, Gray 200 dpi, Gray 300...
Network Users Manual - English
Page 173
... or Speed Dials with the One Touch or Speed Dial will be used for the quality and the file type. Note You can store the scan resolution (scan profile) for each E-mail address if you store the E-mail address in the ADF, or face down on the scanner glass. d Press Start. Internet... fax and Scan to E-mail (E-mail server) (For MFC-8880DN and MFC-8890DW) Using One Touch or Speed Dial number 13 You can also scan a document directly to an address you...
... or Speed Dials with the One Touch or Speed Dial will be used for the quality and the file type. Note You can store the scan resolution (scan profile) for each E-mail address if you store the E-mail address in the ADF, or face down on the scanner glass. d Press Start. Internet... fax and Scan to E-mail (E-mail server) (For MFC-8880DN and MFC-8890DW) Using One Touch or Speed Dial number 13 You can also scan a document directly to an address you...

Network Users Manual - English
Page 206
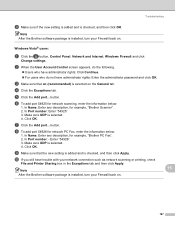
... service: Enter "137". 5. Click OK. In Name or IP address (for example, "Brother Scanner". 2. h To add port 137 for this service on your network: Enter "Localhost". 3. In Internal Port number for network scanning, network printing and network PC Fax receiving, enter the information below... to On. Make sure UDP is selected. 6. In Name or IP address (for example, "Brother PC Fax". 2. In Description of service...
... service: Enter "137". 5. Click OK. In Name or IP address (for example, "Brother Scanner". 2. h To add port 137 for this service on your network: Enter "Localhost". 3. In Internal Port number for network scanning, network printing and network PC Fax receiving, enter the information below... to On. Make sure UDP is selected. 6. In Name or IP address (for example, "Brother PC Fax". 2. In Description of service...
Network Users Manual - English
Page 207
...port... In Name: Enter any description, for network scanning, enter the information below : 1. Click OK. h To add port 54926 for example, "Brother Scanner". 2. j If you still have administrator rights: Enter the administrator password and click OK. Windows Vista® users: a Click the button, Control ...then click OK. Troubleshooting i Make sure if the new setting is added and is installed, turn your Firewall back on. Note After the Brother software package is selected. 4. d Click the Exceptions tab. In Port number: - Enter "54926". 3. Make sure UDP is installed, ...
...port... In Name: Enter any description, for network scanning, enter the information below : 1. Click OK. h To add port 54926 for example, "Brother Scanner". 2. j If you still have administrator rights: Enter the administrator password and click OK. Windows Vista® users: a Click the button, Control ...then click OK. Troubleshooting i Make sure if the new setting is added and is installed, turn your Firewall back on. Note After the Brother software package is selected. 4. d Click the Exceptions tab. In Port number: - Enter "54926". 3. Make sure UDP is installed, ...
Software Users Manual - English
Page 4
... document using the TWAIN driver 33 Scanning a document into the PC ...33 Pre-Scanning to crop a portion you want to scan 35 Settings in the Scanner Setup dialog box 36 Scanning a document using the WIA driver (Windows® XP/Windows Vista 40 WIA compliant ...40 Scanning a document into the PC ......40 Pre-Scanning to crop a portion you want to scan using the scanner glass 42 Scanning a document using the WIA driver (Windows Photo Gallery and Windows Fax and Scan) ......45 Scanning a document into the PC ...45 Pre...
... document using the TWAIN driver 33 Scanning a document into the PC ...33 Pre-Scanning to crop a portion you want to scan 35 Settings in the Scanner Setup dialog box 36 Scanning a document using the WIA driver (Windows® XP/Windows Vista 40 WIA compliant ...40 Scanning a document into the PC ......40 Pre-Scanning to crop a portion you want to scan using the scanner glass 42 Scanning a document using the WIA driver (Windows Photo Gallery and Windows Fax and Scan) ......45 Scanning a document into the PC ...45 Pre...
Software Users Manual - English
Page 6
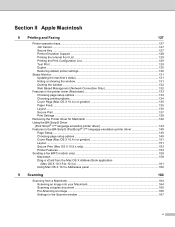
Section II Apple Macintosh 8 Printing and Faxing 127 Printer operation keys...127 Job Cancel...127 Secure Key ...127 Printer Emulation Support ...128 Printing the Internal Font List...129 Printing the Print Configuration List 129 Test Print ...129 Duplex ...130 Restoring default printer settings...130 Status Monitor...131 Updating the machine's ... 9 Scanning 164 Scanning from a Macintosh ...164 Scanning an image into your Macintosh 164 Scanning a duplex document ...165 Pre-Scanning an image ...166 Settings in the Scanner window ...167 v
Section II Apple Macintosh 8 Printing and Faxing 127 Printer operation keys...127 Job Cancel...127 Secure Key ...127 Printer Emulation Support ...128 Printing the Internal Font List...129 Printing the Print Configuration List 129 Test Print ...129 Duplex ...130 Restoring default printer settings...130 Status Monitor...131 Updating the machine's ... 9 Scanning 164 Scanning from a Macintosh ...164 Scanning an image into your Macintosh 164 Scanning a duplex document ...165 Pre-Scanning an image ...166 Settings in the Scanner window ...167 v

Software Users Manual - English
Page 41
...54925 and 137. (See Firewall settings (For Network users) on page 121.) Scanning a document using the TWAIN driver 2 The Brother MFL-Pro Suite software includes a TWAIN compliant scanner driver. The Scan or Get Photo panel appears on the left side of other software applications. Windows® XP and Windows Vista...8482; PaperPort™ 11SE with your PC is protected by a firewall, and is unable to scan a document. This means that you can either one of the two when you may vary when using the WIA driver (Windows® XP/Windows Vista®) on page 40). Note The instructions ...
...54925 and 137. (See Firewall settings (For Network users) on page 121.) Scanning a document using the TWAIN driver 2 The Brother MFL-Pro Suite software includes a TWAIN compliant scanner driver. The Scan or Get Photo panel appears on the left side of other software applications. Windows® XP and Windows Vista...8482; PaperPort™ 11SE with your PC is protected by a firewall, and is unable to scan a document. This means that you can either one of the two when you may vary when using the WIA driver (Windows® XP/Windows Vista®) on page 40). Note The instructions ...
Software Users Manual - English
Page 42
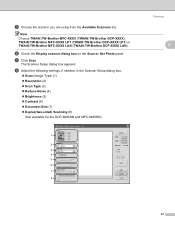
Note Choose TWAIN:TW-Brother MFC-XXXX (TWAIN:TW-Brother DCP-XXXX), TWAIN:TW-Brother MFC-XXXX LPT (TWAIN:TW-Brother DCP-XXXX LPT) or TWAIN:TW-Brother MFC-XXXX LAN (TWAIN:TW-Brother DCP-XXXX LAN). f Check the Display scanner dialog box on the Scan or Get Photo panel. The Scanner Setup dialog box appears. e Choose the scanner you are using from...
Note Choose TWAIN:TW-Brother MFC-XXXX (TWAIN:TW-Brother DCP-XXXX), TWAIN:TW-Brother MFC-XXXX LPT (TWAIN:TW-Brother DCP-XXXX LPT) or TWAIN:TW-Brother MFC-XXXX LAN (TWAIN:TW-Brother DCP-XXXX LAN). f Check the Display scanner dialog box on the Scan or Get Photo panel. The Scanner Setup dialog box appears. e Choose the scanner you are using from...

Software Users Manual - English
Page 43
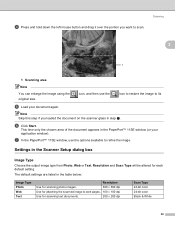
... You cannot adjust the scanning area. The whole image is not available if you are satisfied with the preview, click the Start button in the Scanner Setup dialog box to g of Scanning a document into the PC and appears in the Scanning Area (1) of the... Scanner Setup dialog box. 1 35 When you choose Duplex(two-sided) Scanning. c Click PreScan. a Follow the steps from a to scan the image. This is finished, click ...
... You cannot adjust the scanning area. The whole image is not available if you are satisfied with the preview, click the Start button in the Scanner Setup dialog box to g of Scanning a document into the PC and appears in the Scanning Area (1) of the... Scanner Setup dialog box. 1 35 When you choose Duplex(two-sided) Scanning. c Click PreScan. a Follow the steps from a to scan the image. This is finished, click ...
Software Users Manual - English
Page 44
... window (or your document again. d Press and hold down the left mouse button and drag it over the portion you loaded the document on the scanner glass in step a. g In the PaperPort™ 11SE window, use the icon to restore the image to scan. This time only the chosen area of...
... window (or your document again. d Press and hold down the left mouse button and drag it over the portion you loaded the document on the scanner glass in step a. g In the PaperPort™ 11SE window, use the icon to restore the image to scan. This time only the chosen area of...
Software Users Manual - English
Page 46
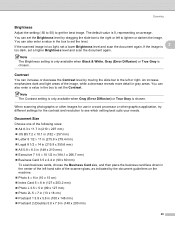
... Brightness setting is only available when Black & White, Gray (Error Diffusion) or True Gray is chosen. An increase emphasizes dark and light areas of the scanner glass, as indicated by the document guidelines on the machine. „ Photo 4 × 6 in (10 x 15 cm) „ Index Card 5 × 8 in... also enter a value in gray areas. Note The Contrast setting is only available when Gray (Error Diffusion) or True Gray is chosen. Document Size 2 Choose one of the following sizes: „ A4 8.3 x 11.7 in (210 × 297 mm) „ JIS B5 7.2 x 10.1 in (182 × 257 mm) „ ...
... Brightness setting is only available when Black & White, Gray (Error Diffusion) or True Gray is chosen. An increase emphasizes dark and light areas of the scanner glass, as indicated by the document guidelines on the machine. „ Photo 4 × 6 in (10 x 15 cm) „ Index Card 5 × 8 in... also enter a value in gray areas. Note The Contrast setting is only available when Gray (Error Diffusion) or True Gray is chosen. Document Size 2 Choose one of the following sizes: „ A4 8.3 x 11.7 in (210 × 297 mm) „ JIS B5 7.2 x 10.1 in (182 × 257 mm) „ ...

Software Users Manual - English
Page 48
... • Duplex Scan is not available for scanning images from the Available Scanners list. Note Choose WIA:Brother MFC-XXXX (WIA:Brother DCP-XXXX), WIA:Brother MFC-XXXX LPT (WIA:Brother DCP-XXXX LPT) or WIA:Brother MFC-XXXX LAN (WIA:Brother DCP-XXXX LAN). If you want to scan a document. The scanning steps ...Get Photo panel appears on the Scan or Get Photo panel. Scanning a document into the PaperPort™ 11SE viewer that Brother included with your document. The Scanner Setup dialog box appears. 40 Note • Windows® 2000/XP do not support Duplex Scan in which you ...
... • Duplex Scan is not available for scanning images from the Available Scanners list. Note Choose WIA:Brother MFC-XXXX (WIA:Brother DCP-XXXX), WIA:Brother MFC-XXXX LPT (WIA:Brother DCP-XXXX LPT) or WIA:Brother MFC-XXXX LAN (WIA:Brother DCP-XXXX LAN). If you want to scan a document. The scanning steps ...Get Photo panel appears on the Scan or Get Photo panel. Scanning a document into the PaperPort™ 11SE viewer that Brother included with your document. The Scanner Setup dialog box appears. 40 Note • Windows® 2000/XP do not support Duplex Scan in which you ...
Software Users Manual - English
Page 49
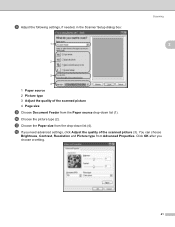
h Adjust the following settings, if needed, in the Scanner Setup dialog box: Scanning 1 2 2 3 4 1 Paper source 2 Picture type 3 Adjust the quality of the scanned picture (3). l If you choose a setting. 41 j Choose the picture type (2). k Choose the Paper size from Advanced Properties. Click OK after you need advanced settings, click Adjust the quality of the scanned picture 4 Page size i Choose Document Feeder from the Paper source drop-down list (4). You can choose Brightness, Contrast, Resolution and Picture type from the drop-down list (1).
h Adjust the following settings, if needed, in the Scanner Setup dialog box: Scanning 1 2 2 3 4 1 Paper source 2 Picture type 3 Adjust the quality of the scanned picture (3). l If you choose a setting. 41 j Choose the picture type (2). k Choose the Paper size from Advanced Properties. Click OK after you need advanced settings, click Adjust the quality of the scanned picture 4 Page size i Choose Document Feeder from the Paper source drop-down list (4). You can choose Brightness, Contrast, Resolution and Picture type from the drop-down list (1).

Software Users Manual - English
Page 50
... type (2). Pre-Scanning to crop a portion you are satisfied with the preview, click the Scan button in the Scan dialog box to scan using the scanner glass 2 The Preview button is scanned into the PC on page 43.) m Click the Scan button in the scanning area (4). 42 When you want to... a document into the PC and appears in the Scan dialog box. 2 The machine starts scanning the document. For resolutions greater than 1200 dpi, use the Scanner Utility. (See Scanner Utility on page 40. Scanning Note The scanner resolution can be set as high as 1200 dpi. d Click Preview.
... type (2). Pre-Scanning to crop a portion you are satisfied with the preview, click the Scan button in the Scan dialog box to scan using the scanner glass 2 The Preview button is scanned into the PC on page 43.) m Click the Scan button in the scanning area (4). 42 When you want to... a document into the PC and appears in the Scan dialog box. 2 The machine starts scanning the document. For resolutions greater than 1200 dpi, use the Scanner Utility. (See Scanner Utility on page 40. Scanning Note The scanner resolution can be set as high as 1200 dpi. d Click Preview.

Software Users Manual - English
Page 51
... of the document appears in the Scan dialog box. You must restart your application window). Scanning 2 f If you choose a setting. Scanner Utility 2 The Scanner Utility is used for configuring the WIA scanner driver for resolutions greater than 1200 dpi and for the new settings to take effect. 43 g Click the Scan button in...
... of the document appears in the Scan dialog box. You must restart your application window). Scanning 2 f If you choose a setting. Scanner Utility 2 The Scanner Utility is used for configuring the WIA scanner driver for resolutions greater than 1200 dpi and for the new settings to take effect. 43 g Click the Scan button in...
Software Users Manual - English
Page 52
... administrator rights: Enter the administrator password and click OK. 44 If you do not have enough memory or hard disk space then your model name)/ Scanner Settings/Scanner Utility. 2 Note If you scan the document at a resolution greater than 1200 dpi, the file size may freeze and you are trying to scan.... Scanning „ Running the utility You can run the utility by choosing the Scanner Utility located in the Start/All Programs/Brother/MFC-XXXX (or DCP-XXXX) (where XXXX is your PC may be very large.
... administrator rights: Enter the administrator password and click OK. 44 If you do not have enough memory or hard disk space then your model name)/ Scanner Settings/Scanner Utility. 2 Note If you scan the document at a resolution greater than 1200 dpi, the file size may freeze and you are trying to scan.... Scanning „ Running the utility You can run the utility by choosing the Scanner Utility located in the Start/All Programs/Brother/MFC-XXXX (or DCP-XXXX) (where XXXX is your PC may be very large.
Software Users Manual - English
Page 53
...dialog box appears. 45 You can scan a whole page. c Do one of a page after pre-scanning the document, you need to use the ADF (automatic document feeder) or the scanner glass. e Click Import. d Choose the scanner you want to scan using the WIA driver (Windows Photo Gallery and ... your document. If you can either use the scanner glass. (See Pre-Scanning to crop a portion you want to scan the document. Scanning Scanning a document using the scanner glass on page 46.) Note • Duplex Scan is not supported by the DCP-8080DN and MFC-8480DN. • Duplex Scan is ...
...dialog box appears. 45 You can scan a whole page. c Do one of a page after pre-scanning the document, you need to use the ADF (automatic document feeder) or the scanner glass. e Click Import. d Choose the scanner you want to scan using the WIA driver (Windows Photo Gallery and ... your document. If you can either use the scanner glass. (See Pre-Scanning to crop a portion you want to scan the document. Scanning Scanning a document using the scanner glass on page 46.) Note • Duplex Scan is not supported by the DCP-8080DN and MFC-8480DN. • Duplex Scan is ...

Software Users Manual - English
Page 54
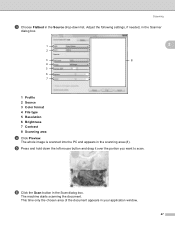
... box. 1 2 3 4 5 6 7 8 Scanning 2 1 Profile 2 Source 3 Paper size 4 Color format 5 File type 6 Resolution 7 Brightness 8 Contrast Note The scanner resolution can be set as high as 1200 dpi. b Put the document face down on page 45. The machine starts scanning the document. f Adjust the ... the preview, click the Scan button in the Scan dialog box to e of Scanning a document into the PC on the scanner glass. 46 When you want to scan using the scanner glass 2 The Preview button is used to preview an image for cropping any unwanted portions from a to scan the image. For...
... box. 1 2 3 4 5 6 7 8 Scanning 2 1 Profile 2 Source 3 Paper size 4 Color format 5 File type 6 Resolution 7 Brightness 8 Contrast Note The scanner resolution can be set as high as 1200 dpi. b Put the document face down on page 45. The machine starts scanning the document. f Adjust the ... the preview, click the Scan button in the Scan dialog box to e of Scanning a document into the PC on the scanner glass. 46 When you want to scan using the scanner glass 2 The Preview button is used to preview an image for cropping any unwanted portions from a to scan the image. For...
Software Users Manual - English
Page 55
... only the chosen area of the document appears in the Scan dialog box. The whole image is scanned into the PC and appears in the Scanner dialog box. 1 2 2 3 8 4 5 6 7 1 Profile 2 Source 3 Color format 4 File type 5 Resolution 6 Brightness 7 Contrast 8 Scanning area d Click Preview. The machine starts scanning the document. Adjust the following settings...
... only the chosen area of the document appears in the Scan dialog box. The whole image is scanned into the PC and appears in the Scanner dialog box. 1 2 2 3 8 4 5 6 7 1 Profile 2 Source 3 Color format 4 File type 5 Resolution 6 Brightness 7 Contrast 8 Scanning area d Click Preview. The machine starts scanning the document. Adjust the following settings...


