Quick Setup Guide - English
Page 28
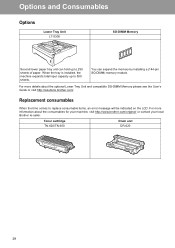
...more details about the consumables for your machine, visit http://www.brother.com/original/ or contact your local Brother re-seller. Replacement consumables When the time comes to 250 sheets of paper. Toner cartridge TN-620/TN-650 Drum unit DR-620 28 When the tray is installed, the machine ...expands total input capacity up to replace consumable items, an error message...
...more details about the consumables for your machine, visit http://www.brother.com/original/ or contact your local Brother re-seller. Replacement consumables When the time comes to 250 sheets of paper. Toner cartridge TN-620/TN-650 Drum unit DR-620 28 When the tray is installed, the machine ...expands total input capacity up to replace consumable items, an error message...
Users Manual - English
Page 6
...one-stage warranty: 90 days from the original purchase date or the rated life of sale. and, 5 Problems arising from other than defects in materials or workmanship. For the name of the serial number). What to do : After contacting Brother or a Brother... only warranty service within the applicable warranty period. iv Brother® Three-Year Limited Warranty and Replacement Service (USA Only) Who is covered: „ This..., drums, print heads and ink cartridges. „ Except as "this Product"). „ If you purchased a product from someone other than an authorized Brother reseller...
...one-stage warranty: 90 days from the original purchase date or the rated life of sale. and, 5 Problems arising from other than defects in materials or workmanship. For the name of the serial number). What to do : After contacting Brother or a Brother... only warranty service within the applicable warranty period. iv Brother® Three-Year Limited Warranty and Replacement Service (USA Only) Who is covered: „ This..., drums, print heads and ink cartridges. „ Except as "this Product"). „ If you purchased a product from someone other than an authorized Brother reseller...

Users Manual - English
Page 9
... packing the Inkjet MFC/Fax machine without limitation, ink cartridges, print cartridges, print rolls, thermal paper rolls, toner cartridges, drum units, OPC belts, fixing units, print heads, paper feed rollers, transfer rolls, cleaning rollers, waste toner packs, oil...Laser MFC/Fax machine and will repair or replace (at Brother Authorized Service Centres throughout Canada. BROTHER MULTIFUNCTION CENTER / FAX MACHINE LIMITED WARRANTY (Canada only) Pursuant to the limited warranty of 1 year from the date of purchase for labour and parts, Brother International Corporation (Canada) Ltd. ("Brother...
... packing the Inkjet MFC/Fax machine without limitation, ink cartridges, print cartridges, print rolls, thermal paper rolls, toner cartridges, drum units, OPC belts, fixing units, print heads, paper feed rollers, transfer rolls, cleaning rollers, waste toner packs, oil...Laser MFC/Fax machine and will repair or replace (at Brother Authorized Service Centres throughout Canada. BROTHER MULTIFUNCTION CENTER / FAX MACHINE LIMITED WARRANTY (Canada only) Pursuant to the limited warranty of 1 year from the date of purchase for labour and parts, Brother International Corporation (Canada) Ltd. ("Brother...
Users Manual - English
Page 12
...Commission (FCC) Declaration of Conformity (USA only 59 Industry Canada Compliance Statement (Canada only 59 Laser safety 60 FDA regulations 60 Disconnect device 61 LAN connection 61 International ENERGY STAR® Compliance Statement 61 Libtiff Copyright and License 62 Trademarks...63 Options 64 Options...86 Routine maintenance 92 Cleaning the outside of the machine 93 Cleaning the scanner 94 Cleaning the laser scanner window 95 Cleaning the corona wire 96 Cleaning the drum unit 98 Replacing the consumable items 100 Replacing a toner cartridge 101 Replacing the drum unit 103
...Commission (FCC) Declaration of Conformity (USA only 59 Industry Canada Compliance Statement (Canada only 59 Laser safety 60 FDA regulations 60 Disconnect device 61 LAN connection 61 International ENERGY STAR® Compliance Statement 61 Libtiff Copyright and License 62 Trademarks...63 Options 64 Options...86 Routine maintenance 92 Cleaning the outside of the machine 93 Cleaning the scanner 94 Cleaning the laser scanner window 95 Cleaning the corona wire 96 Cleaning the drum unit 98 Replacing the consumable items 100 Replacing a toner cartridge 101 Replacing the drum unit 103
Users Manual - English
Page 81
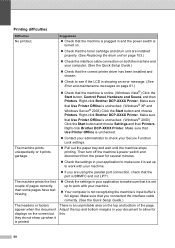
... Printer. Right-click Brother DCP-XXXX Printer. The machine prints the first couple of the page. Adjust the top and bottom margins in and the power switch is turned on. „ Check that the toner cartridge and drum unit are using the parallel port connection, check that the port is ...machine stops printing. Make sure that Use Printer Offline is an unprintable area on page 81.) „ Check that you are installed properly. (See Replacing the drum unit on page 103.) „ Check the interface cable connection on both the machine and your computer. (See the Quick Setup Guide.) „...
... Printer. Right-click Brother DCP-XXXX Printer. The machine prints the first couple of the page. Adjust the top and bottom margins in and the power switch is turned on. „ Check that the toner cartridge and drum unit are using the parallel port connection, check that the port is ...machine stops printing. Make sure that Use Printer Offline is an unprintable area on page 81.) „ Check that you are installed properly. (See Replacing the drum unit on page 103.) „ Check the interface cable connection on both the machine and your computer. (See the Quick Setup Guide.) „...
Users Manual - English
Page 87
... print media on page 14.) „ Check the machine's environment. Put in a new drum unit. (See Replacing the drum unit on page 103.) „ Wipe the laser scanner windows with a dry, lint-free soft cloth. (See Cleaning the laser scanner window on page 95.) „ Make sure that a torn sheet of paper is ...page 22 and Basic tab in the Software User's Guide on the CD-ROM.) „ Check the machine's environment. Put in a new drum unit. (See Replacing the drum unit on page 103.) „ Make sure that you use paper that meets our specifications. (See Acceptable paper and other print media on page...
... print media on page 14.) „ Check the machine's environment. Put in a new drum unit. (See Replacing the drum unit on page 103.) „ Wipe the laser scanner windows with a dry, lint-free soft cloth. (See Cleaning the laser scanner window on page 95.) „ Make sure that a torn sheet of paper is ...page 22 and Basic tab in the Software User's Guide on the CD-ROM.) „ Check the machine's environment. Put in a new drum unit. (See Replacing the drum unit on page 103.) „ Make sure that you use paper that meets our specifications. (See Acceptable paper and other print media on page...

Users Manual - English
Page 88
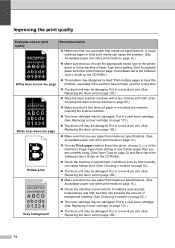
...Make sure that you are using the MP tray, see Loading paper in the Software User's Guide on the CD-ROM.) „ The drum unit may be damaged. Troubleshooting and routine maintenance Examples of poor print quality AaAa0bBbc1CBdDe2cEfCgdF3hGDie4jHk Page skewed Ghost B DEFGH abc efghijk A CD bcde 1...the tray or rotate the paper 180° in a new drum unit. (See Replacing the drum unit on page 103.) „ The fuser unit may be contaminated. Call Brother Customer Service at 1-877-BROTHER (1-877-276-8437) (in USA) or 1-877-BROTHER (in Canada). „ Check the paper type and quality...
...Make sure that you are using the MP tray, see Loading paper in the Software User's Guide on the CD-ROM.) „ The drum unit may be damaged. Troubleshooting and routine maintenance Examples of poor print quality AaAa0bBbc1CBdDe2cEfCgdF3hGDie4jHk Page skewed Ghost B DEFGH abc efghijk A CD bcde 1...the tray or rotate the paper 180° in a new drum unit. (See Replacing the drum unit on page 103.) „ The fuser unit may be contaminated. Call Brother Customer Service at 1-877-BROTHER (1-877-276-8437) (in USA) or 1-877-BROTHER (in Canada). „ Check the paper type and quality...
Users Manual - English
Page 91
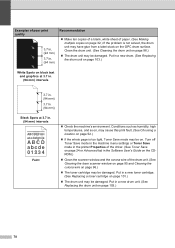
Put in the Software User's Guide on the CDROM.) „ Clean the scanner window and the corona wire of the drum unit. (See Cleaning the laser scanner window on page 95 and Cleaning the corona wire on page 96.) „ The toner cartridge may be damaged. Put in . (94 mm) intervals ... on page 103.) White Spots on black text and graphics at 3.7 in. (94 mm) intervals Black Spots at 3.7 in a new drum unit. (See Replacing the drum unit on page 103.) 78 Turn off Toner Save mode in the machine menu settings or Toner Save mode in the printer Properties of the ...
Put in the Software User's Guide on the CDROM.) „ Clean the scanner window and the corona wire of the drum unit. (See Cleaning the laser scanner window on page 95 and Cleaning the corona wire on page 96.) „ The toner cartridge may be damaged. Put in . (94 mm) intervals ... on page 103.) White Spots on black text and graphics at 3.7 in. (94 mm) intervals Black Spots at 3.7 in a new drum unit. (See Replacing the drum unit on page 103.) 78 Turn off Toner Save mode in the machine menu settings or Toner Save mode in the printer Properties of the ...

Users Manual - English
Page 92
... meets our specifications. Put in a new drum unit. (See Replacing the drum unit on page 96.) „ The drum unit may be damaged. Call Brother Customer Service at 1-877-BROTHER (1-877-276-8437) (in USA) or 1-877-BROTHER (in Canada). „ Clean the corona wire inside the drum unit. (See Cleaning the laser scanner window on page 95 and...
... meets our specifications. Put in a new drum unit. (See Replacing the drum unit on page 96.) „ The drum unit may be damaged. Call Brother Customer Service at 1-877-BROTHER (1-877-276-8437) (in USA) or 1-877-BROTHER (in Canada). „ Clean the corona wire inside the drum unit. (See Cleaning the laser scanner window on page 95 and...
Users Manual - English
Page 93
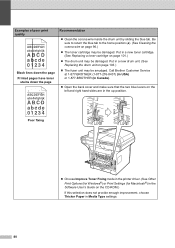
.... Put in the up position. Call Brother Customer Service at 1-877-BROTHER (1-877-276-8437) (in USA) or 1-877-BROTHER (in Canada). „ Open the back cover and make sure that the two blue levers on the left and right hand sides are in a new drum unit. (See Replacing the drum unit on page 101.) „...; The drum unit may be smudged. Poor fixing „ Choose Improve ...
.... Put in the up position. Call Brother Customer Service at 1-877-BROTHER (1-877-276-8437) (in USA) or 1-877-BROTHER (in Canada). „ Open the back cover and make sure that the two blue levers on the left and right hand sides are in a new drum unit. (See Replacing the drum unit on page 101.) „...; The drum unit may be smudged. Poor fixing „ Choose Improve ...
Users Manual - English
Page 94
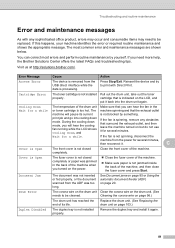
... too long. Error Message Cause Action Access Error The device is not blocked by yourself. Replace the drum unit. (See Replacing the drum unit on page 20. Press Stop/Exit. Drum Error The corona wire on the drum unit Clean the corona wire on the LCD, and put it . If the fan is..., then reconnect it back into cooling down mode, you turned on but do not use it again. 81 Visit us at http://solutions.brother.com/. If you can correct most common error and maintenance messages are shown below. Cooling Down The temperature of the machine, and then ...
... too long. Error Message Cause Action Access Error The device is not blocked by yourself. Replace the drum unit. (See Replacing the drum unit on page 20. Press Stop/Exit. Drum Error The corona wire on the drum unit Clean the corona wire on the LCD, and put it . If the fan is..., then reconnect it back into cooling down mode, you turned on but do not use it again. 81 Visit us at http://solutions.brother.com/. If you can correct most common error and maintenance messages are shown below. Cooling Down The temperature of the machine, and then ...

Users Manual - English
Page 96
... USA) 1-877-BROTHER (in Canada) Replace Parts Laser Unit It is time to replace the paper feeding kit for Tray 1. Troubleshooting and routine maintenance Error Message Cause Action Replace Parts The drum unit is already a file on the USB Flash memory drive with a new one. (See Replacing a toner cartridge on page 129.) 83 Drum (See Replacing the drum unit on page...
... USA) 1-877-BROTHER (in Canada) Replace Parts Laser Unit It is time to replace the paper feeding kit for Tray 1. Troubleshooting and routine maintenance Error Message Cause Action Replace Parts The drum unit is already a file on the USB Flash memory drive with a new one. (See Replacing a toner cartridge on page 129.) 83 Drum (See Replacing the drum unit on page...
Users Manual - English
Page 113
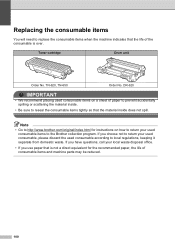
... items C You will need to replace the consumable items when the machine indicates that the life of paper to prevent accidentally spilling or scattering the material inside. • Be sure to reseal the consumable items tightly so that is over. Toner cartridge Drum unit Order No. TN-620, TN...-650 Order No. DR-620 IMPORTANT • We recommend placing used consumable items to the Brother collection program. If you use paper that the material inside does not spill. ...
... items C You will need to replace the consumable items when the machine indicates that the life of paper to prevent accidentally spilling or scattering the material inside. • Be sure to reseal the consumable items tightly so that is over. Toner cartridge Drum unit Order No. TN-620, TN...-650 Order No. DR-620 IMPORTANT • We recommend placing used consumable items to the Brother collection program. If you use paper that the material inside does not spill. ...
Users Manual - English
Page 114
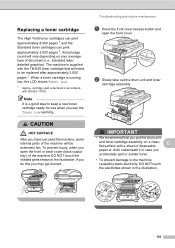
...you see the Toner Low warning. b Slowly take out the drum unit and toner cartridge assembly. When a toner cartridge is supplied with the TN-620 toner... to keep a new toner cartridge ready for use when you have just used the machine, some internal parts of document (i.e., standard letter, detailed graphics). Troubleshooting and routine maintenance a Press the front cover.... 101 To prevent injury, when you may get burned. IMPORTANT • We recommend that will be replaced after approximately 3,000 pages 1. The machine is running low, the LCD shows Toner Low. 1 Approx....
...you see the Toner Low warning. b Slowly take out the drum unit and toner cartridge assembly. When a toner cartridge is supplied with the TN-620 toner... to keep a new toner cartridge ready for use when you have just used the machine, some internal parts of document (i.e., standard letter, detailed graphics). Troubleshooting and routine maintenance a Press the front cover.... 101 To prevent injury, when you may get burned. IMPORTANT • We recommend that will be replaced after approximately 3,000 pages 1. The machine is running low, the LCD shows Toner Low. 1 Approx....
Users Manual - English
Page 115
...or attempted use of the cartridge. WARNING DO NOT put a toner cartridge into place. Gently shake it from the Brother machine, we strongly recommend the use only Genuine Brother Brand replacement toner cartridges. We also strongly recommend that you hear it lock into a fire. It could explode, resulting in injuries.... c Push down the blue lock lever and take the used toner cartridge out of Genuine Brother Supplies. 102 f Put the new toner cartridge firmly into the drum unit until immediately before you put it in properly, the lock lever will be shortened. • Be sure to seal...
...or attempted use of the cartridge. WARNING DO NOT put a toner cartridge into place. Gently shake it from the Brother machine, we strongly recommend the use only Genuine Brother Brand replacement toner cartridges. We also strongly recommend that you hear it lock into a fire. It could explode, resulting in injuries.... c Push down the blue lock lever and take the used toner cartridge out of Genuine Brother Supplies. 102 f Put the new toner cartridge firmly into the drum unit until immediately before you put it in properly, the lock lever will be shortened. • Be sure to seal...

Users Manual - English
Page 116
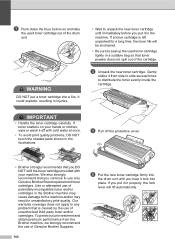
..., such as temperature, humidity, type of paper and how much toner you use . 103 The estimated drum life is time to buy a new one. The actual number of pages your drum will be printed by your hands or clothes, wipe or wash it may separate from right to left and left to... estimate. Note DO NOT turn off with cold water at once. If you replace the drum unit. (See Cleaning the laser scanner window on paper. Note The drum unit is a consumable item, and C it periodically. g Clean the corona wire of the drum unit by type of use for a while. However, if there is necessary...
..., such as temperature, humidity, type of paper and how much toner you use . 103 The estimated drum life is time to buy a new one. The actual number of pages your drum will be printed by your hands or clothes, wipe or wash it may separate from right to left and left to... estimate. Note DO NOT turn off with cold water at once. If you replace the drum unit. (See Cleaning the laser scanner window on paper. Note The drum unit is a consumable item, and C it periodically. g Clean the corona wire of the drum unit by type of use for a while. However, if there is necessary...

Users Manual - English
Page 118
... and toner cartridge assembly in the toner cartridge properly or it lock into the new drum unit until you are installing a new drum, press 1. h When the LCD shows Accepted, close the front cover. If you put the cartridge in properly, the blue lock lever will lift automatically. Note ... put in the machine. Do not close the front cover. a 1.Yes b 2.No Select ab or OK To confirm you hear it may separate from the drum unit. e Put the toner cartridge firmly into place. Replace Drum?
... and toner cartridge assembly in the toner cartridge properly or it lock into the new drum unit until you are installing a new drum, press 1. h When the LCD shows Accepted, close the front cover. If you put the cartridge in properly, the blue lock lever will lift automatically. Note ... put in the machine. Do not close the front cover. a 1.Yes b 2.No Select ab or OK To confirm you hear it may separate from the drum unit. e Put the toner cartridge firmly into place. Replace Drum?
Users Manual - English
Page 153
...in 1 (page layout 36 Network printing See Network User's Guide on the CD-ROM. Maintenance, routine 92 checking the remaining life of drum unit and periodic maintenance parts 107 page counts 106 status LED 8 Macintosh® See Software User's Guide on the CD-ROM. Power failure... L Labels 12, 14, 16, 19 LCD (liquid crystal display 6, 110 contrast 25 M Machine information checking remaining life of drum unit and periodic maintenance parts 107 replacing drum unit 103 toner cartridge 101 Memory adding SO-DIMM (option 65 installing 66 storage 110 Menu Table 110, 112 using menu keys...
...in 1 (page layout 36 Network printing See Network User's Guide on the CD-ROM. Maintenance, routine 92 checking the remaining life of drum unit and periodic maintenance parts 107 page counts 106 status LED 8 Macintosh® See Software User's Guide on the CD-ROM. Power failure... L Labels 12, 14, 16, 19 LCD (liquid crystal display 6, 110 contrast 25 M Machine information checking remaining life of drum unit and periodic maintenance parts 107 replacing drum unit 103 toner cartridge 101 Memory adding SO-DIMM (option 65 installing 66 storage 110 Menu Table 110, 112 using menu keys...
Users Manual - English
Page 154
Q Quality copying 34 printing 71, 74 R Reducing copies 33 Replacing drum unit 103 toner cartridge 101 Resolution copy 128 print 130 scan 129 Restricted users 29 S Safety instructions 57 Scan 7 Scanner glass using 21 Scanning See ... inside front cover Service centers i Shipping the machine 108 Sleep time 25 Sort 34 Status LED 8 T Temporary copy settings 33 Text, entering 122 Toner cartridge, replacing 101 Toner save 24 Transparency 10, 12, 14 Tray selection 40 Tray use, setting copy 23 print 23 Troubleshooting 67 document jam 85 error messages...
Q Quality copying 34 printing 71, 74 R Reducing copies 33 Replacing drum unit 103 toner cartridge 101 Resolution copy 128 print 130 scan 129 Restricted users 29 S Safety instructions 57 Scan 7 Scanner glass using 21 Scanning See ... inside front cover Service centers i Shipping the machine 108 Sleep time 25 Sort 34 Status LED 8 T Temporary copy settings 33 Text, entering 122 Toner cartridge, replacing 101 Toner save 24 Transparency 10, 12, 14 Tray selection 40 Tray use, setting copy 23 print 23 Troubleshooting 67 document jam 85 error messages...
Service Manual
Page 425
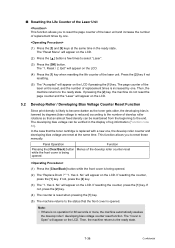
...almost fixed density can be maintained from the beginning to the end. The page counter of the laser unit is reset, and the number of replacement times is replaced with a new one, the develop roller counter and developing bias voltage are reset at the same time in the display... is being opened. (1) Press the [Clear/Back] button while the front cover is opened . (2) The "Replace Drum ?" Yes 2. No" will appear on the LCD. (2) Press the [ ] button a few times to select "Laser". (3) Press the [OK] button. The "1. The developing bias voltage can be verified in the ready state....
...almost fixed density can be maintained from the beginning to the end. The page counter of the laser unit is reset, and the number of replacement times is replaced with a new one, the develop roller counter and developing bias voltage are reset at the same time in the display... is being opened. (1) Press the [Clear/Back] button while the front cover is opened . (2) The "Replace Drum ?" Yes 2. No" will appear on the LCD. (2) Press the [ ] button a few times to select "Laser". (3) Press the [OK] button. The "1. The developing bias voltage can be verified in the ready state....


