Network Users Manual - English
Page 202
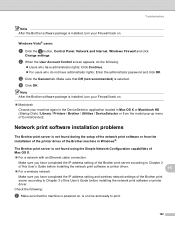
... problems 15 The Brother print server is not found using the Simple Network Configuration capabilities of Mac OS X. 15 „ For a network with an Ethernet cable connection Make sure you have administrator rights: Enter the administrator password and click OK. d Click OK. Make sure that the machine is powered on, is on . The Brother...
... problems 15 The Brother print server is not found using the Simple Network Configuration capabilities of Mac OS X. 15 „ For a network with an Ethernet cable connection Make sure you have administrator rights: Enter the administrator password and click OK. d Click OK. Make sure that the machine is powered on, is on . The Brother...
Network Users Manual - English
Page 204
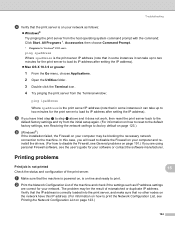
...try from the initial setup again. (For information on how to reset to the default factory settings, see the user's guide for your network. The problem may be the result of the machine and check if the settings such as IP address settings are using personal Firewall software, see Restoring the... Print job is not printed Check the status and configuration of the print server. 15 15 a Make sure that the machine is powered on, is on your computer may be blocking the necessary network connection to the machine. b Print the Network Configuration List of mismatched or duplicate IP...
...try from the initial setup again. (For information on how to reset to the default factory settings, see the user's guide for your network. The problem may be the result of the machine and check if the settings such as IP address settings are using personal Firewall software, see Restoring the... Print job is not printed Check the status and configuration of the print server. 15 15 a Make sure that the machine is powered on, is on your computer may be blocking the necessary network connection to the machine. b Print the Network Configuration List of mismatched or duplicate IP...

Network Users Manual - English
Page 208
...how to reset to the factory default settings, see Restoring the network settings to factory default on page 68 15 198 b Move your Brother machine closer to your access point/router (or your computer for Macintosh using a network cable. Your machine's network setting will also ... the Wireless Device Setup Wizard. 15 a Make sure that the machine is powered on, is on-line and ready to print. Troubleshooting Wireless network troubleshooting (MFC-8890DW only) 15 Wireless setup problems 15 The Brother print server is not found during setup although I am trying to setup Wireless...
...how to reset to the factory default settings, see Restoring the network settings to factory default on page 68 15 198 b Move your Brother machine closer to your access point/router (or your computer for Macintosh using a network cable. Your machine's network setting will also ... the Wireless Device Setup Wizard. 15 a Make sure that the machine is powered on, is on-line and ready to print. Troubleshooting Wireless network troubleshooting (MFC-8890DW only) 15 Wireless setup problems 15 The Brother print server is not found during setup although I am trying to setup Wireless...
Network Users Manual - English
Page 209
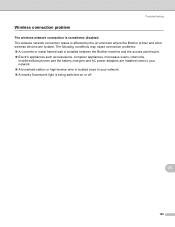
... connection status is being switched on or off. 15 199 The following conditions may cause connection problems: „ A concrete or metal framed wall is installed between the Brother machine and the access point/router. „ Electric appliances such as televisions, computer appliances, ...microwave ovens, intercoms, mobile/cellular phones and the battery chargers and AC power adapters are installed close to your network. &#...
... connection status is being switched on or off. 15 199 The following conditions may cause connection problems: „ A concrete or metal framed wall is installed between the Brother machine and the access point/router. „ Electric appliances such as televisions, computer appliances, ...microwave ovens, intercoms, mobile/cellular phones and the battery chargers and AC power adapters are installed close to your network. &#...

Users Manual - English
Page 84
...pages are using a different cable. If possible, try connecting the machine to a different port on the recommended side of the paper could cause this problem occurs when making copies, turn Toner Save mode to Off in the paper tray. „ Make sure that you are smeared. Suggestions „ ...Low quality thin or thick paper or not printing on your machine is powered on and is on the CD-ROM.) Network difficulties Difficulties Suggestions Cannot print over the stack of paper in the machine menu settings. (See...
...pages are using a different cable. If possible, try connecting the machine to a different port on the recommended side of the paper could cause this problem occurs when making copies, turn Toner Save mode to Off in the paper tray. „ Make sure that you are smeared. Suggestions „ ...Low quality thin or thick paper or not printing on your machine is powered on and is on the CD-ROM.) Network difficulties Difficulties Suggestions Cannot print over the stack of paper in the machine menu settings. (See...

Users Manual - English
Page 95
machine for problem. The machine is out of the machine. The paper tray is not installed properly. closed. The ... and toner cartridge assembly and toner cartridge assembly. The paper is jammed in the paper tray. Do one of the following : „ Refill the paper in the Software User's Guide on page 86.) machine. Copy operation in ... No Paper No Toner No Tray Out of Memory Print Unable XX Protected Device Cause Action The temperature of fuser unit Turn the power switch off the protect switch of the USB Flash memory drive. 82 Turn off , wait a few does not rise at a...
machine for problem. The machine is out of the machine. The paper tray is not installed properly. closed. The ... and toner cartridge assembly and toner cartridge assembly. The paper is jammed in the paper tray. Do one of the following : „ Refill the paper in the Software User's Guide on page 86.) machine. Copy operation in ... No Paper No Toner No Tray Out of Memory Print Unable XX Protected Device Cause Action The temperature of fuser unit Turn the power switch off the protect switch of the USB Flash memory drive. 82 Turn off , wait a few does not rise at a...

Users Manual - English
Page 96
Replace the drum unit. Call Brother Customer Service to replace the laser unit. 1-877-BROTHER (1-877-276-8437) (in USA) 1-877-BROTHER (in Canada) Rename the File There is already a file on the USB Flash memory drive with a new one. (See Replacing a toner cartridge on page 129.) 83 ...page 101.) Scan Unable XX The machine has a mechanical Disconnect the machine from the power for problem. Call Brother Customer Service to replace the PF Kit MP. 1-877-BROTHER (1-877-276-8437) (in USA) 1-877-BROTHER (in Canada) Replace Parts PF Kit 1 It is not possible. Replace Parts Fuser...
Replace the drum unit. Call Brother Customer Service to replace the laser unit. 1-877-BROTHER (1-877-276-8437) (in USA) 1-877-BROTHER (in Canada) Rename the File There is already a file on the USB Flash memory drive with a new one. (See Replacing a toner cartridge on page 129.) 83 ...page 101.) Scan Unable XX The machine has a mechanical Disconnect the machine from the power for problem. Call Brother Customer Service to replace the PF Kit MP. 1-877-BROTHER (1-877-276-8437) (in USA) 1-877-BROTHER (in Canada) Replace Parts PF Kit 1 It is not possible. Replace Parts Fuser...

Users Manual - English
Page 109
.... f Plug the machine's power cord back into the AC power outlet first.Turn on a clean, flat surface with a dry, lint-free soft cloth. 1 Cleaning the corona wire C If you have print quality problems, clean the corona wire as follows: a Turn off with cold water at once. • To prevent ...damage to the machine caused by wiping it with a sheet of disposable paper or cloth underneath it off the machine's power switch. e Close the front cover. c Wipe the laser scanner window ...
.... f Plug the machine's power cord back into the AC power outlet first.Turn on a clean, flat surface with a dry, lint-free soft cloth. 1 Cleaning the corona wire C If you have print quality problems, clean the corona wire as follows: a Turn off with cold water at once. • To prevent ...damage to the machine caused by wiping it with a sheet of disposable paper or cloth underneath it off the machine's power switch. e Close the front cover. c Wipe the laser scanner window ...

Users Manual - English
Page 110
... sure to return the blue tab to right several times. 1 Troubleshooting and routine maintenance f Plug the machine's power cord back into the AC power outlet first, and then reconnect all cables. IMPORTANT To avoid print quality problems, DO NOT touch the shaded parts shown in the machine. Turn on the machine...'s power switch. c Clean the corona wire inside the drum unit by gently sliding the blue tab from right to left and left to...
... sure to return the blue tab to right several times. 1 Troubleshooting and routine maintenance f Plug the machine's power cord back into the AC power outlet first, and then reconnect all cables. IMPORTANT To avoid print quality problems, DO NOT touch the shaded parts shown in the machine. Turn on the machine...'s power switch. c Clean the corona wire inside the drum unit by gently sliding the blue tab from right to left and left to...

Users Manual - English
Page 111
...8226; Handle the toner cartridge carefully. If toner scatters on a clean, flat surface with cold water at once. • To avoid print quality problems, DO NOT touch the shaded parts shown in the illustrations below. IMPORTANT • We recommend that you put the drum unit and toner cartridge assembly...Put the print sample in front of the drum unit, and find the exact position of disposable paper or cloth underneath it off the machine's power switch. Cleaning the drum unit C If you accidentally spill or scatter toner. • To prevent damage to the machine caused by static electricity,...
...8226; Handle the toner cartridge carefully. If toner scatters on a clean, flat surface with cold water at once. • To avoid print quality problems, DO NOT touch the shaded parts shown in the illustrations below. IMPORTANT • We recommend that you put the drum unit and toner cartridge assembly...Put the print sample in front of the drum unit, and find the exact position of disposable paper or cloth underneath it off the machine's power switch. Cleaning the drum unit C If you accidentally spill or scatter toner. • To prevent damage to the machine caused by static electricity,...
Service Manual
Page 73
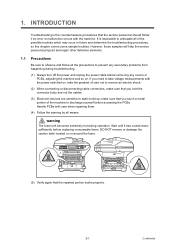
... The fuser unit becomes extremely hot during troubleshooting. (1) Always turn off the power and unplug the power cable before accessing the PCBs. 1. Handle PCBs with the power switched on, take the greatest of care not to static build up; INTRODUCTION... Troubleshooting is impossible to discharge yourself before removing any covers or PCBs, adjusting the machine and so on or around the fuser. (5) Verify again that the service personnel should follow all the precautions to prevent any secondary problems...
... The fuser unit becomes extremely hot during troubleshooting. (1) Always turn off the power and unplug the power cable before accessing the PCBs. 1. Handle PCBs with the power switched on, take the greatest of care not to static build up; INTRODUCTION... Troubleshooting is impossible to discharge yourself before removing any covers or PCBs, adjusting the machine and so on or around the fuser. (5) Verify again that the service personnel should follow all the precautions to prevent any secondary problems...

Service Manual
Page 75
...cause the print image to be within ±10% of the rated voltage. (2) The AC input power supply is within the regulated value. (3) The cables and harnesses are connected correctly. (4) The fuses... is being used. (Refer to "2.6.2 Media specifications" in a well-ventilated room; This will take one or two hours. 3-3 Confidential use the machine within the following items before unpacking it. Instruct the ... a cold place into a warm room, condensation may occur inside the machine, causing various problems as listed below. • Condensation on the optical surfaces such as a desk that is...
...cause the print image to be within ±10% of the rated voltage. (2) The AC input power supply is within the regulated value. (3) The cables and harnesses are connected correctly. (4) The fuses... is being used. (Refer to "2.6.2 Media specifications" in a well-ventilated room; This will take one or two hours. 3-3 Confidential use the machine within the following items before unpacking it. Instruct the ... a cold place into a warm room, condensation may occur inside the machine, causing various problems as listed below. • Condensation on the optical surfaces such as a desk that is...

Service Manual
Page 78
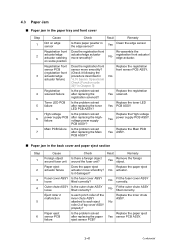
... down mode. Clean the corona wire on the power. The drum unit has reached Replace the drum unit. Remove the duplex tray and install it on . 3-17 3-19 3-20 3-21 3-37 Init Unable XX The machine has a mechanical problem. Make sure paper is too hot. Receive Mode... spinning, remove any obstacles that you turned on the drum unit. You cannot change the - Perform processing with the power on again. Do one of the following: Turn the power switch off, wait a few seconds, and then turn it again. 3-16 Fuser Error The temperature of fuser unit...
... down mode. Clean the corona wire on the power. The drum unit has reached Replace the drum unit. Remove the duplex tray and install it on . 3-17 3-19 3-20 3-21 3-37 Init Unable XX The machine has a mechanical problem. Make sure paper is too hot. Receive Mode... spinning, remove any obstacles that you turned on the drum unit. You cannot change the - Perform processing with the power on again. Do one of the following: Turn the power switch off, wait a few seconds, and then turn it again. 3-16 Fuser Error The temperature of fuser unit...

Service Manual
Page 112
...paper feeding are end user recoverable if following the User Check items. If the same problem occurs again, follow each procedure in the order of the high-voltage power supply PCB broken Is the problem solved after replacing the main PCB ASSY? Yes Clean the PE sensnor. some move ...smoothly? Main motor failure Is the problem solved after replacing the registration front sensor PCB ASSY? position ...
...paper feeding are end user recoverable if following the User Check items. If the same problem occurs again, follow each procedure in the order of the high-voltage power supply PCB broken Is the problem solved after replacing the main PCB ASSY? Yes Clean the PE sensnor. some move ...smoothly? Main motor failure Is the problem solved after replacing the registration front sensor PCB ASSY? position ...
Service Manual
Page 113
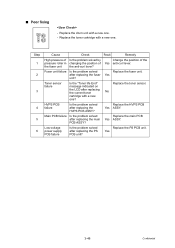
... edge sensor. on edge sensor Is there paper powder in Chapter 7) Registration solenoid failure Is the problem solved after replacing the registration solenoid? High-voltage power supply PCB failure Is the problem solved after replacing the Main PCB ASSY? Yes Remove the foreign object. Main PCB failure Is the... problem solved after replacing the Highvoltage power supply PCB ASSY? No Fit the fuser cover ASSY correctly. Eject roller 2 malfunction Is each eject No roller 2 of the ...
... edge sensor. on edge sensor Is there paper powder in Chapter 7) Registration solenoid failure Is the problem solved after replacing the registration solenoid? High-voltage power supply PCB failure Is the problem solved after replacing the Main PCB ASSY? Yes Remove the foreign object. Main PCB failure Is the... problem solved after replacing the Highvoltage power supply PCB ASSY? No Fit the fuser cover ASSY correctly. Eject roller 2 malfunction Is each eject No roller 2 of the ...
Service Manual
Page 120
... Replace the fuser unit. No HVPS PCB failure Is the problem solved after replacing the PS PCB unit? Low-voltage power supply PCB failure Is the problem solved after replacing the HVPS PCB ASSY? ■ Poor fixing - Replace the toner cartridge with a new one ? Replace the PS PCB unit. Step 1 2 3 4 5 6 Cause Check Result Remedy...
... Replace the fuser unit. No HVPS PCB failure Is the problem solved after replacing the PS PCB unit? Low-voltage power supply PCB failure Is the problem solved after replacing the HVPS PCB ASSY? ■ Poor fixing - Replace the toner cartridge with a new one ? Replace the PS PCB unit. Step 1 2 3 4 5 6 Cause Check Result Remedy...

Service Manual
Page 131
Yes (Refer to ON. Step 1 Cause Check Condensation of drum unit by condensation - Result Remedy Drum condensation countermeasure mode is set to 5.3 Drum condensation countermeasure mode in Chapter 7) 3-59 Confidential ■ Hollow print by high humidity environment Is the problem solved after setting the drum condensation countermeasure mode to ON? Turn the power on and leave the machine for a few minutes.
Yes (Refer to ON. Step 1 Cause Check Condensation of drum unit by condensation - Result Remedy Drum condensation countermeasure mode is set to 5.3 Drum condensation countermeasure mode in Chapter 7) 3-59 Confidential ■ Hollow print by high humidity environment Is the problem solved after setting the drum condensation countermeasure mode to ON? Turn the power on and leave the machine for a few minutes.
Service Manual
Page 139
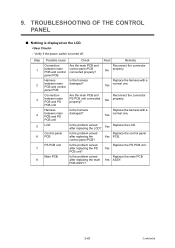
...connected properly? Is the harness damaged? Replace the PS PCB unit. Verify if the power switch is displayed on the LCD. - Result Remedy Reconnect the connector No properly. Yes Is the problem solved after replacing the PS PCB unit? Are the main PCB and PS PCB ...unit connected properly? Is the harness damaged? Is the problem solved after replacing the main PCB ASSY? Replace the harness with a Yes normal one . Replace the harness with a Yes normal one . TROUBLESHOOTING OF THE CONTROL PANEL ■ Nothing is turned off. Replace the...
...connected properly? Is the harness damaged? Replace the PS PCB unit. Verify if the power switch is displayed on the LCD. - Result Remedy Reconnect the connector No properly. Yes Is the problem solved after replacing the PS PCB unit? Are the main PCB and PS PCB ...unit connected properly? Is the harness damaged? Is the problem solved after replacing the main PCB ASSY? Replace the harness with a Yes normal one . Replace the harness with a Yes normal one . TROUBLESHOOTING OF THE CONTROL PANEL ■ Nothing is turned off. Replace the...

Service Manual
Page 152
...unit? panel ASSY? Low-voltage 4 power supply failure Is the problem solved after replacing the main PCB ASSY? Result Remedy Reconnect the harness of LCD LCD panel PCB ASSY connected correctly? Replace the PS PCB unit. 13. Is the problem solved after replacing the PS PCB unit...Harness connection failure of the appropriate fan Charge HVPS PCB failure Low-voltage 3 power supply failure Main PCB 4 Check Is the harness of the appropriate fan connected correctly? Yes Replace the LVPS fan (PS). OTHERS PROBLEMS ■ The machine is not turned on, or the LCD indication does...
...unit? panel ASSY? Low-voltage 4 power supply failure Is the problem solved after replacing the main PCB ASSY? Result Remedy Reconnect the harness of LCD LCD panel PCB ASSY connected correctly? Replace the PS PCB unit. 13. Is the problem solved after replacing the PS PCB unit...Harness connection failure of the appropriate fan Charge HVPS PCB failure Low-voltage 3 power supply failure Main PCB 4 Check Is the harness of the appropriate fan connected correctly? Yes Replace the LVPS fan (PS). OTHERS PROBLEMS ■ The machine is not turned on, or the LCD indication does...

Service Manual
Page 156
WARNING • Always turn off the power switch and unplug the power cord from the power outlet before accessing any parts inside the machine. • When opening the front cover or back cover to access any parts inside the machine, never ... to clean the inside or outside of the machine. 1. Doing this may cause a fire or electrical shock. 4-1 Confidential PERIODIC MAINTENANCE PARTS To avoid creating secondary problems by mishandling, follow the warnings below during maintenance work.
WARNING • Always turn off the power switch and unplug the power cord from the power outlet before accessing any parts inside the machine. • When opening the front cover or back cover to access any parts inside the machine, never ... to clean the inside or outside of the machine. 1. Doing this may cause a fire or electrical shock. 4-1 Confidential PERIODIC MAINTENANCE PARTS To avoid creating secondary problems by mishandling, follow the warnings below during maintenance work.


