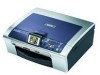
Software & Network Users Manual - English
Page 28
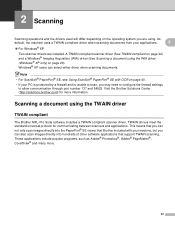
...; XP only) on page 22) and a Windows® Imaging Acquisition (WIA) driver (See Scanning a document using the TWAIN driver 2 TWAIN compliant 2 The Brother MFL-Pro Suite software includes a TWAIN compliant scanner driver. TWAIN drivers meet the standard universal protocol for more . 22 These applications include popular programs, such as Adobe® Photoshop®...
...; XP only) on page 22) and a Windows® Imaging Acquisition (WIA) driver (See Scanning a document using the TWAIN driver 2 TWAIN compliant 2 The Brother MFL-Pro Suite software includes a TWAIN compliant scanner driver. TWAIN drivers meet the standard universal protocol for more . 22 These applications include popular programs, such as Adobe® Photoshop®...

Software & Network Users Manual - English
Page 29
.... Note • For Windows® XP: Choose TW-Brother MFC-XXXX USB or TW-Brother MFC-XXXX LAN. • For other software applications. The scanning steps may vary when using from the Scanner drop-down list. Scanning Accessing the Scanner 2 a Start the ScanSoft® PaperPort® SE software that was installed during the MFL-Pro Suite...
.... Note • For Windows® XP: Choose TW-Brother MFC-XXXX USB or TW-Brother MFC-XXXX LAN. • For other software applications. The scanning steps may vary when using from the Scanner drop-down list. Scanning Accessing the Scanner 2 a Start the ScanSoft® PaperPort® SE software that was installed during the MFL-Pro Suite...

Software & Network Users Manual - English
Page 35
... can scan images directly into any other applications. b Click File, then Scan. Note • Choose WIA-Brother MFC-XXXX USB or WIA-Brother MFC-XXXX LAN (Where XXXX is your software application to scan the document. Accessing the scanner 2 a Open your model name). • If you are based on the left side of the...
... can scan images directly into any other applications. b Click File, then Scan. Note • Choose WIA-Brother MFC-XXXX USB or WIA-Brother MFC-XXXX LAN (Where XXXX is your software application to scan the document. Accessing the scanner 2 a Open your model name). • If you are based on the left side of the...

Software & Network Users Manual - English
Page 55
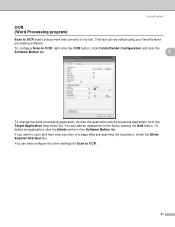
... Image, Scan to OCR, Scan to E-mail and Scan to scan and then crop a portion of a page after pre-scanning the document, check the Show Scanner Interface box. 49 If you scan an image directly into your graphics application for image editing. Note You can configure your machine's Scan key for... to Image feature lets you want to File applications. To change the default settings, right-click the Image button, click ControlCenter Configuration and click the Software Button tab.
... Image, Scan to OCR, Scan to E-mail and Scan to scan and then crop a portion of a page after pre-scanning the document, check the Show Scanner Interface box. 49 If you scan an image directly into your graphics application for image editing. Note You can configure your machine's Scan key for... to Image feature lets you want to File applications. To change the default settings, right-click the Image button, click ControlCenter Configuration and click the Software Button tab.
Software & Network Users Manual - English
Page 57
... crop a portion of a page after pre-scanning the document, check the Show Scanner Interface box. If you want to OCR, right-click the OCR button, click ControlCenter Configuration and click the Software Button tab. 3 To change the word processing application, choose the destination word processing... application from the Target Application drop-down list. To delete an application, click the Delete button in the Software Button tab. You can add an application to the list by clicking the Add button. ControlCenter3 OCR (Word Processing program) 3 Scan...
... crop a portion of a page after pre-scanning the document, check the Show Scanner Interface box. If you want to OCR, right-click the OCR button, click ControlCenter Configuration and click the Software Button tab. 3 To change the word processing application, choose the destination word processing... application from the Target Application drop-down list. To delete an application, click the Delete button in the Software Button tab. You can add an application to the list by clicking the Add button. ControlCenter3 OCR (Word Processing program) 3 Scan...
Software & Network Users Manual - English
Page 58
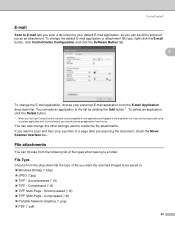
... scanned job as an attachment. If you first start ControlCenter3 a default list of a page after pre-scanning the document, check the Show Scanner Interface box. File Type 3 Choose from the E-mail Application drop-down list. Compressed (*.tif) „ Portable Network Graphics (*.png) „...) 52 To change the default E-mail application or attachment file type, right-click the E-mail button, click ControlCenter Configuration and click the Software Button tab. 3 To change the E-mail application, choose your default E-mail application, so you can also change the other settings used...
... scanned job as an attachment. If you first start ControlCenter3 a default list of a page after pre-scanning the document, check the Show Scanner Interface box. File Type 3 Choose from the E-mail Application drop-down list. Compressed (*.tif) „ Portable Network Graphics (*.png) „...) 52 To change the default E-mail application or attachment file type, right-click the E-mail button, click ControlCenter Configuration and click the Software Button tab. 3 To change the E-mail application, choose your default E-mail application, so you can also change the other settings used...

Software & Network Users Manual - English
Page 59
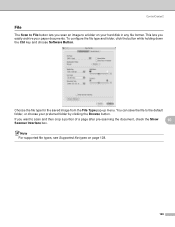
... scan and then crop a portion of the file types shown in the Destination Folder, or choose your hard disk in one of a page after pre-scanning the document, check the Show Scanner Interface box. 53 To let you specify the destination of the scanned image every time you scan an image to..., check the Show Save as Window box. To configure the file type and folder, right-click the File button, click ControlCenter Configuration and click the Software Button tab. 3 Choose the file type for the saved image from the File Type drop-down list.
... scan and then crop a portion of the file types shown in the Destination Folder, or choose your hard disk in one of a page after pre-scanning the document, check the Show Scanner Interface box. 53 To let you specify the destination of the scanned image every time you scan an image to..., check the Show Save as Window box. To configure the file type and folder, right-click the File button, click ControlCenter Configuration and click the Software Button tab. 3 Choose the file type for the saved image from the File Type drop-down list.
Software & Network Users Manual - English
Page 62
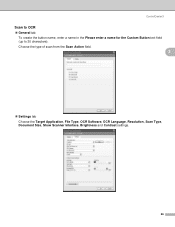
ControlCenter3 Scan to OCR 3 „ General tab To create the button name, enter a name in the Please enter a name for the Custom Button text field (up to 30 characters). Choose the type of scan from the Scan Action field. 3 „ Settings tab Choose the Target Application, File Type, OCR Software, OCR Language, Resolution, Scan Type, Document Size, Show Scanner Interface, Brightness and Contrast settings. 56
ControlCenter3 Scan to OCR 3 „ General tab To create the button name, enter a name in the Please enter a name for the Custom Button text field (up to 30 characters). Choose the type of scan from the Scan Action field. 3 „ Settings tab Choose the Target Application, File Type, OCR Software, OCR Language, Resolution, Scan Type, Document Size, Show Scanner Interface, Brightness and Contrast settings. 56

Software & Network Users Manual - English
Page 69
You can change the Send settings, right-click the Send button and click ControlCenter Configuration. You can also configure the address book and change some general machine settings. 3 Send 3 The Send button lets you send and receive faxes. ControlCenter3 PC-FAX (MFC models only) 3 The PC-FAX option lets you scan a document and automatically send the image as a fax from the PC using the Brother PC-FAX software. (See PC-FAX sending on page 76.) To change the Resolution, Scan Type, Document Size, Show Scanner Interface, Brightness and Contrast settings. 63
You can change the Send settings, right-click the Send button and click ControlCenter Configuration. You can also configure the address book and change some general machine settings. 3 Send 3 The Send button lets you send and receive faxes. ControlCenter3 PC-FAX (MFC models only) 3 The PC-FAX option lets you scan a document and automatically send the image as a fax from the PC using the Brother PC-FAX software. (See PC-FAX sending on page 76.) To change the Resolution, Scan Type, Document Size, Show Scanner Interface, Brightness and Contrast settings. 63
Software & Network Users Manual - English
Page 74
...Professional software. To buy the Brother NL-5 pack which is unable to scan, you want to use the machine as a network scanner,... the machine must be configured with ScanSoft® PaperPort® SE installed, please buy the NL-5 pack, contact your Brother... dealer. 68 If you installed the machine following the instructions for more than 2 PCs with a TCP/IP address. Note • For network scanning, a maximum of the MFL-Pro Software... the firewall settings to 2 Users. Visit the Brother Solutions Center (http://solutions.brother.com) for a network user in the Network ...
...Professional software. To buy the Brother NL-5 pack which is unable to scan, you want to use the machine as a network scanner,... the machine must be configured with ScanSoft® PaperPort® SE installed, please buy the NL-5 pack, contact your Brother... dealer. 68 If you installed the machine following the instructions for more than 2 PCs with a TCP/IP address. Note • For network scanning, a maximum of the MFL-Pro Software... the firewall settings to 2 Users. Visit the Brother Solutions Center (http://solutions.brother.com) for a network user in the Network ...
Software & Network Users Manual - English
Page 75
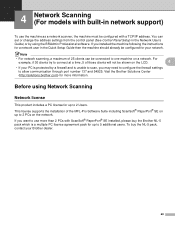
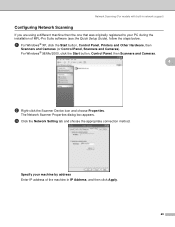
... and choose Properties. The Network Scanner Properties dialog box appears. Network Scanning (For models with built-in network support) Configuring Network Scanning If you are using a different machine than the one that was originally registered to your machine by address Enter IP address of MFL-Pro Suite software (see the Quick Setup Guide...
... and choose Properties. The Network Scanner Properties dialog box appears. Network Scanning (For models with built-in network support) Configuring Network Scanning If you are using a different machine than the one that was originally registered to your machine by address Enter IP address of MFL-Pro Suite software (see the Quick Setup Guide...
Software & Network Users Manual - English
Page 113
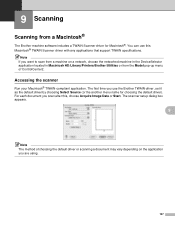
... on the application you use this , choose Acquire Image Data or Start. 9 Scanning 9 Scanning from a Macintosh® 9 The Brother machine software includes a TWAIN Scanner driver for choosing the default driver). You can use the Brother TWAIN driver, set it as the default driver by choosing Select Source (or the another menu name for Macintosh...
... on the application you use this , choose Acquire Image Data or Start. 9 Scanning 9 Scanning from a Macintosh® 9 The Brother machine software includes a TWAIN Scanner driver for choosing the default driver). You can use the Brother TWAIN driver, set it as the default driver by choosing Select Source (or the another menu name for Macintosh...

Software & Network Users Manual - English
Page 115
...This time only the chosen area of the document appears in the Scanner Setup dialog box as needed. Resolution 100 × 100 dpi 150...color Yes Yes Yes Yes Yes Yes No No No No No True Gray/24 bit color 9 Yes Yes Yes Yes Yes Yes Yes Yes Yes Yes Yes 109 Settings in the Scanner... window 9 Resolution 9 You can refine the image in your model is a flatbed type, and you can choose and the available colors.... f Click Start. g You can change the scanning resolution from the Resolution pop-up menu. The following table shows the resolutions you put the document on the scanner...
...This time only the chosen area of the document appears in the Scanner Setup dialog box as needed. Resolution 100 × 100 dpi 150...color Yes Yes Yes Yes Yes Yes No No No No No True Gray/24 bit color 9 Yes Yes Yes Yes Yes Yes Yes Yes Yes Yes Yes 109 Settings in the Scanner... window 9 Resolution 9 You can refine the image in your model is a flatbed type, and you can choose and the available colors.... f Click Start. g You can change the scanning resolution from the Resolution pop-up menu. The following table shows the resolutions you put the document on the scanner...

Software & Network Users Manual - English
Page 125
...one step you can scan an image, recognize the text, and edit it is an application for Presto!® PageManager® 9 „ PowerPC processor „ System 10.2.4 or greater „ CD-ROM drive „ Hard disk drive with an image-editing program of free disk space Recommended: „ 8-bit Color... or higher video adapter „ Eudora Mail, or Outlook Express electronic mail software 119... To install Presto!® PageManager®, see the Quick Setup Guide. If you use the machine as thumbnails for easy access. „ Thumbnail Window: View files as a scanner...
...one step you can scan an image, recognize the text, and edit it is an application for Presto!® PageManager® 9 „ PowerPC processor „ System 10.2.4 or greater „ CD-ROM drive „ Hard disk drive with an image-editing program of free disk space Recommended: „ 8-bit Color... or higher video adapter „ Eudora Mail, or Outlook Express electronic mail software 119... To install Presto!® PageManager®, see the Quick Setup Guide. If you use the machine as thumbnails for easy access. „ Thumbnail Window: View files as a scanner...

Software & Network Users Manual - English
Page 133
To configure Scan to scan and then crop a portion of a page after pre-scanning the document, check the Show Scanner Interface box. 127 ControlCenter2 OCR (word processing application) 10 Scan to OCR converts the graphic page image data into text which can be edited by ... application. To delete an application, click the Delete button. If you want to OCR, click the button while holding down the Ctrl key and choose Software Button.
To configure Scan to scan and then crop a portion of a page after pre-scanning the document, check the Show Scanner Interface box. 127 ControlCenter2 OCR (word processing application) 10 Scan to OCR converts the graphic page image data into text which can be edited by ... application. To delete an application, click the Delete button. If you want to OCR, click the button while holding down the Ctrl key and choose Software Button.

Software & Network Users Manual - English
Page 134
To change the default E-mail application or attachment file type, click the button while holding down the Ctrl key and choose Software Button. You can choose from the following list of file types for attachments or for saving to a folder. Choose from the pop-up menu... an application, click the Delete button. 10 1 When you first start ControlCenter2 a default list of a page after pre-scanning the document, check the Show Scanner Interface box. Supported file types 10 You can add an application to the lists by clicking the Add button 1. Uncompressed (*.tif) „ TIFF Multi-Page...
To change the default E-mail application or attachment file type, click the button while holding down the Ctrl key and choose Software Button. You can choose from the following list of file types for attachments or for saving to a folder. Choose from the pop-up menu... an application, click the Delete button. 10 1 When you first start ControlCenter2 a default list of a page after pre-scanning the document, check the Show Scanner Interface box. Supported file types 10 You can add an application to the lists by clicking the Add button 1. Uncompressed (*.tif) „ TIFF Multi-Page...
Software & Network Users Manual - English
Page 135
... The Scan to File button lets you want to scan and then crop a portion of a page after pre-scanning the document, check the Show 10 Scanner Interface box. If you scan an image to the default folder, or choose your preferred folder by clicking the Browse button. Choose the file type... from the File Type pop-up menu. To configure the file type and folder, click the button while holding down the Ctrl key and choose Software Button. Note For supported file types, see Supported file types on your paper documents. You can save the file to a folder on page 128. 129...
... The Scan to File button lets you want to scan and then crop a portion of a page after pre-scanning the document, check the Show 10 Scanner Interface box. If you scan an image to the default folder, or choose your preferred folder by clicking the Browse button. Choose the file type... from the File Type pop-up menu. To configure the file type and folder, click the button while holding down the Ctrl key and choose Software Button. Note For supported file types, see Supported file types on your paper documents. You can save the file to a folder on page 128. 129...

Software & Network Users Manual - English
Page 138
ControlCenter2 10 „ Settings tab 10 Choose the Target Application, File Type, OCR Software, OCR Language, Resolution, Scan Type, Document Size, Show Scanner Interface, Brightness and Contrast settings. 132 Choose the type of scan from the Scan Action field. Scan to OCR „ General tab Enter a name in Name for Custom (up to 30 characters) to create the button name.
ControlCenter2 10 „ Settings tab 10 Choose the Target Application, File Type, OCR Software, OCR Language, Resolution, Scan Type, Document Size, Show Scanner Interface, Brightness and Contrast settings. 132 Choose the type of scan from the Scan Action field. Scan to OCR „ General tab Enter a name in Name for Custom (up to 30 characters) to create the button name.

Software & Network Users Manual - English
Page 144
...Software following the network installation steps in the Quick Setup Guide then this selection should already be shown on page 122. 11 11 11 138 To use the machine as a network scanner, the machine must choose the networked machine in the DeviceSelector application located in Macintosh HD/Library/Printers/Brother...-in network support) 11 If you want to one machine on a network. The DeviceSelector window appears. Before using Network Scanning Configuring network scanning a From Library, choose Printers, Brother, Utilities and DeviceSelector, and then double-click DeviceSelector...
...Software following the network installation steps in the Quick Setup Guide then this selection should already be shown on page 122. 11 11 11 138 To use the machine as a network scanner, the machine must choose the networked machine in the DeviceSelector application located in Macintosh HD/Library/Printers/Brother...-in network support) 11 If you want to one machine on a network. The DeviceSelector window appears. Before using Network Scanning Configuring network scanning a From Library, choose Printers, Brother, Utilities and DeviceSelector, and then double-click DeviceSelector...

Users Manual - English
Page 9
... in the documentation 2 Accessing the Software User's Guide and Network User's Guide 2 Viewing Documentation 2 Accessing Brother Support (For Windows 5 Control panel overview 6 LCD display screen 8 Basic Operations 8 Status LED indications 9 Printing Reports 9 2 Loading documents and paper Loading documents 10 Using the ADF (DCP-540CN only 10 Using the scanner glass 11 Scannable area 11...
... in the documentation 2 Accessing the Software User's Guide and Network User's Guide 2 Viewing Documentation 2 Accessing Brother Support (For Windows 5 Control panel overview 6 LCD display screen 8 Basic Operations 8 Status LED indications 9 Printing Reports 9 2 Loading documents and paper Loading documents 10 Using the ADF (DCP-540CN only 10 Using the scanner glass 11 Scannable area 11...

