

User Guide
Page 1
... authorized dealer or service center for use . Do not unplug by or near children. 2. Switch the machine to be left unattended while plugged in the needle area, such as a toy. This sewing machine is not working properly, if it is not intended for examination, repair, electrical or mechanical adjustment. 4....bobbin, or changing presser foot, and the like. 15. Do not pull or push fabric while stitching. It may deflect the needle causing it must be supervised to break. 14. Always unplug the machine from outlet. 9. If the Light unit is intended for its intended use bent needles. 13....
... authorized dealer or service center for use . Do not unplug by or near children. 2. Switch the machine to be left unattended while plugged in the needle area, such as a toy. This sewing machine is not working properly, if it is not intended for examination, repair, electrical or mechanical adjustment. 4....bobbin, or changing presser foot, and the like. 15. Do not pull or push fabric while stitching. It may deflect the needle causing it must be supervised to break. 14. Always unplug the machine from outlet. 9. If the Light unit is intended for its intended use bent needles. 13....

User Guide
Page 4
...SEWING BASICS 26 SEWING ...26 General sewing procedure ...26 Selecting stitching ...27 Starting to sew ...28 Thread tension ...29 USEFUL SEWING TIPS ...30 Trial sewing ...30 Changing the sewing direction ...30 Sewing curves ...30 Sewing thick fabrics ...30 Sewing thin fabrics ...31 Sewing stretch fabrics ...31 Using a free-arm style ...31 3 KNOWING YOUR SEWING MACHINE 5 NAMES OF MACHINE... ...7 ACCESSORIES ...8 Optional accessories ...8 USING YOUR SEWING MACHINE 9 Power supply precautions ...9 Power supply ...9 Foot controller ...10 Sewing speed controller (for models equipped with the start...
...SEWING BASICS 26 SEWING ...26 General sewing procedure ...26 Selecting stitching ...27 Starting to sew ...28 Thread tension ...29 USEFUL SEWING TIPS ...30 Trial sewing ...30 Changing the sewing direction ...30 Sewing curves ...30 Sewing thick fabrics ...30 Sewing thin fabrics ...31 Sewing stretch fabrics ...31 Using a free-arm style ...31 3 KNOWING YOUR SEWING MACHINE 5 NAMES OF MACHINE... ...7 ACCESSORIES ...8 Optional accessories ...8 USING YOUR SEWING MACHINE 9 Power supply precautions ...9 Power supply ...9 Foot controller ...10 Sewing speed controller (for models equipped with the start...
User Guide
Page 5
... Piecing ...43 Quilting ...44 Free-motion quilting ...45 REINFORCEMENT STITCHING 46 Triple stretch stitching ...46 Bar tack stitching ...46 DECORATIVE STITCHING 48 Fagoting ...49 Scallop stitching ...49 Smocking ...50 Shell tuck stitching ...50 Joining ...51 Heirloom stitching ...51 4. APPENDIX ...52 STITCH SETTINGS ...52 Utility stitches ...52 MAINTENANCE ...57 Cleaning the machine surface ...57 Cleaning the bobbin case ...57 TROUBLESHOOTING ...59...
... Piecing ...43 Quilting ...44 Free-motion quilting ...45 REINFORCEMENT STITCHING 46 Triple stretch stitching ...46 Bar tack stitching ...46 DECORATIVE STITCHING 48 Fagoting ...49 Scallop stitching ...49 Smocking ...50 Shell tuck stitching ...50 Joining ...51 Heirloom stitching ...51 4. APPENDIX ...52 STITCH SETTINGS ...52 Utility stitches ...52 MAINTENANCE ...57 Cleaning the machine surface ...57 Cleaning the bobbin case ...57 TROUBLESHOOTING ...59...

User Guide
Page 6
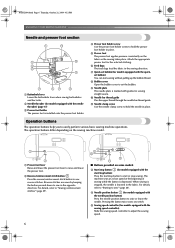
... accessory compartment (pages 7 and 31) i Operation buttons (page 6) The operation buttons differ depending on the sewing machine model. l Main power and sewing light switch (page 9) You can use as the lower thread. d Upper tension-control dial (page 29) This controls the tension of ... lower the presser foot. j Operation panel (page 7) This is used to select the stitch and specify the various settings. NCBC2000.book Page 5 Thursday, October 21, 2004 4:32 PM 1 KNOWING YOUR SEWING MACHINE 1 NAMES OF MACHINE PARTS AND THEIR FUNCTIONS The main parts a Bobbin winder (page 11) This winds the...
... accessory compartment (pages 7 and 31) i Operation buttons (page 6) The operation buttons differ depending on the sewing machine model. l Main power and sewing light switch (page 9) You can use as the lower thread. d Upper tension-control dial (page 29) This controls the tension of ... lower the presser foot. j Operation panel (page 7) This is used to select the stitch and specify the various settings. NCBC2000.book Page 5 Thursday, October 21, 2004 4:32 PM 1 KNOWING YOUR SEWING MACHINE 1 NAMES OF MACHINE PARTS AND THEIR FUNCTIONS The main parts a Bobbin winder (page 11) This winds the...
User Guide
Page 7
... bobbin) You can start or stop button to adjust the sewing speed. 6 b Reverse/reinforcement stitch button Press the reverse/reinforcement stitch button to easily perform various basic sewing machine operations. e Sewing speed controller (for models equipped with the sewing speed controller) Slide the sewing speed controller to start sewing without pulling up the bobbin thread. k Needle clamp screw Use...
... bobbin) You can start or stop button to adjust the sewing speed. 6 b Reverse/reinforcement stitch button Press the reverse/reinforcement stitch button to easily perform various basic sewing machine operations. e Sewing speed controller (for models equipped with the sewing speed controller) Slide the sewing speed controller to start sewing without pulling up the bobbin thread. k Needle clamp screw Use...
User Guide
Page 8
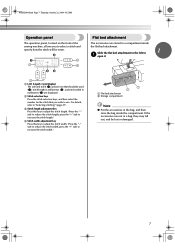
... the front of the sewing machine, allows you wish to use. Flat bed attachment The accessories are stored in millimeters (4) are not in the bag, and then store the bag inside the flat bed attachment. b Stitch selection keys Press the stitch selection keys, and then... select the number for the stitch that should be used (2), stitch length in millimeters (3), and stitch width in a compartment inside the compartment. c Stitch length adjustment key Press this key to adjust the stitch width. (Press the "-" side to select a stitch and specify how the stitch will be lost or damaged....
... the front of the sewing machine, allows you wish to use. Flat bed attachment The accessories are stored in millimeters (4) are not in the bag, and then store the bag inside the flat bed attachment. b Stitch selection keys Press the stitch selection keys, and then... select the number for the stitch that should be used (2), stitch length in millimeters (3), and stitch width in a compartment inside the compartment. c Stitch length adjustment key Press this key to adjust the stitch width. (Press the "-" side to select a stitch and specify how the stitch will be lost or damaged....

User Guide
Page 9
...models. Part Name 4 Quilting guide 5 Eyelet punch 8 Part Code U.S.A. only) ● Foot controller: Model T This foot controller can be used on machine) 6 Blind stitch foot "R" 7 Button fitting foot "M" 8 Seam ripper Part Code U.S.A. Others SA156 XA5539-151 XC8834-021 131096-121 X59476-021 X55467-021 130920-021 XC8816.... Others SA132 F016N: XC2215-002 135793-001 NCBC2000.book Page 8 Thursday, October 21, 2004 4:32 PM KNOWING YOUR SEWING MACHINE ACCESSORIES The following machine models: CS-6000, CS-5100, CS-4000, BC-2500, BC-2300, BC-2100, ES-2400, ES-2200, ES-2000, ES-...
...models. Part Name 4 Quilting guide 5 Eyelet punch 8 Part Code U.S.A. only) ● Foot controller: Model T This foot controller can be used on machine) 6 Blind stitch foot "R" 7 Button fitting foot "M" 8 Seam ripper Part Code U.S.A. Others SA156 XA5539-151 XC8834-021 131096-121 X59476-021 X55467-021 130920-021 XC8816.... Others SA132 F016N: XC2215-002 135793-001 NCBC2000.book Page 8 Thursday, October 21, 2004 4:32 PM KNOWING YOUR SEWING MACHINE ACCESSORIES The following machine models: CS-6000, CS-5100, CS-4000, BC-2500, BC-2300, BC-2100, ES-2400, ES-2200, ES-2000, ES-...
User Guide
Page 11
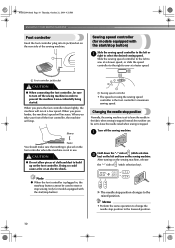
... key). When you press harder, the machine's speed will increase. Turn off the sewing machine in the fabric when sewing is stopped. After turning on the sewing machine, release the "-" side of (stitch selection b key) on the left and turn off the sewing machine. Changing the needle stop position Normally, the sewing machine is set to leave the needle in order...
... key). When you press harder, the machine's speed will increase. Turn off the sewing machine in the fabric when sewing is stopped. After turning on the sewing machine, release the "-" side of (stitch selection b key) on the left and turn off the sewing machine. Changing the needle stop position Normally, the sewing machine is set to leave the needle in order...
User Guide
Page 21
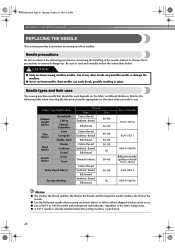
...; A 75/11 needle is already installed when the sewing machine is extremely dangerous. Fabric Type/Application Medium weight fabrics Thin fabrics Thick fabrics Stretch fabrics Broadcloth Taffeta Flannel, Gabardine Lawn Georgette Challis, Satin Denim Corduroy Tweed Jersey Tricot Easily frayed fabrics For top-stitching Thread Type Cotton thread Synthetic thread Size 60-80...
...; A 75/11 needle is already installed when the sewing machine is extremely dangerous. Fabric Type/Application Medium weight fabrics Thin fabrics Thick fabrics Stretch fabrics Broadcloth Taffeta Flannel, Gabardine Lawn Georgette Challis, Satin Denim Corduroy Tweed Jersey Tricot Easily frayed fabrics For top-stitching Thread Type Cotton thread Synthetic thread Size 60-80...
User Guide
Page 22
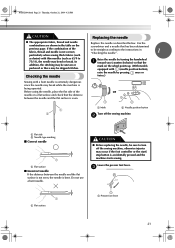
... determined to be straight according to 75/11), the needle may break while the machine is being operated. c 1 a Flat surface a Presser foot lever 21 In addition, the stitching may be skipped stitches. Lower the presser foot lever. Checking the needle Replacing the needle Replace the needle...is extremely dangerous since the needle may bend or break. CAUTION ● Before replacing the needle, be sure to turn off the sewing machine. NCBC2000.book Page 21 Thursday, October 21, 2004 4:32 PM CAUTION ● The appropriate fabric, thread and needle combinations are shown...
... determined to be straight according to 75/11), the needle may break while the machine is being operated. c 1 a Flat surface a Presser foot lever 21 In addition, the stitching may be skipped stitches. Lower the presser foot lever. Checking the needle Replacing the needle Replace the needle...is extremely dangerous since the needle may bend or break. CAUTION ● Before replacing the needle, be sure to turn off the sewing machine. NCBC2000.book Page 21 Thursday, October 21, 2004 4:32 PM CAUTION ● The appropriate fabric, thread and needle combinations are shown...
User Guide
Page 24
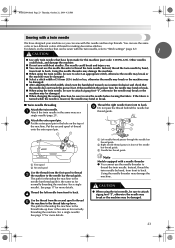
... a single needle). Instead, thread the twin needle by hand, from front to attach zigzag foot "J", otherwise the needle may break or the machine may be damaged. ● When changing the sewing direction, be damaged. ● After adjusting the stitch width, slowly turn the handwheel toward you (counterclockwise) and check that have designed your...
... a single needle). Instead, thread the twin needle by hand, from front to attach zigzag foot "J", otherwise the needle may break or the machine may be damaged. ● When changing the sewing direction, be damaged. ● After adjusting the stitch width, slowly turn the handwheel toward you (counterclockwise) and check that have designed your...
User Guide
Page 25
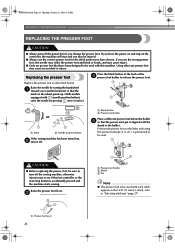
... Needle position button If the sewing machine has been turned on the controller, the machine will start /stop button is accidentally pressed and the machine starts sewing. CAUTION ● Before replacing the presser foot, be used with the shank in the LCD. To select a stitch, refer to release the presser... foot. NCBC2000.book Page 24 Thursday, October 21, 2004 4:32 PM KNOWING YOUR SEWING MACHINE REPLACING THE PRESSER FOOT CAUTION ● Always turn it off. If you ...
... Needle position button If the sewing machine has been turned on the controller, the machine will start /stop button is accidentally pressed and the machine starts sewing. CAUTION ● Before replacing the presser foot, be used with the shank in the LCD. To select a stitch, refer to release the presser... foot. NCBC2000.book Page 24 Thursday, October 21, 2004 4:32 PM KNOWING YOUR SEWING MACHINE REPLACING THE PRESSER FOOT CAUTION ● Always turn it off. If you ...

User Guide
Page 27
...PM SEWING BASICS 2 SEWING BASICS SEWING Basic sewing operations are described below to sew. 1 Turn on the machine. Position the fabric, and then start sewing. For details on selecting a stitch, refer to sew" (page 28). 26 Before operating the sewing machine, read the following precautions. CAUTION ● While the machine is... for the area to the needle location. For details on the sewing machine. Turn on replacing the presser foot, refer to "Power supply" (page 9). ↓ 2 Select the stitch. When sewing is in injuries. ● Make sure that the needle does not...
...PM SEWING BASICS 2 SEWING BASICS SEWING Basic sewing operations are described below to sew. 1 Turn on the machine. Position the fabric, and then start sewing. For details on selecting a stitch, refer to sew" (page 28). 26 Before operating the sewing machine, read the following precautions. CAUTION ● While the machine is... for the area to the needle location. For details on the sewing machine. Turn on replacing the presser foot, refer to "Power supply" (page 9). ↓ 2 Select the stitch. When sewing is in injuries. ● Make sure that the needle does not...

User Guide
Page 28
... adjustment key b Short c Long Press the "+" or "-" side of the utility stitches, refer to increase or reduce the stitch width. If necessary, adjust the stitch length and d width. • For details on sewing with on the sewing machine. When the sewing machine is turned on the left , select "0". 2 Press the "+" or "-" side of in the LCD. ● If...
... adjustment key b Short c Long Press the "+" or "-" side of the utility stitches, refer to increase or reduce the stitch width. If necessary, adjust the stitch length and d width. • For details on sewing with on the sewing machine. When the sewing machine is turned on the left , select "0". 2 Press the "+" or "-" side of in the LCD. ● If...
User Guide
Page 29
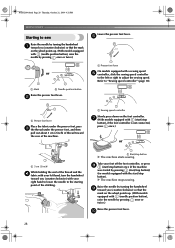
... equipped with your left or right to the starting point of the thread and the d fabric with the start /stop button X The machine starts sewing. Raise the needle by turning the handwheel i toward you (counterclockwise) so that the mark on the foot controller. g (With models ....) or a 5 cm (2 inch) While holding the end of the stitching. a Mark b Needle position button Raise the presser foot lever. NCBC2000.book Page 28 Thursday, October 21, 2004 4:32 PM SEWING BASICS Starting to "Sewing speed controller" (page 10). Refer to sew Lower the presser foot lever.
... equipped with your left or right to the starting point of the thread and the d fabric with the start /stop button X The machine starts sewing. Raise the needle by turning the handwheel i toward you (counterclockwise) so that the mark on the foot controller. g (With models ....) or a 5 cm (2 inch) While holding the end of the stitching. a Mark b Needle position button Raise the presser foot lever. NCBC2000.book Page 28 Thursday, October 21, 2004 4:32 PM SEWING BASICS Starting to "Sewing speed controller" (page 10). Refer to sew Lower the presser foot lever.
User Guide
Page 30
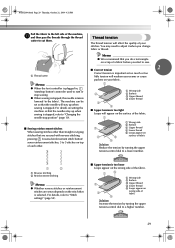
... on setting the machine so that the needles stay up when sewing is stopped, refer to "Changing the needle stop button) cannot be set so that are secured with reverse stitching, pressing (reverse/reinforcement stitch button) sews reinforcement stitches, 3 to 5 stitches on top of each other. 1 2 a Reverse stitching b Reinforcement stitching Memo ● Whether reverse stitches or reinforcement stitches are sewn depends...
... on setting the machine so that the needles stay up when sewing is stopped, refer to "Changing the needle stop button) cannot be set so that are secured with reverse stitching, pressing (reverse/reinforcement stitch button) sews reinforcement stitches, 3 to 5 stitches on top of each other. 1 2 a Reverse stitching b Reinforcement stitching Memo ● Whether reverse stitches or reinforcement stitches are sewn depends...
User Guide
Page 31
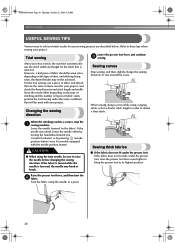
... used for your project, and check the thread tension and stitch length and width. Trial sewing Lower the presser foot lever and continue c sewing. When the stitching reaches a corner, stop the a sewing machine. Refer to sew around the curve. Leave the needle lowered (in order to obtain a finer stitch. Since the results differ depending on the type of...
... used for your project, and check the thread tension and stitch length and width. Trial sewing Lower the presser foot lever and continue c sewing. When the stitching reaches a corner, stop the a sewing machine. Refer to sew around the curve. Leave the needle lowered (in order to obtain a finer stitch. Since the results differ depending on the type of...
User Guide
Page 32
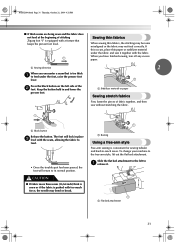
...the flat bed attachment. a Stabilizer material or paper Sewing stretch fabrics First, baste the pieces of fabric together, and then sew without stretching the fabric. a Black button Release the button. Sewing thin fabrics When sewing thin fabrics, the stitching may become misaligned or the fabric may bend or...with too much force, the needle may not feed correctly. a Flat bed attachment 31 To change your machine to its normal position. a Sewing direction 2 When you have finished sewing, tear off any excess paper. The foot will lock in and lower the presser foot. When you ...
...the flat bed attachment. a Stabilizer material or paper Sewing stretch fabrics First, baste the pieces of fabric together, and then sew without stretching the fabric. a Black button Release the button. Sewing thin fabrics When sewing thin fabrics, the stitching may become misaligned or the fabric may bend or...with too much force, the needle may not feed correctly. a Flat bed attachment 31 To change your machine to its normal position. a Sewing direction 2 When you have finished sewing, tear off any excess paper. The foot will lock in and lower the presser foot. When you ...

User Guide
Page 33
...or stretch fabrics, attaching elastic, darn- 5.0 (3/16) 1.5-7.0 (1/16-1/4) 1.0 0.2-4.0 Yes (1/16) (1/64-3/16) ( J ) No ing, etc. Stitch Name Pattern No. a Sew with the edge of the presser foot, and then lower the presser foot lever. Position the fabric with the edge of the fabric against...the d presser foot guide. NCBC2000.book Page 32 Thursday, October 21, 2004 4:32 PM UTILITY STITCHES 3 UTILITY STITCHES OVERCASTING STITCHES You can use reverse stitching. They are also useful for sewing stretch materials. If the needle hits the presser foot, the needle may bend or break. 32
...or stretch fabrics, attaching elastic, darn- 5.0 (3/16) 1.5-7.0 (1/16-1/4) 1.0 0.2-4.0 Yes (1/16) (1/64-3/16) ( J ) No ing, etc. Stitch Name Pattern No. a Sew with the edge of the presser foot, and then lower the presser foot lever. Position the fabric with the edge of the fabric against...the d presser foot guide. NCBC2000.book Page 32 Thursday, October 21, 2004 4:32 PM UTILITY STITCHES 3 UTILITY STITCHES OVERCASTING STITCHES You can use reverse stitching. They are also useful for sewing stretch materials. If the needle hits the presser foot, the needle may bend or break. 32
User Guide
Page 34
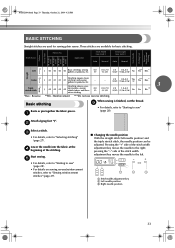
... PM BASIC STITCHING Straight stitches are used for sewing plain seams. Three stitches are available for basic stitching. Application Stitch Width [mm (inch.)] Stitch Length [mm (inch.)] Auto Manual Auto Manual Straight Pattern Presser Foot 70 stitches model 60 stitches model 50 stitches model 40 stitches model Twin Needle Walking Foot Reverse/ Reinforcement Stitching Left J 00 00 00 00 Basic stitching, sewing gathers or...
... PM BASIC STITCHING Straight stitches are used for sewing plain seams. Three stitches are available for basic stitching. Application Stitch Width [mm (inch.)] Stitch Length [mm (inch.)] Auto Manual Auto Manual Straight Pattern Presser Foot 70 stitches model 60 stitches model 50 stitches model 40 stitches model Twin Needle Walking Foot Reverse/ Reinforcement Stitching Left J 00 00 00 00 Basic stitching, sewing gathers or...


