
Users Manual - English
Page 4
... should be used. • Always consult the operation manual when replacing or installing any adjustments in injuries. 5 Special care is required around the machine needle. • Switch the machine to the symbol "O" position to turn it to break. 6 This machine is not a toy: • Your close... outdoors. 7 For a longer service life: • When storing this machine on the foot controller. • Do not use a damaged or incorrect needle plate, as a stove or iron; Keep ventilation openings of the machine and foot control free from all moving parts. Plug the machine directly into the...
... should be used. • Always consult the operation manual when replacing or installing any adjustments in injuries. 5 Special care is required around the machine needle. • Switch the machine to the symbol "O" position to turn it to break. 6 This machine is not a toy: • Your close... outdoors. 7 For a longer service life: • When storing this machine on the foot controller. • Do not use a damaged or incorrect needle plate, as a stove or iron; Keep ventilation openings of the machine and foot control free from all moving parts. Plug the machine directly into the...

Users Manual - English
Page 6
...6 ACCESSORIES ...6 Included accessories ...6 Optional accessories ...7 Accessory compartment ...7 NAMES OF MACHINE PARTS AND THEIR FUNCTIONS 8 The main parts ...8 Needle and presser foot section ...9 Operation buttons ...9 Operation panel ...10 Spool pin ...10 USING YOUR SEWING MACHINE 12 Power supply precautions ...12...threading ...22 Drawing up the lower thread ...27 REPLACING THE NEEDLE 28 Needle precautions ...28 Needle types and their uses ...28 Checking the needle ...29 Replacing the needle ...29 Sewing with the twin needle ...31 REPLACING THE PRESSER FOOT 33 Replacing the presser foot...
...6 ACCESSORIES ...6 Included accessories ...6 Optional accessories ...7 Accessory compartment ...7 NAMES OF MACHINE PARTS AND THEIR FUNCTIONS 8 The main parts ...8 Needle and presser foot section ...9 Operation buttons ...9 Operation panel ...10 Spool pin ...10 USING YOUR SEWING MACHINE 12 Power supply precautions ...12...threading ...22 Drawing up the lower thread ...27 REPLACING THE NEEDLE 28 Needle precautions ...28 Needle types and their uses ...28 Checking the needle ...29 Replacing the needle ...29 Sewing with the twin needle ...31 REPLACING THE PRESSER FOOT 33 Replacing the presser foot...

Users Manual - English
Page 8
... or damaged, contact your authorized dealer. (Part code: 132730-122) 1. 2. 3. 4. 5. 6. 7. 8. 9. 10. 11. 75/11 1 needle 90/14 1 needle 100/16 1 needle 16. 17. 18. 19. 12. 13. 90/14 1 needle 14. 15. Part Name 11 Twin needle 12 Ball point needle (gold colored) 13 Cleaning brush 14 Disc-shaped screwdriver 15 Spool cap (large) 16 Spool...
... or damaged, contact your authorized dealer. (Part code: 132730-122) 1. 2. 3. 4. 5. 6. 7. 8. 9. 10. 11. 75/11 1 needle 90/14 1 needle 100/16 1 needle 16. 17. 18. 19. 12. 13. 90/14 1 needle 14. 15. Part Name 11 Twin needle 12 Ball point needle (gold colored) 13 Cleaning brush 14 Disc-shaped screwdriver 15 Spool cap (large) 16 Spool...

Users Manual - English
Page 10
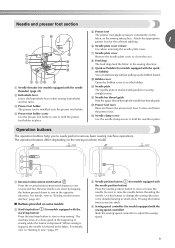
... this thread guide when winding the bobbin thread and threading the machine. h Operation panel (page 10) This is used to manually raise and lower the needle. m Jack/socket connector (page 12) Insert the plug on the sewing machine model. s Thread guide cover (pages 16 and 22) Pass the thread under this...
... this thread guide when winding the bobbin thread and threading the machine. h Operation panel (page 10) This is used to manually raise and lower the needle. m Jack/socket connector (page 12) Insert the plug on the sewing machine model. s Thread guide cover (pages 16 and 22) Pass the thread under this...
Users Manual - English
Page 11
... stitches" (page 40). ■ Buttons provided on some models b Start/stop sewing. For details, refer to "Starting to hold the needle in small areas. d Presser foot holder screw Use the presser foot holder screw to sew" (page 39). Operation buttons The operation buttons... pressure consistently on the sewing machine model. c Needle position button (for the selected stitching. 1 f Needle plate cover release Use when removing the needle plate cover. n Needle clamp screw Use the needle clamp screw to raise or lower the needle. c Presser foot holder The presser foot is depressed...
... stitches" (page 40). ■ Buttons provided on some models b Start/stop sewing. For details, refer to "Starting to hold the needle in small areas. d Presser foot holder screw Use the presser foot holder screw to sew" (page 39). Operation buttons The operation buttons... pressure consistently on the sewing machine model. c Needle position button (for the selected stitching. 1 f Needle plate cover release Use when removing the needle plate cover. n Needle clamp screw Use the needle clamp screw to raise or lower the needle. c Presser foot holder The presser foot is depressed...

Users Manual - English
Page 15
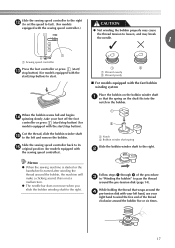
... speed, or slide the speed controller to the right to sew at a low speed. Slower a Sewing speed controller • The speed set to leave the needle in , the start /stop button). a Faster You should make sure that nothing is placed on the foot controller when the machine is the foot controller.... Doing so could cause a fire or an electric shock. Turn off the foot controller, the machine will stop button cannot be set to leave the needle raised when sewing is stopped. Foot controller Insert the foot controller plug into its jack/socket on the rear side of cloth and dust to...
... speed, or slide the speed controller to the right to sew at a low speed. Slower a Sewing speed controller • The speed set to leave the needle in , the start /stop button). a Faster You should make sure that nothing is placed on the foot controller when the machine is the foot controller.... Doing so could cause a fire or an electric shock. Turn off the foot controller, the machine will stop button cannot be set to leave the needle raised when sewing is stopped. Foot controller Insert the foot controller plug into its jack/socket on the rear side of cloth and dust to...

Users Manual - English
Page 18
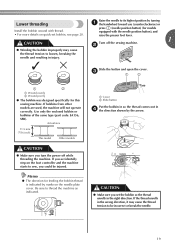
... Pull the thread to the right, pass it under the pretension disk. b Hook c Pretension disk d Pull it may tangle around the bobbin and cause the needle to wind the thread around the bobbin. i While holding the end of the bobbin-winding thread guide, and then wind the thread counterclockwise between the...
... Pull the thread to the right, pass it under the pretension disk. b Hook c Pretension disk d Pull it may tangle around the bobbin and cause the needle to wind the thread around the bobbin. i While holding the end of the bobbin-winding thread guide, and then wind the thread counterclockwise between the...
Users Manual - English
Page 19
...to the left and remove the bobbin. Memo ● When the sewing machine is started or the handwheel is not a malfunction. ● The needle bar does not move when you slide the bobbin winding shaft to the right. Cut the thread, slide the bobbin winder shaft o to wind the... models CAUTION equipped with the sewing speed controller.) ● Not winding the bobbin properly may cause the thread tension to loosen, and may break the needle. 1 a Sewing speed controller Press the foot controller or press (start/ m stop button) (for models equipped with the start/stop button) to pass the...
...to the left and remove the bobbin. Memo ● When the sewing machine is started or the handwheel is not a malfunction. ● The needle bar does not move when you slide the bobbin winding shaft to the right. Cut the thread, slide the bobbin winder shaft o to wind the... models CAUTION equipped with the sewing speed controller.) ● Not winding the bobbin properly may cause the thread tension to loosen, and may break the needle. 1 a Sewing speed controller Press the foot controller or press (start/ m stop button) (for models equipped with the start/stop button) to pass the...

Users Manual - English
Page 20
...using the cutter built into the slit in the bobbin winder seat, the thread may become tangled in the bobbin or the needle may break the needle. Note ● If the sewing machine is wound without cutting the thread using the foot controller, connect the foot controller before.../stop button). 1 2 a Wound evenly b Wound poorly Memo ● When the sewing machine is started or the handwheel is not a malfunction. ● The needle bar does not move when you slide the bobbin winding shaft to start sewing (only for models equipped with the start . a Sewing speed controller Turn...
...using the cutter built into the slit in the bobbin winder seat, the thread may become tangled in the bobbin or the needle may break the needle. Note ● If the sewing machine is wound without cutting the thread using the foot controller, connect the foot controller before.../stop button). 1 2 a Wound evenly b Wound poorly Memo ● When the sewing machine is started or the handwheel is not a malfunction. ● The needle bar does not move when you slide the bobbin winding shaft to start sewing (only for models equipped with the start . a Sewing speed controller Turn...
Users Manual - English
Page 21
... thread. c 1 2 1 2 a Wound evenly b Wound poorly ● The bobbin was designed specifically for models Install the bobbin wound with the needle position button), and • For more details on quick-set the bobbin so the thread unrolls in d the direction shown by marks on the foot.... 1 CAUTION Turn off while threading the machine. b ● Winding the bobbin improperly may cause the thread tension to loosen, breaking the needle and resulting in injury. Slide the button and open the cover. Actual size 11.5 mm (7/16 inch) This model Other models CAUTION ●...
... thread. c 1 2 1 2 a Wound evenly b Wound poorly ● The bobbin was designed specifically for models Install the bobbin wound with the needle position button), and • For more details on quick-set the bobbin so the thread unrolls in d the direction shown by marks on the foot.... 1 CAUTION Turn off while threading the machine. b ● Winding the bobbin improperly may cause the thread tension to loosen, breaking the needle and resulting in injury. Slide the button and open the cover. Actual size 11.5 mm (7/16 inch) This model Other models CAUTION ●...

Users Manual - English
Page 22
... then, after pulling the thread firmly around the tab with your left hand as shown, lightly pull the thread to be incorrect or break the needle. 20 Put the left side of the cover (as indicated. KNOWING YOUR SEWING MACHINE Hold the end of the thread, push the bobbin e down with... it through the tension-adjusting spring of the thread is indicated by marks on the right side (see arrow a), and then press lightly on the needle plate cover. a Cover b Slide button Insert the bobbin with your right hand so that the end of the thread comes out from the left tab...
... then, after pulling the thread firmly around the tab with your left hand as shown, lightly pull the thread to be incorrect or break the needle. 20 Put the left side of the cover (as indicated. KNOWING YOUR SEWING MACHINE Hold the end of the thread, push the bobbin e down with... it through the tension-adjusting spring of the thread is indicated by marks on the right side (see arrow a), and then press lightly on the needle plate cover. a Cover b Slide button Insert the bobbin with your right hand so that the end of the thread comes out from the left tab...

Users Manual - English
Page 24
... YOUR SEWING MACHINE Upper threading Set the upper thread and thread the needle. • For details on the wheel points up , or press (needle position button) (for models equipped with the needle position button) once or twice to "Needle types and their uses" (page 28). a Raise the presser foot... foot b lever. Be sure to turn the handwheel so that the mark on the correct combination of 20 or lower. ● Use the needle and the thread in the correct combination. Turn on the handwheel CAUTION ● When threading the upper thread, carefully follow the instructions. a Spool...
... YOUR SEWING MACHINE Upper threading Set the upper thread and thread the needle. • For details on the wheel points up , or press (needle position button) (for models equipped with the needle position button) once or twice to "Needle types and their uses" (page 28). a Raise the presser foot... foot b lever. Be sure to turn the handwheel so that the mark on the correct combination of 20 or lower. ● Use the needle and the thread in the correct combination. Turn on the handwheel CAUTION ● When threading the upper thread, carefully follow the instructions. a Spool...

Users Manual - English
Page 25
...being used , the thread may catch on the slit in the wrong place, or is in the spool or the needle may tangle on the spool pin lever d with your finger. Remove the spool cap. If the spool of thread is... right so that the spool is not positioned correctly, the thread may become tangled around the spool pin or the needle may bend or break. Slide the spool onto the pin so that the spool is too small for the upper... of the spool pin. As shown, press down on the spool pin and cause the needle to break. a Spool pin b Spool cap CAUTION ● Be sure to raise the spool pin before use.
...being used , the thread may catch on the slit in the wrong place, or is in the spool or the needle may tangle on the spool pin lever d with your finger. Remove the spool cap. If the spool of thread is... right so that the spool is not positioned correctly, the thread may become tangled around the spool pin or the needle may bend or break. Slide the spool onto the pin so that the spool is too small for the upper... of the spool pin. As shown, press down on the spool pin and cause the needle to break. a Spool pin b Spool cap CAUTION ● Be sure to raise the spool pin before use.
Users Manual - English
Page 26
...the thread guide cover with your left as shown in the j illustration below . a Thread take-up lever. Be sure to press the needle position button to raise the needle before threading the thread take -up lever from the back to left hand. Make sure you guide the thread through the k thread take... -up lever Memo ● If the needle is no slack in the illustration below . Hold the thread with fine, cross-wound thread, use the small spool cap, and leave a small space between...
...the thread guide cover with your left as shown in the j illustration below . a Thread take-up lever. Be sure to press the needle position button to raise the needle before threading the thread take -up lever from the back to left hand. Make sure you guide the thread through the k thread take... -up lever Memo ● If the needle is no slack in the illustration below . Hold the thread with fine, cross-wound thread, use the small spool cap, and leave a small space between...

Users Manual - English
Page 27
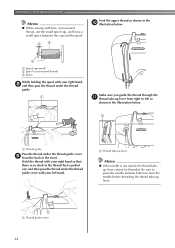
...5 cm (2 inches) Note ● If the thread take-up lever is lowered, the upper thread cannot be passed behind the needle bar thread l guide above the needle. ■ Using the needle threader (for models equipped with a 75/11 1 through m of the procedure a in your left hand, then feeding the thread... with CAUTION your right hand. ● The needle threader can be used with the needle threader). Make sure you raise the presser foot lever and the thread take -up lever before you feed the upper thread. &#...
...5 cm (2 inches) Note ● If the thread take-up lever is lowered, the upper thread cannot be passed behind the needle bar thread l guide above the needle. ■ Using the needle threader (for models equipped with a 75/11 1 through m of the procedure a in your left hand, then feeding the thread... with CAUTION your right hand. ● The needle threader can be used with the needle threader). Make sure you raise the presser foot lever and the thread take -up lever before you feed the upper thread. &#...

Users Manual - English
Page 28
... and then pull out about 5 cm (2 inches) of thread toward the rear of the needle. h a Hook b Thread While lightly holding the thread, release the f needle threader lever. KNOWING YOUR SEWING MACHINE Fully lower the needle threader lever. Raise the presser foot lever. The hook will pull the thread through the ...loop of thread CAUTION ● Be careful not to pull on the hook as shown below. e a Loop of the thread passed through the needle. a Presser foot lever Pass the end of the thread through the eye of the machine. Catch the thread on the thread with force or...
... and then pull out about 5 cm (2 inches) of thread toward the rear of the needle. h a Hook b Thread While lightly holding the thread, release the f needle threader lever. KNOWING YOUR SEWING MACHINE Fully lower the needle threader lever. Raise the presser foot lever. The hook will pull the thread through the ...loop of thread CAUTION ● Be careful not to pull on the hook as shown below. e a Loop of the thread passed through the needle. a Presser foot lever Pass the end of the thread through the eye of the machine. Catch the thread on the thread with force or...
Users Manual - English
Page 29
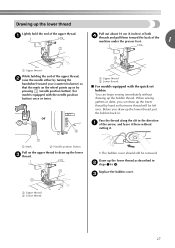
Before you draw up the lower c thread. • The bobbin cover should still be left over. c a Upper thread b Lower thread 27 a Mark b Needle position button Pull on the wheel points up the bobbin thread. Draw up the lower thread by hand so that the mark on the upper ... under the presser foot. 1 a Upper thread While holding the end of the upper thread. or a Upper thread b Lower thread ■ For models equipped with the needle position button) once or twice. Pass the thread along the slit in . Replace the bobbin cover. Drawing up the lower thread Lightly hold the end...
Before you draw up the lower c thread. • The bobbin cover should still be left over. c a Upper thread b Lower thread 27 a Mark b Needle position button Pull on the wheel points up the bobbin thread. Draw up the lower thread by hand so that the mark on the upper ... under the presser foot. 1 a Upper thread While holding the end of the upper thread. or a Upper thread b Lower thread ■ For models equipped with the needle position button) once or twice. Pass the thread along the slit in . Replace the bobbin cover. Drawing up the lower thread Lightly hold the end...

Users Manual - English
Page 30
... 50 50-60 50-60 50-90 50 30 50-60 Size of the needle. Use of weight 20 or lower. Bent needles can easily break, possibly resulting in injury. and the larger the needle number, the thicker the needle. 28 Failure to read and carefully follow the instructions below. Refer to sew.... information on the fabric and thread thickness. It may bend the needle or damage the machine. ● Never use bent needles. Needle types and their uses The sewing machine needle that you wish to the following precautions concerning the handling of Needle 75/11-90/14 65/9-75/11 100/16 90/14-100...
... 50 50-60 50-60 50-90 50 30 50-60 Size of the needle. Use of weight 20 or lower. Bent needles can easily break, possibly resulting in injury. and the larger the needle number, the thicker the needle. 28 Failure to read and carefully follow the instructions below. Refer to sew.... information on the fabric and thread thickness. It may bend the needle or damage the machine. ● Never use bent needles. Needle types and their uses The sewing machine needle that you wish to the following precautions concerning the handling of Needle 75/11-90/14 65/9-75/11 100/16 90/14-100...

Users Manual - English
Page 31
... surface fabric or thread. Checking the needle Replace the needle as denim) with a bent needle is extremely dangerous since the needle may break while the machine is being operated. ■ Ball point needle ■ Incorrect needle Use the ball point needle when sewing on the wheel points up...break. Do not use occur. CAUTION Replacing the needle ● The appropriate fabric, thread and needle combinations are shown in "Checking the needle". Use the disc-shaped screwdriver and a needle that the distance between the needle and the flat fabrics or fabrics where skipped ...
... surface fabric or thread. Checking the needle Replace the needle as denim) with a bent needle is extremely dangerous since the needle may break while the machine is being operated. ■ Ball point needle ■ Incorrect needle Use the ball point needle when sewing on the wheel points up...break. Do not use occur. CAUTION Replacing the needle ● The appropriate fabric, thread and needle combinations are shown in "Checking the needle". Use the disc-shaped screwdriver and a needle that the distance between the needle and the flat fabrics or fabrics where skipped ...

Users Manual - English
Page 32
... your left hand, and then d use the disc-shaped screwdriver to remove the needle. KNOWING YOUR SEWING MACHINE Lower the presser foot lever. Note ● The needle can be damaged. Install the twin needle in the needle plate. a Disc-shaped screwdriver b Needle clamp screw • Do not apply strong force when loosening or tightening the...
... your left hand, and then d use the disc-shaped screwdriver to remove the needle. KNOWING YOUR SEWING MACHINE Lower the presser foot lever. Note ● The needle can be damaged. Install the twin needle in the needle plate. a Disc-shaped screwdriver b Needle clamp screw • Do not apply strong force when loosening or tightening the...


