Users Manual - English
Page 1
KNOWING YOUR SEWING MACHINE SEWING BASICS UTILITY STITCHES APPENDIX Computerized Sewing Machine Operation Manual
KNOWING YOUR SEWING MACHINE SEWING BASICS UTILITY STITCHES APPENDIX Computerized Sewing Machine Operation Manual
Users Manual - English
Page 2
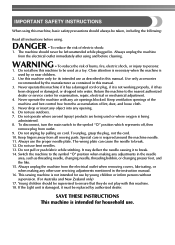
To reduce the risk of burns, fire, electric shock, or injury to break. 12. WARNING - Return the machine to the symbol "{" position which represents off, then remove plug from the accumulation of the machine and foot control free from outlet. 9. Do not use the proper needle plate. To disconnect, turn the main switch to the nearest authorized dealer or service center for household use by young children or infirm persons without supervision. (For Australia and New Zealand only) 17. Always use outdoors. 7. Do not pull or push fabric while stitching. Always unplug the machine from ...
To reduce the risk of burns, fire, electric shock, or injury to break. 12. WARNING - Return the machine to the symbol "{" position which represents off, then remove plug from the accumulation of the machine and foot control free from outlet. 9. Do not use the proper needle plate. To disconnect, turn the main switch to the nearest authorized dealer or service center for household use by young children or infirm persons without supervision. (For Australia and New Zealand only) 17. Always use outdoors. 7. Do not pull or push fabric while stitching. Always unplug the machine from ...
Users Manual - English
Page 3
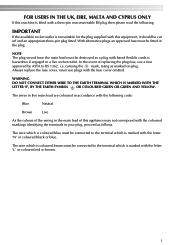
The wires in this main lead are coloured in accordance with the following . In the event of this machine is marked with the letter 'N' or coloured black or blue. The wire which is coloured blue must be connected to the terminal which is fitted with a three-pin non-rewireable BS plug then please read the following code: Blue Neutral Brown Live As the colours of the wiring in the main lead of replacing the plug fuse, use plugs with bared flexible cords is not suitable for the plug supplied with this equipment, it should be destroyed as a plug with the fuse cover ...
The wires in this main lead are coloured in accordance with the following . In the event of this machine is marked with the letter 'N' or coloured black or blue. The wire which is coloured blue must be connected to the terminal which is fitted with a three-pin non-rewireable BS plug then please read the following code: Blue Neutral Brown Live As the colours of the wiring in the main lead of replacing the plug fuse, use plugs with bared flexible cords is not suitable for the plug supplied with this equipment, it should be destroyed as a plug with the fuse cover ...
Users Manual - English
Page 4
... the machine • Leaving the machine unattended 3. Always consult the operation manual when replacing or installing any other parts to keep your local authorized Brother dealer. To fully enjoy all the features, we suggest that you study the manual before using the machine. For a longer service life 1. When...problem persists, please consult your eye on the foot controller. 4. For additional product information and updates, visit our web site at www.brother.com The contents of this manual and specifications of this machine, avoid direct sunlight and high humidity locations.
... the machine • Leaving the machine unattended 3. Always consult the operation manual when replacing or installing any other parts to keep your local authorized Brother dealer. To fully enjoy all the features, we suggest that you study the manual before using the machine. For a longer service life 1. When...problem persists, please consult your eye on the foot controller. 4. For additional product information and updates, visit our web site at www.brother.com The contents of this manual and specifications of this machine, avoid direct sunlight and high humidity locations.
Users Manual - English
Page 5
CONTENTS 1. SEWING BASICS 26 SEWING ...26 General sewing procedure ...26 Selecting stitching ...27 Starting to sew ...28 Thread tension ...29 USEFUL SEWING TIPS ...30 Trial sewing ...30 Changing the sewing direction ...30 Sewing curves ...30 Sewing thick fabrics ...30 Sewing thin fabrics ...31 Sewing stretch fabrics ...31 Using a free-arm style ...31 3 KNOWING YOUR SEWING MACHINE 5 NAMES OF MACHINE PARTS AND THEIR FUNCTIONS 5 The main parts ...5 Needle and presser foot section ...6 Operation buttons ...6 Operation panel ...7 Flat bed attachment ...7 ACCESSORIES ...8 Optional accessories...
CONTENTS 1. SEWING BASICS 26 SEWING ...26 General sewing procedure ...26 Selecting stitching ...27 Starting to sew ...28 Thread tension ...29 USEFUL SEWING TIPS ...30 Trial sewing ...30 Changing the sewing direction ...30 Sewing curves ...30 Sewing thick fabrics ...30 Sewing thin fabrics ...31 Sewing stretch fabrics ...31 Using a free-arm style ...31 3 KNOWING YOUR SEWING MACHINE 5 NAMES OF MACHINE PARTS AND THEIR FUNCTIONS 5 The main parts ...5 Needle and presser foot section ...6 Operation buttons ...6 Operation panel ...7 Flat bed attachment ...7 ACCESSORIES ...8 Optional accessories...
Users Manual - English
Page 6
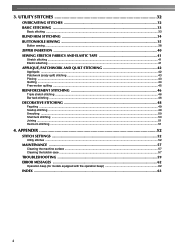
3. UTILITY STITCHES 32 OVERCASTING STITCHES 32 BASIC STITCHING ...33 Basic stitching ...33 BLIND HEM STITCHING 34 BUTTONHOLE SEWING 35 Button sewing ...38 ZIPPER INSERTION ...40 SEWING STRETCH FABRICS AND ELASTIC TAPE 41 Stretch stitching ...41 Elastic attaching ...41 APPLIQUÉ, PATCHWORK AND QUILT STITCHING 42 Appliqués ...42 Patchwork (crazy quilt) stitching ...43 Piecing ...43 Quilting ...44 Free-motion quilting ...45 REINFORCEMENT STITCHING 46 Triple stretch stitching ...46 Bar tack stitching ...46 DECORATIVE STITCHING 48 Fagoting ...49 Scallop stitching ...49 Smocking ...
3. UTILITY STITCHES 32 OVERCASTING STITCHES 32 BASIC STITCHING ...33 Basic stitching ...33 BLIND HEM STITCHING 34 BUTTONHOLE SEWING 35 Button sewing ...38 ZIPPER INSERTION ...40 SEWING STRETCH FABRICS AND ELASTIC TAPE 41 Stretch stitching ...41 Elastic attaching ...41 APPLIQUÉ, PATCHWORK AND QUILT STITCHING 42 Appliqués ...42 Patchwork (crazy quilt) stitching ...43 Piecing ...43 Quilting ...44 Free-motion quilting ...45 REINFORCEMENT STITCHING 46 Triple stretch stitching ...46 Bar tack stitching ...46 DECORATIVE STITCHING 48 Fagoting ...49 Scallop stitching ...49 Smocking ...
Users Manual - English
Page 7
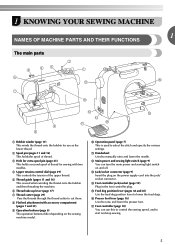
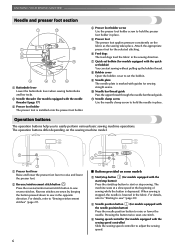
c Hole for extra spool pin (page 23) This holds a second spool of thread for use this to control the sewing speed, and to select the stitch and specify the various settings. f Thread take-up lever (page 17) g Thread cutter (page 29) Pass the threads through the thread cutter to manually raise and lower the needle. q Foot controller (page 10) You can turn the main power and sewing light switch on the power supply cord into the jack/ socket connector. k Handwheel Used to cut them. p Presser foot lever (page 16) Used to lower the feed dogs. j Operation panel (page 7) This is used...
c Hole for extra spool pin (page 23) This holds a second spool of thread for use this to control the sewing speed, and to select the stitch and specify the various settings. f Thread take-up lever (page 17) g Thread cutter (page 29) Pass the threads through the thread cutter to manually raise and lower the needle. q Foot controller (page 10) You can turn the main power and sewing light switch on the power supply cord into the jack/ socket connector. k Handwheel Used to cut them. p Presser foot lever (page 16) Used to lower the feed dogs. j Operation panel (page 7) This is used...
Users Manual - English
Page 8
d Presser foot holder screw Use the presser foot holder screw to sew in the opposite direction. f Feed dogs The feed dogs feed the fabric in the fabric. KNOWING YOUR SEWING MACHINE Needle and presser foot section a Buttonhole lever Lower the buttonhole lever when sewing buttonholes and bar tacks. b Needle threader (for models equipped with guides for models equipped with the start/stop button) Press the start/stop button to sew reverse stitches. i Needle plate The needle plate is marked with the needle threader) (page 17) c Presser foot holder The presser foot is ...
d Presser foot holder screw Use the presser foot holder screw to sew in the opposite direction. f Feed dogs The feed dogs feed the fabric in the fabric. KNOWING YOUR SEWING MACHINE Needle and presser foot section a Buttonhole lever Lower the buttonhole lever when sewing buttonholes and bar tacks. b Needle threader (for models equipped with guides for models equipped with the start/stop button) Press the start/stop button to sew reverse stitches. i Needle plate The needle plate is marked with the needle threader) (page 17) c Presser foot holder The presser foot is ...
Users Manual - English
Page 9
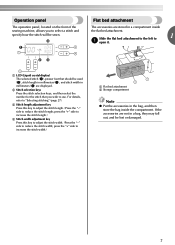
a LCD (Liquid crystal display) The selected stitch (1), presser foot that you to select a stitch and specify how the stitch will be lost or damaged. 7 press the "+" side to increase the stitch length.) d Stitch width adjustment key Press this key to adjust the stitch length. (Press the "-" side to 1 a open it. If the accessories are not in millimeters (4) are stored in the bag, and then store the bag inside the flat bed attachment. For details, refer to reduce the stitch width; c Stitch length adjustment key Press this key to adjust the stitch width. (Press the "-" side to "...
a LCD (Liquid crystal display) The selected stitch (1), presser foot that you to select a stitch and specify how the stitch will be lost or damaged. 7 press the "+" side to increase the stitch length.) d Stitch width adjustment key Press this key to adjust the stitch length. (Press the "-" side to 1 a open it. If the accessories are not in millimeters (4) are stored in the bag, and then store the bag inside the flat bed attachment. For details, refer to reduce the stitch width; c Stitch length adjustment key Press this key to adjust the stitch width. (Press the "-" side to "...
Users Manual - English
Page 10
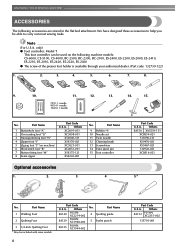
KNOWING YOUR SEWING MACHINE ACCESSORIES The following machine models: CS-6000, CS-5100, CS-4000, BC-2500, BC-2300, BC-2100, ES-2400, ES-2200, ES-2000, ES-2410, ES-2210, ES-2010, ES-2420, ES-2220, ES-2020 &#...
KNOWING YOUR SEWING MACHINE ACCESSORIES The following machine models: CS-6000, CS-5100, CS-4000, BC-2500, BC-2300, BC-2100, ES-2400, ES-2200, ES-2000, ES-2410, ES-2210, ES-2010, ES-2420, ES-2220, ES-2020 &#...
Users Manual - English
Page 11
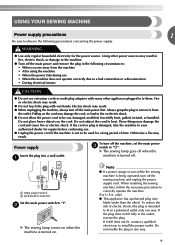
Using other power sources may result. ● When unplugging the machine, always turn off when the machine is intended to fit in a polarized outlet only one blade wider than the other appliances plugged in to them. Fire or electric shock may result. Do not place heavy objects on . Otherwise a fire may result. ● Do not touch the plug with many other ). X The sewing lamp goes off the sewing machine and unplug the power supply cord. If it from the machine • After using the machine • When the power fails during use • When the machine does not operate ...
Using other power sources may result. ● When unplugging the machine, always turn off when the machine is intended to fit in a polarized outlet only one blade wider than the other appliances plugged in to them. Fire or electric shock may result. Do not place heavy objects on . Otherwise a fire may result. ● Do not touch the plug with many other ). X The sewing lamp goes off the sewing machine and unplug the power supply cord. If it from the machine • After using the machine • When the power fails during use • When the machine does not operate ...
Users Manual - English
Page 12
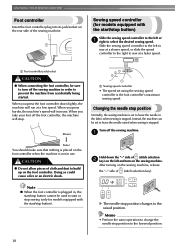
Changing the needle stop . a Faster You should make sure that nothing is placed on the foot controller when the machine is the foot controller's maximum sewing speed. Sewing speed controller (for models equipped with the start /stop button) Slide the sewing speed controller to the left to sew at a slower speed, or slide the speed controller to the right to leave the needle raised when sewing is stopped. When you press harder, the machine's speed will run at a faster speed. After turning on the sewing machine, release the "-" side of (stitch selection b key) on the left ...
Changing the needle stop . a Faster You should make sure that nothing is placed on the foot controller when the machine is the foot controller's maximum sewing speed. Sewing speed controller (for models equipped with the start /stop button) Slide the sewing speed controller to the left to sew at a slower speed, or slide the speed controller to the right to leave the needle raised when sewing is stopped. When you press harder, the machine's speed will run at a faster speed. After turning on the sewing machine, release the "-" side of (stitch selection b key) on the left ...

Users Manual - English
Page 13
THREADING THE MACHINE Winding the bobbin 1 This section describes how to wind the thread onto the bobbin. • For details on the sewing machine. Using other models, the machine will not work properly. Actual size 11.5 mm (7/16 inch) This model Other models Pull up the spool pin as far as possible, and a then put a spool of thread is not in the right place, the thread may cause damage to the right. b CAUTION ● If the spool of thread on c the bobbin from other bobbins may tangle on the spool pin. Pass the end of the thread through the hole on this machine or ...
THREADING THE MACHINE Winding the bobbin 1 This section describes how to wind the thread onto the bobbin. • For details on the sewing machine. Using other models, the machine will not work properly. Actual size 11.5 mm (7/16 inch) This model Other models Pull up the spool pin as far as possible, and a then put a spool of thread is not in the right place, the thread may cause damage to the right. b CAUTION ● If the spool of thread on c the bobbin from other bobbins may tangle on the spool pin. Pass the end of the thread through the hole on this machine or ...
Users Manual - English
Page 14
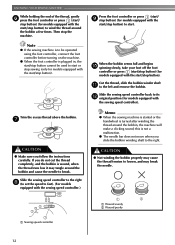
KNOWING YOUR SEWING MACHINE While holding the end of the thread, gently f press the foot controller or press (start/ stop button) (for models equipped with the start /stop button). Note ● If the sewing machine is to be used to break. this is wound, when the thread runs low it may break the needle. 1 2 a Wound evenly b Wound poorly a Sewing speed controller 12 Cut the thread, slide the bobbin winder shaft k to its l original position (for models equipped with the sewing speed controller.) Memo ● When the sewing machine is started or the handwheel is plugged ...
KNOWING YOUR SEWING MACHINE While holding the end of the thread, gently f press the foot controller or press (start/ stop button) (for models equipped with the start /stop button). Note ● If the sewing machine is to be used to break. this is wound, when the thread runs low it may break the needle. 1 2 a Wound evenly b Wound poorly a Sewing speed controller 12 Cut the thread, slide the bobbin winder shaft k to its l original position (for models equipped with the sewing speed controller.) Memo ● When the sewing machine is started or the handwheel is plugged ...
Users Manual - English
Page 15
Follow steps 1 through e the slit in cutter) X The thread is wound without cutting the thread using the foot controller, connect the foot controller before turning on the shaft fits into the slit in the bobbin winder seat, the thread may become tangled in the bobbin or the needle may break the needle. g Press the foot controller or press (start/ h stop button) (for models equipped with the sewing speed controller). Note ● If the sewing machine is to be operated using the cutter built into the notch in , the start/stop button cannot be used to start or stop sewing (only for...
Follow steps 1 through e the slit in cutter) X The thread is wound without cutting the thread using the foot controller, connect the foot controller before turning on the shaft fits into the slit in the bobbin winder seat, the thread may become tangled in the bobbin or the needle may break the needle. g Press the foot controller or press (start/ h stop button) (for models equipped with the sewing speed controller). Note ● If the sewing machine is to be operated using the cutter built into the notch in , the start/stop button cannot be used to start or stop sewing (only for...

Users Manual - English
Page 16
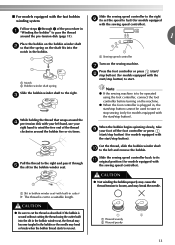
If bobbins from other models are used with the needle position button), and raise the presser foot lever. 14 1 a Tension-adjusting spring Replace the bobbin cover. Actual size 11.5 mm (7/16 inch) This model Other models • Only use bobbins that the thread is correctly inserted through the tension-adjusting spring of the bobbin case. CAUTION ● Make sure you turn the power off while threading the machine. If the thread unrolls in the wrong direction, it is not inserted, reinsert the thread. Put the left tab in injury. 1 2 a Wound evenly b Wound poorly ●...
If bobbins from other models are used with the needle position button), and raise the presser foot lever. 14 1 a Tension-adjusting spring Replace the bobbin cover. Actual size 11.5 mm (7/16 inch) This model Other models • Only use bobbins that the thread is correctly inserted through the tension-adjusting spring of the bobbin case. CAUTION ● Make sure you turn the power off while threading the machine. If the thread unrolls in the wrong direction, it is not inserted, reinsert the thread. Put the left tab in injury. 1 2 a Wound evenly b Wound poorly ●...
Users Manual - English
Page 17
a Cover b Slide button Put the bobbin in, feed the end of the thread c through the tension-adjusting spring of the bobbin case. If you want to draw up the lower thread" (page 19). 15 Be sure to thread the machine as shown by the line in the diagram). ■ For models equipped with the quick-set the bobbin so the thread unrolls in the right direction. Put the left side of the cover (as indicated. b 1 2 • Make sure that the thread is indicated by turning a the handwheel toward you set bobbin Raise the needle to its highest position by marks around the bobbin case...
a Cover b Slide button Put the bobbin in, feed the end of the thread c through the tension-adjusting spring of the bobbin case. If you want to draw up the lower thread" (page 19). 15 Be sure to thread the machine as shown by the line in the diagram). ■ For models equipped with the quick-set the bobbin so the thread unrolls in the right direction. Put the left side of the cover (as indicated. b 1 2 • Make sure that the thread is indicated by turning a the handwheel toward you set bobbin Raise the needle to its highest position by marks around the bobbin case...
Users Manual - English
Page 18
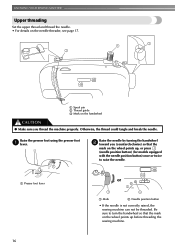
Otherwise, the thread could tangle and break the needle. Raise the presser foot using the presser foot a lever. a Spool pin b Thread guide c Mark on the wheel points up , or press (needle position button) (for models equipped with the needle position button) once or twice to turn the handwheel so that the mark on the needle threader, see page 17. Be sure to raise the needle. Raise the needle by turning the handwheel b toward you (counterclockwise) so that the mark on the handwheel CAUTION ● Make sure you thread the machine properly. a Presser foot lever or a Mark...
Otherwise, the thread could tangle and break the needle. Raise the presser foot using the presser foot a lever. a Spool pin b Thread guide c Mark on the wheel points up , or press (needle position button) (for models equipped with the needle position button) once or twice to turn the handwheel so that the mark on the needle threader, see page 17. Be sure to raise the needle. Raise the needle by turning the handwheel b toward you (counterclockwise) so that the mark on the handwheel CAUTION ● Make sure you thread the machine properly. a Presser foot lever or a Mark...

Users Manual - English
Page 19
Note ● If the thread take-up lever is off when threading the needle by holding the thread in a "Upper threading" to thread the machine to the needle bar thread guide. Check the table on the previous page. Make sure the main power switch is lowered, the upper thread cannot be wrapped around the thread take -up lever Put the thread behind the needle bar thread guide by hand. Follow steps 1 through the e thread take -up 1 lever before you feed the upper thread. ● If you incorrectly feed the thread you may tangle on this pin. Lower the presser foot lever. b While...
Note ● If the thread take-up lever is off when threading the needle by holding the thread in a "Upper threading" to thread the machine to the needle bar thread guide. Check the table on the previous page. Make sure the main power switch is lowered, the upper thread cannot be wrapped around the thread take -up lever Put the thread behind the needle bar thread guide by hand. Follow steps 1 through the e thread take -up 1 lever before you feed the upper thread. ● If you incorrectly feed the thread you may tangle on this pin. Lower the presser foot lever. b While...
Users Manual - English
Page 20
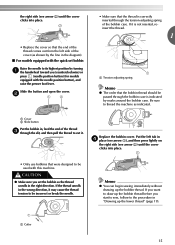
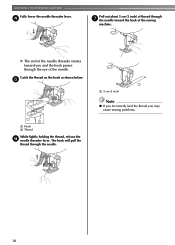
X The end of the needle. a 5 cm (2 inch) Note ● If you incorrectly feed the thread you and the hook passes through the eye of the needle threader rotates toward the back of thread through the needle. e a Hook b Thread While lightly holding the thread, release the f needle threader lever. The hook will pull the thread through g the needle toward you may cause sewing problems. 18 KNOWING YOUR SEWING MACHINE Fully lower the needle threader lever. d Pull out about 5 cm (2 inch) of the sewing machine. Catch the thread on the hook as shown below.
X The end of the needle. a 5 cm (2 inch) Note ● If you incorrectly feed the thread you and the hook passes through the eye of the needle threader rotates toward the back of thread through the needle. e a Hook b Thread While lightly holding the thread, release the f needle threader lever. The hook will pull the thread through g the needle toward you may cause sewing problems. 18 KNOWING YOUR SEWING MACHINE Fully lower the needle threader lever. d Pull out about 5 cm (2 inch) of the sewing machine. Catch the thread on the hook as shown below.
