
Users Manual - English
Page 3
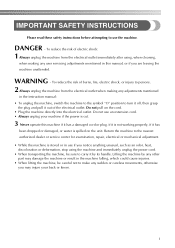
Lifting the machine by any other part may damage the machine or result in use if you are leaving the machine unattended. To reduce the risk of burns, fire, electric shock, or ...
Lifting the machine by any other part may damage the machine or result in use if you are leaving the machine unattended. To reduce the risk of burns, fire, electric shock, or ...
Users Manual - English
Page 4
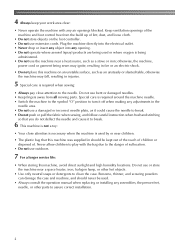
...never be kept out of the reach of children or disposed of. Keep ventilation openings of the machine and foot control free from all moving parts. Special care is required around the machine needle. • Switch the machine to the symbol "O" position to turn it to break. ...not operate where aerosol (spray) products are being administered. • Do not use the machine near a space heater, iron, halogen lamp, or other parts to assure correct installation. 2 Plug the machine directly into the electrical outlet. • Never drop or insert any object into any air openings blocked. ...
...never be kept out of the reach of children or disposed of. Keep ventilation openings of the machine and foot control free from all moving parts. Special care is required around the machine needle. • Switch the machine to the symbol "O" position to turn it to break. ...not operate where aerosol (spray) products are being administered. • Do not use the machine near a space heater, iron, halogen lamp, or other parts to assure correct installation. 2 Plug the machine directly into the electrical outlet. • Never drop or insert any object into any air openings blocked. ...

Users Manual - English
Page 6
CONTENTS IMPORTANT SAFETY INSTRUCTIONS 1 1. KNOWING YOUR SEWING MACHINE 6 ACCESSORIES ...6 Included accessories ...6 Optional accessories ...7 Accessory compartment ...7 NAMES OF MACHINE PARTS AND THEIR FUNCTIONS 8 The main parts ...8 Needle and presser foot section ...9 Operation buttons ...9 Operation panel ...10 Spool pin ...10 USING YOUR SEWING MACHINE 12 Power supply precautions ...12 Power supply ...12 ...
CONTENTS IMPORTANT SAFETY INSTRUCTIONS 1 1. KNOWING YOUR SEWING MACHINE 6 ACCESSORIES ...6 Included accessories ...6 Optional accessories ...7 Accessory compartment ...7 NAMES OF MACHINE PARTS AND THEIR FUNCTIONS 8 The main parts ...8 Needle and presser foot section ...9 Operation buttons ...9 Operation panel ...10 Spool pin ...10 USING YOUR SEWING MACHINE 12 Power supply precautions ...12 Power supply ...12 ...
Users Manual - English
Page 8
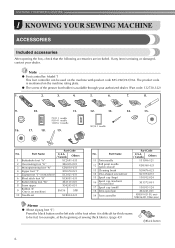
... thick seams to be used on the machine rating plate. ● The screw of sewing thick fabrics. (page 43) aBlack button 6 Part Code No. Part Name U.S.A. / Canada Others 1 Buttonhole foot "A" XC2691-033 2 Overcasting foot "G" XE6305-001 3 Monogramming foot "N" XD0810-031 4 Zipper...stitch foot "R" XC4051-031 7 Button fitting foot "M" XE2137-001 8 Seam ripper X54243-051 9 Bobbin (4) (One is missing or damaged, contact your authorized dealer. (Part code: 132730-122) 1. 2. 3. 4. 5. 6. 7. 8. 9. 10. 11. 75/11 1 needle 90/14 1 needle 100/16 1 needle 16. 17. ...
... thick seams to be used on the machine rating plate. ● The screw of sewing thick fabrics. (page 43) aBlack button 6 Part Code No. Part Name U.S.A. / Canada Others 1 Buttonhole foot "A" XC2691-033 2 Overcasting foot "G" XE6305-001 3 Monogramming foot "N" XD0810-031 4 Zipper...stitch foot "R" XC4051-031 7 Button fitting foot "M" XE2137-001 8 Seam ripper X54243-051 9 Bobbin (4) (One is missing or damaged, contact your authorized dealer. (Part code: 132730-122) 1. 2. 3. 4. 5. 6. 7. 8. 9. 10. 11. 75/11 1 needle 90/14 1 needle 100/16 1 needle 16. 17. ...

Users Manual - English
Page 9
...No. Slide the flat bed attachment to the left to open it. If the accessories are stored in a compartment inside the compartment. Part Name 4 Quilting guide 5 Eyelet punch Part Code U.S.A. / Canada Others SA132 F016N XZ5051-001 Accessory compartment The accessories are not in the bag, and then store the bag ...Put the accessories in a bag, they may fall out, and be lost or damaged. a Flat bed attachment b Storage compartment 7 Part Name 1 Walking Foot 2 Quilting Foot 3 1/4-Inch Quilting Foot Part Code U.S.A. / Canada Others SA140 F033N SA129 F005N SA125 F001N No.
...No. Slide the flat bed attachment to the left to open it. If the accessories are stored in a compartment inside the compartment. Part Name 4 Quilting guide 5 Eyelet punch Part Code U.S.A. / Canada Others SA132 F016N XZ5051-001 Accessory compartment The accessories are not in the bag, and then store the bag ...Put the accessories in a bag, they may fall out, and be lost or damaged. a Flat bed attachment b Storage compartment 7 Part Name 1 Walking Foot 2 Quilting Foot 3 1/4-Inch Quilting Foot Part Code U.S.A. / Canada Others SA140 F033N SA129 F005N SA125 F001N No.
Users Manual - English
Page 10
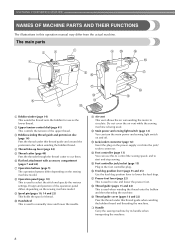
... foot. q Presser foot lever (page 22) This is used when winding the thread onto the bobbin and then threading the machine. The main parts a Bobbin winder (page 14) This winds the thread onto the bobbin for use this thread guide and around the pretension disc when winding the ...to start and stop sewing. t Handle Carry the sewing machine by its handle when transporting the machine. 8 KNOWING YOUR SEWING MACHINE NAMES OF MACHINE PARTS AND THEIR FUNCTIONS The illustrations in the foot controller plug. s Thread guide cover (pages 16 and 22) Pass the thread under this to control ...
... foot. q Presser foot lever (page 22) This is used when winding the thread onto the bobbin and then threading the machine. The main parts a Bobbin winder (page 14) This winds the thread onto the bobbin for use this thread guide and around the pretension disc when winding the ...to start and stop sewing. t Handle Carry the sewing machine by its handle when transporting the machine. 8 KNOWING YOUR SEWING MACHINE NAMES OF MACHINE PARTS AND THEIR FUNCTIONS The illustrations in the foot controller plug. s Thread guide cover (pages 16 and 22) Pass the thread under this to control ...
Users Manual - English
Page 16
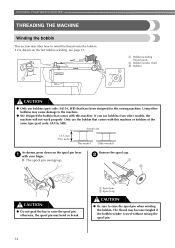
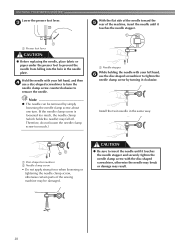
... ● Be sure to raise the spool pin, otherwise, the spool pin may bend or break. X The spool pin swings up. Only use bobbins (part code: SA156, SFB) that have been designed for this sewing machine. b CAUTION ● Do not grab the bar to raise the spool pin when winding...a Bobbin-winding thread guide b Bobbin winder shaft c Bobbin CAUTION ● Only use the bobbin that comes with this machine or bobbins of the same type (part code: SA156, SFB). Using other models, the machine will not work properly. If you use bobbins from other bobbins may become tangled if the bobbin...
... ● Be sure to raise the spool pin, otherwise, the spool pin may bend or break. X The spool pin swings up. Only use bobbins (part code: SA156, SFB) that have been designed for this sewing machine. b CAUTION ● Do not grab the bar to raise the spool pin when winding...a Bobbin-winding thread guide b Bobbin winder shaft c Bobbin CAUTION ● Only use the bobbin that comes with this machine or bobbins of the same type (part code: SA156, SFB). Using other models, the machine will not work properly. If you use bobbins from other bobbins may become tangled if the bobbin...

Users Manual - English
Page 21
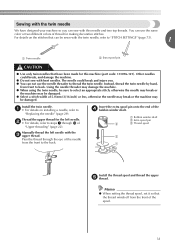
... for feeding the bobbin thread is indicated by marks on the needle plate cover. Use only the enclosed bobbin or bobbins of the same type (part code: SA156, SFB). Memo ● The direction for this sewing machine. Lower threading Raise the needle to thread the machine as indicated. Actual size 11...
... for feeding the bobbin thread is indicated by marks on the needle plate cover. Use only the enclosed bobbin or bobbins of the same type (part code: SA156, SFB). Memo ● The direction for this sewing machine. Lower threading Raise the needle to thread the machine as indicated. Actual size 11...
Users Manual - English
Page 32
... can be damaged. a Disc-shaped screwdriver b Needle clamp screw • Do not apply strong force when loosening or tightening the needle clamp screw, otherwise certain parts of the machine, insert the needle until it touches the needle stopper and securely tighten the needle clamp screw with your left hand, f use a disc...
... can be damaged. a Disc-shaped screwdriver b Needle clamp screw • Do not apply strong force when loosening or tightening the needle clamp screw, otherwise certain parts of the machine, insert the needle until it touches the needle stopper and securely tighten the needle clamp screw with your left hand, f use a disc...
Users Manual - English
Page 33
... the machine may be damaged. a • For details on the stitches that have designed your machine so you . ● You can sew with this machine (part code: 131096-121). b • For details, refer to steps a through the eye of 5.0 mm (3/16 inch) or less, otherwise the needle may break or the...
... the machine may be damaged. a • For details on the stitches that have designed your machine so you . ● You can sew with this machine (part code: 131096-121). b • For details, refer to steps a through the eye of 5.0 mm (3/16 inch) or less, otherwise the needle may break or the...
Users Manual - English
Page 38
...). ↓ 4 Start sewing. For details on turning on replacing the presser foot, refer to be sewn. In addition, keep your hands away from all moving parts such as the needle and handwheel, otherwise injuries may occur. ● Do not pull or push the fabric too hard while sewing, otherwise injuries may...
...). ↓ 4 Start sewing. For details on turning on replacing the presser foot, refer to be sewn. In addition, keep your hands away from all moving parts such as the needle and handwheel, otherwise injuries may occur. ● Do not pull or push the fabric too hard while sewing, otherwise injuries may...
Users Manual - English
Page 46
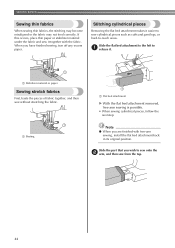
... sew cylindrical pieces such as cuffs and pant legs, or hard-to sew onto the b arm, and then sew from the top. 44 Slide the part that you wish to -reach areas. If this occurs, place thin paper or stabilizer material under the fabric and sew it . Note ● When you...
... sew cylindrical pieces such as cuffs and pant legs, or hard-to sew onto the b arm, and then sew from the top. 44 Slide the part that you wish to -reach areas. If this occurs, place thin paper or stabilizer material under the fabric and sew it . Note ● When you...
Users Manual - English
Page 51
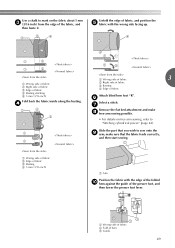
...; For details on the fabric about 5 mm c (3/16 inch) from the edge of the presser foot, and then lower the presser foot lever. Slide the part that the fabric feeds correctly, and then start sewing. g Remove the flat bed attachment and make sure that you wish to "Stitching cylindrical pieces" (page...
...; For details on the fabric about 5 mm c (3/16 inch) from the edge of the presser foot, and then lower the presser foot lever. Slide the part that the fabric feeds correctly, and then start sewing. g Remove the flat bed attachment and make sure that you wish to "Stitching cylindrical pieces" (page...
Users Manual - English
Page 54
... 15 mm (9/16 inch) and a thickness of 10 mm (3/8 inch), the button guide plate should be set . 52 c Select a stitch. UTILITY STITCHES The names of parts of buttonhole foot "A", which is used for sewing buttonholes, are indicated below. 1 2 5 ■ If the button does not fit in the button guide plate Add...
... 15 mm (9/16 inch) and a thickness of 10 mm (3/8 inch), the button guide plate should be set . 52 c Select a stitch. UTILITY STITCHES The names of parts of buttonhole foot "A", which is used for sewing buttonholes, are indicated below. 1 2 5 ■ If the button does not fit in the button guide plate Add...

Users Manual - English
Page 56
...in the fabric. Use a handsewing needle to pull the gimp g thread to the thickness of the d gimp thread. With a seam ripper, cut the middle part of the h gimp thread remaining at the end of the buttonhole k stitching to prevent the stitching from being cut, and then use a gimp thread. Hook... the gimp thread onto the part of a buttonhole foot "A" shown in the cutting path, otherwise injuries may result if the seam ripper slips. UTILITY STITCHES Insert a pin at the ...
...in the fabric. Use a handsewing needle to pull the gimp g thread to the thickness of the d gimp thread. With a seam ripper, cut the middle part of the h gimp thread remaining at the end of the buttonhole k stitching to prevent the stitching from being cut, and then use a gimp thread. Hook... the gimp thread onto the part of a buttonhole foot "A" shown in the cutting path, otherwise injuries may result if the seam ripper slips. UTILITY STITCHES Insert a pin at the ...
Users Manual - English
Page 81
... the top surface of the needle plate cover. • Align the U and { marks. As shown, insert the tab on the race. For a new bobbin case (part code: XE7560-001), contact your nearest authorized service center. ● Make sure that you fit the bobbin case properly, otherwise the needle may suffer. a U mark...
... the top surface of the needle plate cover. • Align the U and { marks. As shown, insert the tab on the race. For a new bobbin case (part code: XE7560-001), contact your nearest authorized service center. ● Make sure that you fit the bobbin case properly, otherwise the needle may suffer. a U mark...
Users Manual - English
Page 88
..., contact your nearest authorized service center. ■ Removing the fabric from the race and its surrounding area. a Needle plate cover release b Needle plate cover (front part) 86 Follow the procedure described below it. Continue with the following steps to i remove any dust from the machine Immediately stop the sewing machine. a Turn...
..., contact your nearest authorized service center. ■ Removing the fabric from the race and its surrounding area. a Needle plate cover release b Needle plate cover (front part) 86 Follow the procedure described below it. Continue with the following steps to i remove any dust from the machine Immediately stop the sewing machine. a Turn...

Users Manual - English
Page 90
... "Checking the needle" (page 29) and "Replacing the needle" (page 29). Note ● After completing this procedure, continue with a new one. For a new bobbin case (part code: XE7560-001), contact your nearest authorized service center. ● Make sure that is bent, be sure to install a new needle. • Refer to check...
... "Checking the needle" (page 29) and "Replacing the needle" (page 29). Note ● After completing this procedure, continue with a new one. For a new bobbin case (part code: XE7560-001), contact your nearest authorized service center. ● Make sure that is bent, be sure to install a new needle. • Refer to check...
Users Manual - English
Page 98
... foot controller 6 13, 39 free-motion quilting 64 H , handwheel 8 39 heirloom stitching 72 hook-and-loop fastener 43 J joining 71 , joining stitch 61 68 M main parts 8 main power switch 12 , monogramming 70 72 96 N needle 28 , needle bar thread guide 9 25 , needle clamp screw 9 30 needle plate 9 , needle plate cover 9 78...
... foot controller 6 13, 39 free-motion quilting 64 H , handwheel 8 39 heirloom stitching 72 hook-and-loop fastener 43 J joining 71 , joining stitch 61 68 M main parts 8 main power switch 12 , monogramming 70 72 96 N needle 28 , needle bar thread guide 9 25 , needle clamp screw 9 30 needle plate 9 , needle plate cover 9 78...


