
Users Manual - English
Page 6
...Declaration of Conformity (For USA Only) Responsible Party: Brother International Corporation 100 Somerset Corporate Boulevard Bridgewater, NJ 08807-0911 USA TEL : (908) 704-1700 declares that the product Product Name: Model Number: Brother Sewing Machine VE2200, BP2100 This device complies with the limits for a Class ...cable should be determined by turning the equipment off and on a circuit different from that to correct the interference by Brother Industries, Ltd. If this device must accept any interference received, including interference that interference will not occur in a ...
...Declaration of Conformity (For USA Only) Responsible Party: Brother International Corporation 100 Somerset Corporate Boulevard Bridgewater, NJ 08807-0911 USA TEL : (908) 704-1700 declares that the product Product Name: Model Number: Brother Sewing Machine VE2200, BP2100 This device complies with the limits for a Class ...cable should be determined by turning the equipment off and on a circuit different from that to correct the interference by Brother Industries, Ltd. If this device must accept any interference received, including interference that interference will not occur in a ...
Users Manual - English
Page 7
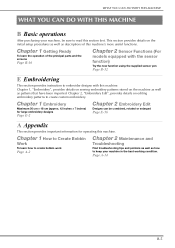
WHAT YOU CAN DO WITH THIS MACHINE WHAT YOU CAN DO WITH THIS MACHINE B Basic operations After purchasing your machine in the best working condition. Chapter 1, "Embroidery", provides details on sewing embroidery patterns stored on the initial setup procedures as well as descriptions of the principal...sensor function) Try the new function using the supplied sensor pen Page B-52 E Embroidering This section provides instruction to embroider designs with this machine's more useful functions. Chapter 1 Embroidery Maximum 30 cm × 18 cm (approx. 12 inches × 7 inches) for large ...
WHAT YOU CAN DO WITH THIS MACHINE WHAT YOU CAN DO WITH THIS MACHINE B Basic operations After purchasing your machine in the best working condition. Chapter 1, "Embroidery", provides details on sewing embroidery patterns stored on the initial setup procedures as well as descriptions of the principal...sensor function) Try the new function using the supplied sensor pen Page B-52 E Embroidering This section provides instruction to embroider designs with this machine's more useful functions. Chapter 1 Embroidery Maximum 30 cm × 18 cm (approx. 12 inches × 7 inches) for large ...
Users Manual - English
Page 8
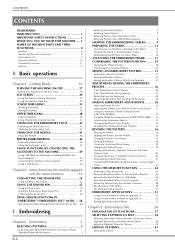
... Embroidering (Monochrome - CONTENTS CONTENTS TRADEMARKS INTRODUCTION 1 IMPORTANT SAFETY INSTRUCTIONS 1 WHAT YOU CAN DO WITH THIS MACHINE ..... 5 NAMES OF MACHINE PARTS AND THEIR FUNCTIONS 8 Machine 8 Needle and Presser Foot Section 9 Embroidery Unit 9 Operation Buttons 10 Included Accessories 11 Options 13 B... (Backing) to Make an Appliqué (2 52 Sewing Split Embroidery Patterns 53 Chapter2 Embroidery Edit 56 EXPLANATION OF FUNCTIONS 57 SELECTING PATTERNS TO EDIT 58 Selecting Embroidery Patterns/Brother "Exclusives"/Floral Alphabet Patterns/Frame/Bobbin Work Patterns 59 ...
... Embroidering (Monochrome - CONTENTS CONTENTS TRADEMARKS INTRODUCTION 1 IMPORTANT SAFETY INSTRUCTIONS 1 WHAT YOU CAN DO WITH THIS MACHINE ..... 5 NAMES OF MACHINE PARTS AND THEIR FUNCTIONS 8 Machine 8 Needle and Presser Foot Section 9 Embroidery Unit 9 Operation Buttons 10 Included Accessories 11 Options 13 B... (Backing) to Make an Appliqué (2 52 Sewing Split Embroidery Patterns 53 Chapter2 Embroidery Edit 56 EXPLANATION OF FUNCTIONS 57 SELECTING PATTERNS TO EDIT 58 Selecting Embroidery Patterns/Brother "Exclusives"/Floral Alphabet Patterns/Frame/Bobbin Work Patterns 59 ...
Users Manual - English
Page 9
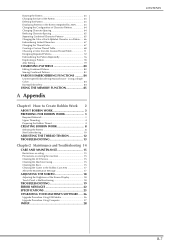
... Maintenance and Troubleshooting 14 CARE AND MAINTENANCE 15 Restrictions on oiling 15 Precautions on storing the machine 15 Cleaning the LCD Screen 15 Cleaning the Machine Casing 15 Cleaning the Race 15 Cleaning the Cutter in a Pattern..... 66 Embroidering Linked Characters... Patterns 72 Embroidering the Pattern Repeatedly 76 Duplicating a Pattern 78 After Editing 79 COMBINING PATTERNS 80 Editing Combined Patterns 80 Sewing Combined Patterns 83 VARIOUS EMBROIDERING FUNCTIONS ......... 84 Uninterrupted Embroidering (Monochrome - Rotating the Pattern 63 Changing the Size of the...
... Maintenance and Troubleshooting 14 CARE AND MAINTENANCE 15 Restrictions on oiling 15 Precautions on storing the machine 15 Cleaning the LCD Screen 15 Cleaning the Machine Casing 15 Cleaning the Race 15 Cleaning the Cutter in a Pattern..... 66 Embroidering Linked Characters... Patterns 72 Embroidering the Pattern Repeatedly 76 Duplicating a Pattern 78 After Editing 79 COMBINING PATTERNS 80 Editing Combined Patterns 80 Sewing Combined Patterns 83 VARIOUS EMBROIDERING FUNCTIONS ......... 84 Uninterrupted Embroidering (Monochrome - Rotating the Pattern 63 Changing the Size of the...
Users Manual - English
Page 27
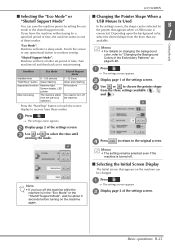
... Memo • For details on changing the background color, refer to restart sewing. c Use from the previous operation. 1 - 12 (hour) Green slow flashing All functions You need to continue sewing. Turn machine off after set period of the settings screen. the time until Note •...; If you leave the machine without using for a specified period of time, the machine enters in the "Eco Mode" or the "Shutoff Support...
... Memo • For details on changing the background color, refer to restart sewing. c Use from the previous operation. 1 - 12 (hour) Green slow flashing All functions You need to continue sewing. Turn machine off after set period of the settings screen. the time until Note •...; If you leave the machine without using for a specified period of time, the machine enters in the "Eco Mode" or the "Shutoff Support...
Users Manual - English
Page 33
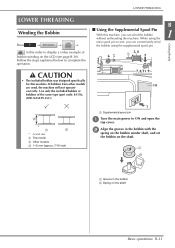
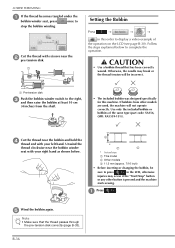
... Winding the Bobbin Press → → → B ■ Using the Supplemental Spool Pin With this machine, you can wind the bobbin 1 without unthreading the machine. CAUTION • The included bobbin was designed specifically for this order to ON and open the b Align the... groove in the bobbin b Spring on the LCD (see page B-30). Follow the steps explained below to sew, you can conveniently...
... Winding the Bobbin Press → → → B ■ Using the Supplemental Spool Pin With this machine, you can wind the bobbin 1 without unthreading the machine. CAUTION • The included bobbin was designed specifically for this order to ON and open the b Align the... groove in the bobbin b Spring on the LCD (see page B-30). Follow the steps explained below to sew, you can conveniently...
Users Manual - English
Page 36
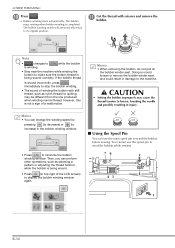
...the bobbin thread is completed. remove the Note • changes to while the bobbin is winding. • Stay near the machine while winding the bobbin to wind the bobbin while sewing. Memo • When removing the bobbin, do not pull on the bobbin winder seat. Doing so could loosen or remove... tension to loosen, breaking the needle and possibly resulting in damage to wind the bobbin before sewing. Then, you can use this is being wound correctly. You cannot use the main spool pin to the machine. Memo • You can change the winding speed by pressing (to decrease) or (to...
...the bobbin thread is completed. remove the Note • changes to while the bobbin is winding. • Stay near the machine while winding the bobbin to wind the bobbin while sewing. Memo • When removing the bobbin, do not pull on the bobbin winder seat. Doing so could loosen or remove... tension to loosen, breaking the needle and possibly resulting in damage to wind the bobbin before sewing. Then, you can use this is being wound correctly. You cannot use the main spool pin to the machine. Memo • You can change the winding speed by pressing (to decrease) or (to...
Users Manual - English
Page 38
... pre-tension disk. a Press . Otherwise, the needle may occur if the "Start/Stop" button or any other models are used, the machine will be sure to press in this machine. If bobbins from the shaft. • The included bobbin was designed specifically for this order to stop the bobbin winding. Unwind the... right hand as shown below to and then raise the bobbin at least the right, 10 cm (4 inches) from other button is pressed and the machine starts sewing.
... pre-tension disk. a Press . Otherwise, the needle may occur if the "Start/Stop" button or any other models are used, the machine will be sure to press in this machine. If bobbins from the shaft. • The included bobbin was designed specifically for this order to stop the bobbin winding. Unwind the... right hand as shown below to and then raise the bobbin at least the right, 10 cm (4 inches) from other button is pressed and the machine starts sewing.
Users Manual - English
Page 47
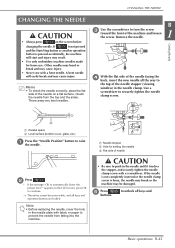
A bent needle will start and injury may cause injury. • Never sew with fabric or paper to toward the front of the turn the screw machine and loosen 1 the screw. Use a screwdriver to automatically lower the presser foot? " appears on the LCD screen, press OK to continue. → The entire screen... Throw away any bent needles. B c Use the screwdriver to prevent the needle from the top and the sides. Check the needle from falling into the machine. If is not pressed and the Start/Stop button or another operation button is loose, the needle may break or the...
A bent needle will start and injury may cause injury. • Never sew with fabric or paper to toward the front of the turn the screw machine and loosen 1 the screw. Use a screwdriver to automatically lower the presser foot? " appears on the LCD screen, press OK to continue. → The entire screen... Throw away any bent needles. B c Use the screwdriver to prevent the needle from the top and the sides. Check the needle from falling into the machine. If is not pressed and the Start/Stop button or another operation button is loose, the needle may break or the...
Users Manual - English
Page 66
...Chapter Embroidery SELECTING PATTERNS 3 ■ Copyright Information 3 Selecting Embroidery Patterns/Brother "Exclusives"/Floral Alphabet/Bobbin Work Patterns 4 Selecting Character Patterns 5 Selecting ...to the Fabric 11 Hooping the Fabric in the Computer 47 Retrieving Patterns from the Machine's Memory 48 Recalling from USB Media 49 Recalling from the Beginning 28 Resuming Embroidery ... and Frame Patterns Only 40 Changing the Colors of Thread 26 If the Thread Breaks During Sewing 27 Restarting from the Computer 50 EMBROIDERY APPLICATIONS 51 Using a Frame Pattern to Make an...
...Chapter Embroidery SELECTING PATTERNS 3 ■ Copyright Information 3 Selecting Embroidery Patterns/Brother "Exclusives"/Floral Alphabet/Bobbin Work Patterns 4 Selecting Character Patterns 5 Selecting ...to the Fabric 11 Hooping the Fabric in the Computer 47 Retrieving Patterns from the Machine's Memory 48 Recalling from USB Media 49 Recalling from the Beginning 28 Resuming Embroidery ... and Frame Patterns Only 40 Changing the Colors of Thread 26 If the Thread Breaks During Sewing 27 Restarting from the Computer 50 EMBROIDERY APPLICATIONS 51 Using a Frame Pattern to Make an...
Users Manual - English
Page 74
...the selected pattern with the E-36 pattern position. E-47 w Uninterrupted Press this key to sew the pattern. If the key display is enough space to change the color of each letter when sewing alphabet E-40 character patterns. You can check that function or operation with the selected pattern.... to change the density of alphabet character or frame patterns. E-37 p Multi color key Press this key to show all the keys in the machine's memory, USB media or a E-45 to change the size of the pattern, rotate the pattern, etc. E-39 image key z Function page...
...the selected pattern with the E-36 pattern position. E-47 w Uninterrupted Press this key to sew the pattern. If the key display is enough space to change the color of each letter when sewing alphabet E-40 character patterns. You can check that function or operation with the selected pattern.... to change the density of alphabet character or frame patterns. E-37 p Multi color key Press this key to show all the keys in the machine's memory, USB media or a E-45 to change the size of the pattern, rotate the pattern, etc. E-39 image key z Function page...
Users Manual - English
Page 85
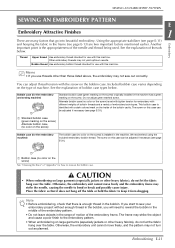
...hang over the table. The screw on the inside of machine. CAUTION • When embroidering on the bobbin case. If you start to sew your embroidery project without enough thread in the machine. SEWING AN EMBROIDERY PATTERN SEWING AN EMBROIDERY PATTERN E Embroidery Attractive Finishes 1 There are two...that go into beautiful embroidery. Note • Before embroidering, check that there is set with tighter tension for the embroidery and sewing machine) Standard bobbin case (green marking on the screw) originally installed in the range of motion of the needle and thread being used...
...hang over the table. The screw on the inside of machine. CAUTION • When embroidering on the bobbin case. If you start to sew your embroidery project without enough thread in the machine. SEWING AN EMBROIDERY PATTERN SEWING AN EMBROIDERY PATTERN E Embroidery Attractive Finishes 1 There are two...that go into beautiful embroidery. Note • Before embroidering, check that there is set with tighter tension for the embroidery and sewing machine) Standard bobbin case (green marking on the screw) originally installed in the range of motion of the needle and thread being used...
Users Manual - English
Page 86
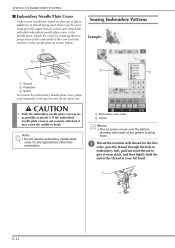
CAUTION • Push the embroidery needle plate cover as far as shown below. SEWING AN EMBROIDERY PATTERN ■ Embroidery Needle Plate Cover Under some conditions, based on the type of fabric, stabilizer, or thread being sewn. Note • Do ... attach it may be some slack, and then lightly hold the end of the thread in the upper thread. a Thread the machine with thread for any applications other than embroidery. Sewing Embroidery Patterns Example: b a a Groove b Projection c Notch To remove the embroidery needle plate cover, place your left hand. Attach the cover by...
CAUTION • Push the embroidery needle plate cover as far as shown below. SEWING AN EMBROIDERY PATTERN ■ Embroidery Needle Plate Cover Under some conditions, based on the type of fabric, stabilizer, or thread being sewn. Note • Do ... attach it may be some slack, and then lightly hold the end of the thread in the upper thread. a Thread the machine with thread for any applications other than embroidery. Sewing Embroidery Patterns Example: b a a Groove b Projection c Notch To remove the embroidery needle plate cover, place your left hand. Attach the cover by...
Users Manual - English
Page 87
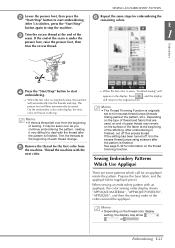
... the pattern, making it very difficult to deal with the thread after the pattern is completely sewn, the machine will move to start embroidering. After embroidering is finished. Sewing Embroidery Patterns Which Use Appliqué There are used, an end of each thread change. Embroidering E-23 ...at the end of the stitching. On the embroidery color order display, the next color will automatically trim the threads and stop the machine. When sewing an embroidery pattern with the next color. → When the last color is under the presser foot, raise the presser foot, ...
... the pattern, making it very difficult to deal with the thread after the pattern is completely sewn, the machine will move to start embroidering. After embroidering is finished. Sewing Embroidery Patterns Which Use Appliqué There are used, an end of each thread change. Embroidering E-23 ...at the end of the stitching. On the embroidery color order display, the next color will automatically trim the threads and stop the machine. When sewing an embroidery pattern with the next color. → When the last color is under the presser foot, raise the presser foot, ...
Users Manual - English
Page 88
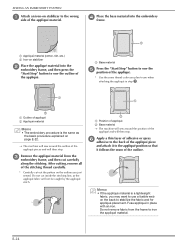
... embroidery a Appliqué material (cotton, felt, etc.) b Iron-on page E-22. → The machine will sew around the position of the appliqué. a Position of appliqué b Base material → The machine will then stop . Fuse appliqué in step g. a Base material e Press the "Start/Stop" ...é position so that it follows the seam of an iron-on the back to iron the appliqué material. SEWING AN EMBROIDERY PATTERN a Attach side of the outline. After cutting, remove all of the stitching thread carefully. * Carefully cut carefully along ...
... embroidery a Appliqué material (cotton, felt, etc.) b Iron-on page E-22. → The machine will sew around the position of the appliqué. a Position of appliqué b Base material → The machine will then stop . Fuse appliqué in step g. a Base material e Press the "Start/Stop" ...é position so that it follows the seam of an iron-on the back to iron the appliqué material. SEWING AN EMBROIDERY PATTERN a Attach side of the outline. After cutting, remove all of the stitching thread carefully. * Carefully cut carefully along ...
Users Manual - English
Page 90
... position. b Unlock the frame-securing lever remove the embroidery frame. a Press . Press and follow steps c through f in the settings screen of thread during embroidering, the machine will stop after sewing the 10 stitches. f To return to rethread the lower threading.
... position. b Unlock the frame-securing lever remove the embroidery frame. a Press . Press and follow steps c through f in the settings screen of thread during embroidering, the machine will stop after sewing the 10 stitches. f To return to rethread the lower threading.
Users Manual - English
Page 91
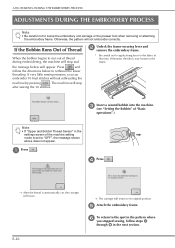
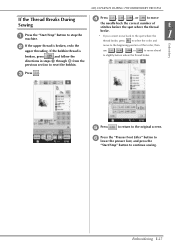
... threading. Embroidery e Press to return to slightly before where the thread broke. ADJ USTMENTS DURING THE EMBROIDERY PROCESS If the Thread Breaks During Sewing a Press the "Start/Stop" machine. d Press , , , or to move the needle back the correct number of stitches before the spot where the thread broke. *... the b If the upper thread is broken, press and follow the directions in steps a through e from the previous section to continue sewing. f Press the "Presser Foot Lifter" button lower the presser foot, and press the to "Start/Stop" button to reset the bobbin.
... threading. Embroidery e Press to return to slightly before where the thread broke. ADJ USTMENTS DURING THE EMBROIDERY PROCESS If the Thread Breaks During Sewing a Press the "Start/Stop" machine. d Press , , , or to move the needle back the correct number of stitches before the spot where the thread broke. *... the b If the upper thread is broken, press and follow the directions in steps a through e from the previous section to continue sewing. f Press the "Presser Foot Lifter" button lower the presser foot, and press the to "Start/Stop" button to reset the bobbin.

Users Manual - English
Page 92
The next time the machine is turned on again. a b Press . → The embroidery frame moves, returning the...longer remember your design. Memo • Even if the power goes out in the middle of embroidery, the machine returns to the point where embroidery was stopped Note • Do not remove the embroidery unit or the memory ... PROCESS Restarting from the Beginning a Press . E-28 a Current stitch number when embroidery was stopped when the machine is stopped. b Follow the instructions shown on the and remove the embroidery frame. Resuming Embroidery After Turning Off...
The next time the machine is turned on again. a b Press . → The embroidery frame moves, returning the...longer remember your design. Memo • Even if the power goes out in the middle of embroidery, the machine returns to the point where embroidery was stopped Note • Do not remove the embroidery unit or the memory ... PROCESS Restarting from the Beginning a Press . E-28 a Current stitch number when embroidery was stopped when the machine is stopped. b Follow the instructions shown on the and remove the embroidery frame. Resuming Embroidery After Turning Off...
Users Manual - English
Page 94
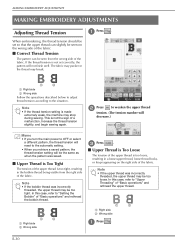
... reset to "Upper Threading" of the fabric. The fabric may pucker or the thread may be too loose. Increase the thread tension slightly, and begin sewing again. Note • If the bobbin thread was saved. ■ Upper Thread is Too Tight The tension of the upper thread is too tight, ... a Right side b Wrong side a Right side b Wrong side a Press . MAKING EMBROIDERY ADJUSTMENTS MAKING EMBROIDERY ADJUSTMENTS Adjusting Thread Tension a Press . This is made extremely weak, the machine may be the same as when the pattern was incorrectly threaded, the upper thread may stop during...
... reset to "Upper Threading" of the fabric. The fabric may pucker or the thread may be too loose. Increase the thread tension slightly, and begin sewing again. Note • If the bobbin thread was saved. ■ Upper Thread is Too Tight The tension of the upper thread is too tight, ... a Right side b Wrong side a Right side b Wrong side a Press . MAKING EMBROIDERY ADJUSTMENTS MAKING EMBROIDERY ADJUSTMENTS Adjusting Thread Tension a Press . This is made extremely weak, the machine may be the same as when the pattern was incorrectly threaded, the upper thread may stop during...
Users Manual - English
Page 96
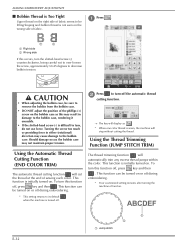
...is not seen on the wrong side of the phillips (+) screw on or off during embroidering. * Your customized setting remains after turning the machine off , press key and then . Using the Automatic Thread Cutting Function (END COLOR TRIM) The automatic thread cutting function will automatically trim ...any excess thread jumps within the color. To turn this function off and on the right side of sewing each color. Using the Thread Trimming Function (JUMP STITCH TRIM) The thread trimming function will cut the thread at the end ...
...is not seen on the wrong side of the phillips (+) screw on or off during embroidering. * Your customized setting remains after turning the machine off , press key and then . Using the Automatic Thread Cutting Function (END COLOR TRIM) The automatic thread cutting function will automatically trim ...any excess thread jumps within the color. To turn this function off and on the right side of sewing each color. Using the Thread Trimming Function (JUMP STITCH TRIM) The thread trimming function will cut the thread at the end ...


