
Users Manual - English
Page 1
We recommend that you keep this document before using the machine. Operation Manual Embroidery Machine Product Code: 882-D80/D82 Be sure to read this document nearby for future reference.
We recommend that you keep this document before using the machine. Operation Manual Embroidery Machine Product Code: 882-D80/D82 Be sure to read this document nearby for future reference.
Users Manual - English
Page 7
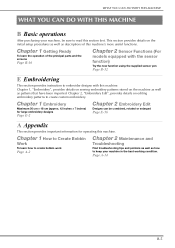
...parts and the screens Page B-16 Chapter 2 Sensor Functions (For models equipped with this machine's more useful functions. Page A-14 B-5 This section provides details on editing embroidery patterns to embroider designs with the sensor function) Try the new function using the supplied ... Troubleshooting Find troubleshooting tips and pointers as well as how to read this machine. Chapter 2, "Embroidery Edit", provides details on the initial setup procedures as well as patterns that have been imported. Chapter 1 Embroidery Maximum 30 cm × 18 cm (approx. 12 inches × ...
...parts and the screens Page B-16 Chapter 2 Sensor Functions (For models equipped with this machine's more useful functions. Page A-14 B-5 This section provides details on editing embroidery patterns to embroider designs with the sensor function) Try the new function using the supplied ... Troubleshooting Find troubleshooting tips and pointers as well as how to read this machine. Chapter 2, "Embroidery Edit", provides details on the initial setup procedures as well as patterns that have been imported. Chapter 1 Embroidery Maximum 30 cm × 18 cm (approx. 12 inches × ...
Users Manual - English
Page 8
... Embroidery Patterns/Brother "Exclusives"/Floral Alphabet Patterns/Frame/Bobbin Work Patterns 59 Selecting Alphabet Character Patterns 59 EDITING PATTERNS 61 Moving the Pattern 63 Using a Single Color 43 USING THE MEMORY FUNCTION 44 Embroidery Data Precautions 44 Saving Embroidery Patterns in the Machine's Memory ......... 45 Saving Embroidery Patterns to USB Media 46 Saving Embroidery Patterns in the Embroidery...
... Embroidery Patterns/Brother "Exclusives"/Floral Alphabet Patterns/Frame/Bobbin Work Patterns 59 Selecting Alphabet Character Patterns 59 EDITING PATTERNS 61 Moving the Pattern 63 Using a Single Color 43 USING THE MEMORY FUNCTION 44 Embroidery Data Precautions 44 Saving Embroidery Patterns in the Machine's Memory ......... 45 Saving Embroidery Patterns to USB Media 46 Saving Embroidery Patterns in the Embroidery...
Users Manual - English
Page 9
Using a Single Color 84 Basting Embroidery 84 USING THE MEMORY FUNCTION 85 A Appendix Chapter1 How to Create Bobbin Work 2 ABOUT BOBBIN WORK 3 PREPARING FOR BOBBIN WORK 3 Required Materials 3 Upper Threading 4 Preparing ... Character Patterns 65 Changing the Color of the Screen Display 18 Touch Panel is Malfunctioning 18 TROUBLESHOOTING 19 ERROR MESSAGES 22 SPECIFICATIONS 25 UPGRADING YOUR MACHINE'S SOFTWARE ..... 26 Upgrade Procedure Using USB Media 26 Upgrade Procedure Using Computer 27 INDEX 28 CONTENTS B-7 Rotating the Pattern 63 Changing the Size of the...
Using a Single Color 84 Basting Embroidery 84 USING THE MEMORY FUNCTION 85 A Appendix Chapter1 How to Create Bobbin Work 2 ABOUT BOBBIN WORK 3 PREPARING FOR BOBBIN WORK 3 Required Materials 3 Upper Threading 4 Preparing ... Character Patterns 65 Changing the Color of the Screen Display 18 Touch Panel is Malfunctioning 18 TROUBLESHOOTING 19 ERROR MESSAGES 22 SPECIFICATIONS 25 UPGRADING YOUR MACHINE'S SOFTWARE ..... 26 Upgrade Procedure Using USB Media 26 Upgrade Procedure Using Computer 27 INDEX 28 CONTENTS B-7 Rotating the Pattern 63 Changing the Size of the...
Users Manual - English
Page 10
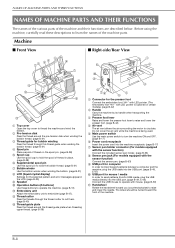
... B-49, E-47) j USB port for the presser foot Connect the embroidery foot "W+" with LED pointer. (The embroidery foot "W+" with mouse. (page B-50) k Handwheel Rotate the handwheel toward the front of the machine parts. Machine ■ Front View ■ Right-side/Rear View a Top cover... guide for bobbin winding Pass the thread through the thread cutter to circulate. Before using the machine, carefully read these buttons to operate the machine. (page B-10) k Embroidery unit Attach the embroidery unit to embroider (page B-47). l Thread cutter Pass the threads through this spool pin...
... B-49, E-47) j USB port for the presser foot Connect the embroidery foot "W+" with LED pointer. (The embroidery foot "W+" with mouse. (page B-50) k Handwheel Rotate the handwheel toward the front of the machine parts. Machine ■ Front View ■ Right-side/Rear View a Top cover... guide for bobbin winding Pass the thread through the thread cutter to circulate. Before using the machine, carefully read these buttons to operate the machine. (page B-10) k Embroidery unit Attach the embroidery unit to embroider (page B-47). l Thread cutter Pass the threads through this spool pin...
Users Manual - English
Page 11
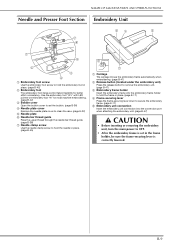
... in the frame holder, be sure the frame-securing lever is set in place. (page B-42) b Embroidery foot The embroidery foot helps control fabric flexibility for better stitch consistency. NAMES OF MACHINE PARTS AND THEIR FUNCTIONS Needle and Presser Foot Section Embroidery Unit a Embroidery foot screw Use the embroidery foot screw to OFF. • After the...
... in the frame holder, be sure the frame-securing lever is set in place. (page B-42) b Embroidery foot The embroidery foot helps control fabric flexibility for better stitch consistency. NAMES OF MACHINE PARTS AND THEIR FUNCTIONS Needle and Presser Foot Section Embroidery Unit a Embroidery foot screw Use the embroidery foot screw to OFF. • After the...

Users Manual - English
Page 12
... may become tangled, or damage to the machine's operation mode. The button changes color according to the machine may occur. Green: The machine is ready to begin embroidering. e "Automatic Threading" button Use this button to lower the embroidery foot and apply pressure to the fabric. ...B-10 Red: The machine cannot embroider. d "Presser Foot Lifter" button Press this button to automatically thread the needle. CAUTION &#...
... may become tangled, or damage to the machine's operation mode. The button changes color according to the machine may occur. Green: The machine is ready to begin embroidering. e "Automatic Threading" button Use this button to lower the embroidery foot and apply pressure to the fabric. ...B-10 Red: The machine cannot embroider. d "Presser Foot Lifter" button Press this button to automatically thread the needle. CAUTION &#...
Users Manual - English
Page 14
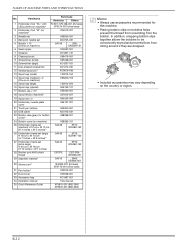
...130012-054 16 Spool cap (special) XA5752-121 17 Bobbin clip × 10* XE3060-001 18 Spool felt (on machine)* X57045-051 19 Spool net × 2 XA5523-050 20 Embroidery needle plate cover XE5131-001 21 Touch pen (stylus) XA9940-051 22 USB cable XD0745-051 23 Bobbin case (gray... 18 cm × W 13 cm (H 7 inches × W 5 inches)* SA439 EF75: XC8481-152 27 Embroidery frame set (extra large) H 30 cm × W 18 cm (H 12 inches × W 7 inches) SA440 EF76: XC8482-152 28 Brother poly #90 bobbin thread EBT-PE EBT-PEN: XC5996-001 29 Stabilizer material* SA519 BM3: XE0806-001...
...130012-054 16 Spool cap (special) XA5752-121 17 Bobbin clip × 10* XE3060-001 18 Spool felt (on machine)* X57045-051 19 Spool net × 2 XA5523-050 20 Embroidery needle plate cover XE5131-001 21 Touch pen (stylus) XA9940-051 22 USB cable XD0745-051 23 Bobbin case (gray... 18 cm × W 13 cm (H 7 inches × W 5 inches)* SA439 EF75: XC8481-152 27 Embroidery frame set (extra large) H 30 cm × W 18 cm (H 12 inches × W 7 inches) SA440 EF76: XC8482-152 28 Brother poly #90 bobbin thread EBT-PE EBT-PEN: XC5996-001 29 Stabilizer material* SA519 BM3: XE0806-001...
Users Manual - English
Page 15
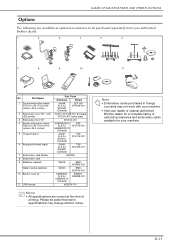
... cm (H 6 inches x W 6 inches) 2 Embroidery foot "W+" with LED pointer 3 Embroidery foot "W" 4 Border embroidery frame H 30 cm x W 10 cm (H 12 inches x W 4 inches) 5 10 spool stand 6 King spool thread stand 7 Embroidery card Reader 8 Embroidery card 9 Stabilizer material Water soluble stabilizer 10 Bobbin work with your machine. • Visit your dealer or nearest authorized Brother dealer for your authorized Brother dealer. 1 2 3 4 5 6 7 8 9 10...
... cm (H 6 inches x W 6 inches) 2 Embroidery foot "W+" with LED pointer 3 Embroidery foot "W" 4 Border embroidery frame H 30 cm x W 10 cm (H 12 inches x W 4 inches) 5 10 spool stand 6 King spool thread stand 7 Embroidery card Reader 8 Embroidery card 9 Stabilizer material Water soluble stabilizer 10 Bobbin work with your machine. • Visit your dealer or nearest authorized Brother dealer for your authorized Brother dealer. 1 2 3 4 5 6 7 8 9 10...

Users Manual - English
Page 18
... the Display Language 26 ■ Changing the Background Colors of the Embroidery Patterns....... 26 ■ Specifying the Size of Pattern Thumbnails 27 ■ Saving a Settings Screen Image to USB Media 28 Using the Machine Help Key 29 LOWER THREADING 31 Winding the Bobbin 31 ■...the Needle 46 BEFORE EMBROIDERING 46 Embroidery Step by Step 46 About the Embroidery Unit 47 ■ Removing the Embroidery Unit 47 ■ Attaching the Embroidery Unit 47 USING FUNCTIONS BY CONNECTING THE ACCESSORY TO THE MACHINE 49 Using USB Media or Embroidery Card Reader/USB Card Writer Module...
... the Display Language 26 ■ Changing the Background Colors of the Embroidery Patterns....... 26 ■ Specifying the Size of Pattern Thumbnails 27 ■ Saving a Settings Screen Image to USB Media 28 Using the Machine Help Key 29 LOWER THREADING 31 Winding the Bobbin 31 ■...the Needle 46 BEFORE EMBROIDERING 46 Embroidery Step by Step 46 About the Embroidery Unit 47 ■ Removing the Embroidery Unit 47 ■ Attaching the Embroidery Unit 47 USING FUNCTIONS BY CONNECTING THE ACCESSORY TO THE MACHINE 49 Using USB Media or Embroidery Card Reader/USB Card Writer Module...
Users Manual - English
Page 23
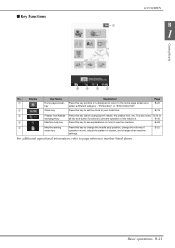
... it is displayed to return to prevent operation of B-22 mode key operation sound, adjust the pattern or screen, and change other machine settings. This key locks B-42 to exchange key all key and button functions to the home page screen and B-20 key select...29 e Machine setting Press this key before changing the needle, the presser foot, etc. B-18 c Presser foot/Needle Press this key to page reference number listed above. For additional operational information, refer to change the needle stop position, change the volume of the machine. "Embroidery" or "Embroidery Edit"....
... it is displayed to return to prevent operation of B-22 mode key operation sound, adjust the pattern or screen, and change other machine settings. This key locks B-42 to exchange key all key and button functions to the home page screen and B-20 key select...29 e Machine setting Press this key before changing the needle, the presser foot, etc. B-18 c Presser foot/Needle Press this key to page reference number listed above. For additional operational information, refer to change the needle stop position, change the volume of the machine. "Embroidery" or "Embroidery Edit"....
Users Manual - English
Page 24
...up or down position when using the pivot key. d Turn the "Upper and Bobbin Thread Sensor" "ON" or "OFF". If the machine is used without thread. (see page B-25). f Select to save the current settings screen image to USB media (see page B-25). ... language (see page B-25). i Press to detect if the thread has become tangled. a f b c g d e h i i a Select the needle stop position, embroidery speed, opening display, etc.). raises the needle, then lowers it is turned on (see page B-28). Continuing to display a different settings screen. g Select the initial...
...up or down position when using the pivot key. d Turn the "Upper and Bobbin Thread Sensor" "ON" or "OFF". If the machine is used without thread. (see page B-25). f Select to save the current settings screen image to USB media (see page B-25). ... language (see page B-25). i Press to detect if the thread has become tangled. a f b c g d e h i i a Select the needle stop position, embroidery speed, opening display, etc.). raises the needle, then lowers it is turned on (see page B-28). Continuing to display a different settings screen. g Select the initial...
Users Manual - English
Page 27
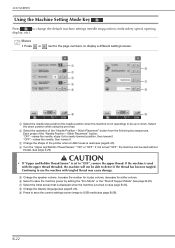
...operations B-25 Touch the screen or any operational button to turn off the machine. Turn machine off the machine while the machine is connected. the time until Note • If you leave the machine without using for about 5 seconds before turning on page B-26. Getting ... Press . → The settings screen appears. b Display page 2 of the settings screen. Machine will turn off and then back on to "Changing the Background Colors of the Embroidery Patterns" on the machine again. c Use or entering the to the original screen. d Press to return to select mode...
...operations B-25 Touch the screen or any operational button to turn off the machine. Turn machine off the machine while the machine is connected. the time until Note • If you leave the machine without using for about 5 seconds before turning on page B-26. Getting ... Press . → The settings screen appears. b Display page 2 of the settings screen. Machine will turn off and then back on to "Changing the Background Colors of the Embroidery Patterns" on the machine again. c Use or entering the to the original screen. d Press to return to select mode...
Users Manual - English
Page 28
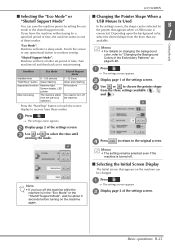
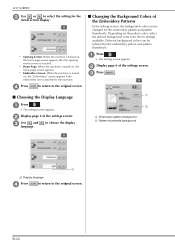
... movie screen is touched. * Home Page: When the machine is turned on, the home page screen appears. * Embroidery Screen: When the machine is attached to the machine. b Display page 6 of the settings screen. B-26 the setting for the embroidery pattern and pattern thumbnails. to choose the display a b a Embroidery pattern background b Pattern thumbnails background a a Display language d Press...
... movie screen is touched. * Home Page: When the machine is turned on, the home page screen appears. * Embroidery Screen: When the machine is attached to the machine. b Display page 6 of the settings screen. B-26 the setting for the embroidery pattern and pattern thumbnails. to choose the display a b a Embroidery pattern background b Pattern thumbnails background a a Display language d Press...

Users Manual - English
Page 40
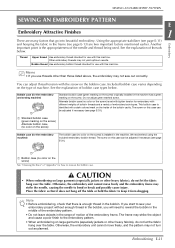
... threading can cause the thread to tangle and break the needle, leading to injury. → The upper thread shutter opens so the machine can be used with an upper thread shutter, allowing you try to check that the upper threading is equipped with the automatic threading function... sure to display a video example of 130/20 or thicker cannot be threaded. Memo • The automatic threading function can be used with embroidery machine needle sizes 75/11 through 90/14. • Thread such as transparent nylon monofilament thread and thread with a thickness of the operation on ...
... threading can cause the thread to tangle and break the needle, leading to injury. → The upper thread shutter opens so the machine can be used with an upper thread shutter, allowing you try to check that the upper threading is equipped with the automatic threading function... sure to display a video example of 130/20 or thicker cannot be threaded. Memo • The automatic threading function can be used with embroidery machine needle sizes 75/11 through 90/14. • Thread such as transparent nylon monofilament thread and thread with a thickness of the operation on ...
Users Manual - English
Page 47
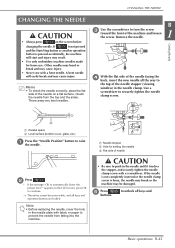
...not completely inserted or the needle clamp screw is pressed accidentally, the machine will easily break and may result. • Use only embroidery machine needles made for setting the needle c Flat side of the turn the screw machine and loosen 1 the screw. Position" button to prevent the needle from... needle until it touches the stopper, and securely tighten the needle clamp screw with a bent needle. Check the needle from falling into the machine. Getting Ready d With the flat side of the needle facing the back, insert the new needle all the way to continue. →...
...not completely inserted or the needle clamp screw is pressed accidentally, the machine will easily break and may result. • Use only embroidery machine needles made for setting the needle c Flat side of the turn the screw machine and loosen 1 the screw. Position" button to prevent the needle from... needle until it touches the stopper, and securely tighten the needle clamp screw with a bent needle. Check the needle from falling into the machine. Getting Ready d With the flat side of the needle facing the back, insert the new needle all the way to continue. →...
Users Manual - English
Page 85
... color on this case can be adjusted if necessary (see page E-31). Embroidery Thread Upper thread Use embroidery thread intended for how to rewind the bobbin in the middle of threads below . Bobbin thread Use embroidery bobbin thread intended for the embroidery machine) The bobbin case (no color on large garments (especially jackets or other...
... color on this case can be adjusted if necessary (see page E-31). Embroidery Thread Upper thread Use embroidery thread intended for how to rewind the bobbin in the middle of threads below . Bobbin thread Use embroidery bobbin thread intended for the embroidery machine) The bobbin case (no color on large garments (especially jackets or other...
Users Manual - English
Page 108
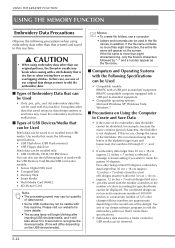
... to Create and Save Data • If the name of our design software programs to edit the embroidery pattern so that meets the following precautions when using our data design systems or machines may cause the embroidery machine to recognize the devices/media. (Time will appear on the screen. Using data other than eight...
... to Create and Save Data • If the name of our design software programs to edit the embroidery pattern so that meets the following precautions when using our data design systems or machines may cause the embroidery machine to recognize the devices/media. (Time will appear on the screen. Using data other than eight...
Users Manual - English
Page 111
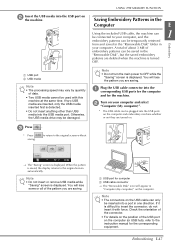
... (My computer)". * The USB cable can be plugged into the USB ports on the computer and embroidery machine whether or not they are saving. If two USB media are saving. b Turn on your computer, and the 1 embroidery patterns can only be used with force. a USB port for computer b USB cable connector → The...
... (My computer)". * The USB cable can be plugged into the USB ports on the computer and embroidery machine whether or not they are saving. If two USB media are saving. b Turn on your computer, and the 1 embroidery patterns can only be used with force. a USB port for computer b USB cable connector → The...

Users Manual - English
Page 175
Maintenance and Troubleshooting A 2 Appendix A-25 SPECIFICATIONS SPECIFICATIONS Item Embroidery Machine and Accessories Dimensions of machine (Box 1 of 2) Dimensions of box Embroidery Unit (Box 2 of 2) Weight of machine Weight of box (for shipping) Embroidering speed Dimensions of embroidery unit Dimensions of machine with embroidery unit attached Dimensions of box Weight of embroidery unit Weight of box (for shipping) Total Shipping Weight...
Maintenance and Troubleshooting A 2 Appendix A-25 SPECIFICATIONS SPECIFICATIONS Item Embroidery Machine and Accessories Dimensions of machine (Box 1 of 2) Dimensions of box Embroidery Unit (Box 2 of 2) Weight of machine Weight of box (for shipping) Embroidering speed Dimensions of embroidery unit Dimensions of machine with embroidery unit attached Dimensions of box Weight of embroidery unit Weight of box (for shipping) Total Shipping Weight...


