
BE-100 Workbook - English
Page 2
... Regions 43 Example s Chapter 19: Flipping Design Shapes 45 Flipping graphic shapes 45 Flipping text shapes 45 Example s Chapter 20: Shapes Toolbar 47 Using the Manual Stitch tool 47 Using the Path tool 47 Using the Column tool 48 Using the Region tool 49 Using the Simple Polygon tool 49 Using...
... Regions 43 Example s Chapter 19: Flipping Design Shapes 45 Flipping graphic shapes 45 Flipping text shapes 45 Example s Chapter 20: Shapes Toolbar 47 Using the Manual Stitch tool 47 Using the Path tool 47 Using the Column tool 48 Using the Region tool 49 Using the Simple Polygon tool 49 Using...
BE-100 Workbook - English
Page 3
... 23: Navigating the Design 55 Navigating through the design 55 Selecting alternating punchpoints 55 s Chapter 24: Punchpoints Drop-Down Menu 57 Inserting punchpoints 57 Splitting manual stitches 57 Setting entry and exit points 58 s Chapter 25: Trims and Connections 59 Specifying character connections 59 Specifying design shape connections 59 s Chapter 26...
... 23: Navigating the Design 55 Navigating through the design 55 Selecting alternating punchpoints 55 s Chapter 24: Punchpoints Drop-Down Menu 57 Inserting punchpoints 57 Splitting manual stitches 57 Setting entry and exit points 58 s Chapter 25: Trims and Connections 59 Specifying character connections 59 Specifying design shape connections 59 s Chapter 26...

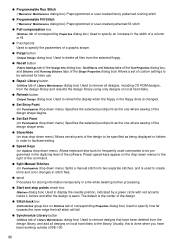
BE-100 Workbook - English
Page 4
...designs are merged x Classify designs and search them according to keywords, customer name or other sections x Edit individual stitches by using the Manual Stitch tool x View the sequence of color changes in the design x Group sections of stitching together or separate them x Automatically create... design after specific points x Change graphic shape properties (such as the 2-ply stitch and the bean stitch 1 Introduction The Brother BE-100 embroidery software provides numerous functions for easily creating and manipulating stitch and outline files, which can be entered. In ...
...designs are merged x Classify designs and search them according to keywords, customer name or other sections x Edit individual stitches by using the Manual Stitch tool x View the sequence of color changes in the design x Group sections of stitching together or separate them x Automatically create... design after specific points x Change graphic shape properties (such as the 2-ply stitch and the bean stitch 1 Introduction The Brother BE-100 embroidery software provides numerous functions for easily creating and manipulating stitch and outline files, which can be entered. In ...
BE-100 Workbook - English
Page 8
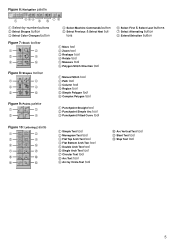
tons Figure 7: Stock toolbar 1 2 3 4 5 6 1 Move tool 2 Zoom tool 3 Reshape tool 4 Rotate tool 5 Measure tool 6 Polygon Stitch Direction tool Figure 8: Shapes toolbar 1 2 3 4 5 6 1 Manual Stitch tool 2 Path tool 3 Column tool 4 Region tool 5 Simple Polygon tool 6 Complex Polygon tool Figure 9: Points palette 1 2 3 4 1 Punchpoint Straight tool 2 Punchpoint Simple Arc tool 3 Punchpoint ...
tons Figure 7: Stock toolbar 1 2 3 4 5 6 1 Move tool 2 Zoom tool 3 Reshape tool 4 Rotate tool 5 Measure tool 6 Polygon Stitch Direction tool Figure 8: Shapes toolbar 1 2 3 4 5 6 1 Manual Stitch tool 2 Path tool 3 Column tool 4 Region tool 5 Simple Polygon tool 6 Complex Polygon tool Figure 9: Points palette 1 2 3 4 1 Punchpoint Straight tool 2 Punchpoint Simple Arc tool 3 Punchpoint ...
BE-100 Workbook - English
Page 50
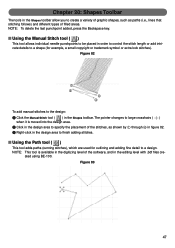
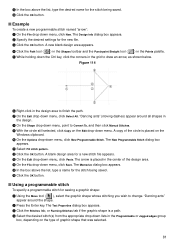
...for example, a small copyright or trademark symbol or extra lock stitches). ated using BE-100. Figure 82 1 3 2 4 To add manual stitches to the design: 1 Click the Manual Stitch tool ( ) in the Shapes toolbar allow you to specify the placement of the stitches, as paths (i.e., lines that stitching follows)... area to finish adding stitches. Figure 83 47 Chapter 20: Shapes Toolbar The tools in the Shapes toolbar. s Using the Manual Stitch tool ( ) This tool allows individual needle punchpoints to be placed in order to control the stitch length or add intricate details to a...
...for example, a small copyright or trademark symbol or extra lock stitches). ated using BE-100. Figure 82 1 3 2 4 To add manual stitches to the design: 1 Click the Manual Stitch tool ( ) in the Shapes toolbar allow you to specify the placement of the stitches, as paths (i.e., lines that stitching follows)... area to finish adding stitches. Figure 83 47 Chapter 20: Shapes Toolbar The tools in the Shapes toolbar. s Using the Manual Stitch tool ( ) This tool allows individual needle punchpoints to be placed in order to control the stitch length or add intricate details to a...
BE-100 Workbook - English
Page 60
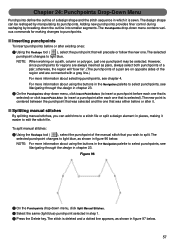
For more information about using the buttons in the Navigation palette to edit the stitch file. s Splitting manual stitches By splitting manual stitches, you wish to punchpoints. The selected punchpoint changes to light blue. The stitch is sewn. NOTE: When working on...punchpoints of a pair; However, since punchpoints for making it easier to select punchpoints, see chapter 4. To split manual stitches: 1 Using the Reshape tool ( ), select the punchpoint of the manual stitch that was either before or after it. The design shape can add trims to a stitch file ...
For more information about using the buttons in the Navigation palette to edit the stitch file. s Splitting manual stitches By splitting manual stitches, you wish to punchpoints. The selected punchpoint changes to light blue. The stitch is sewn. NOTE: When working on...punchpoints of a pair; However, since punchpoints for making it easier to select punchpoints, see chapter 4. To split manual stitches: 1 Using the Reshape tool ( ), select the punchpoint of the manual stitch that was either before or after it. The design shape can add trims to a stitch file ...
BE-100 Workbook - English
Page 61
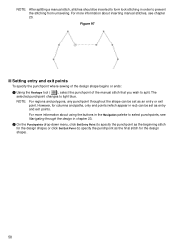
...punchpoint throughout the shape can be set as an entry or exit point. The selected punchpoint changes to split. NOTE: After splitting a manual stitch, stitches should be set as entry and exit points. For more information about using the buttons in the Navigation palette to select punchpoints...the design shape begins or ends: 1 Using the Reshape tool ( ), select the punchpoint of the manual stitch that you wish to light blue. For more information about inserting manual stitches, see Navigating through the design in order to specify the punchpoint as the beginning stitch for ...
...punchpoint throughout the shape can be set as an entry or exit point. The selected punchpoint changes to split. NOTE: After splitting a manual stitch, stitches should be set as entry and exit points. For more information about using the buttons in the Navigation palette to select punchpoints...the design shape begins or ends: 1 Using the Reshape tool ( ), select the punchpoint of the manual stitch that you wish to light blue. For more information about inserting manual stitches, see Navigating through the design in order to specify the punchpoint as the beginning stitch for ...
BE-100 Workbook - English
Page 83
...File drop-down menu, click Save. "Dancing ants" (moving dashes) 6 On the Shape drop-down menu, point to Convert To, and then click Manual Stitches. 7 With the shape still selected, click Copy on the Windows clipboard. 8 On the Options drop-down menu, click New Programmable Stitch. The...point. 5 Using the Move tool ( appear around it , see Displaying a background image in a new programmable stitch file, which only allows the Manual Stitch tool ( ) to be created to sew various patterns, giving a different outline or texture to trace an image. The Memorize dialog box appears. A...
...File drop-down menu, click Save. "Dancing ants" (moving dashes) 6 On the Shape drop-down menu, point to Convert To, and then click Manual Stitches. 7 With the shape still selected, click Copy on the Windows clipboard. 8 On the Options drop-down menu, click New Programmable Stitch. The...point. 5 Using the Move tool ( appear around it , see Displaying a background image in a new programmable stitch file, which only allows the Manual Stitch tool ( ) to be created to sew various patterns, giving a different outline or texture to trace an image. The Memorize dialog box appears. A...
BE-100 Workbook - English
Page 84
... group box, depending on the type of the design area. "Dancing ants" appear around all shapes in the grid to Convert To, and then click Manual Stitches. 9 With the circle still selected, click Copy on the Windows clipboard. 0 On the Options drop-down menu, point to draw an arrow, as shown...
... group box, depending on the type of the design area. "Dancing ants" appear around all shapes in the grid to Convert To, and then click Manual Stitches. 9 With the circle still selected, click Copy on the Windows clipboard. 0 On the Options drop-down menu, point to draw an arrow, as shown...
BE-100 Workbook - English
Page 94
... flows either in or out. q Flat Bottom Arch Text tool ( ) Used to digitize filled shapes containing one or two lines along an arc. q Manual Stitch tool ( ) Used to be reshaped and deformed by Circle Text tool ( ) Used to display a palette containing various text shapes for easy creation of BES...
... flows either in or out. q Flat Bottom Arch Text tool ( ) Used to digitize filled shapes containing one or two lines along an arc. q Manual Stitch tool ( ) Used to be reshaped and deformed by Circle Text tool ( ) Used to display a palette containing various text shapes for easy creation of BES...
BE-100 Workbook - English
Page 96
.... q Duplicate (on Edit drop-down menu) Deletes or removes the selection. q Connection group box (Commands tab of the selection and pastes it easier to trim manually with scissors. q Zoom tool ( ) Used to zoom in precisely on an area by dragging the pointer over the desired area in the Design Reference window...
.... q Duplicate (on Edit drop-down menu) Deletes or removes the selection. q Connection group box (Commands tab of the selection and pastes it easier to trim manually with scissors. q Zoom tool ( ) Used to zoom in precisely on an area by dragging the pointer over the desired area in the Design Reference window...
BE-100 Workbook - English
Page 99
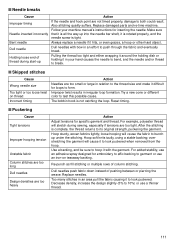
... using only designs on local hard disks. q Speed Keys (on Punchpoints drop-down menu) Allows keyboard shortcuts for later use. q Split Manual Stitches (on Options drop-down menu) Splits a manual stitch into two separate stitches, and is sewn. Usually, this is the center of the design. q Set Entry Point (on View drop...
... using only designs on local hard disks. q Speed Keys (on Punchpoints drop-down menu) Allows keyboard shortcuts for later use. q Split Manual Stitches (on Options drop-down menu) Splits a manual stitch into two separate stitches, and is sewn. Usually, this is the center of the design. q Set Entry Point (on View drop...
BE-100 Workbook - English
Page 101
... stitched to another to add dimension and texture. If appliqué occupies a significant amount of the design, the stitch count is formed on a manual or computerized machine with one piece of Embroidery Terms q Appliqué 1. q Buckram Coarse woven fabric stiffened with threads laying close together.
... stitched to another to add dimension and texture. If appliqué occupies a significant amount of the design, the stitch count is formed on a manual or computerized machine with one piece of Embroidery Terms q Appliqué 1. q Buckram Coarse woven fabric stiffened with threads laying close together.
BE-100 Workbook - English
Page 102
...;ned. q Emblem Embroidered design with the design, move aspects of the design around, combine designs, and insert or edit machine commands. Evolved from handwork to manual sewing machines, and from hand looms and schiffli machines with the application of heat. q Fill stitch Series of digitized designs kept by embroidery shops...
...;ned. q Emblem Embroidered design with the design, move aspects of the design around, combine designs, and insert or edit machine commands. Evolved from handwork to manual sewing machines, and from hand looms and schiffli machines with the application of heat. q Fill stitch Series of digitized designs kept by embroidery shops...
BE-100 Workbook - English
Page 113
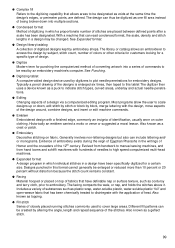
...-punched or use . Use the smallest needle size that is not catching the loop. Replace the needle. Increase the design size by using your machine manual. Loose tensions cause thread to burst or become distorted. The hook needs frequent lubrication because it dries out faster. Large needles can cut some delicate...
...-punched or use . Use the smallest needle size that is not catching the loop. Replace the needle. Increase the design size by using your machine manual. Loose tensions cause thread to burst or become distorted. The hook needs frequent lubrication because it dries out faster. Large needles can cut some delicate...
BE-100 Workbook - English
Page 114
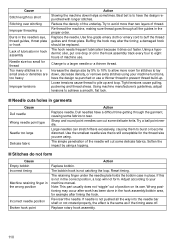
... garment. Pulling the thread too tight and either wrapping it around the holding disk or holding it to break. Improper twist results in your machine manual's instructions for embroidery to affix backing to garment or use a thinner thread. 111 Try a new cone or different color to hoop it with bow...
... garment. Pulling the thread too tight and either wrapping it around the holding disk or holding it to break. Improper twist results in your machine manual's instructions for embroidery to affix backing to garment or use a thinner thread. 111 Try a new cone or different color to hoop it with bow...
BE-100 Workbook - English
Page 117
... 21 Single Arch Text tool 24 Slant Text tool 28 Step Text tool 29 Library Maintenance command 65 M Main window 4 Maintain Aspect Ratio button 94 Manual Stitch tool 47 Markers command 94 Markers dialog box Entry and exit points check box 93 Needle penetrations check box 82 Start and stop point...
... 21 Single Arch Text tool 24 Slant Text tool 28 Step Text tool 29 Library Maintenance command 65 M Main window 4 Maintain Aspect Ratio button 94 Manual Stitch tool 47 Markers command 94 Markers dialog box Entry and exit points check box 93 Needle penetrations check box 82 Start and stop point...
BE-100 Workbook - English
Page 118
... Set Exit Point command 58 Sewing simulation 3 Shape drop-down menu Convert To Deformed Text 41 Manual Stitches 80 Paths/Regions 43 STB Settings 83 Deconstruct Text 39 Flip Horizontal 45 Flip Vertical 45 Group...Underlay stitches group box 94, 97 Shapes toolbar 5, 47 Column tool 48 Complex Polygon tool 50 Manual Stitch tool 47 Path tool 47 Region tool 49 Simple Polygon tool 49 Show/Hide command 72 ... Single Arch Text tool 24 Slant Text tool 28 Slow Draw command 3 Speed Keys command 96 Split Manual Stitches command 57 Spool 96 STB Settings command 83 Step Text tool 29 Stock toolbar 5 Measure tool ...
... Set Exit Point command 58 Sewing simulation 3 Shape drop-down menu Convert To Deformed Text 41 Manual Stitches 80 Paths/Regions 43 STB Settings 83 Deconstruct Text 39 Flip Horizontal 45 Flip Vertical 45 Group...Underlay stitches group box 94, 97 Shapes toolbar 5, 47 Column tool 48 Complex Polygon tool 50 Manual Stitch tool 47 Path tool 47 Region tool 49 Simple Polygon tool 49 Show/Hide command 72 ... Single Arch Text tool 24 Slant Text tool 28 Slow Draw command 3 Speed Keys command 96 Split Manual Stitches command 57 Spool 96 STB Settings command 83 Step Text tool 29 Stock toolbar 5 Measure tool ...


