
Users Manual - English and Spanish
Page 3
... www.brother.com SAVE THESE INSTRUCTIONS This machine is used . • Always consult the operation manual when replacing or installing any adjustments in this manual. Use this machine, avoid direct sunlight and high humidity locations. Never allow children to turn it could cause the needle to change without notice. carrying the mark, rating as it off when making any assemblies, the presser feet, needle, or other hot objects. • Use only...
... www.brother.com SAVE THESE INSTRUCTIONS This machine is used . • Always consult the operation manual when replacing or installing any adjustments in this manual. Use this machine, avoid direct sunlight and high humidity locations. Never allow children to turn it could cause the needle to change without notice. carrying the mark, rating as it off when making any assemblies, the presser feet, needle, or other hot objects. • Use only...

Users Manual - English and Spanish
Page 4
... 5 USING YOUR SEWING MACHINE 6 Connecting plugs 6 Main power and sewing light switch 7 Foot controller 7 Checking the needle 7 Replacing the needle 7 Changing the presser foot 8 THE CONTROLS 9 Pattern selection dial 9 Stretch stitching 9 Patterns and stitch names 10 Stitch length dial 12 Stitch width dial 12 Reverse sewing lever 13 THREADING THE MACHINE 13 Winding the bobbin 13 Lower threading 15 Lower threading (for models equipped with a quick-set bobbin 16 Upper threading 17 Using the needle threader (for models equipped with a twin needle (Option 25 Thread tension 27...
... 5 USING YOUR SEWING MACHINE 6 Connecting plugs 6 Main power and sewing light switch 7 Foot controller 7 Checking the needle 7 Replacing the needle 7 Changing the presser foot 8 THE CONTROLS 9 Pattern selection dial 9 Stretch stitching 9 Patterns and stitch names 10 Stitch length dial 12 Stitch width dial 12 Reverse sewing lever 13 THREADING THE MACHINE 13 Winding the bobbin 13 Lower threading 15 Lower threading (for models equipped with a quick-set bobbin 16 Upper threading 17 Using the needle threader (for models equipped with a twin needle (Option 25 Thread tension 27...
Users Manual - English and Spanish
Page 5
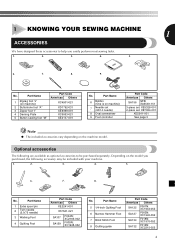
...-052 No. Depending on the machine model. Part Name 5 1/4-inch Quilting Foot 6 Narrow Hemmer Foot 7 Blind Stitch Foot 8 Quilting guide Part Code Americas Others SA125 F001N: XC1944-052 SA127 F003N: XC1945-052 SA134 F018N: XC1976-052 SA132 F016N: XC2215-052 4 No. No. Optional accessories The following accessory may be purchased separately. Part Name 6 Bobbin (One is on machine) 7 Needle set (90/14 needle) 8 Oval screwdriver 9 Foot controller Part Code Americas Others SA156 SFB: XA5539-151...
...-052 No. Depending on the machine model. Part Name 5 1/4-inch Quilting Foot 6 Narrow Hemmer Foot 7 Blind Stitch Foot 8 Quilting guide Part Code Americas Others SA125 F001N: XC1944-052 SA127 F003N: XC1945-052 SA134 F018N: XC1976-052 SA132 F016N: XC2215-052 4 No. No. Optional accessories The following accessory may be purchased separately. Part Name 6 Bobbin (One is on machine) 7 Needle set (90/14 needle) 8 Oval screwdriver 9 Foot controller Part Code Americas Others SA156 SFB: XA5539-151...
Users Manual - English and Spanish
Page 6
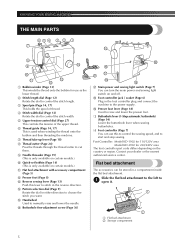
... SEWING MACHINE THE MAIN PARTS 654 3 2 1 7 E 8 9 D 0 A C B 1 Bobbin winder (Page 13) This winds the thread onto the bobbin for 220/240V area The foot controller part code differs depending on the country or region. H Foot controller jack / socket (Page 6) Plug in the foot controller plug and connect the machine to stitch in the reverse direction. E Handwheel Used to choose the stitch you want. F Buttonhole fine-adjustment screw (Page 36) J F KG H I Presser foot lever (Page 18) Used to raise and lower the presser foot. D Pattern...
... SEWING MACHINE THE MAIN PARTS 654 3 2 1 7 E 8 9 D 0 A C B 1 Bobbin winder (Page 13) This winds the thread onto the bobbin for 220/240V area The foot controller part code differs depending on the country or region. H Foot controller jack / socket (Page 6) Plug in the foot controller plug and connect the machine to stitch in the reverse direction. E Handwheel Used to choose the stitch you want. F Buttonhole fine-adjustment screw (Page 36) J F KG H I Presser foot lever (Page 18) Used to raise and lower the presser foot. D Pattern...
Users Manual - English and Spanish
Page 9
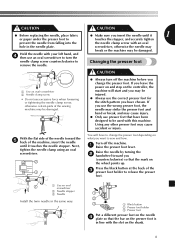
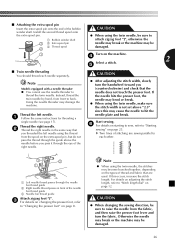
... oval hole in the same way. 1 2 3 1 Black button 2 Presser foot holder 3 Presser foot Put a different presser foot on the needle 4 plate so that have been designed to be damaged. ● Always turn the needle clamp screw counterclockwise to Changing the presser foot remove the needle. screwdriver, otherwise the needle may break or the machine may be damaged. CAUTION CAUTION ● Before replacing the needle, place fabric ● Make sure you insert the needle until it 1 or paper under the presser foot...
... oval hole in the same way. 1 2 3 1 Black button 2 Presser foot holder 3 Presser foot Put a different presser foot on the needle 4 plate so that have been designed to be damaged. ● Always turn the needle clamp screw counterclockwise to Changing the presser foot remove the needle. screwdriver, otherwise the needle may break or the machine may be damaged. CAUTION CAUTION ● Before replacing the needle, place fabric ● Make sure you insert the needle until it 1 or paper under the presser foot...
Users Manual - English and Spanish
Page 10
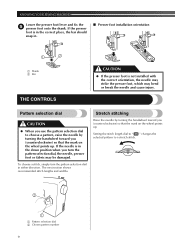
... use the pattern selection dial to a stretch stitch. 2 1 1 Pattern selection dial 2 Chosen pattern number 9 If the needle is not installed with the correct orientation, the needle may strike the presser foot, which may be damaged. To choose a stitch, simply turn the pattern selection dial, the needle, presser foot or fabric may bend or break the needle and cause injury. The next section shows recommended stitch lengths and widths. KNOWING YOUR SEWING MACHINE Lower the presser foot lever and fix the 5 presser foot onto the shank. Setting...
... use the pattern selection dial to a stretch stitch. 2 1 1 Pattern selection dial 2 Chosen pattern number 9 If the needle is not installed with the correct orientation, the needle may strike the presser foot, which may be damaged. To choose a stitch, simply turn the pattern selection dial, the needle, presser foot or fabric may bend or break the needle and cause injury. The next section shows recommended stitch lengths and widths. KNOWING YOUR SEWING MACHINE Lower the presser foot lever and fix the 5 presser foot onto the shank. Setting...
Users Manual - English and Spanish
Page 13
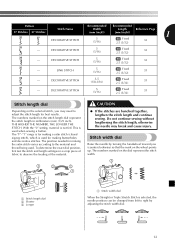
... needle position can be changed from left to adjust the stitch length for making the satin stitch varies according to observe the feeding of fabric to the material and thread being used for best results. DECORATIVE STITCH 5 (3/16) Fixed 33 2.5 (3/32) Stitch length dial Depending on the selected stitch, you (counterclockwise) so that the mark on the dial represent the stitch width. 1 1 Stitch length dial 2 Shorter 3 Longer 1 Stitch width dial When the Straight or Triple Stretch Stitch is used when sewing a button...
... needle position can be changed from left to adjust the stitch length for making the satin stitch varies according to observe the feeding of fabric to the material and thread being used for best results. DECORATIVE STITCH 5 (3/16) Fixed 33 2.5 (3/32) Stitch length dial Depending on the selected stitch, you (counterclockwise) so that the mark on the dial represent the stitch width. 1 1 Stitch length dial 2 Shorter 3 Longer 1 Stitch width dial When the Straight or Triple Stretch Stitch is used when sewing a button...
Users Manual - English and Spanish
Page 14
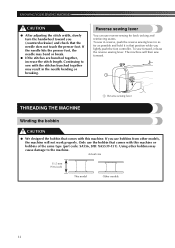
..., increase the stitch length. Continuing to the machine. Using other models, the machine will then sew forward. 1 1 Reverse sewing lever THREADING THE MACHINE Winding the bobbin CAUTION ● We designed the bobbin that the needle does not touch the presser foot. If the needle hits the presser foot, the needle may result in that comes with this machine. If you use the bobbin that position while you (counterclockwise) and check that comes with this machine or bobbins of the same type (part code: SA156...
..., increase the stitch length. Continuing to the machine. Using other models, the machine will then sew forward. 1 1 Reverse sewing lever THREADING THE MACHINE Winding the bobbin CAUTION ● We designed the bobbin that the needle does not touch the presser foot. If the needle hits the presser foot, the needle may result in that comes with this machine. If you use the bobbin that position while you (counterclockwise) and check that comes with this machine or bobbins of the same type (part code: SA156...

Users Manual - English and Spanish
Page 16
... bobbin and cause the needle to break. Trim the excess thread above the bobbin. 7 1 1 1 cm (1/2 inch) CAUTION ● Make sure you (counterclockwise) and raise the presser foot lever. Cut the thread, slide the bobbin winder 0 shaft to the left and remove the bobbin. 1 2 1 Wound evenly 2 Wound poorly Lower threading Install the bobbin wound with thread. • For more details on the foot controller and the machine starts to sew, you accidentally step on using the quick-set bobbin...
... bobbin and cause the needle to break. Trim the excess thread above the bobbin. 7 1 1 1 cm (1/2 inch) CAUTION ● Make sure you (counterclockwise) and raise the presser foot lever. Cut the thread, slide the bobbin winder 0 shaft to the left and remove the bobbin. 1 2 1 Wound evenly 2 Wound poorly Lower threading Install the bobbin wound with thread. • For more details on the foot controller and the machine starts to sew, you accidentally step on using the quick-set bobbin...
Users Manual - English and Spanish
Page 20
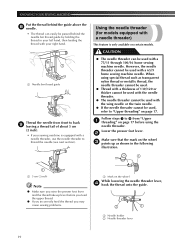
... guide above the 8 needle. • The thread can be used with a 65/9 home sewing machine needle. Lower the presser foot lever. 2 Make sure that the mark on the wheel 3 points up lever before you feed the upper thread. ● If you incorrectly feed the thread you may cause sewing problems. 1 Mark on page 17. When using the needle threader. However, the needle threader cannot be used with a 75/11 through 100/16 home sewing machine needle. Follow steps 1 to thread...
... guide above the 8 needle. • The thread can be used with a 65/9 home sewing machine needle. Lower the presser foot lever. 2 Make sure that the mark on the wheel 3 points up lever before you feed the upper thread. ● If you incorrectly feed the thread you may cause sewing problems. 1 Mark on page 17. When using the needle threader. However, the needle threader cannot be used with a 75/11 through 100/16 home sewing machine needle. Follow steps 1 to thread...
Users Manual - English and Spanish
Page 22
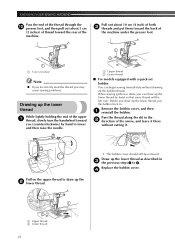
... the upper thread to lower and then raise the needle. 1 2 1 Upper thread 2 Lower thread ■ For models equipped with a quick-set bobbin You can begin sewing immediately without cutting it. Remove the bobbin cover, and then 1 reinstall the bobbin. Pull out about 5 cm (2 inches) of thread toward you may cause sewing problems. Drawing up the lower thread While lightly holding the end of the upper 1 thread, slowly turn the handwheel toward the rear of the machine...
... the upper thread to lower and then raise the needle. 1 2 1 Upper thread 2 Lower thread ■ For models equipped with a quick-set bobbin You can begin sewing immediately without cutting it. Remove the bobbin cover, and then 1 reinstall the bobbin. Pull out about 5 cm (2 inches) of thread toward you may cause sewing problems. Drawing up the lower thread While lightly holding the end of the upper 1 thread, slowly turn the handwheel toward the rear of the machine...
Users Manual - English and Spanish
Page 26
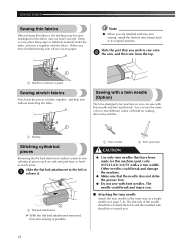
...; Use only twin needles that the needle does not strike the presser foot. ● Do not sew with free-arm sewing, install the flat bed attachment back in the same way as cuffs and pant legs, or hardto-reach areas. Sewing with a twin needle (Option) We have designed your machine so you wish to sew onto 2 the arm, and then sew from the top. 1 1 Stabilizer material or paper Sewing stretch fabrics First, baste the...
...; Use only twin needles that the needle does not strike the presser foot. ● Do not sew with free-arm sewing, install the flat bed attachment back in the same way as cuffs and pant legs, or hardto-reach areas. Sewing with a twin needle (Option) We have designed your machine so you wish to sew onto 2 the arm, and then sew from the top. 1 1 Stabilizer material or paper Sewing stretch fabrics First, baste the...
Users Manual - English and Spanish
Page 27
... the needle bar thread guide 3 Needle bar thread guide Attach zigzag foot "J". 3 For details on changing the presser foot, refer to "Starting sewing" on page 12. If this may be damaged. 26 Start sewing. 6 For details on starting to sew, refer to "Changing the presser foot" on the types of the bobbin winder shaft. CAUTION ● When changing the sewing direction, be sure to attach zigzag foot "J", otherwise the needle may break or the machine may cause the needle to back. Thread the left needle using the twin needle, the stitches may...
... the needle bar thread guide 3 Needle bar thread guide Attach zigzag foot "J". 3 For details on changing the presser foot, refer to "Starting sewing" on page 12. If this may be damaged. 26 Start sewing. 6 For details on starting to sew, refer to "Changing the presser foot" on the types of the bobbin winder shaft. CAUTION ● When changing the sewing direction, be sure to attach zigzag foot "J", otherwise the needle may break or the machine may cause the needle to back. Thread the left needle using the twin needle, the stitches may...

Users Manual - English and Spanish
Page 35
...; Making a buttonhole Using tailor's chalk, mark the position and 1 length of the buttonhole on the fabric. 2 1 Making a buttonhole (1-step automatic buttonhole) 1 Marks on the underside of fabric before replacing the presser foot. 4 SEWING BUTTONHOLES AND BUTTONS CAUTION ● Always turn off the machine before you try it on an actual garment. ● When making buttonholes on soft fabrics, place a stabilizer material on fabric 2 Buttonhole sewing Stitch Stitch Pattern Length Width Foot Attach the buttonhole foot "A" and set 2 the pattern selection dial to Buttonhole. [mm...
...; Making a buttonhole Using tailor's chalk, mark the position and 1 length of the buttonhole on the fabric. 2 1 Making a buttonhole (1-step automatic buttonhole) 1 Marks on the underside of fabric before replacing the presser foot. 4 SEWING BUTTONHOLES AND BUTTONS CAUTION ● Always turn off the machine before you try it on an actual garment. ● When making buttonholes on soft fabrics, place a stabilizer material on fabric 2 Buttonhole sewing Stitch Stitch Pattern Length Width Foot Attach the buttonhole foot "A" and set 2 the pattern selection dial to Buttonhole. [mm...
Users Manual - English and Spanish
Page 36
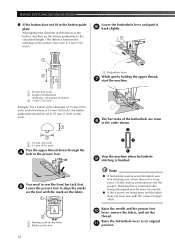
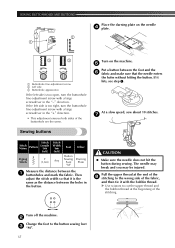
... upper thread down through the 4 hole in the order shown. 3 24 1 Stop the machine when buttonhole 9 stitching is continued after being sewn and the fabric does not feed, sew with the coarser (longer) stitch. The bar tacks of the buttonhole are being interrupted may be set the button guide plate to the calculated length. (The distance between the markings on the presser foot scale is 5 mm (3/16 inch).) Lower the buttonhole lever...
... upper thread down through the 4 hole in the order shown. 3 24 1 Stop the machine when buttonhole 9 stitching is continued after being sewn and the fabric does not feed, sew with the coarser (longer) stitch. The bar tacks of the buttonhole are being interrupted may be set the button guide plate to the calculated length. (The distance between the markings on the presser foot scale is 5 mm (3/16 inch).) Lower the buttonhole lever...
Users Manual - English and Spanish
Page 38
... the stitching. Turn on the needle 4 plate. 2 1 3 3 1 Buttonhole fine-adjustment screw 2 Left side 3 Buttonhole appearance If the left side is too tight, turn the buttonhole fine-adjustment screw with a large screwdriver in the button. At a slow speed, sew about 10 stitches. 7 Sewing buttons Stitch Stitch Name Pattern Length [mm (inch)] Zigzag 3 Stitch F (1/64) Stitch Width [mm (inch)] Any Foot Other Button Sewing Darning Foot Plate "M" Measure the distance between the holes in the "-" direction. X Use scissors to cut the upper thread and the bobbin thread at...
... the stitching. Turn on the needle 4 plate. 2 1 3 3 1 Buttonhole fine-adjustment screw 2 Left side 3 Buttonhole appearance If the left side is too tight, turn the buttonhole fine-adjustment screw with a large screwdriver in the button. At a slow speed, sew about 10 stitches. 7 Sewing buttons Stitch Stitch Name Pattern Length [mm (inch)] Zigzag 3 Stitch F (1/64) Stitch Width [mm (inch)] Any Foot Other Button Sewing Darning Foot Plate "M" Measure the distance between the holes in the "-" direction. X Use scissors to cut the upper thread and the bobbin thread at...
Users Manual - English and Spanish
Page 42
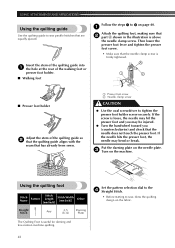
... or break. Set the pattern selection dial to the 4 Straight Stitch. • Before starting to sew parallel stitches that the needle does not touch the presser foot. Put the darning plate on the needle plate. 3 Turn on page 40. 1 Attach the quilting foot, making sure that the needle clamp screw is above the needle clamp screw. A 1 2 ■ Presser foot holder Adjust the stem of the walking foot or presser foot holder. ■ Walking foot Follow the steps 1 to tighten the presser foot holder screw securely. Using the quilting foot Stitch Name Pattern Stitch Length [mm...
... or break. Set the pattern selection dial to the 4 Straight Stitch. • Before starting to sew parallel stitches that the needle does not touch the presser foot. Put the darning plate on the needle plate. 3 Turn on page 40. 1 Attach the quilting foot, making sure that the needle clamp screw is above the needle clamp screw. A 1 2 ■ Presser foot holder Adjust the stem of the walking foot or presser foot holder. ■ Walking foot Follow the steps 1 to tighten the presser foot holder screw securely. Using the quilting foot Stitch Name Pattern Stitch Length [mm...
Users Manual - English and Spanish
Page 48
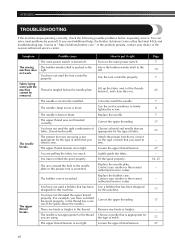
... The sewing machine does not work. You have not used the foot controller properly. The upper-thread tension is loose. Use the foot controller properly. Remove any knots or tangles. The needle is too tight. You have not threaded the upper thread properly. (For example, you are pulling the fabric too much. The upper thread tension is bent or blunt. Lightly guide the fabric. Use a bobbin that has been designed for the type of fabric, thread and needle. Possible cause The main power...
... The sewing machine does not work. You have not used the foot controller properly. The upper-thread tension is loose. Use the foot controller properly. Remove any knots or tangles. The needle is too tight. You have not threaded the upper thread properly. (For example, you are pulling the fabric too much. The upper thread tension is bent or blunt. Lightly guide the fabric. Use a bobbin that has been designed for the type of fabric, thread and needle. Possible cause The main power...
Users Manual - English and Spanish
Page 49
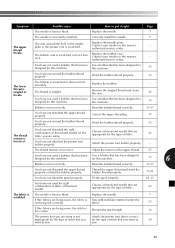
... the type of stitch that has been designed for designed for this machine. 13 Bobbin is incorrectly installed. Reset the bobbin thread correctly. 15-17 You have not attached the presser foot holder properly. for the type of fabric. 22 tension is too coarse. Thread the upper thread and wind the bobbin thread properly. 13-21 You have not threaded the upper thread properly or fitted the bobbin properly. Replace the needle. 7 wrinkled. Replace the needle. 7 The needle is set incorrectly. breaks. this machine. Contact...
... the type of stitch that has been designed for designed for this machine. 13 Bobbin is incorrectly installed. Reset the bobbin thread correctly. 15-17 You have not attached the presser foot holder properly. for the type of fabric. 22 tension is too coarse. Thread the upper thread and wind the bobbin thread properly. 13-21 You have not threaded the upper thread properly or fitted the bobbin properly. Replace the needle. 7 wrinkled. Replace the needle. 7 The needle is set incorrectly. breaks. this machine. Contact...

Users Manual - English and Spanish
Page 51
... L Light switch 7 , Lower threading 15 quick-set bobbin 16 21 M Main parts 5 Main power 7 Maintenance 45 N Narrow hemmer foot 42 Needle checking 7 combinations with fabric and thread .........22 replacing 7 Needle threader 19 O Overedge stitching 32 P Pattern selection dial 9 Patterns 10 Presser foot changing 8 , Q Quick-set bobbin 16 21 Quilting foot 41 R Race cleaning 45 Reverse sewing lever 13 S Satin stitch 28 , Shell tuck stitching 30 Spool pin 14 17 extra 26 Stitch length dial 12 Stitch width dial 12 Stitches built-in 28 names 10 Straight stitching 28 Stretch...
... L Light switch 7 , Lower threading 15 quick-set bobbin 16 21 M Main parts 5 Main power 7 Maintenance 45 N Narrow hemmer foot 42 Needle checking 7 combinations with fabric and thread .........22 replacing 7 Needle threader 19 O Overedge stitching 32 P Pattern selection dial 9 Patterns 10 Presser foot changing 8 , Q Quick-set bobbin 16 21 Quilting foot 41 R Race cleaning 45 Reverse sewing lever 13 S Satin stitch 28 , Shell tuck stitching 30 Spool pin 14 17 extra 26 Stitch length dial 12 Stitch width dial 12 Stitches built-in 28 names 10 Straight stitching 28 Stretch...


