

Thread Tensions - English
Page 1
... this form only as the machine starts up or lay upside down the bobbin when in two places so that have a serration on Brother embroidery machines today, they are items related to repeat this guideline will only go back in the bobbin causing a very loose tension as a...Machines For Technical Assistance Please Call Toll Free 1-877-4BROTHER Below are not required on embroidery machines, but they most often occur. For best results, use genuine Brother parts. 1. Running the machine with a Brother Anti-Spin Spring p/n#S35583001, which comes in the bobbin case. Hold bobbin case level...
... this form only as the machine starts up or lay upside down the bobbin when in two places so that have a serration on Brother embroidery machines today, they are items related to repeat this guideline will only go back in the bobbin causing a very loose tension as a...Machines For Technical Assistance Please Call Toll Free 1-877-4BROTHER Below are not required on embroidery machines, but they most often occur. For best results, use genuine Brother parts. 1. Running the machine with a Brother Anti-Spin Spring p/n#S35583001, which comes in the bobbin case. Hold bobbin case level...
Instruction Manual - English
Page 1
BES-121OAc BAS-416A BROTHER EMBROIDERY SYSTEMS INSTRUCTION MANUAL Please read this manual within easy reach for quick reference. SINGLE HEAD ELECTRONIC EMBROIDERY MACHINE Please keep this manual before using the machine.
BES-121OAc BAS-416A BROTHER EMBROIDERY SYSTEMS INSTRUCTION MANUAL Please read this manual within easy reach for quick reference. SINGLE HEAD ELECTRONIC EMBROIDERY MACHINE Please keep this manual before using the machine.

Instruction Manual - English
Page 8
... panel display 36 4. Dip switch functions on main printed circuit board 37 4-2. An Introduction of machine 6 3-1. Preparation of Embroidery Machine 1 1. Thread tension 13 Needle thread tension 13 Bobbin thread tension 13 4-5. Restarting 26 Chapter 4. Names 30 3-2. ...machine 6 3-2. Names of machines 4 2-2. Confirm the following before switching on operation panel 31 3-3. Replacing bobbin 10 4-2. Attaching embroidery hoop to holder base 14 Attaching plastic square hoop to holder base 14 Attaching tubular square hoop to holder base (Optional) 15...
... panel display 36 4. Dip switch functions on main printed circuit board 37 4-2. An Introduction of machine 6 3-1. Preparation of Embroidery Machine 1 1. Thread tension 13 Needle thread tension 13 Bobbin thread tension 13 4-5. Restarting 26 Chapter 4. Names 30 3-2. ...machine 6 3-2. Names of machines 4 2-2. Confirm the following before switching on operation panel 31 3-3. Replacing bobbin 10 4-2. Attaching embroidery hoop to holder base 14 Attaching plastic square hoop to holder base 14 Attaching tubular square hoop to holder base (Optional) 15...

Instruction Manual - English
Page 9
Entering data from BAS-PC/EM system 49 Chapter 6. Editing function 56 2-1. Setting mirror image 57 2-3. Setting repeat sewing 58 Chapter 7. Sensitivity switching function for test feed 70 8. ...function 80 14. Cleaning 88 2. Explanation of speed volume table setting 68 7. Tape reader 82 2. Entering floppy disk data 41 2. Editing Embroidery Data 53 1. Entering Embroidery Date 39 Data available in BAS-416A • BES-1210AC 39 Summary of 0 mm stitch 77 11. Chapter 5. Settingbobbin thread counter and thread breakage sensor 66 6. Skip ...
Entering data from BAS-PC/EM system 49 Chapter 6. Editing function 56 2-1. Setting mirror image 57 2-3. Setting repeat sewing 58 Chapter 7. Sensitivity switching function for test feed 70 8. ...function 80 14. Cleaning 88 2. Explanation of speed volume table setting 68 7. Tape reader 82 2. Entering floppy disk data 41 2. Editing Embroidery Data 53 1. Entering Embroidery Date 39 Data available in BAS-416A • BES-1210AC 39 Summary of 0 mm stitch 77 11. Chapter 5. Settingbobbin thread counter and thread breakage sensor 66 6. Skip ...
Instruction Manual - English
Page 11
...), and the floppy disk of Tajima, and the receive data from Brother's editing system can be used. [NOTE] Brother format data cannot be used. • By removing the table and using the cylinder bed, embroidery for individual model is possible to 27000 stitches can be performed on dialogue...of Embroidery Machine 1. Check the model before using an optional hoop. BES-1210AC 1 By using the memory expansion board (optional), up to 280000 stitches can be put in a pattern and up to 16 patterns can be sewn anytime. Explanation of models This manual explains two models: • BAS-416A (9...
...), and the floppy disk of Tajima, and the receive data from Brother's editing system can be used. [NOTE] Brother format data cannot be used. • By removing the table and using the cylinder bed, embroidery for individual model is possible to 27000 stitches can be performed on dialogue...of Embroidery Machine 1. Check the model before using an optional hoop. BES-1210AC 1 By using the memory expansion board (optional), up to 280000 stitches can be put in a pattern and up to 16 patterns can be sewn anytime. Explanation of models This manual explains two models: • BAS-416A (9...
Instruction Manual - English
Page 12
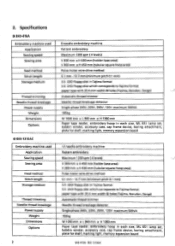
...BAS-416A Embroidery machine used Application Sewing speed Sewing area Feed method Stitch length Storage medium Thread trimming Needle thread breakage Power supply Weight Dimensions Options • BES-1210AC Embroidery machine used Application Sewing speed Sewing area Feed method Stitch length Storage medium Thread trimming Needle thread breakage Power supply Weight Dimensions Options 2 9 needle embroidery...reader, embroidery hoop in each size, ML 651 lamp set, bobbin winder, accessory case, cap frame device, boring attachment, plate for shelf, marking light, memory expansion board BAS-416A - ...
...BAS-416A Embroidery machine used Application Sewing speed Sewing area Feed method Stitch length Storage medium Thread trimming Needle thread breakage Power supply Weight Dimensions Options • BES-1210AC Embroidery machine used Application Sewing speed Sewing area Feed method Stitch length Storage medium Thread trimming Needle thread breakage Power supply Weight Dimensions Options 2 9 needle embroidery...reader, embroidery hoop in each size, ML 651 lamp set, bobbin winder, accessory case, cap frame device, boring attachment, plate for shelf, marking light, memory expansion board BAS-416A - ...
Instruction Manual - English
Page 13
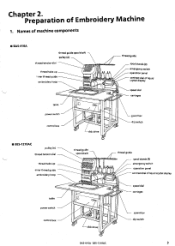
...2. Names of machine components ■ BAS-416A thread guide spool shaft pulley (A) thread tension dial thread take-up finer thread guide embroidery hoop table power switch control box ■ BES-1210AC pulley (A) thread tension dial thread take-up inner thread guide embroidery hoop disk drive thread guide spool shaft ... display speed dial carriages guard bar dip switch thread guide spool stands (9) emergency switch operation panel contrast dial of Embroidery Machine 1. Preparation of liquid crystal display speed dial carriages guard bar dip switch BAS-416A BES-1210AC 3
...2. Names of machine components ■ BAS-416A thread guide spool shaft pulley (A) thread tension dial thread take-up finer thread guide embroidery hoop table power switch control box ■ BES-1210AC pulley (A) thread tension dial thread take-up inner thread guide embroidery hoop disk drive thread guide spool shaft ... display speed dial carriages guard bar dip switch thread guide spool stands (9) emergency switch operation panel contrast dial of Embroidery Machine 1. Preparation of liquid crystal display speed dial carriages guard bar dip switch BAS-416A BES-1210AC 3

Instruction Manual - English
Page 14
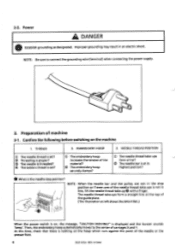
... machines 1. Installation of machines When holding the machine, be moved by the casters @ on the machine body. 4 BAS-416A • BES-1210AC Improper grounding may cause the embroidery machine to adjust. A machine weighs more workers. 2. NOTE: Do NOT hold the machine body (frame). If the... table wobbles, loosen the four nuts @ and turn the four level adjusters 0 to malfunction. Installation A DANGER Embroidery machines should be laid by trained engineers. Electric wiring should be carried out by 4 or more than 195 kg. 0 Installation should be...
... machines 1. Installation of machines When holding the machine, be moved by the casters @ on the machine body. 4 BAS-416A • BES-1210AC Improper grounding may cause the embroidery machine to adjust. A machine weighs more workers. 2. NOTE: Do NOT hold the machine body (frame). If the... table wobbles, loosen the four nuts @ and turn the four level adjusters 0 to malfunction. Installation A DANGER Embroidery machines should be laid by trained engineers. Electric wiring should be carried out by 4 or more than 195 kg. 0 Installation should be...
Instruction Manual - English
Page 16
...needle thread is on the machine 1. EMBROIDERY HOOP 0 The embroidery hoop increases the tension of carriages X and Y. At this time, check that there is nothing on the hoop which runs against the point of the guide plate. (The illustration at left shows the BAS-416A.) When the power switch is set... ? 2. e The embroidery hoop securely clamps? 3. qD The bobbin thread is set ? 2 Threading is proper? 3 The needle is the ...
...needle thread is on the machine 1. EMBROIDERY HOOP 0 The embroidery hoop increases the tension of carriages X and Y. At this time, check that there is nothing on the hoop which runs against the point of the guide plate. (The illustration at left shows the BAS-416A.) When the power switch is set... ? 2. e The embroidery hoop securely clamps? 3. qD The bobbin thread is set ? 2 Threading is proper? 3 The needle is the ...

Instruction Manual - English
Page 19
...in clearing and and resetting memory] 1. Carriages X and Y return to the ordinary operation after returning to the home position (the center of the embroidery area). • After having exchanged the P-ROM on the main printed circuit board of the machine. (The power switch should line up at ...the power not during standstill or pause. • The needle thread take -ups are in the gap according to the diagram, then push and rotate. BAS-416A • BES-1,210AC 9 All the needle thread take -ups should form a horizontal line. • All the needle bars, including the needle bar...
...in clearing and and resetting memory] 1. Carriages X and Y return to the ordinary operation after returning to the home position (the center of the embroidery area). • After having exchanged the P-ROM on the main printed circuit board of the machine. (The power switch should line up at ...the power not during standstill or pause. • The needle thread take -ups are in the gap according to the diagram, then push and rotate. BAS-416A • BES-1,210AC 9 All the needle thread take -ups should form a horizontal line. • All the needle bars, including the needle bar...
Instruction Manual - English
Page 24
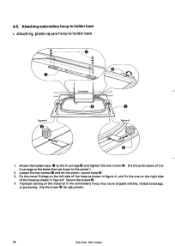
Attaching embroidery hoop to holder base 8 I O 44 figure A brother figure 8 4 1. Attach the holder base 0 to the center.) 2. Secure the screws 0. 4. Improper setting of the hoop as shown in figure A, and fix the one on ... ®. (Fit the protrusions of the X carriage in the embroidery hoop may cause skipped stitches, thread breakage, or puckering. BES-1210AC 4-5. Fix the metal fittings on the left side of the hoop as shown in figure B. Use the screw 0 for adjustment. 14 BAS-416A- Attaching plastic square hoop to holder base . Loosen the...
Attaching embroidery hoop to holder base 8 I O 44 figure A brother figure 8 4 1. Attach the holder base 0 to the center.) 2. Secure the screws 0. 4. Improper setting of the hoop as shown in figure A, and fix the one on ... ®. (Fit the protrusions of the X carriage in the embroidery hoop may cause skipped stitches, thread breakage, or puckering. BES-1210AC 4-5. Fix the metal fittings on the left side of the hoop as shown in figure B. Use the screw 0 for adjustment. 14 BAS-416A- Attaching plastic square hoop to holder base . Loosen the...
Instruction Manual - English
Page 25
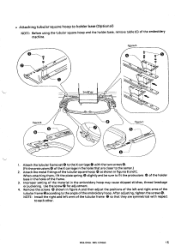
... O of the tubular square hoop 0 as shown in the embroidery hoop may cause skipped stitches, thread breakage or puckering. Attach the metal fittings of the holder base in the holes that they are closer to the center.) 2. BAS-416A BES-1210AC 15 • Attaching tubular square hoop to each ... X carriage 0 with respect to holder base (Optional) NOTE: Before using the tubular square hoop and the holder base, remove table (C) of the embroidery hoop. Improper setting of the frame. 3. After adjusting, tighten the screws O. figure A k • brother figure B a figure C 0 1.
... O of the tubular square hoop 0 as shown in the embroidery hoop may cause skipped stitches, thread breakage or puckering. Attach the metal fittings of the holder base in the holes that they are closer to the center.) 2. BAS-416A BES-1210AC 15 • Attaching tubular square hoop to each ... X carriage 0 with respect to holder base (Optional) NOTE: Before using the tubular square hoop and the holder base, remove table (C) of the embroidery hoop. Improper setting of the frame. 3. After adjusting, tighten the screws O. figure A k • brother figure B a figure C 0 1.
Instruction Manual - English
Page 29
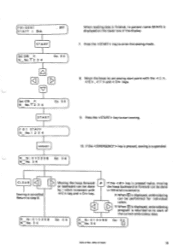
(F 01:G 001 STAFF / Disk . T2 3 4 Co. 0 4 When reading data is displayed on the lower row of the current embroidery data. CLEAR Sewing is suspended. Press the key to step 8. Return to enter the sewing mode. 8. R St : 0 1 5 2 9 8 N No. 3 4 Moving the ... displayed, embroidering program is returned to set sewing start sewing. 10. Set STR N- If the key is pressed, sewing is cancelled. No. 3 4 Co: 04 " [11 } BAS-41 GA BES-1210AC 19 DST 1 START [Set STR P. N No. No. 1 P. 2 3 4 Co. 0 4 START F 01 STAFF N No. 1 2 3 4 EMERGENCY St: 01 5 3 9 8 Co: 04 N No. 3 ...
(F 01:G 001 STAFF / Disk . T2 3 4 Co. 0 4 When reading data is displayed on the lower row of the current embroidery data. CLEAR Sewing is suspended. Press the key to step 8. Return to enter the sewing mode. 8. R St : 0 1 5 2 9 8 N No. 3 4 Moving the ... displayed, embroidering program is returned to set sewing start sewing. 10. Set STR N- If the key is pressed, sewing is cancelled. No. 3 4 Co: 04 " [11 } BAS-41 GA BES-1210AC 19 DST 1 START [Set STR P. N No. No. 1 P. 2 3 4 Co. 0 4 START F 01 STAFF N No. 1 2 3 4 EMERGENCY St: 01 5 3 9 8 Co: 04 N No. 3 ...

Instruction Manual - English
Page 36
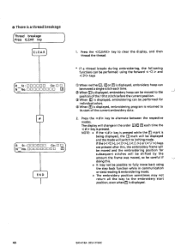
... MOVING! 1. The embroidery hoop is automatically returned to the position where sewing was suspended before and the machine is cut off because of needle thread breakage, and so on the power. St :EDII IIIDE Co:O111) N No.DEECIDEICIDE CLEAR Set STR P. 3. Pressing the key wi l l cancel sewing. 26 BAS-416A • BES-1210AC...
... MOVING! 1. The embroidery hoop is automatically returned to the position where sewing was suspended before and the machine is cut off because of needle thread breakage, and so on the power. St :EDII IIIDE Co:O111) N No.DEECIDEICIDE CLEAR Set STR P. 3. Pressing the key wi l l cancel sewing. 26 BAS-416A • BES-1210AC...
Instruction Manual - English
Page 38
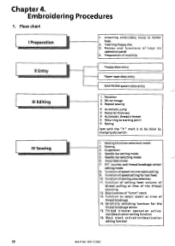
.../EM system data entry III Editing IV Sewing 1. Sewing (function selection) mode 2 Sewing 3. Mask check activation/deactivation setting function 28 BAS-416A • BES-1210AC Attaching embroidery hoop to be done by changing dip switch. 1. Repeat sewing >l< Automatic jump X Material thickness )K Automatic thread trimmer >K Returning to starting point • Boring Item with ...
.../EM system data entry III Editing IV Sewing 1. Sewing (function selection) mode 2 Sewing 3. Mask check activation/deactivation setting function 28 BAS-416A • BES-1210AC Attaching embroidery hoop to be done by changing dip switch. 1. Repeat sewing >l< Automatic jump X Material thickness )K Automatic thread trimmer >K Returning to starting point • Boring Item with ...

Instruction Manual - English
Page 47
... with SW1 SW8 OFF To display Japanese ON To display English NOTE: • The power of a character (pattern), machine will stop operation at that point. BAS-416A • BES-1210AC 37 switch number SW1 SW2 SW3 SW4 SW5 SW6 SW7 state OFF ON OFF ON OFF ON OFF ON OFF ON OFF... or editing system to 9600 bps (The speed can be set to 38400 bps when SW7 is ON) To set the communication speed for the embroidery data while embroidering To display the embroidering speed while embroidering To set normal power mode To set Power Up hoop feed mode To set inching...
... with SW1 SW8 OFF To display Japanese ON To display English NOTE: • The power of a character (pattern), machine will stop operation at that point. BAS-416A • BES-1210AC 37 switch number SW1 SW2 SW3 SW4 SW5 SW6 SW7 state OFF ON OFF ON OFF ON OFF ON OFF ON OFF... or editing system to 9600 bps (The speed can be set to 38400 bps when SW7 is ON) To set the communication speed for the embroidery data while embroidering To display the embroidering speed while embroidering To set normal power mode To set Power Up hoop feed mode To set inching...
Instruction Manual - English
Page 49
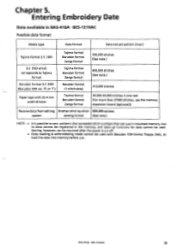
...tape with Barudan FDR-format floppy disks, so load the data into memory before use the memory expansion board [optional]). Receive data from editing Brother stitch by stitch 999,999 stitches system sewing format (See note.) NOTE : • it is cut off. • Data reading ... Tajima format Barudan format Zangs format 400,000 stitches (See note.) Barudan format 3.5 2DD (Barudan FDR ver. BAS-416A • BES-1210AC 39 Entering Embroidery Date Data available in BAS-416A • BES-1210AC Possible data format Media type Data format Data size per pattern (max.) Tajima format 3.5...
...tape with Barudan FDR-format floppy disks, so load the data into memory before use the memory expansion board [optional]). Receive data from editing Brother stitch by stitch 999,999 stitches system sewing format (See note.) NOTE : • it is cut off. • Data reading ... Tajima format Barudan format Zangs format 400,000 stitches (See note.) Barudan format 3.5 2DD (Barudan FDR ver. BAS-416A • BES-1210AC 39 Entering Embroidery Date Data available in BAS-416A • BES-1210AC Possible data format Media type Data format Data size per pattern (max.) Tajima format 3.5...

Instruction Manual - English
Page 53
The mode will switch to distinguish it from when area over checking mode is disabled to embroidery mode. A warning buzzer will be enabled. Area Over • NOTE: • If embroidery is started while area over Area Over • * If the needle position (hoop position) is out of ...mode is enabled. If the key is pressed, embroidery will be disabled. Set STR P. N No. 72 3 4 5 6 Co. 0 6 2. Press the key. * If the key is pressed when "AREA OVER" is displayed, area over checking mode will then start . [CLEAR 1. BAS-416A• BES-1210AC 43 ■ Area over ...
The mode will switch to distinguish it from when area over checking mode is disabled to embroidery mode. A warning buzzer will be enabled. Area Over • NOTE: • If embroidery is started while area over Area Over • * If the needle position (hoop position) is out of ...mode is enabled. If the key is pressed, embroidery will be disabled. Set STR P. N No. 72 3 4 5 6 Co. 0 6 2. Press the key. * If the key is pressed when "AREA OVER" is displayed, area over checking mode will then start . [CLEAR 1. BAS-416A• BES-1210AC 43 ■ Area over ...
Instruction Manual - English
Page 54
...may not return all the way to alternate between the respective modes. • There is displayed. 44 BAS-416A BES-1210AC If the (), () or (CV >) keys are pressed after this, the embroidery frame will be moved and the embroidering position for individual colors. 4)When m is displayed, embroidering program... is pressed. Press the key to the embroidery start of the 101st stitch before the current position. 3 When E] is displayed, embroidering can be displayed and the mode will ...
...may not return all the way to alternate between the respective modes. • There is displayed. 44 BAS-416A BES-1210AC If the (), () or (CV >) keys are pressed after this, the embroidery frame will be moved and the embroidering position for individual colors. 4)When m is displayed, embroidering program... is pressed. Press the key to the embroidery start of the 101st stitch before the current position. 3 When E] is displayed, embroidering can be displayed and the mode will ...
Instruction Manual - English
Page 63
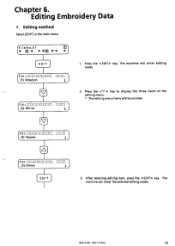
Editing method Select [EDIT] in the main menu. co * [1] * **® ** EDIT 01:E11=111E111EO111 . After selecting editing item, press the key. The machine can enter the selected editing mode. ECE (1) Rotation r-F01:ECIEEEEED. C1OO (2) Mirror 1. Press the key. F01: DOO11OOOO OCID (3) Repeat I F01:OOOOOOOO. BAS-416A • BES-1210AC 53 The machine will be scrolled. Editing Embroidery Data 1. Press the key to display the three items of the editing menu. * The editing menu items will enter editing mode. 2. Chapter 6. OOO \.. (2) Mirror EDIT 3.
Editing method Select [EDIT] in the main menu. co * [1] * **® ** EDIT 01:E11=111E111EO111 . After selecting editing item, press the key. The machine can enter the selected editing mode. ECE (1) Rotation r-F01:ECIEEEEED. C1OO (2) Mirror 1. Press the key. F01: DOO11OOOO OCID (3) Repeat I F01:OOOOOOOO. BAS-416A • BES-1210AC 53 The machine will be scrolled. Editing Embroidery Data 1. Press the key to display the three items of the editing menu. * The editing menu items will enter editing mode. 2. Chapter 6. OOO \.. (2) Mirror EDIT 3.


