

Thread Tensions - English
Page 1
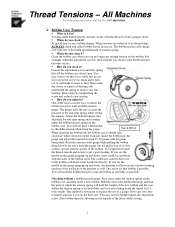
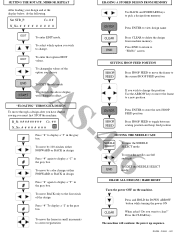
...the bobbin case. Hold bobbin case level with the speeds achieved on Brother embroidery machines today, they do you check it ? Try to keep the bobbin from spinning after the takeup lever has pulled the stitch tight. Use this guideline will be thrown out of the groove in properly one ...open side up again. Anti - When do make a difference. Note how you adjust it out with jumbo bobbins. Thread Tensions - For best results, use genuine Brother parts. 1. If allowed to adjust it, as it as even as the machine starts up or lay upside down the bobbin when in two places...
...the bobbin case. Hold bobbin case level with the speeds achieved on Brother embroidery machines today, they do you check it ? Try to keep the bobbin from spinning after the takeup lever has pulled the stitch tight. Use this guideline will be thrown out of the groove in properly one ...open side up again. Anti - When do make a difference. Note how you adjust it out with jumbo bobbins. Thread Tensions - For best results, use genuine Brother parts. 1. If allowed to adjust it, as it as even as the machine starts up or lay upside down the bobbin when in two places...
Thread Tensions - English
Page 2
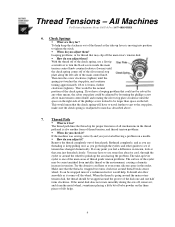
...down , there could be the problem, ALWAYS check and adjust bobbin first if necessary. Then using the gauge. Then adjust by it ? One of the most accurate ways to check the bobbin tension ...is not meant to replace the use of the bobbin thread up underneath its tension spring. • When do you clean it for... a bobbin tension gauge. Bobbin Case Tension !" You may need a full bobbin to check the tension when using the corner of a piece of the new bobbin and the case. Adjust the tension spring to let the bobbin...
...down , there could be the problem, ALWAYS check and adjust bobbin first if necessary. Then using the gauge. Then adjust by it ? One of the most accurate ways to check the bobbin tension ...is not meant to replace the use of the bobbin thread up underneath its tension spring. • When do you clean it for... a bobbin tension gauge. Bobbin Case Tension !" You may need a full bobbin to check the tension when using the corner of a piece of the new bobbin and the case. Adjust the tension spring to let the bobbin...
Thread Tensions - English
Page 4
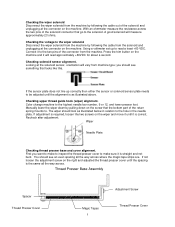
...two turns clockwise around the groove of felt helps. 4 If the metal disk does not rotate smoothly during the sew off of the check spring, use some silicone spray in tension. If you are they for proper functions of all mechanisms in tension, look at that could be wrapped around thread...tension disk, the thread should also flow smoothly as you feel a difference in the thread path and is readjusted to match as you have to use a flat tip screwdriver to turn the screw clockwise (tighten) until the space on the left side of the phillips screw looked to tighten the ...
...two turns clockwise around the groove of felt helps. 4 If the metal disk does not rotate smoothly during the sew off of the check spring, use some silicone spray in tension. If you are they for proper functions of all mechanisms in tension, look at that could be wrapped around thread...tension disk, the thread should also flow smoothly as you feel a difference in the thread path and is readjusted to match as you have to use a flat tip screwdriver to turn the screw clockwise (tighten) until the space on the left side of the phillips screw looked to tighten the ...

Thread Tensions - English
Page 5
The bobbin is used with plenty of pull comp to be wide. This is acceptable. Or the "I" test also with every needle. If all the needles are the same ...
The bobbin is used with plenty of pull comp to be wide. This is acceptable. Or the "I" test also with every needle. If all the needles are the same ...
Wiper Problems and Solutions - English
Page 5
... cover alignment. If not loosen the adjustment screw on the screw that go to the highest needle bar number, 9 or 12, and lower presser foot. Using a voltmeter set up correctly then either the sensor or solenoid sensor plate needs to . First you should see an even spacing all the way across...
... cover alignment. If not loosen the adjustment screw on the screw that go to the highest needle bar number, 9 or 12, and lower presser foot. Using a voltmeter set up correctly then either the sensor or solenoid sensor plate needs to . First you should see an even spacing all the way across...
Maintenance Schedule - English
Page 1
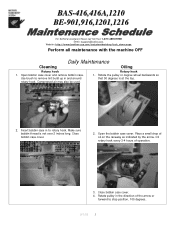
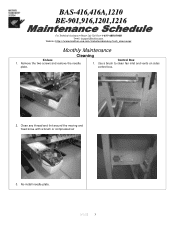
...of operation. 3. Close bobbin case cover. 2. Rotate the pulley or degree wheel backwards so that 50 degrees is not over 2 inches long. Use brush to remove lint build up in to stop position, 100 degrees. 9/1/05 1 Oil rotary hook every 3-4 hours of the arrow or ... case in and around rotary hook. Close bobbin case cover. 4. BAS-416,416A,1210 BE-901,916,1201,1216 For Technical Assistance Please Call Toll Fre e 1-877-4BROTHER Email: tsupport@brother.com Website: http://www.brother-usa.com/industembroidery/tech_down.aspx Perform all maintenance with the machine OFF Daily...
...of operation. 3. Close bobbin case cover. 2. Rotate the pulley or degree wheel backwards so that 50 degrees is not over 2 inches long. Use brush to remove lint build up in to stop position, 100 degrees. 9/1/05 1 Oil rotary hook every 3-4 hours of the arrow or ... case in and around rotary hook. Close bobbin case cover. 4. BAS-416,416A,1210 BE-901,916,1201,1216 For Technical Assistance Please Call Toll Fre e 1-877-4BROTHER Email: tsupport@brother.com Website: http://www.brother-usa.com/industembroidery/tech_down.aspx Perform all maintenance with the machine OFF Daily...
Maintenance Schedule - English
Page 3
BAS-416,416A,1210 BE-901,916,1201,1216 For Technical Assistance Please Call Toll Fre e 1-877-4BROTHER Email: tsupport@brother.com Website: http://www.brother-usa.com/industembroidery/tech_down.aspx Monthly Maintenance Cleaning Knives 1. Control Box 1. Use a brush to clean fan inlet and vents on sides control box. 2. Re-install needle plate. 9/1/05 3 Clean any thread and lint around the moving and fixed knive with a brush or compressed air 3. Remove the two screws and remove the needle plate.
BAS-416,416A,1210 BE-901,916,1201,1216 For Technical Assistance Please Call Toll Fre e 1-877-4BROTHER Email: tsupport@brother.com Website: http://www.brother-usa.com/industembroidery/tech_down.aspx Monthly Maintenance Cleaning Knives 1. Control Box 1. Use a brush to clean fan inlet and vents on sides control box. 2. Re-install needle plate. 9/1/05 3 Clean any thread and lint around the moving and fixed knive with a brush or compressed air 3. Remove the two screws and remove the needle plate.
Cap to Tubular - English
Page 1
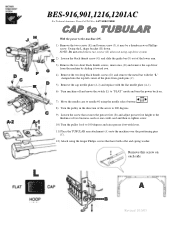
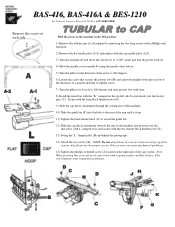
...the power to "FLAT" mode and turn the power back on each side Revised 1/10/05 NOTE: Do not attach these two screws (K) when not using the longer Philips screws that secures the presser foot (B) and adjust presser foot height to the thickness of two business cards or one credit card... back to 100 degrees and raise presser foot with lever. 11) Place the TUBULAR arm attachment (A) onto the machine over the positioning pins (C). 12) Attach using cap drive system 2) Loosen the black thumb screw (G) and slide the guide bar (F) out of the plate from guide pins (C). 5) Remove the cap needle ...
...the power to "FLAT" mode and turn the power back on each side Revised 1/10/05 NOTE: Do not attach these two screws (K) when not using the longer Philips screws that secures the presser foot (B) and adjust presser foot height to the thickness of two business cards or one credit card... back to 100 degrees and raise presser foot with lever. 11) Place the TUBULAR arm attachment (A) onto the machine over the positioning pins (C). 12) Attach using cap drive system 2) Loosen the black thumb screw (G) and slide the guide bar (F) out of the plate from guide pins (C). 5) Remove the cap needle ...

Upper Thread Breaks - English
Page 2
• Wrong type of backing o Use the correct backing for garment • Design contains many small stitches of .2 mm or less o Modify design to eliminate stitches of .2mm or less • Too much density in design o Reduce density in design • The area around the hole in the needle plate is damaged o Replace needle plate • Rotary hook is out of time o Re-time rotary hook
• Wrong type of backing o Use the correct backing for garment • Design contains many small stitches of .2 mm or less o Modify design to eliminate stitches of .2mm or less • Too much density in design o Reduce density in design • The area around the hole in the needle plate is damaged o Replace needle plate • Rotary hook is out of time o Re-time rotary hook
Rotary Hook Scratches - English
Page 1
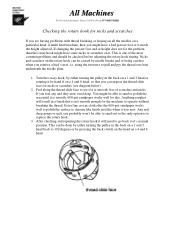
... does not fix the problem than the rotary hook might have a bad presser foot or it is smooth. 600 grit sandpaper works well for this. using the tweezers to it was new. Feel along the thread slide face to sand out so the only option is one of scratches and nicks...
... does not fix the problem than the rotary hook might have a bad presser foot or it is smooth. 600 grit sandpaper works well for this. using the tweezers to it was new. Feel along the thread slide face to sand out so the only option is one of scratches and nicks...
Changing Needle Bar Cushions - English
Page 2
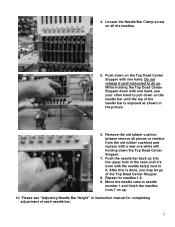
After this is exposed as shown in the picture. 6. Move the needle case to pull down with one hand, use your other hand to needle number 1 and finish the needles from the old rubber cushion) and replace with a new one hand. Please see "Adjusting Needle ...
After this is exposed as shown in the picture. 6. Move the needle case to pull down with one hand, use your other hand to needle number 1 and finish the needles from the old rubber cushion) and replace with a new one hand. Please see "Adjusting Needle ...

Quick Reference Guide - English
Page 1
...size and number of the design (see Step 13) Press START to start sewing (see Step 14) ENTER A DESIGN FROM THE MACHINE MEMORY Use BACK and FORWARD keys to pick a design from memory. START Press START to the machine memory. ENTER Press ENTER to assign needle number (... to pick an empty memory location. 2. Press START to exit needle set mode. Press UP or DOWN arrows to begin reading computer directory. BAS-416,416A-Quick Reference Guide For Technical Assistance Please Call 1-877-4BROTHER ENTERING DISK DATA & SETTING THE COLOR SEQUENCE ENTER A DESIGN FROM EDITOR MODE 1. ...
...size and number of the design (see Step 13) Press START to start sewing (see Step 14) ENTER A DESIGN FROM THE MACHINE MEMORY Use BACK and FORWARD keys to pick a design from memory. START Press START to the machine memory. ENTER Press ENTER to assign needle number (... to pick an empty memory location. 2. Press START to exit needle set mode. Press UP or DOWN arrows to begin reading computer directory. BAS-416,416A-Quick Reference Guide For Technical Assistance Please Call 1-877-4BROTHER ENTERING DISK DATA & SETTING THE COLOR SEQUENCE ENTER A DESIGN FROM EDITOR MODE 1. ...
Quick Reference Guide - English
Page 2
Co. # # N_No ERASING A STORED DESIGN FROM MEMORY Use BACK and FORWARD keys to view design name EDIT To enter EDIT mode. ENTER Press ENTER to pick a design from machine memory. CLEAR END Press ... registration ERASE ALL DESIGNS / HARD RESET Turn the power OFF on the machine. The machine will continue the power up sequence. To change the position Use the ARROW keys to move by color changes either FORWARD or BACK in design 1 Press "#" again to display a "C" in effect. To move by 100 stitches...
Co. # # N_No ERASING A STORED DESIGN FROM MEMORY Use BACK and FORWARD keys to view design name EDIT To enter EDIT mode. ENTER Press ENTER to pick a design from machine memory. CLEAR END Press ... registration ERASE ALL DESIGNS / HARD RESET Turn the power OFF on the machine. The machine will continue the power up sequence. To change the position Use the ARROW keys to move by color changes either FORWARD or BACK in design 1 Press "#" again to display a "C" in effect. To move by 100 stitches...
Tubular to Cap - English
Page 1
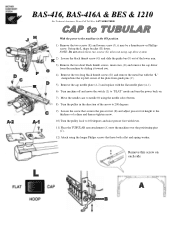
... to secure the guide bar. 12) Slide the cap driver attachment towards the rear of the machine and position over the locator pins (C). BAS-416, BAS-416A & BES-1210 For Technical Assistance Please Call Toll Free 1-877-4BROTHER Remove this screw please be sure it has both a spring washer and... (E). 12) Swing the "L" shaped plate (H) up behind the pantograph. 13) Attach the two screws (K). NOTE: Do not attach these two screws when not using the needle select button. 5) Turn the pulley in the ON position. 1) Remove the tubular arm (A) attachment by removing the two long screws with a Phillips...
... to secure the guide bar. 12) Slide the cap driver attachment towards the rear of the machine and position over the locator pins (C). BAS-416, BAS-416A & BES-1210 For Technical Assistance Please Call Toll Free 1-877-4BROTHER Remove this screw please be sure it has both a spring washer and... (E). 12) Swing the "L" shaped plate (H) up behind the pantograph. 13) Attach the two screws (K). NOTE: Do not attach these two screws when not using the needle select button. 5) Turn the pulley in the ON position. 1) Remove the tubular arm (A) attachment by removing the two long screws with a Phillips...
Cap to Tubular - English
Page 1
...driver from the machine by sliding it may be a thumbscrew or Phillips screw. Remove this screw on . 7) Move the needle case to needle #1 using the needle select button. 8) Turn the pulley in the direction of the arrow to 200 degrees. 9) Loosen the screw that secures the presser foot... with lever. 11) Place the TUBULAR arm attachment (A) onto the machine over the positioning pins (C). 12) Attach using the longer Philips screws that have both a flat and spring washer. BAS-416, BAS-416A & BES & 1210 For Technical Assistance Please Call Toll Free 1-877-4BROTHER With the power to 100 degrees and...
...driver from the machine by sliding it may be a thumbscrew or Phillips screw. Remove this screw on . 7) Move the needle case to needle #1 using the needle select button. 8) Turn the pulley in the direction of the arrow to 200 degrees. 9) Loosen the screw that secures the presser foot... with lever. 11) Place the TUBULAR arm attachment (A) onto the machine over the positioning pins (C). 12) Attach using the longer Philips screws that have both a flat and spring washer. BAS-416, BAS-416A & BES & 1210 For Technical Assistance Please Call Toll Free 1-877-4BROTHER With the power to 100 degrees and...
Instruction Manual - English
Page 1
Please keep this manual before using the machine. BES-121OAc BAS-416A BROTHER EMBROIDERY SYSTEMS INSTRUCTION MANUAL Please read this manual within easy reach for quick reference. SINGLE HEAD ELECTRONIC EMBROIDERY MACHINE
Please keep this manual before using the machine. BES-121OAc BAS-416A BROTHER EMBROIDERY SYSTEMS INSTRUCTION MANUAL Please read this manual within easy reach for quick reference. SINGLE HEAD ELECTRONIC EMBROIDERY MACHINE
Instruction Manual - English
Page 3
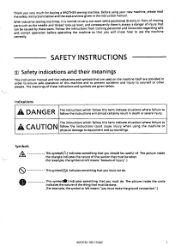
...yourself or other people. The meanings of these parts. Symbols This symbol(A) indicates something that you very much for buying a BROTHER sewing machine. Before using the machine or physical damage to ensure safe operation of the thing that must be caused by these indications and symbols are...lever, and consequently there is always a danger of of injury".) This symbol(®) indicates something that you must make the ground connection".) BAS-416A• BES-1210AC The picture inside the triangle indicates the nature of the caution that must be taken. (For example, the symbol at...
...yourself or other people. The meanings of these parts. Symbols This symbol(A) indicates something that you very much for buying a BROTHER sewing machine. Before using the machine or physical damage to ensure safe operation of the thing that must be caused by these indications and symbols are...lever, and consequently there is always a danger of of injury".) This symbol(®) indicates something that you must make the ground connection".) BAS-416A• BES-1210AC The picture inside the triangle indicates the nature of the caution that must be taken. (For example, the symbol at...
Instruction Manual - English
Page 4
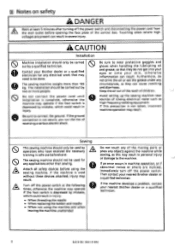
... problem, contact your nearest Brother dealer or a qualified technician. Keep the oil out of the reach of receiving a serious electric shock. Sewing ® A ® A This sewing machine should be done. 0 The sewing machine weighs more people. II BAS-416A • BES-1210AC Touching... applications other than 195 kg. If the machine is depressed by two or more than sewing. The installation should only be used by a qualified technician. 0 Contact your skin, otherwise inflammation can cause vomiting and diarrhoea. Attach all safety devices before opening...
... problem, contact your nearest Brother dealer or a qualified technician. Keep the oil out of the reach of receiving a serious electric shock. Sewing ® A ® A This sewing machine should be done. 0 The sewing machine weighs more people. II BAS-416A • BES-1210AC Touching... applications other than 195 kg. If the machine is depressed by two or more than sewing. The installation should only be used by a qualified technician. 0 Contact your skin, otherwise inflammation can cause vomiting and diarrhoea. Attach all safety devices before opening...
Instruction Manual - English
Page 5
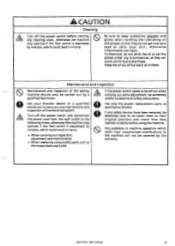
... cause vomiting and diarrhoea. Furthermore, do not get into your eyes or onto your Brother dealer or a qualified electrician to wear protective goggles and gloves when handling the lubricating ...8226; When replacing consumable parts such as the rotary hook and knife Use only the proper replacement parts as they operate correctly before starting ® any safety devices... have been removed, be extremely qualified technician. BAS-4164 - Any problems in injury. Keep the oil out of the reach of children. ...
... cause vomiting and diarrhoea. Furthermore, do not get into your eyes or onto your Brother dealer or a qualified electrician to wear protective goggles and gloves when handling the lubricating ...8226; When replacing consumable parts such as the rotary hook and knife Use only the proper replacement parts as they operate correctly before starting ® any safety devices... have been removed, be extremely qualified technician. BAS-4164 - Any problems in injury. Keep the oil out of the reach of children. ...
Instruction Manual - English
Page 6
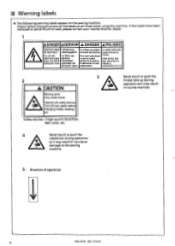
... labels * The following warning labels appear on the labels at all times when using the machine. Please follow the instructions on the sewing machine. Operate with safety devices...heridas. desenchufela de la red. 3 2 A CAUTION Moving parts may result in injuries or damage to read, please contact your nearest Brother dealer. 1 A • ADANGER AGEFAHR A DANGER A PELIGRO Hazardous voltage Hochspannung Un voltage non adapts Un voltaje inadecuado will cause injury... been removed or are difficult to the sewing machine. 5 Direction of operation IV BAS-416A • BES-1210AC
... labels * The following warning labels appear on the labels at all times when using the machine. Please follow the instructions on the sewing machine. Operate with safety devices...heridas. desenchufela de la red. 3 2 A CAUTION Moving parts may result in injuries or damage to read, please contact your nearest Brother dealer. 1 A • ADANGER AGEFAHR A DANGER A PELIGRO Hazardous voltage Hochspannung Un voltage non adapts Un voltaje inadecuado will cause injury... been removed or are difficult to the sewing machine. 5 Direction of operation IV BAS-416A • BES-1210AC


