
User Manual in English
Page 4
iPod Operation 13 5. Radio Operation 11 4. Before Operation 4 1.1 Glossary 4 1.2 Precautions 4 1.3 Maintenance and Cleaning of Discs 5 1.4 Battery Information of Remote Control 5 1.5 Remote Control Description 6 1.6 Locations and Names of Controls on or in the Unit 7 1.7 Wires Connection Description 8 1.8 Unit Installation 9 2. Common Operation 10 3. Contents 1. Disc, USB and MMC/SD Card Operation 14 5.1 Load/unload Disc, USB or Card 14 5.2 Pause Playback 16 5.3 Stop Playback 16 5.4 Select Chapter/Track with UP/DN or >>|/|
iPod Operation 13 5. Radio Operation 11 4. Before Operation 4 1.1 Glossary 4 1.2 Precautions 4 1.3 Maintenance and Cleaning of Discs 5 1.4 Battery Information of Remote Control 5 1.5 Remote Control Description 6 1.6 Locations and Names of Controls on or in the Unit 7 1.7 Wires Connection Description 8 1.8 Unit Installation 9 2. Common Operation 10 3. Contents 1. Disc, USB and MMC/SD Card Operation 14 5.1 Load/unload Disc, USB or Card 14 5.2 Pause Playback 16 5.3 Stop Playback 16 5.4 Select Chapter/Track with UP/DN or >>|/|
User Manual in English
Page 7
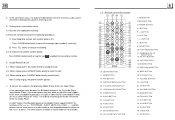
...press HANGUP button briefly to the Car Audio Player. To transfer the audio of a file played by Mobile Phone to the Car Audio Player In the connection status between the Bluetooth devices of the Car Audio Player and a Mobile Phone, if the mobile phone can play audio or video files and support A2DP, ...when the Mobile Phone plays an audio or video file(For some Mobile Phones,...
...press HANGUP button briefly to the Car Audio Player. To transfer the audio of a file played by Mobile Phone to the Car Audio Player In the connection status between the Bluetooth devices of the Car Audio Player and a Mobile Phone, if the mobile phone can play audio or video files and support A2DP, ...when the Mobile Phone plays an audio or video file(For some Mobile Phones,...
User Manual in English
Page 8
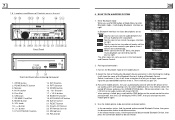
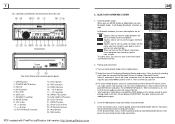
USB Jack 7. SD/MMC Card Slot 8. 1.6 Locations and Names of Controls on or in the unit 18 19 23 5 22 3 20 1 4 11 10 9 24 12 13 14 15 16 17 8 2 25 6 Front Panel SD / M M C 7 21 The Front Facet after removing front panel 1. OPEN button 2. AV IN socket 5. MODE button 9. Monitor 4. VOL knob 10. >>| button 11. | Disc Slot 6. POWER/MUTE button 3.
USB Jack 7. SD/MMC Card Slot 8. 1.6 Locations and Names of Controls on or in the unit 18 19 23 5 22 3 20 1 4 11 10 9 24 12 13 14 15 16 17 8 2 25 6 Front Panel SD / M M C 7 21 The Front Facet after removing front panel 1. OPEN button 2. AV IN socket 5. MODE button 9. Monitor 4. VOL knob 10. >>| button 11. | Disc Slot 6. POWER/MUTE button 3.
User Manual in English
Page 11
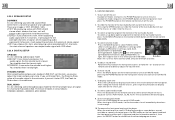
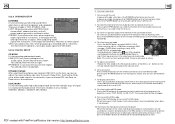
...the player When the monitor or the small LCD display wrongly or some buttons are 4 modes in it will output audio signal with 5.1 channels, it , then press the RESET button to rehabilitate the distorted program to turn off mode... select your desired sound effect when there is the minimum; To select an optimal angle of the monitor of the Car Audio System To select an up Mode Menu as follows: STEREO, MONO L, MONO R, MIX MONO. 2. pressing the POWER ... (After inserting a disc), USB(After inserting a USB storage), CARD(After inserting a card), AUX, BLUETOOTH or Ipod mode.
...the player When the monitor or the small LCD display wrongly or some buttons are 4 modes in it will output audio signal with 5.1 channels, it , then press the RESET button to rehabilitate the distorted program to turn off mode... select your desired sound effect when there is the minimum; To select an optimal angle of the monitor of the Car Audio System To select an up Mode Menu as follows: STEREO, MONO L, MONO R, MIX MONO. 2. pressing the POWER ... (After inserting a disc), USB(After inserting a USB storage), CARD(After inserting a card), AUX, BLUETOOTH or Ipod mode.
User Manual in Spanish
Page 32
Radio Operation 11 4. Disc, USB and MMC/SD Card Operation 14 5.1 Load/unload Disc, USB or Card 14 5.2 Pause Playback 16 5.3 Stop Playback 16 5.4 Select Chapter/Track with UP/DN or >>|/| Common Operation 10 3. iPod Operation 13 5. Contents 1. Before Operation 4 1.1 Glossary 4 1.2 Precautions 4 1.3 Maintenance and Cleaning of Discs 5 1.4 Battery Information of Remote Control 5 1.5 Remote Control Description 6 1.6 Locations and Names of Controls on or in the Unit 7 1.7 Wires Connection Description 8 1.8 Unit Installation 9 2.
Radio Operation 11 4. Disc, USB and MMC/SD Card Operation 14 5.1 Load/unload Disc, USB or Card 14 5.2 Pause Playback 16 5.3 Stop Playback 16 5.4 Select Chapter/Track with UP/DN or >>|/| Common Operation 10 3. iPod Operation 13 5. Contents 1. Before Operation 4 1.1 Glossary 4 1.2 Precautions 4 1.3 Maintenance and Cleaning of Discs 5 1.4 Battery Information of Remote Control 5 1.5 Remote Control Description 6 1.6 Locations and Names of Controls on or in the Unit 7 1.7 Wires Connection Description 8 1.8 Unit Installation 9 2.

User Manual in Spanish
Page 35
... HANGUP button briefly to reject the call; 6.3 When talking, press HANGUP button briefly to the Car Audio Player In the connection status between the Bluetooth devices of the Car Audio Player and a Mobile Phone, if the mobile phone can play audio or video files and support A2DP, when the Mobile Phone plays an... audio or video file(For some Mobile Phones, you must select Play by Mobile Phone to end ...
... HANGUP button briefly to reject the call; 6.3 When talking, press HANGUP button briefly to the Car Audio Player In the connection status between the Bluetooth devices of the Car Audio Player and a Mobile Phone, if the mobile phone can play audio or video files and support A2DP, when the Mobile Phone plays an... audio or video file(For some Mobile Phones, you must select Play by Mobile Phone to end ...
User Manual in Spanish
Page 36
POWER/MUTE button 3. USB Jack 7. VOL knob 10. >>| button 11. | 1.6 Locations and Names of Controls on or in the unit 18 19 23 5 22 3 20 1 4 11 10 9 24 12 13 14 15 16 17 8 2 25 6 Front Panel SD / M M C 7 21 The Front Facet after removing front panel 1. AV IN socket 5. MODE button 9. Monitor 4. SD/MMC Card Slot 8. Disc Slot 6. OPEN button 2.
POWER/MUTE button 3. USB Jack 7. VOL knob 10. >>| button 11. | 1.6 Locations and Names of Controls on or in the unit 18 19 23 5 22 3 20 1 4 11 10 9 24 12 13 14 15 16 17 8 2 25 6 Front Panel SD / M M C 7 21 The Front Facet after removing front panel 1. AV IN socket 5. MODE button 9. Monitor 4. SD/MMC Card Slot 8. Disc Slot 6. OPEN button 2.
User Manual in Spanish
Page 39
... can adjust the linear compression ratio. When turning on the remote control repeatedly. 4. DYNAMIC RANGE After selecting the compression mode of the Car Audio System, press the DOWN/UP button on the monitor or ANG button on LOUD mode, it will output the left and right ways of ... MUTE button on the remote control to select RADIO, DISC (After inserting a disc), USB(After inserting a USB storage), CARD(After inserting a card), AUX, BLUETOOTH or Ipod mode. It is mainly for selecting your desired mode. To select a desired EQ mode Press the EQ button on the remote control to...
... can adjust the linear compression ratio. When turning on the remote control repeatedly. 4. DYNAMIC RANGE After selecting the compression mode of the Car Audio System, press the DOWN/UP button on the monitor or ANG button on LOUD mode, it will output the left and right ways of ... MUTE button on the remote control to select RADIO, DISC (After inserting a disc), USB(After inserting a USB storage), CARD(After inserting a card), AUX, BLUETOOTH or Ipod mode. It is mainly for selecting your desired mode. To select a desired EQ mode Press the EQ button on the remote control to...


