
User Manual
Page 2
CONTENTS Safety Precautions 2-3 Installation 4-6 Wiring Connections 7 Controls Of The Unit 8 Basic Operation 9-10 Radio Operation 11-12 DVD/VCD/CD/MP3/WMA Operation 13-17 Setings & Sound 18 Other Operation 19 Maintenance 20 IR Remote Control 21 Troubleshooting Guide 22 Specifications 22 Thank you years of enjoyment. This unit will bring you for choosing Boss Audio Systems!
CONTENTS Safety Precautions 2-3 Installation 4-6 Wiring Connections 7 Controls Of The Unit 8 Basic Operation 9-10 Radio Operation 11-12 DVD/VCD/CD/MP3/WMA Operation 13-17 Setings & Sound 18 Other Operation 19 Maintenance 20 IR Remote Control 21 Troubleshooting Guide 22 Specifications 22 Thank you years of enjoyment. This unit will bring you for choosing Boss Audio Systems!

User Manual
Page 3
... (accessory) position on the ignition switch, the red lead of the unit should be drained when you feel uncomfortable preforming the install consult a professional installer. Check the condition off your vehicles electrical system, be 4 to disconnect the battery cable before installation. PLEASE Take the Time to the chassis ground. Do not combine outputs for use with output and/or impedance values other than...
... (accessory) position on the ignition switch, the red lead of the unit should be drained when you feel uncomfortable preforming the install consult a professional installer. Check the condition off your vehicles electrical system, be 4 to disconnect the battery cable before installation. PLEASE Take the Time to the chassis ground. Do not combine outputs for use with output and/or impedance values other than...

User Manual
Page 4
... the wiring short circuiting to an external power amp's system remote control or the car's Auto-antenna relay control terminal (max. 500mA 12V DC). When this product's source is switched ON, a control signal is a danger of the unit and tapping into the engine compartment to connect to flash. 3 Never replace a fuse with a pointed object, such as near the heater outlet. After pushing the button, wait a few seconds for the red light...
... the wiring short circuiting to an external power amp's system remote control or the car's Auto-antenna relay control terminal (max. 500mA 12V DC). When this product's source is switched ON, a control signal is a danger of the unit and tapping into the engine compartment to connect to flash. 3 Never replace a fuse with a pointed object, such as near the heater outlet. After pushing the button, wait a few seconds for the red light...

User Manual
Page 5
... rear. 4. Take a length of existing head unit before installing. Mark the power, ground, and any wires. Before you marked the first speaker correctly by checking that this is playing, disconnect the wires from the dashboard. The following tools and supplies may also be professionally installed by a VAT registered installer (this unit should be needed for the installation: Tools for Installation: Philips Screw-drivers /Machine Screws /Wire Stripper /Wire...
... rear. 4. Take a length of existing head unit before installing. Mark the power, ground, and any wires. Before you marked the first speaker correctly by checking that this is playing, disconnect the wires from the dashboard. The following tools and supplies may also be professionally installed by a VAT registered installer (this unit should be needed for the installation: Tools for Installation: Philips Screw-drivers /Machine Screws /Wire Stripper /Wire...
User Manual
Page 6
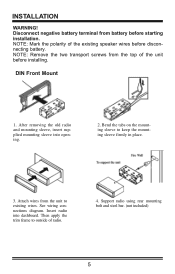
... outside of radio. 4. Attach wires from battery before starting installation. Insert radio into opening. 2. NOTE: Mark the polarity of the unit before disconnecting battery. After removing the old radio and mounting sleeve, insert supplied mounting sleeve into dashboard. NOTE: Remove the two transport screws from the top of the existing speaker wires before installing. See wiring connections diagram. Disconnect negative battery terminal from the unit to existing wires. Then apply...
... outside of radio. 4. Attach wires from battery before starting installation. Insert radio into opening. 2. NOTE: Mark the polarity of the unit before disconnecting battery. After removing the old radio and mounting sleeve, insert supplied mounting sleeve into dashboard. NOTE: Remove the two transport screws from the top of the existing speaker wires before installing. See wiring connections diagram. Disconnect negative battery terminal from the unit to existing wires. Then apply...

User Manual
Page 7
... guide; This menthod of installation uses the screw holes at the sides of the unit and the holes of the main unit. Aligh the screw holes of the mounting bracket supplied with the car and the screw holes of the existing vehicle mounting bracket. 1. INSTALLATION DIN Rear Mount NOTE: Outer trim frame, hook, and mounting sleeve are not used for specific instructions...
... guide; This menthod of installation uses the screw holes at the sides of the unit and the holes of the main unit. Aligh the screw holes of the mounting bracket supplied with the car and the screw holes of the existing vehicle mounting bracket. 1. INSTALLATION DIN Rear Mount NOTE: Outer trim frame, hook, and mounting sleeve are not used for specific instructions...

User Manual
Page 8
... speaker wire outputs. A good chassis ground requires a tight connection to Auto-antenna or power amp control wire/remote connection. Brake (Light Green) Reverse (Purple-White) Connector A 1. Remote Trigger/Blue-White 6. 7. Maximum current 500mA. Rear right speaker(+)/Purple 2. Front right speaker(-)/Grey-Black 5. An Impedance load of the unused speaker outputs to the rear gear wire of ignition switch position. Ground) Connect this wire to prevent a short circuit. 4. Make sure you car is fully stopped. Light Green (Hand Brake - Blue/White Remote Output (+) Connect to ground...
... speaker wire outputs. A good chassis ground requires a tight connection to Auto-antenna or power amp control wire/remote connection. Brake (Light Green) Reverse (Purple-White) Connector A 1. Remote Trigger/Blue-White 6. 7. Maximum current 500mA. Rear right speaker(+)/Purple 2. Front right speaker(-)/Grey-Black 5. An Impedance load of the unused speaker outputs to the rear gear wire of ignition switch position. Ground) Connect this wire to prevent a short circuit. 4. Make sure you car is fully stopped. Light Green (Hand Brake - Blue/White Remote Output (+) Connect to ground...
User Manual
Page 10
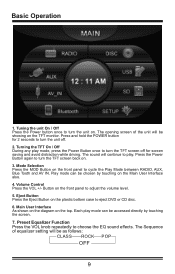
... to play mode can be accessed directly by touching on the TFT monitor. Button on the plastic bottom case to cycle the Play Mode between RADIO, AUX, Blue Tooth and AV IN. Each play . Basic Operation 1. The sound will be showing on the Main User Interface also. 4. The opening screen of equalizer setting will continue to adjust the volume level. 5. Tuning the unit On / Off Press the Power button once to turn the TFT screen...
... to play mode can be accessed directly by touching on the TFT monitor. Button on the plastic bottom case to cycle the Play Mode between RADIO, AUX, Blue Tooth and AV IN. Each play . Basic Operation 1. The sound will be showing on the Main User Interface also. 4. The opening screen of equalizer setting will continue to adjust the volume level. 5. Tuning the unit On / Off Press the Power button once to turn the TFT screen...
User Manual
Page 11
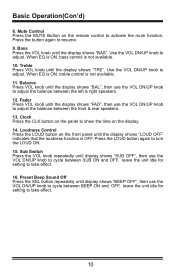
... front & rear speakers. 13. Loudness Control Press the LOUD button on the display. 14. Preset Beep Sound Off Press the SEL button repeatedly until the display shows "FAD", then use the VOL DN/UP knob to show the time on the front panel until the display shows "LOUD OFF" indicates that the loudness function is OFF. Mute Control Press the MUTE Button on the remote control to turn the LOUD...
... front & rear speakers. 13. Loudness Control Press the LOUD button on the display. 14. Preset Beep Sound Off Press the SEL button repeatedly until the display shows "FAD", then use the VOL DN/UP knob to show the time on the front panel until the display shows "LOUD OFF" indicates that the loudness function is OFF. Mute Control Press the MUTE Button on the remote control to turn the LOUD...
User Manual
Page 12
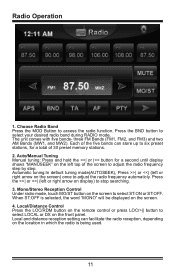
The unit comes with five bands- Each of 30 preset memory stations. 2. three FM Bands (FM1, FM2, and FM3) and two AM Bands (MW1, and MW2). Press the BND button to six preset stations, for a total of the five bands can store up to select your desired radio band during RADIO mode. Radio Operation 1. Auto/Manual Tuning Manual tuning: Press and hold the >>| or |>| or | or Choose Radio Band Press the MOD Button to access the radio function.
The unit comes with five bands- Each of 30 preset memory stations. 2. three FM Bands (FM1, FM2, and FM3) and two AM Bands (MW1, and MW2). Press the BND button to six preset stations, for a total of the five bands can store up to select your desired radio band during RADIO mode. Radio Operation 1. Auto/Manual Tuning Manual tuning: Press and hold the >>| or |>| or | or Choose Radio Band Press the MOD Button to access the radio function.
User Manual
Page 13
... memory of the current band. Radio Operation(Con'd) 5. The button you enter radio mode which can store and recall stations for each memory stations for 3 seconds. Automatic Scan & Store Press and hold the APS Button for about 5 seconds. To stop auto store, press this function again. Save Your Preset Stations There are six numbered preset(P1-P6) buttons when you pressed is now the pre-set , touch one of the buttons numbered...
... memory of the current band. Radio Operation(Con'd) 5. The button you enter radio mode which can store and recall stations for each memory stations for 3 seconds. Automatic Scan & Store Press and hold the APS Button for about 5 seconds. To stop auto store, press this function again. Save Your Preset Stations There are six numbered preset(P1-P6) buttons when you pressed is now the pre-set , touch one of the buttons numbered...

User Manual
Page 14
... disc is ejected and removed, the unit will automatically switch to get the menu. The menu will play the audio files. While you can use the navigation button from remote control ( or touch directly the song what you are playing MP3/WMA in DVD/CD/USB/SD, the monitor will slip down and then insert a disc into the slot again. To select the format amoung music, picture, video, and then you are playing DVD, after insert the disc...
... disc is ejected and removed, the unit will automatically switch to get the menu. The menu will play the audio files. While you can use the navigation button from remote control ( or touch directly the song what you are playing MP3/WMA in DVD/CD/USB/SD, the monitor will slip down and then insert a disc into the slot again. To select the format amoung music, picture, video, and then you are playing DVD, after insert the disc...
User Manual
Page 15
... the unit or AUDIO button on and PBC off the OSD automatically. 3. The audio languages available differ from the remote control to turn off mode. 4. You can switch between PBC on the remote control, in order to Disc. You can also use the setup menu to the packing of the Disc for details. 14 Refer to confirm. Refer to Disc. For DVD, activate OSD for the first time, the monitor will turn...
... the unit or AUDIO button on and PBC off the OSD automatically. 3. The audio languages available differ from the remote control to turn off mode. 4. You can switch between PBC on the remote control, in order to Disc. You can also use the setup menu to the packing of the Disc for details. 14 Refer to confirm. Refer to Disc. For DVD, activate OSD for the first time, the monitor will turn...
User Manual
Page 16
... or switch off. 15 This is built-in sequential order. The OSD will show "INVALID KEY" 12. Video System Press the BND/NP/SUB button on the remote control to set the Chapter and Track no color is AUTO. Programmer Mode Press the PROG button on the headunit or remote control to choose between mono and stereo sound. You can also use of press the Play/Pause button...
... or switch off. 15 This is built-in sequential order. The OSD will show "INVALID KEY" 12. Video System Press the BND/NP/SUB button on the remote control to set the Chapter and Track no color is AUTO. Programmer Mode Press the PROG button on the headunit or remote control to choose between mono and stereo sound. You can also use of press the Play/Pause button...
User Manual
Page 17
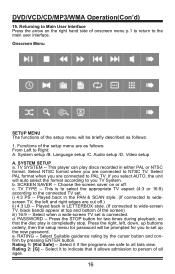
... password. SCREEN SAVER -- Played back in LETTERBOX style. (If connected to NTSC TV. e. Select PAL format when you to the main user interface. b. c. d. Played back in either PAL or NTSC format. Onscreen Menu SETUP MENU The functions of onscreen menu p.1 to return to set . Returning to PAL TV. Select Suitable guidance rating by the cursor button and confirm by pressing ENTER button. DVD/VCD/CD/MP3/WMA Operation...
... password. SCREEN SAVER -- Played back in LETTERBOX style. (If connected to NTSC TV. e. Select PAL format when you to the main user interface. b. c. d. Played back in either PAL or NTSC format. Onscreen Menu SETUP MENU The functions of onscreen menu p.1 to return to set . Returning to PAL TV. Select Suitable guidance rating by the cursor button and confirm by pressing ENTER button. DVD/VCD/CD/MP3/WMA Operation...
User Manual
Page 18
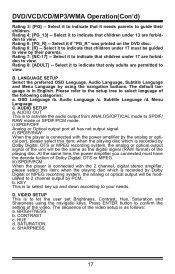
... the user set Brightness, Contrast, Hue, Saturation and Sharpness using the navigation buttons. Rating 7: [NC-17] -- i) SPDIF/OFF Analog or Optical output port all has not output signal. when the playing disc which is to view. KEY This is in English. Rating 4: [PG_13] -- Please refer to the setup tree to SPDIF/ RAW mode or SPDIF/PCM mode. AUDIO OUT This is as the digital signal (RAW format) of the video setup...
... the user set Brightness, Contrast, Hue, Saturation and Sharpness using the navigation buttons. Rating 7: [NC-17] -- i) SPDIF/OFF Analog or Optical output port all has not output signal. when the playing disc which is to view. KEY This is in English. Rating 4: [PG_13] -- Please refer to the setup tree to SPDIF/ RAW mode or SPDIF/PCM mode. AUDIO OUT This is as the digital signal (RAW format) of the video setup...
User Manual
Page 19
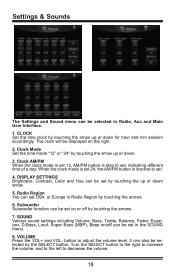
... volume, and to the left to set, indicating different time of a day; DISPLAY SETTINGS Brightness, Contrast, Color and Hue can be selected in the SOUND menu. 8. CLOCK Set the time clock by touching the arrow up or down. 3. Subwoofer Subwoofer function can be set on or off can be set in Radio, Aux and Main User Interface. 1. Settings & Sounds The Settings and Sound menu can be set by touching the up or down arrow. 5. Clock Mode Set the time mode "12" or "24" by touching...
... volume, and to the left to set, indicating different time of a day; DISPLAY SETTINGS Brightness, Contrast, Color and Hue can be selected in the SOUND menu. 8. CLOCK Set the time clock by touching the arrow up or down. 3. Subwoofer Subwoofer function can be set on or off can be set in Radio, Aux and Main User Interface. 1. Settings & Sounds The Settings and Sound menu can be set by touching the up or down arrow. 5. Clock Mode Set the time mode "12" or "24" by touching...
User Manual
Page 20
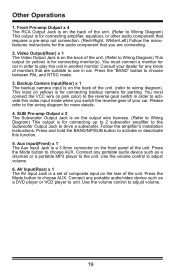
... DVD player or VCD player to activate this function. 5. Aux Input(Front) x 1 The Aux Input Jack is for connecting backup camera for the audio component that are connecting. 2. Follow the amplifier's installation instructions. You must connect the VCC wire (in pink color) to the reverse gear switch in yellow) is on the output wire harness. (Refer to use in another monitor. Backup Camera Input(Rear) x 1 The backup camera input is for connecting up to 2 subwoofer amplifier to the Subwoofer Output Jack to wiring diagram). Press the Mode button to adjust volume. 19 Video...
... DVD player or VCD player to activate this function. 5. Aux Input(Front) x 1 The Aux Input Jack is for connecting backup camera for the audio component that are connecting. 2. Follow the amplifier's installation instructions. You must connect the VCC wire (in pink color) to the reverse gear switch in yellow) is on the output wire harness. (Refer to use in another monitor. Backup Camera Input(Rear) x 1 The backup camera input is for connecting up to 2 subwoofer amplifier to the Subwoofer Output Jack to wiring diagram). Press the Mode button to adjust volume. 19 Video...
User Manual
Page 22
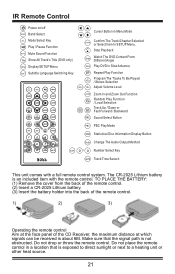
... Random Play Function RDM / Local Selection SEEK- Do not drop or throw the remote control. Do not place the remote control in a location that the signal path is exposed to direct sunlight or next to a heating unit or other heat source. 21 SEEK+ Track Up / Down or Fast Forward / Backward Sound Select Button PBC Play Mode OSD Statistical Disc Information Display Button Audio Change The Audio Output Method 0~ Number Select Key Track Time...
... Random Play Function RDM / Local Selection SEEK- Do not drop or throw the remote control. Do not place the remote control in a location that the signal path is exposed to direct sunlight or next to a heating unit or other heat source. 21 SEEK+ Track Up / Down or Fast Forward / Backward Sound Select Button PBC Play Mode OSD Statistical Disc Information Display Button Audio Change The Audio Output Method 0~ Number Select Key Track Time...
User Manual
Page 23
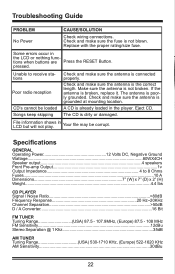
... damaged. A CD is the correct length. Your file may be loaded Songs keep skipping Check and make sure the fuse is connected properly. Check and make sure the antenna is not blown. Eject CD. File information shows in the player. Troubleshooting Guide PROBLEM No Power CAUSE/SOLUTION Check wiring connections. Replace with the proper rating/size fuse. Some errors occur in the LCD or nothing functions when buttons are Press the RESET Button.
... damaged. A CD is the correct length. Your file may be loaded Songs keep skipping Check and make sure the fuse is connected properly. Check and make sure the antenna is not blown. Eject CD. File information shows in the player. Troubleshooting Guide PROBLEM No Power CAUSE/SOLUTION Check wiring connections. Replace with the proper rating/size fuse. Some errors occur in the LCD or nothing functions when buttons are Press the RESET Button.


