
User Manual in English
Page 2
... LASER PRODUCT Laser product symbol: located on the rear panel of the unit, indicate this instruction manual before installation and use. 2.Do not open the cover or touch any kind of electric shock to persons. CAUTION: TO REDUCE THE RISK OF ELECTRIC SHOCK, DO NOT REMOVE COVER (OR BACK). PRECAUTION WARNING:... outside of the unit. 1.Read through this player is intended to alert user to out of important operating and maintenance (servicing) instructions in moist and humid conditions, which effect the pick-up of the unit lead to the presence of work. 5.Place the unit on a flat ...
... LASER PRODUCT Laser product symbol: located on the rear panel of the unit, indicate this instruction manual before installation and use. 2.Do not open the cover or touch any kind of electric shock to persons. CAUTION: TO REDUCE THE RISK OF ELECTRIC SHOCK, DO NOT REMOVE COVER (OR BACK). PRECAUTION WARNING:... outside of the unit. 1.Read through this player is intended to alert user to out of important operating and maintenance (servicing) instructions in moist and humid conditions, which effect the pick-up of the unit lead to the presence of work. 5.Place the unit on a flat ...

User Manual in English
Page 3
Before Operation...4 1.1 Glossary 4 1.2 Precautions 4 1.3 Maintenance and Cleaning of Discs 5 1.4 Battery Information of the Remote Control 5 1.5 The Remote Control Description 6 1.6 Locations and Names of the Controls 7 1.7 Connection Description 8 1.8 Unit Installation 9 2. Basic Disc, USB or SD Operation 13 4.1 Begin Playback 13 4.2 Pause Playback 14 4.3 Stop Playback 14 4.4 Select Chapter/Track with the UP/DN or the >>|/| Common Operation 9 3. Radio Operation...11 4. Contents 1.
Before Operation...4 1.1 Glossary 4 1.2 Precautions 4 1.3 Maintenance and Cleaning of Discs 5 1.4 Battery Information of the Remote Control 5 1.5 The Remote Control Description 6 1.6 Locations and Names of the Controls 7 1.7 Connection Description 8 1.8 Unit Installation 9 2. Basic Disc, USB or SD Operation 13 4.1 Begin Playback 13 4.2 Pause Playback 14 4.3 Stop Playback 14 4.4 Select Chapter/Track with the UP/DN or the >>|/| Common Operation 9 3. Radio Operation...11 4. Contents 1.

User Manual in English
Page 4
...). Every title contain a serial number that every block can playback interactive software with SVCD or VCD2.0 format used for negative terminal of DVD disc. Track It is the biggest component of a disc is switched on TV. Do not allow the speaker wires to be divided into several blocks, so that is extremely hot, do not use this problem, wait about one hour...
...). Every title contain a serial number that every block can playback interactive software with SVCD or VCD2.0 format used for negative terminal of DVD disc. Track It is the biggest component of a disc is switched on TV. Do not allow the speaker wires to be divided into several blocks, so that is extremely hot, do not use this problem, wait about one hour...
User Manual in English
Page 6
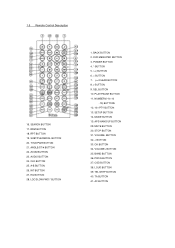
RPT BUTTON 19. ZOOM BUTTON 23. LOC/SLOW-FWD/* BUTTON 1. ANGLE/ST/# BUTTON 22. POWER BUTTON 4. ^ BUTTON 5. >>| BUTTON 6. > BUTTON 7. | 1.5 Remote Control Description 16. SUBTITLE/REDIAL BUTTON 20. CLK BUTTON 25. RDM BUTTON 18. BACK BUTTON 2. EQ BUTTON 28. SEARCH BUTTON 17. TITLE/PAIR BUTTON 21. AUDIO BUTTON 24. A-B BUTTON 26. INT BUTTON 27. DVD MENU/PBC BUTTON 3.
RPT BUTTON 19. ZOOM BUTTON 23. LOC/SLOW-FWD/* BUTTON 1. ANGLE/ST/# BUTTON 22. POWER BUTTON 4. ^ BUTTON 5. >>| BUTTON 6. > BUTTON 7. | 1.5 Remote Control Description 16. SUBTITLE/REDIAL BUTTON 20. CLK BUTTON 25. RDM BUTTON 18. BACK BUTTON 2. EQ BUTTON 28. SEARCH BUTTON 17. TITLE/PAIR BUTTON 21. AUDIO BUTTON 24. A-B BUTTON 26. INT BUTTON 27. DVD MENU/PBC BUTTON 3.

User Manual in English
Page 8
Front Left Speaker (+) 6. Memory +12V(yellow) 5. Rear Right Speaker (+) 2. Front Right Speaker (+) 4. Rear Left Speaker (+) 8. 1.7 Connection Description Description of wires connection The Description of the Fixed ISO Female Connector CONNECTOR A 1. 2. 3. 4. Front Right Speaker (-) 5. Rear Right Speaker (-) 3. Front Left Speaker (-) 7. Rear Left Speaker (-) GROUND(black) CONNECTOR B 1. Auto Antenna(blue) 6. 7. 12V (To Ignition Key)(red) 8.
Front Left Speaker (+) 6. Memory +12V(yellow) 5. Rear Right Speaker (+) 2. Front Right Speaker (+) 4. Rear Left Speaker (+) 8. 1.7 Connection Description Description of wires connection The Description of the Fixed ISO Female Connector CONNECTOR A 1. 2. 3. 4. Front Right Speaker (-) 5. Rear Right Speaker (-) 3. Front Left Speaker (-) 7. Rear Left Speaker (-) GROUND(black) CONNECTOR B 1. Auto Antenna(blue) 6. 7. 12V (To Ignition Key)(red) 8.

User Manual in English
Page 9
1.8 UNIT INSTALLATION 2. To adjust sound level Rotate the VOL knob on the remote controll to turn off the unit. 2. button on the unit. To select function mode Press the MODE button to directly adjust the volume level. Common Operation 1. To turn on/off the unit Under power off mode, press the POWER button to turn on the remote control to select TUNER, DISC(After inserting a disc), USB(After inserting a USB storage), Card(After inserting a SD card), AV IN or BLUETOOTH mode. 3. Under power on mode, press...
1.8 UNIT INSTALLATION 2. To adjust sound level Rotate the VOL knob on the remote controll to turn off the unit. 2. button on the unit. To select function mode Press the MODE button to directly adjust the volume level. Common Operation 1. To turn on/off the unit Under power off mode, press the POWER button to turn on the remote control to select TUNER, DISC(After inserting a disc), USB(After inserting a USB storage), Card(After inserting a SD card), AV IN or BLUETOOTH mode. 3. Under power on mode, press...

User Manual in English
Page 10
... turn on/off LOUDNESS mode Press the LOUD button to detach the front panel from the unit and remove it, then use the VOL Knob on the monitor of the front panel. 6. Return control Press the button or DVD MENU button up to select the preset music equalizer curves: POP, ROCK, CLAS, EQ OFF . To adjust the clock time 1)Press the CLK button to select one of the sound modes such...
... turn on/off LOUDNESS mode Press the LOUD button to detach the front panel from the unit and remove it, then use the VOL Knob on the monitor of the front panel. 6. Return control Press the button or DVD MENU button up to select the preset music equalizer curves: POP, ROCK, CLAS, EQ OFF . To adjust the clock time 1)Press the CLK button to select one of the sound modes such...
User Manual in English
Page 11
BAND BUTTON Press the BAND button on the front panel to select your desired radio band of FM1, FM2, FM3,AM1 and AM2, and the selected band will be displayed on the monitor of the front panel. 3. TUNE/SEEK UP/DOWN BUTTONS 1) Press and hold the SEL button repeatedly to select your desired frequency EUROPE,USA1 ,USA2,JAPAN,RUSSIA. 2. FREQUENCY SELECT In RADIO mode. 3. Press and hold the >>|/|>|/| Radio Operation 1.
BAND BUTTON Press the BAND button on the front panel to select your desired radio band of FM1, FM2, FM3,AM1 and AM2, and the selected band will be displayed on the monitor of the front panel. 3. TUNE/SEEK UP/DOWN BUTTONS 1) Press and hold the SEL button repeatedly to select your desired frequency EUROPE,USA1 ,USA2,JAPAN,RUSSIA. 2. FREQUENCY SELECT In RADIO mode. 3. Press and hold the >>|/|>|/| Radio Operation 1.

User Manual in English
Page 12
... strong station to that other program, and TA, TP will display SEEK PTY and automatically search for the weak station. button on the remote controller or rotate the VOL knob on the front panel to turn on , SEEK, (SCAN), AUTO MEMORY function can be received or saved only when traffic program identification code has been received. Segment flashing: AF switching mode on, but RDS information is on LCD, it...
... strong station to that other program, and TA, TP will display SEEK PTY and automatically search for the weak station. button on the remote controller or rotate the VOL knob on the front panel to turn on , SEEK, (SCAN), AUTO MEMORY function can be received or saved only when traffic program identification code has been received. Segment flashing: AF switching mode on, but RDS information is on LCD, it...

User Manual in English
Page 13
... displayed on the monitor, and ensure that the TV was set TV to solve the problem? Basic Disc, USB or SD Operation 4.1 Begin playback 1. After turning on the DVD player, please turn on TV screen when the DVD player is recommendable to right video input(not TV channel); however, depending on . Press the POWER button briefly to eject and reload the disc again. 3. NOTE 1. How to VIDEO1. 2. Play USB & Card Insert an USB...
... displayed on the monitor, and ensure that the TV was set TV to solve the problem? Basic Disc, USB or SD Operation 4.1 Begin playback 1. After turning on the DVD player, please turn on TV screen when the DVD player is recommendable to right video input(not TV channel); however, depending on . Press the POWER button briefly to eject and reload the disc again. 3. NOTE 1. How to VIDEO1. 2. Play USB & Card Insert an USB...

User Manual in English
Page 17
... to input the serial number of the images on the IR remote control to view in different angle.(This function is not available. 2. When in RANDOM (ON) mode, it will play from the selected time. 4.14 Playback in Random When playing DVD/VCD(PBC OFF)/MP3/WMA/CD discs, press the RDM button to select the desired language type(depend on the IR remote control to switch...
... to input the serial number of the images on the IR remote control to view in different angle.(This function is not available. 2. When in RANDOM (ON) mode, it will play from the selected time. 4.14 Playback in Random When playing DVD/VCD(PBC OFF)/MP3/WMA/CD discs, press the RDM button to select the desired language type(depend on the IR remote control to switch...

User Manual in English
Page 18
.../CD discs 2 Use the direction buttons to move cursor onto the desired place for inputting the sequence number. 3 Use the number button to input desired sequence number of the file and play the programmed titles/chapters/tracks in programmed order; When displaying the root menu, you can play only this sort of program playback, it turns off PBC mode. 4.20 Playback the Picture CD in JPEG Format 1. At the time, it plays MP3/WMA file...
.../CD discs 2 Use the direction buttons to move cursor onto the desired place for inputting the sequence number. 3 Use the number button to input desired sequence number of the file and play the programmed titles/chapters/tracks in programmed order; When displaying the root menu, you can play only this sort of program playback, it turns off PBC mode. 4.20 Playback the Picture CD in JPEG Format 1. At the time, it plays MP3/WMA file...

User Manual in English
Page 19
... mode of the setup item, finally press the OK button to confirm it. * Press the < button to return to the upper level. * Press the SETUP button again or use the direction buttons to highlight the item of the >/: 90 deg cw; Press the ^ or v button to exit the System Menu. or < button to enter the setup item. 3. For the DVD System Menu, there are 6 setup...
... mode of the setup item, finally press the OK button to confirm it. * Press the < button to return to the upper level. * Press the SETUP button again or use the direction buttons to highlight the item of the >/: 90 deg cw; Press the ^ or v button to exit the System Menu. or < button to enter the setup item. 3. For the DVD System Menu, there are 6 setup...

User Manual in English
Page 20
... item is for locking or unlocking the rating level of the TV screen will be turned into a black square respectively. 16:9: Choose the item when connecting a TV set a new password that you should get the password in mind and cut out, and display in the Manual. Select the RATING item and then press the > button to confirm. 3. When playing the pictures with 16...
... item is for locking or unlocking the rating level of the TV screen will be turned into a black square respectively. 16:9: Choose the item when connecting a TV set a new password that you should get the password in mind and cut out, and display in the Manual. Select the RATING item and then press the > button to confirm. 3. When playing the pictures with 16...

User Manual in English
Page 21
... This item is for selecting a disc menu language. 4.24.3 AUDIO SETUP AUDIO OUT there is only ANALOG mode, i.e. MENU LANG This item is for selecting a subtitle language. AUDIO LANG This item is for adjusting the brightness of the video output. KEY It is for selecting your desired basic music tone(from low to high). 4.24.4 VIDEO SETUP BRIGHTNESS It is for selecting a audio language. SPDIF/OFF, not...
... This item is for selecting a disc menu language. 4.24.3 AUDIO SETUP AUDIO OUT there is only ANALOG mode, i.e. MENU LANG This item is for selecting a subtitle language. AUDIO LANG This item is for adjusting the brightness of the video output. KEY It is for selecting your desired basic music tone(from low to high). 4.24.4 VIDEO SETUP BRIGHTNESS It is for selecting a audio language. SPDIF/OFF, not...

User Manual in English
Page 22
... signal ; if you set the item, so you choose the item, when playing a disc recorded with 5.1 channels, the main channel speakers can output audio signal with 5.1 channels, it to be FULL, the Peak-to be OFF, the Peak-toPeak value is for selecting a desired audio output mode for adjusting the sharpness of the video output. SATURATION It is for adjusting the saturation of the video output. 4.24.5 SPEAKER SETUP...
... signal ; if you set the item, so you choose the item, when playing a disc recorded with 5.1 channels, the main channel speakers can output audio signal with 5.1 channels, it to be FULL, the Peak-to be OFF, the Peak-toPeak value is for selecting a desired audio output mode for adjusting the sharpness of the video output. SATURATION It is for adjusting the saturation of the video output. 4.24.5 SPEAKER SETUP...

User Manual in English
Page 23
... of LOCK setup menu for the DVD player will be designed as follows: Unlock 1 Kid Safe 2 G 3 PG 4 PG 13 5 PG R 6 R 7 NC 17 8 Adult NOTE * If you can not playback the disc. Sometimes the Parental Control sequences in some discs are as that you have not changed the password, the factory preset password for details. 4.25 Parental Control Q:After inserting DVD disc into disc compartment, a dialogue window will appear...
... of LOCK setup menu for the DVD player will be designed as follows: Unlock 1 Kid Safe 2 G 3 PG 4 PG 13 5 PG R 6 R 7 NC 17 8 Adult NOTE * If you can not playback the disc. Sometimes the Parental Control sequences in some discs are as that you have not changed the password, the factory preset password for details. 4.25 Parental Control Q:After inserting DVD disc into disc compartment, a dialogue window will appear...

User Manual in English
Page 24
.... 4.2 Dial with remote control with the following procedures: (1) Input telephone number with the BT device of the car audio system after pairing is ok, the LCD of the car audio system will show the name of Finding the Bluetooth Device and enter it will show BT LINK . 2. Pairing and connection 1) Turn on the Bluetooth mode of the mobile phone; 2) Select the item of the Bluetooth Device if finding a Bluetooth Device. When connection is ok;
.... 4.2 Dial with remote control with the following procedures: (1) Input telephone number with the BT device of the car audio system after pairing is ok, the LCD of the car audio system will show the name of Finding the Bluetooth Device and enter it will show BT LINK . 2. Pairing and connection 1) Turn on the Bluetooth mode of the mobile phone; 2) Select the item of the Bluetooth Device if finding a Bluetooth Device. When connection is ok;

User Manual in English
Page 25
... play a AUDIO file from your mobile blue tooth device to end the call , the car audio will temporarily wake up. 7. Dialing or receiving call when the unit is in standby (while your mobile device supports AVRCP then you will then we able to stream music from a external bluetooth device (mobile phone) on the screen. 6. Eg. Your must select on your Blue Tooth device so it will dial the last phone number...
... play a AUDIO file from your mobile blue tooth device to end the call , the car audio will temporarily wake up. 7. Dialing or receiving call when the unit is in standby (while your mobile device supports AVRCP then you will then we able to stream music from a external bluetooth device (mobile phone) on the screen. 6. Eg. Your must select on your Blue Tooth device so it will dial the last phone number...

User Manual in English
Page 26
... to the IR sensor of remote control and make sure that the player video output has a good connection with the TV audio input. * Check whether the audio connector is not under mute. NO RADIO RECEPTION * Check whether the antenna cable is condensation inside the car is less than 30. If you have turned down the volume. * Ensure that . REMOTE CONTROL ISSUES * Check the batteries of the player. * Check whether there are still...
... to the IR sensor of remote control and make sure that the player video output has a good connection with the TV audio input. * Check whether the audio connector is not under mute. NO RADIO RECEPTION * Check whether the antenna cable is condensation inside the car is less than 30. If you have turned down the volume. * Ensure that . REMOTE CONTROL ISSUES * Check the batteries of the player. * Check whether there are still...


