SL2 wireless surround link - Owner's guide
Page 2
... this product from overheating, put the product in recreation vehicles, or on or pinched, particularly at www.bose.com/static/compliance/index.html. Do not install near water - WARNING: No naked flame sources, such as the disconnect device, such disconnect device shall...manufacturer. 10. It is intended to constitute a risk of the system. Follow all warnings - Do not use attachments/accessories specified by Bose Corporation. Install in a wet basement, near a bathtub, washbowl, kitchen sink, laundry tub, in accordance with a dry cloth - This product ...
... this product from overheating, put the product in recreation vehicles, or on or pinched, particularly at www.bose.com/static/compliance/index.html. Do not install near water - WARNING: No naked flame sources, such as the disconnect device, such disconnect device shall...manufacturer. 10. It is intended to constitute a risk of the system. Follow all warnings - Do not use attachments/accessories specified by Bose Corporation. Install in a wet basement, near a bathtub, washbowl, kitchen sink, laundry tub, in accordance with a dry cloth - This product ...
SL2 wireless surround link - Owner's guide
Page 3
...not occur in a fire or electric shock. 15. This device must accept any interference, including interference that could result in a particular installation. Servicing is required when the apparatus has been damaged in the operating instructions or as power supply cord or plug is no guarantee that...power sources - Plug the product into the apparatus; Any modifications made to this device must not be co-located or operated in a residential installation. RF Guideline: This device meets the RF Guideline FCC/OET 65 and Canadian Health Code 6 for mobile devices, which the receiver is ...
...not occur in a fire or electric shock. 15. This device must accept any interference, including interference that could result in a particular installation. Servicing is required when the apparatus has been damaged in the operating instructions or as power supply cord or plug is no guarantee that...power sources - Plug the product into the apparatus; Any modifications made to this device must not be co-located or operated in a residential installation. RF Guideline: This device meets the RF Guideline FCC/OET 65 and Canadian Health Code 6 for mobile devices, which the receiver is ...
Operating guide
Page 3
... receiver. • Connect the equipment to an outlet on your records Bose recommends that you are designed to provide reasonable protection against harmful interference in a particular installation. Serial numbers are located on the bottom of the console, and on the carton): LIFESTYLE Serial numbers: Control console Acoustimass® module Retailer information: Dealer name...
... receiver. • Connect the equipment to an outlet on your records Bose recommends that you are designed to provide reasonable protection against harmful interference in a particular installation. Serial numbers are located on the bottom of the console, and on the carton): LIFESTYLE Serial numbers: Control console Acoustimass® module Retailer information: Dealer name...
Operating guide
Page 26
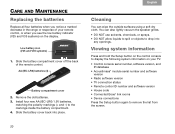
... CARE AND MAINTENANCE Replacing the batteries Replace all four batteries when you see the low battery indicator (V25 and V35 systems) on the display. Install four new AA (IEC-LR6) 1.5V batteries, matching the polarity markings (+ and -) to drop into place. Slide the battery compartment cover...; Radio software version • TV connection status • Remote control ID number and software version • House code • Connected Bose® link rooms • Device connections Press the Setup button again to display the following system information on your remote control, or when...
... CARE AND MAINTENANCE Replacing the batteries Replace all four batteries when you see the low battery indicator (V25 and V35 systems) on the display. Install four new AA (IEC-LR6) 1.5V batteries, matching the polarity markings (+ and -) to drop into place. Slide the battery compartment cover...; Radio software version • TV connection status • Remote control ID number and software version • House code • Connected Bose® link rooms • Device connections Press the Setup button again to display the following system information on your remote control, or when...
Installation guide
Page 4
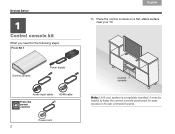
TAB 8 TAB 7 SYSTEM SETUP TAB 6 11 Control console kit What you need for easy access to keep the control console positioned for the following steps: From Kit 1 TAB 5 TAB 4 TAB 3 TAB 2 English 1. Control console Power supply Audio input cable From the power cord kit HDMI cable Power cord 2 Control console Note: Until your TV. Place the control console on a flat, stable surface near your system is completely installed, it may be helpful to its rear connection panel.
TAB 8 TAB 7 SYSTEM SETUP TAB 6 11 Control console kit What you need for easy access to keep the control console positioned for the following steps: From Kit 1 TAB 5 TAB 4 TAB 3 TAB 2 English 1. Control console Power supply Audio input cable From the power cord kit HDMI cable Power cord 2 Control console Note: Until your TV. Place the control console on a flat, stable surface near your system is completely installed, it may be helpful to its rear connection panel.
Installation guide
Page 14
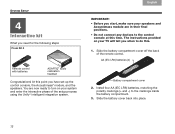
... the interactive phase of the remote control. Slide the battery cover back into place. 12 At this time. AA (IEC LR6) batteries (4) Battery compartment cover 2. Install four AA (IEC LR6) batteries, matching the polarity markings (+ and -) to do this. 1. Slide the battery compartment cover off the back of the setup process...
... the interactive phase of the remote control. Slide the battery cover back into place. 12 At this time. AA (IEC LR6) batteries (4) Battery compartment cover 2. Install four AA (IEC LR6) batteries, matching the polarity markings (+ and -) to do this. 1. Slide the battery compartment cover off the back of the setup process...


