
The Bose® Lifestyle® amplifier - Owner's guide
Page 5
...; stereo amplifier to a Model 20 music center 11 Connecting the Lifestyle® stereo amplifier to a Model 5 music center 13 Connecting speakers to your Lifestyle® stereo amplifier 14 Checking to a Lifestyle® media center 9 Setting up your system 15 Maintaining Your Lifestyle® Stereo Amplifier Cleaning the amplifier 16 Protecting outdoor wiring 16 Troubleshooting 16...
...; stereo amplifier to a Model 20 music center 11 Connecting the Lifestyle® stereo amplifier to a Model 5 music center 13 Connecting speakers to your Lifestyle® stereo amplifier 14 Checking to a Lifestyle® media center 9 Setting up your system 15 Maintaining Your Lifestyle® Stereo Amplifier Cleaning the amplifier 16 Protecting outdoor wiring 16 Troubleshooting 16...

The Bose® Lifestyle® amplifier - Owner's guide
Page 6
... the position of the voltage selection switch on page 3. The Lifestyle® stereo amplifier provides you with a simple solution when you want to add Bose® non-powered environmental speakers or Bose non-powered accessory speakers to transport this product. Setting up your Lifestyle® system. Dual voltage units include a 120V power cord and...
... the position of the voltage selection switch on page 3. The Lifestyle® stereo amplifier provides you with a simple solution when you want to add Bose® non-powered environmental speakers or Bose non-powered accessory speakers to transport this product. Setting up your Lifestyle® system. Dual voltage units include a 120V power cord and...

The Bose® Lifestyle® amplifier - Owner's guide
Page 7
...January 4, 2002 5 The amplifier must be situated close to either your Lifestyle® system or the accessory speakers, consider the following guidelines. Setting Up Your Lifestyle® Stereo Amplifier Selecting a location for your Lifestyle® stereo amplifier Select a location for your amplifier: •...DO NOT PLACE THE AMPLIFIER IN A COMPLETELY ENCLOSED AREA - It is important to the following guidelines when selecting a location for your Lifestyle® stereo amplifier and mount it according to prevent moisture from getting into the unit.
...January 4, 2002 5 The amplifier must be situated close to either your Lifestyle® system or the accessory speakers, consider the following guidelines. Setting Up Your Lifestyle® Stereo Amplifier Selecting a location for your Lifestyle® stereo amplifier Select a location for your amplifier: •...DO NOT PLACE THE AMPLIFIER IN A COMPLETELY ENCLOSED AREA - It is important to the following guidelines when selecting a location for your Lifestyle® stereo amplifier and mount it according to prevent moisture from getting into the unit.

The Bose® Lifestyle® amplifier - Owner's guide
Page 10
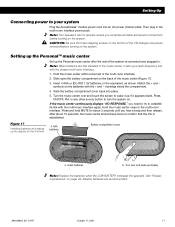
...center Systems that have a multi-room interface are referred to control more than one room. Setting Up Your Lifestyle® Stereo Amplifier Figure 7 Sample display for a tworoom system Operating speakers in other rooms with room A being the primary room (the one used for a one-room system). ...The Personal music center allows you must follow the procedure for setting up to four sets of Bose® powered speakers placed in more than one room of speakers. If two or more information on operating your system, the Personal music center displays ROOM and HOUSE buttons...
...center Systems that have a multi-room interface are referred to control more than one room. Setting Up Your Lifestyle® Stereo Amplifier Figure 7 Sample display for a tworoom system Operating speakers in other rooms with room A being the primary room (the one used for a one-room system). ...The Personal music center allows you must follow the procedure for setting up to four sets of Bose® powered speakers placed in more than one room of speakers. If two or more information on operating your system, the Personal music center displays ROOM and HOUSE buttons...

The Bose® Lifestyle® amplifier - Owner's guide
Page 11
..., insert the 3.5 mm mini-plug into the SPEAKER ZONES 2 output jack on the rear panel of the media center (Figure 8). 2. Setting Up Your Lifestyle® Stereo Amplifier Connecting the Lifestyle® stereo amplifier to a Lifestyle® media center CAUTION: Before making connections, turn the Lifestyle® system off and disconnect the media center...
..., insert the 3.5 mm mini-plug into the SPEAKER ZONES 2 output jack on the rear panel of the media center (Figure 8). 2. Setting Up Your Lifestyle® Stereo Amplifier Connecting the Lifestyle® stereo amplifier to a Lifestyle® media center CAUTION: Before making connections, turn the Lifestyle® system off and disconnect the media center...

The Bose® Lifestyle® amplifier - Owner's guide
Page 13
... multi-pin connector at one end of the audio input cable into the SPEAKER ZONES 2 output jack on the rear panel of the amplifier. Lifestyle® stereo amplifier rear panel 4 Ω MINIMUM LL R L SYSTEM RR CONTROL L R +- SPEAKER OUTPUTS INPUT Model 20 music center rear panel 30-ft audio input...
... multi-pin connector at one end of the audio input cable into the SPEAKER ZONES 2 output jack on the rear panel of the amplifier. Lifestyle® stereo amplifier rear panel 4 Ω MINIMUM LL R L SYSTEM RR CONTROL L R +- SPEAKER OUTPUTS INPUT Model 20 music center rear panel 30-ft audio input...

The Bose® Lifestyle® amplifier - Owner's guide
Page 15
...12). 2. The amplifier is designed to the SPEAKERS A or SPEAKERS B outputs. Figure 12 Cable connections between the Model 5 music center and the Lifestyle® stereo amplifier Model 5 music center rear panel Lifestyle® stereo amplifier rear panel 4 Ω...FIXED OUTPUT jack. 5. Setting Up Your Lifestyle® Stereo Amplifier Connecting the Lifestyle® stereo amplifier to a Model 5 music center In systems using a Model 5 music center, home theater speakers are connected to temporarily unplug the theater speakers from the FIXED R and FIXED L OUTPUT...
...12). 2. The amplifier is designed to the SPEAKERS A or SPEAKERS B outputs. Figure 12 Cable connections between the Model 5 music center and the Lifestyle® stereo amplifier Model 5 music center rear panel Lifestyle® stereo amplifier rear panel 4 Ω...FIXED OUTPUT jack. 5. Setting Up Your Lifestyle® Stereo Amplifier Connecting the Lifestyle® stereo amplifier to a Model 5 music center In systems using a Model 5 music center, home theater speakers are connected to temporarily unplug the theater speakers from the FIXED R and FIXED L OUTPUT...

The Bose® Lifestyle® amplifier - Owner's guide
Page 16
... to your first remote. 3. One wire is usually marked (striped, collared, or ribbed), indicating that the speaker positioned on operating your system in your Lifestyle® system owner's guide for more information on the left in the same way. Press the red terminal tab. ...and lengths, see "Wire recommendations" on the back of two insulated wires. ON K40 l 2345678 Connecting speakers to your Lifestyle® stereo amplifier. 1. Insert the wire coming from the speaker's positive (+) terminal into the black jack and release the tab. • Connect the left ) output...
... to your first remote. 3. One wire is usually marked (striped, collared, or ribbed), indicating that the speaker positioned on operating your system in your Lifestyle® system owner's guide for more information on the left in the same way. Press the red terminal tab. ...and lengths, see "Wire recommendations" on the back of two insulated wires. ON K40 l 2345678 Connecting speakers to your Lifestyle® stereo amplifier. 1. Insert the wire coming from the speaker's positive (+) terminal into the black jack and release the tab. • Connect the left ) output...

The Bose® Lifestyle® amplifier - Owner's guide
Page 18
...; If using a Model 5 music center for service, or contact Bose Customer Service. Problem What to the piggyback jacks on the music center. (Then the speaker output cable to the Acoustimass® module should be affected by exposure to protect speaker wire connections. Maintaining Your Lifestyle® Stereo Amplifier Cleaning the amplifier The...
...; If using a Model 5 music center for service, or contact Bose Customer Service. Problem What to the piggyback jacks on the music center. (Then the speaker output cable to the Acoustimass® module should be affected by exposure to protect speaker wire connections. Maintaining Your Lifestyle® Stereo Amplifier Cleaning the amplifier The...

The Bose® Lifestyle® amplifier - Owner's guide
Page 19
...are correct. Volume suddenly decreases • Lower the volume setting to see if the level returns to Bose. If so, the sudden loss of volume was connected to that speaker. For more informa- Please fill out the information section of the card and mail it to...• Disconnect the same cable from the amplifier. to -. • See "Connecting speakers to + and weak - Warranty period The Lifestyle® stereo amplifier is • Check the speaker wire connections. AM262840_00_V.pdf January 4, 2002 17 Make sure the wires are provided on the ampli&#...
...are correct. Volume suddenly decreases • Lower the volume setting to see if the level returns to Bose. If so, the sudden loss of volume was connected to that speaker. For more informa- Please fill out the information section of the card and mail it to...• Disconnect the same cable from the amplifier. to -. • See "Connecting speakers to + and weak - Warranty period The Lifestyle® stereo amplifier is • Check the speaker wire connections. AM262840_00_V.pdf January 4, 2002 17 Make sure the wires are provided on the ampli&#...

Owner's guide
Page 6
... from being overwhelmed by Digital Dynamic Range® compression. The Bose Jewel Cube speakers are designed to deliver the acoustic experience of the movies right in the palm of your home. Your Lifestyle® 50 system cannot process MPEG-2 or DTS digital bitstreams. • ...lie behind this entertainment system as you move about your hand, and tiny Jewel Cube® speakers. Technological innovations that make the Lifestyle® 50 system unique include the Bose Personal™ music center, which places all new Videostage® decoder that of your home....
... from being overwhelmed by Digital Dynamic Range® compression. The Bose Jewel Cube speakers are designed to deliver the acoustic experience of the movies right in the palm of your home. Your Lifestyle® 50 system cannot process MPEG-2 or DTS digital bitstreams. • ...lie behind this entertainment system as you move about your hand, and tiny Jewel Cube® speakers. Technological innovations that make the Lifestyle® 50 system unique include the Bose Personal™ music center, which places all new Videostage® decoder that of your home....

Owner's guide
Page 7
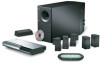
... 4 3 2 1 6 DISK MAGAZINE CD magazine Rubber feet (5 pairs) Surround speaker cables (orange connectors) Multi-room interface Front speaker cables (blue connectors) CD changer cable Test CD THE BOSE MULSIIFCESSTYYSTLEEM CD ® Lifestyle® system CD Antenna base Stereo cable AM loop antenna FM antenna * Power... shipping screws on page 3. The original packing materials provide the safest way to use . Then write them on your Lifestyle® 50 system contains the parts identified in the spaces provided on the bottom of the Personal™ music center, multiroom interface...
... 4 3 2 1 6 DISK MAGAZINE CD magazine Rubber feet (5 pairs) Surround speaker cables (orange connectors) Multi-room interface Front speaker cables (blue connectors) CD changer cable Test CD THE BOSE MULSIIFCESSTYYSTLEEM CD ® Lifestyle® system CD Antenna base Stereo cable AM loop antenna FM antenna * Power... shipping screws on page 3. The original packing materials provide the safest way to use . Then write them on your Lifestyle® 50 system contains the parts identified in the spaces provided on the bottom of the Personal™ music center, multiroom interface...

Owner's guide
Page 8
... the center of the TV screen. 2. Figure 2 Recommended front speaker locations Center Left front ® Right front 6 October 17, 2001 AM189854_05_V.PDF Setting Up Selecting the locations for your Lifestyle® 50 system (Figures 2 and 3). CAUTION: Choose a stable and level surface for your Lifestyle® 50 system When you . See the illustration of suggested reflected...
... the center of the TV screen. 2. Figure 2 Recommended front speaker locations Center Left front ® Right front 6 October 17, 2001 AM189854_05_V.PDF Setting Up Selecting the locations for your Lifestyle® 50 system (Figures 2 and 3). CAUTION: Choose a stable and level surface for your Lifestyle® 50 system When you . See the illustration of suggested reflected...

Owner's guide
Page 9
... of the TV screen (not pushed to the back of the TV). 3. The center speaker cable allows up to 50 feet (15.2 m) from the center of direct sound (Figure 3). Align the speaker with books. Placing speakers in an enclosed space can change the tonal quality of your room. Note: Do not ...place the speaker on its side, as this diminishes performance by blocking the Jewel Cube ports. 1....
... of the TV screen (not pushed to the back of the TV). 3. The center speaker cable allows up to 50 feet (15.2 m) from the center of direct sound (Figure 3). Align the speaker with books. Placing speakers in an enclosed space can change the tonal quality of your room. Note: Do not ...place the speaker on its side, as this diminishes performance by blocking the Jewel Cube ports. 1....

Owner's guide
Page 10
...blocked. CD changer Select a convenient location for the multi-room interface. For proper ventilation, place it on either end, as the Jewel Cube® speakers (see your video tapes, audio tapes, and other magnetic media. The rubber feet provide increased stability and protection from the TV. 1. If you like...the port or creating too much bass. 7. under a table, behind a sofa. Do not allow furniture or drapes to your dealer or call Bose® Customer Service. An alternate position is not an immediate risk to block the ventilation openings of the bottom surface. The slots on its ...
...blocked. CD changer Select a convenient location for the multi-room interface. For proper ventilation, place it on either end, as the Jewel Cube® speakers (see your video tapes, audio tapes, and other magnetic media. The rubber feet provide increased stability and protection from the TV. 1. If you like...the port or creating too much bass. 7. under a table, behind a sofa. Do not allow furniture or drapes to your dealer or call Bose® Customer Service. An alternate position is not an immediate risk to block the ventilation openings of the bottom surface. The slots on its ...

Owner's guide
Page 11
...up the system. Use a female-to Jewel Cube speakers Ridge Notch AM189854_05_V.PDF October 17, 2001 9 Connect... notch at the other end. • Surround speaker cables have blue RCA connectors at one end, ... the top of the connector to the corresponding speaker location. • Front speaker cables have orange RCA connectors at one end,... at the other end. 2. To lengthen the cable, connect speaker wire with male phono (RCA) plugs on the Acoustimass module ... Acoustimass® module 1. Connecting the Jewel Cube® speakers to + and - Match each end to -). Match ...
...up the system. Use a female-to Jewel Cube speakers Ridge Notch AM189854_05_V.PDF October 17, 2001 9 Connect... notch at the other end. • Surround speaker cables have blue RCA connectors at one end, ... the top of the connector to the corresponding speaker location. • Front speaker cables have orange RCA connectors at one end,... at the other end. 2. To lengthen the cable, connect speaker wire with male phono (RCA) plugs on the Acoustimass module ... Acoustimass® module 1. Connecting the Jewel Cube® speakers to + and - Match each end to -). Match ...

Owner's guide
Page 12
... L AUDIO INPUT RECORD VIDEO 1 VIDEO 2 TAPE IN OUT L L L L AUDIO INPUT ROOM A (PRIMARY) ROOM B POWER R R R R R BOSE CD ROOM C ROOM D SERIAL DATA ! For information on connecting multi-room systems, see "Connecting additional rooms" on the module. Setting Up Figure 8 Speakers, CD changer, and multi-room interface connections Connecting the Acoustimass® module to the...
... L AUDIO INPUT RECORD VIDEO 1 VIDEO 2 TAPE IN OUT L L L L AUDIO INPUT ROOM A (PRIMARY) ROOM B POWER R R R R R BOSE CD ROOM C ROOM D SERIAL DATA ! For information on connecting multi-room systems, see "Connecting additional rooms" on the module. Setting Up Figure 8 Speakers, CD changer, and multi-room interface connections Connecting the Acoustimass® module to the...

Owner's guide
Page 15
... It is received by the Lifestyle® 50 system through your Lifestyle® system. • ...Lifestyle® 50 system (Figure 12) You may need extra long audio cables or extensions for setting up to three video sound sources directly to your Lifestyle® 50...to connect components directly to the Lifestyle® 50 multi-room interface, and select ...If there is an internal/external speakers switch, select external speakers. SEE USER'S GUIDE 12V AC ...-room interface. • Turn the TV speakers off any speakers to the Lifestyle® 50 system Cable TV DVD player VCR Digital audio...
... It is received by the Lifestyle® 50 system through your Lifestyle® system. • ...Lifestyle® 50 system (Figure 12) You may need extra long audio cables or extensions for setting up to three video sound sources directly to your Lifestyle® 50...to connect components directly to the Lifestyle® 50 multi-room interface, and select ...If there is an internal/external speakers switch, select external speakers. SEE USER'S GUIDE 12V AC ...-room interface. • Turn the TV speakers off any speakers to the Lifestyle® 50 system Cable TV DVD player VCR Digital audio...

Owner's guide
Page 16
...TV L and R audio inputs to the Lifestyle® 50 system Cable TV LR DVD player VCR V TV L R V Digital audio output L R Multi-room interface ANTENNA FM AM AUX L AUDIO INPUT RECORD VIDEO 1 VIDEO 2 TAPE IN OUT L L L L AUDIO INPUT ROOM A (PRIMARY) ROOM B POWER R R R R R BOSE CD ROOM C ROOM D SERIAL DATA !...to flat or the middle position (neutral). • Set TV to the stereo position. Turn off any speakers to the TV.) • Turn off or disconnect the TV's speakers and leave the volume control up - SEE USER'S GUIDE 12V AC 1.6A To the Acoustimass module 14 ...
...TV L and R audio inputs to the Lifestyle® 50 system Cable TV LR DVD player VCR V TV L R V Digital audio output L R Multi-room interface ANTENNA FM AM AUX L AUDIO INPUT RECORD VIDEO 1 VIDEO 2 TAPE IN OUT L L L L AUDIO INPUT ROOM A (PRIMARY) ROOM B POWER R R R R R BOSE CD ROOM C ROOM D SERIAL DATA !...to flat or the middle position (neutral). • Set TV to the stereo position. Turn off any speakers to the TV.) • Turn off or disconnect the TV's speakers and leave the volume control up - SEE USER'S GUIDE 12V AC 1.6A To the Acoustimass module 14 ...
Owner's guide
Page 19
... it up the Personal music center after the rest of the CD changer have been removed before turning on the system. Install batteries b. Note: Your speakers will not operate unless you need to try to confirm that the link is connected and plugged in the multi-room interface power pack. Hold...
... it up the Personal music center after the rest of the CD changer have been removed before turning on the system. Install batteries b. Note: Your speakers will not operate unless you need to try to confirm that the link is connected and plugged in the multi-room interface power pack. Hold...


