Owner's guide
Page 3
...future reference. 3. Do not use this product. 14. A grounding-type plug has two blades and a third grounding prong. Protect the power cord from the wall outlet before using this is connected. • Consult the dealer or an experienced radio/TV technician for safety related markings. ... wet basement, near water or moisture - A polarized plug has two blades with the cart, stand, tripod, bracket or table specified by Bose® Corporation. Refer all components before cleaning. 7. Clean only with the apparatus. Do not install near you to which can radiate radio ...
...future reference. 3. Do not use this product. 14. A grounding-type plug has two blades and a third grounding prong. Protect the power cord from the wall outlet before using this is connected. • Consult the dealer or an experienced radio/TV technician for safety related markings. ... wet basement, near water or moisture - A polarized plug has two blades with the cart, stand, tripod, bracket or table specified by Bose® Corporation. Refer all components before cleaning. 7. Clean only with the apparatus. Do not install near you to which can radiate radio ...
Owner's guide
Page 7
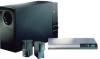
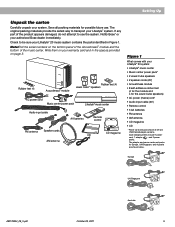
... Bose dealer immediately. Save all packing materials for Europe, UK/Singapore, and Australia are USA/Canada/Japan versions. The adapter and power cords and packs for possible future use the system. If any part of the music center. Europe UK/Singapore AM178934_09_V.pdf October 29, 2001 Australia 5 Check to be sure your Lifestyle® 20...
... Bose dealer immediately. Save all packing materials for Europe, UK/Singapore, and Australia are USA/Canada/Japan versions. The adapter and power cords and packs for possible future use the system. If any part of the music center. Europe UK/Singapore AM178934_09_V.pdf October 29, 2001 Australia 5 Check to be sure your Lifestyle® 20...
Owner's guide
Page 9
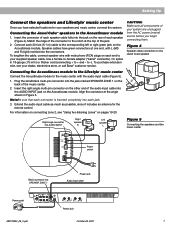
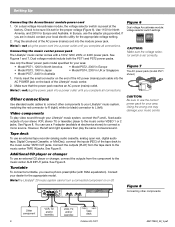
... the AC power (mains) source before you have green connectors at the angle shown in 18-gauge (.75 mm2) or thicker cord (connecting +... to the corresponding left ) and R (right) molded into the AUDIO INPUT jack on pages 19-20. Right-angle ...Power jack Audio input cable Power pack L TAPE IN RL R TAPE OUT Power jack AM178934_09_V.pdf October 29, 2001 7 Connecting the Jewel CubeTM speakers to your dealer, electronics store, or call Bose...Connecting the Acoustimass module to the Lifestyle® music center Connect the Acoustimass module to the music center ...
... the AC power (mains) source before you have green connectors at the angle shown in 18-gauge (.75 mm2) or thicker cord (connecting +... to the corresponding left ) and R (right) molded into the AUDIO INPUT jack on pages 19-20. Right-angle ...Power jack Audio input cable Power pack L TAPE IN RL R TAPE OUT Power jack AM178934_09_V.pdf October 29, 2001 7 Connecting the Jewel CubeTM speakers to your dealer, electronics store, or call Bose...Connecting the Acoustimass module to the Lifestyle® music center Connect the Acoustimass module to the music center ...
Owner's guide
Page 10
...Bose® power pack model specified for the proper voltage (Figure 6). You can use the adapter plug provided. Connect the outputs (PLAY) from the component to the music center TAPE IN jacks. Note:The Lifestyle® 20 music system cannot turn a connected component on the back of the AC power (mains) cord... into the AC POWER jack on or off. English Setting Up Connecting the Acoustimass® module power cord 1. If you complete all ...
...Bose® power pack model specified for the proper voltage (Figure 6). You can use the adapter plug provided. Connect the outputs (PLAY) from the component to the music center TAPE IN jacks. Note:The Lifestyle® 20 music system cannot turn a connected component on the back of the AC power (mains) cord... into the AC POWER jack on or off. English Setting Up Connecting the Acoustimass® module power cord 1. If you complete all ...
Owner's guide
Page 13
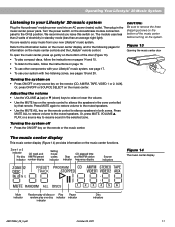
...VOLUME v (up gently on page 16. • To use other components with your Lifestyle® music system, see page 17. • To use your system with two listening zones, see pages 19 and 20. Turning the system off • Press the ON/OFF key on the music center ...the remote or the music center. English Operating Your Lifestyle® 20 Music System Listening to your new Lifestyle® music system. You are ready to enjoy music from your Lifestyle® 20 music system Plug the Acoustimass® module power cord into an AC power (mains) outlet. Figure 13 Opening the music ...
...VOLUME v (up gently on page 16. • To use other components with your Lifestyle® music system, see page 17. • To use your system with two listening zones, see pages 19 and 20. Turning the system off • Press the ON/OFF key on the music center ...the remote or the music center. English Operating Your Lifestyle® 20 Music System Listening to your new Lifestyle® music system. You are ready to enjoy music from your Lifestyle® 20 music system Plug the Acoustimass® module power cord into an AC power (mains) outlet. Figure 13 Opening the music ...
Owner's guide
Page 24
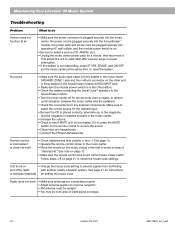
.... • Check the connections for a minute, then reconnect it is plugged securely into the Acoustimass® module, the power pack and power cord are connected properly. • Adjust antenna position to reset the system. No sound • Make sure the audio input ... external components. This allows the unit to reset itself , with another nearby Lifestyle® system. Radio does not work • Check batteries and their polarity (+ and -). English Maintaining Your Lifestyle® 20 Music System Troubleshooting Problem System does not function at the same time, to ...
.... • Check the connections for a minute, then reconnect it is plugged securely into the Acoustimass® module, the power pack and power cord are connected properly. • Adjust antenna position to reset the system. No sound • Make sure the audio input ... external components. This allows the unit to reset itself , with another nearby Lifestyle® system. Radio does not work • Check batteries and their polarity (+ and -). English Maintaining Your Lifestyle® 20 Music System Troubleshooting Problem System does not function at the same time, to ...
Owner's guide
Page 28
... 5, 14, 15 cleaning 24 compact disc 11, 14 connections 7-9, 22-24 controls 2, 6, 12, 13, 18, 21, 25 customer service 7, 23 D display 10, 11, 14-17, 20-22 dual voltage 5, 7, 8, 10, 25 E EJECT button 15 ERASE 10, 13, 16 error message 15, 22 F FM antenna 5, 9, 25 H headphones 17, 22 house codes 10...-25 MUTE 11, 12, 22 MUTE ALL 11, 12 N NEXT DISC 12, 15 O ON/OFF 12, 20 26 P PAUSE 12, 15 PHONES jack 17 placement 6, 18 PLAY 8, 11, 12, 14, 15, 22 port 6 power cord 5, 8, 11, 22 power pack 5, 8, 10, 11, 22, 25 preset radio station 11, 12, 13, 16 R radio 2, 4, 11-13, 16...
... 5, 14, 15 cleaning 24 compact disc 11, 14 connections 7-9, 22-24 controls 2, 6, 12, 13, 18, 21, 25 customer service 7, 23 D display 10, 11, 14-17, 20-22 dual voltage 5, 7, 8, 10, 25 E EJECT button 15 ERASE 10, 13, 16 error message 15, 22 F FM antenna 5, 9, 25 H headphones 17, 22 house codes 10...-25 MUTE 11, 12, 22 MUTE ALL 11, 12 N NEXT DISC 12, 15 O ON/OFF 12, 20 26 P PAUSE 12, 15 PHONES jack 17 placement 6, 18 PLAY 8, 11, 12, 14, 15, 22 port 6 power cord 5, 8, 11, 22 power pack 5, 8, 10, 11, 22, 25 preset radio station 11, 12, 13, 16 R radio 2, 4, 11-13, 16...


