Owner's guide
Page 2
... except properly qualified service personnel. Additional safety information See the additional information on the back panel and bottom of your Lifestyle® music center and the bottom panel of your Acoustimass® module: The lightning flash with this owner's guide. These CAUTION marks may result in moving vehicles. Save your system properly, and...
... except properly qualified service personnel. Additional safety information See the additional information on the back panel and bottom of your Lifestyle® music center and the bottom panel of your Acoustimass® module: The lightning flash with this owner's guide. These CAUTION marks may result in moving vehicles. Save your system properly, and...
Owner's guide
Page 5
... center serial number Acoustimass module serial number Dealer name Dealer phone Purchase date We suggest you begin ...4 Unpack the carton ...5 Select the locations for your Lifestyle® 20 music system 6 Connect the speakers and Lifestyle® music center 7 Other connections ...8 Connect the antennas 9 Set ...spacing on the bottom of the music center and the bottom panel of your Lifestyle® 20 music system 24 Product Information Technical information 25 Accessories ...25 Index ...26 Bose® Corporation inside back cover Contents For your sales slip and warranty card ...
... center serial number Acoustimass module serial number Dealer name Dealer phone Purchase date We suggest you begin ...4 Unpack the carton ...5 Select the locations for your Lifestyle® 20 music system 6 Connect the speakers and Lifestyle® music center 7 Other connections ...8 Connect the antennas 9 Set ...spacing on the bottom of the music center and the bottom panel of your Lifestyle® 20 music system 24 Product Information Technical information 25 Accessories ...25 Index ...26 Bose® Corporation inside back cover Contents For your sales slip and warranty card ...
Owner's guide
Page 6
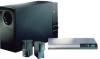
... research. Your system includes: • A Lifestyle® music center with built-in AM/FM radio and six-disc CD changer • Powered Acoustimass speakers consisting of two Jewel Cube speakers and a hide-away Acoustimass module • An easy-to superbly reproduced sound.... These, and numerous other innovations, bring you the Lifestyle® 20 music system, offering superb sound, elegance, technology, and simplicity for purchasing the Bose® Lifestyle® 20 music system. To create...
... research. Your system includes: • A Lifestyle® music center with built-in AM/FM radio and six-disc CD changer • Powered Acoustimass speakers consisting of two Jewel Cube speakers and a hide-away Acoustimass module • An easy-to superbly reproduced sound.... These, and numerous other innovations, bring you the Lifestyle® 20 music system, offering superb sound, elegance, technology, and simplicity for purchasing the Bose® Lifestyle® 20 music system. To create...
Owner's guide
Page 7
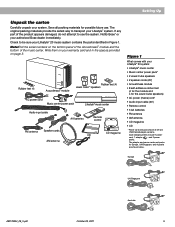
... cords AM antenna THE BOSE SPECIAL EDITION LIFESTYLE MUSIC SYSTEM CD ® CD ® CD magazine Figure 1 What comes with your warranty card and in Figure 1. Write them on your Lifestyle® 20 system: • Lifestyle® music center • Music center power pack* • 2 Jewel Cube speakers • 2 speaker cords (20') • Acoustimass module • 8 self-adhesive...
... cords AM antenna THE BOSE SPECIAL EDITION LIFESTYLE MUSIC SYSTEM CD ® CD ® CD magazine Figure 1 What comes with your warranty card and in Figure 1. Write them on your Lifestyle® 20 system: • Lifestyle® music center • Music center power pack* • 2 Jewel Cube speakers • 2 speaker cords (20') • Acoustimass module • 8 self-adhesive...

Owner's guide
Page 8
...block the ventilation openings on either end. 6. Once you have selected a position for the Acoustimass module, place the four selfadhesive rubber feet near the front of the Acoustimass module. Note:To avoid interference with the placement and orientation of the audio input cable, speaker ... Select the locations for your Lifestyle® 20 music system When you place your speakers according to the guidelines below, a combination of your listening room, see "Fine-tuning your system" on page 18. To adjust your Jewel Cube speakers. Acoustimass module Follow these guidelines to select ...
...block the ventilation openings on either end. 6. Once you have selected a position for the Acoustimass module, place the four selfadhesive rubber feet near the front of the Acoustimass module. Note:To avoid interference with the placement and orientation of the audio input cable, speaker ... Select the locations for your Lifestyle® 20 music system When you place your speakers according to the guidelines below, a combination of your listening room, see "Fine-tuning your system" on page 18. To adjust your Jewel Cube speakers. Acoustimass module Follow these guidelines to select ...
Owner's guide
Page 9
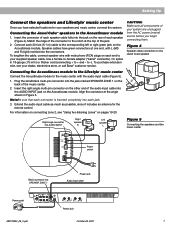
...the Acoustimass module to + and - For information on connecting zone 2, see your supplied speaker cable. English Setting Up Connect the speakers and Lifestyle® music center Once you begin connecting them. Plug the small black multi-pin connector into the jack on pages 19-20. Note...:Be sure that each speaker (Figure 4). CAUTION: Make sure all components of each connector is inserted completely into the connectors. Align the connector at the top of the connector to your dealer, electronics store, or call Bose® customer ...
...the Acoustimass module to + and - For information on connecting zone 2, see your supplied speaker cable. English Setting Up Connect the speakers and Lifestyle® music center Once you begin connecting them. Plug the small black multi-pin connector into the jack on pages 19-20. Note...:Be sure that each speaker (Figure 4). CAUTION: Make sure all components of each connector is inserted completely into the connectors. Align the connector at the top of the connector to your dealer, electronics store, or call Bose® customer ...
Owner's guide
Page 10
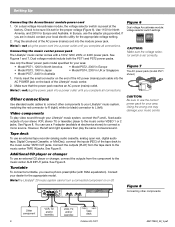
... need a phono preamplifier (with a 100V, 120V, 230V, or 240V power pack. Use only the Bose® power pack model specified for your Lifestyle® music system, matching the red connector to R (right), white (or black) connector to connect...Acoustimass module: voltage selector switch settings 230 V 115 V CAUTION: Make sure the voltage selector switch is preset at electronics stores) to the music center TAPE OUT jacks. Figure 8 Connecting other components to be sure it is set correctly. Plug the small end of the Lifestyle® music center. 2. Note:The Lifestyle® 20...
... need a phono preamplifier (with a 100V, 120V, 230V, or 240V power pack. Use only the Bose® power pack model specified for your Lifestyle® music system, matching the red connector to R (right), white (or black) connector to connect...Acoustimass module: voltage selector switch settings 230 V 115 V CAUTION: Make sure the voltage selector switch is preset at electronics stores) to the music center TAPE OUT jacks. Figure 8 Connecting other components to be sure it is set correctly. Plug the small end of the Lifestyle® music center. 2. Note:The Lifestyle® 20...

Owner's guide
Page 11
...prevents interference with the music center antenna connections. Plug the FM antenna connector into the AM ANTENNA jack on the back of your Lifestyle® music center provides connections for AM and FM antennas (Figure 9). Follow all safety instructions. Move the antenna as far as...the music center and at least four feet (1.2 m) from the Acoustimass® module. To install an outdoor antenna, consult a qualified installer. Spread out the antenna arms. Experiment with both the placement and the angle of the Lifestyle® music center. 2. Figure 10 The FM antenna Figure ...
...prevents interference with the music center antenna connections. Plug the FM antenna connector into the AM ANTENNA jack on the back of your Lifestyle® music center provides connections for AM and FM antennas (Figure 9). Follow all safety instructions. Move the antenna as far as...the music center and at least four feet (1.2 m) from the Acoustimass® module. To install an outdoor antenna, consult a qualified installer. Spread out the antenna arms. Experiment with both the placement and the angle of the Lifestyle® music center. 2. Figure 10 The FM antenna Figure ...
Owner's guide
Page 13
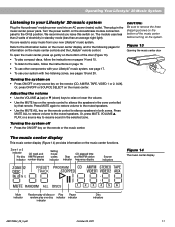
...Lifestyle® 20 music system Plug the Acoustimass® module power cord into an AC power (mains) outlet. Turn the power switch on the music center controls and the Lifestyle® remote control. Refer to the information below on the music center display, and to the following pages for information on the Acoustimass module...source key to resume sound in the music center power pack. English Operating Your Lifestyle® 20 Music System Listening to your system with your Lifestyle® music system, see pages 19 and 20. You are ready to the muted speakers. Or, press ON/OFF or ...
...Lifestyle® 20 music system Plug the Acoustimass® module power cord into an AC power (mains) outlet. Turn the power switch on the music center controls and the Lifestyle® remote control. Refer to the information below on the music center display, and to the following pages for information on the Acoustimass module...source key to resume sound in the music center power pack. English Operating Your Lifestyle® 20 Music System Listening to your system with your Lifestyle® music system, see pages 19 and 20. You are ready to the muted speakers. Or, press ON/OFF or ...
Owner's guide
Page 19
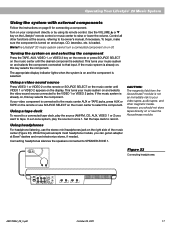
... tapes, and other functions at Bose® dealers and most headphone models, you can get an adapter at the source, referring to tape. However, you want to its remote control. CAUTION: The magnetic field from the Acoustimass® module is selected. Connecting headphones silences the...mini headphones jack on and a tape, CD, laserdisc, etc. Turn on page 8 for connecting a component. English Operating Your Lifestyle® 20 Music System Using the system with external components Follow the instructions on your component directly or by using its owner's manual, if necessary...
... tapes, and other functions at Bose® dealers and most headphone models, you can get an adapter at the source, referring to tape. However, you want to its remote control. CAUTION: The magnetic field from the Acoustimass® module is selected. Connecting headphones silences the...mini headphones jack on and a tape, CD, laserdisc, etc. Turn on page 8 for connecting a component. English Operating Your Lifestyle® 20 Music System Using the system with external components Follow the instructions on your component directly or by using its owner's manual, if necessary...
Owner's guide
Page 20
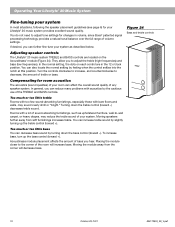
... -) decreases treble sound. Figure 24 Bass and treble controls Adjusting speaker controls The Lifestyle® 20 music system TREBLE and BASS controls are located on each control are in volume, since Bose® patented signal processing technology provides a natural tonal balance over the full range of...wall-to adjust tone settings for changes in the 12 o'clock ® position. They allow you can further fine-tune your system. Acoustimass module placement affects the amount of volume settings. You do not need to -wall carpet, or heavy drapes, may sound overly shrill or ...
... -) decreases treble sound. Figure 24 Bass and treble controls Adjusting speaker controls The Lifestyle® 20 music system TREBLE and BASS controls are located on each control are in volume, since Bose® patented signal processing technology provides a natural tonal balance over the full range of...wall-to adjust tone settings for changes in the 12 o'clock ® position. They allow you can further fine-tune your system. Acoustimass module placement affects the amount of volume settings. You do not need to -wall carpet, or heavy drapes, may sound overly shrill or ...
Owner's guide
Page 24
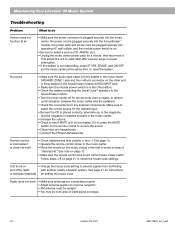
...music center SPEAKER ZONE 1 jack and the multi-pin connector on the other end is firmly seated in the Acoustimass module AUDIO INPUT jack. • Make sure the module power switch is in the ON position. • Check the cables connecting the Jewel CubeTM speakers to the... unmute the sound. • Disconnect any external components. This allows the unit to reset itself , with another nearby Lifestyle® system. English Maintaining Your Lifestyle® 20 Music System Troubleshooting Problem System does not function at the same time, to reset the system. Make sure to select ...
...music center SPEAKER ZONE 1 jack and the multi-pin connector on the other end is firmly seated in the Acoustimass module AUDIO INPUT jack. • Make sure the module power switch is in the ON position. • Check the cables connecting the Jewel CubeTM speakers to the... unmute the sound. • Disconnect any external components. This allows the unit to reset itself , with another nearby Lifestyle® system. English Maintaining Your Lifestyle® 20 Music System Troubleshooting Problem System does not function at the same time, to reset the system. Make sure to select ...
Owner's guide
Page 27
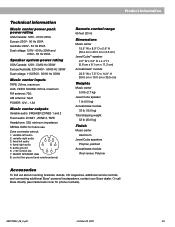
...20 m) Dimensions Music center 15.5" W x 8.0" D x 2.6" H (39.4 cm x 20.3 cm x 6.6 cm) Jewel CubeTM speaker 2.2" W x 3.2" D x 4.4" H (5.6 cm x 8.1 cm x 11.2 cm) Acoustimass® module 23.3" W x 7.5" D x 14.0" H (59.0 cm x 19.0 cm x 35.5 cm) Weights Music center 5.9 lb (2.7 kg) Jewel Cube speaker 1 lb (0.5 kg) Acoustimass module... speakers Polymer, painted Acoustimass module Vinyl veneer, Polymer Accessories To find out about mounting brackets, stands, CD magazines, additional remote controls, and connecting additional Bose® powered loudspeakers, contact your Bose dealer. English Technical...
...20 m) Dimensions Music center 15.5" W x 8.0" D x 2.6" H (39.4 cm x 20.3 cm x 6.6 cm) Jewel CubeTM speaker 2.2" W x 3.2" D x 4.4" H (5.6 cm x 8.1 cm x 11.2 cm) Acoustimass® module 23.3" W x 7.5" D x 14.0" H (59.0 cm x 19.0 cm x 35.5 cm) Weights Music center 5.9 lb (2.7 kg) Jewel Cube speaker 1 lb (0.5 kg) Acoustimass module... speakers Polymer, painted Acoustimass module Vinyl veneer, Polymer Accessories To find out about mounting brackets, stands, CD magazines, additional remote controls, and connecting additional Bose® powered loudspeakers, contact your Bose dealer. English Technical...
Owner's guide
Page 28
English Index A accessories 25 Acoustimass® module 2-8, 11, 18, 22 adapter plug 8 AM antenna 5, 9, 22, 25 AM/FM 4, 11, 12, 16, 17, 22... 11, 14 connections 7-9, 22-24 controls 2, 6, 12, 13, 18, 21, 25 customer service 7, 23 D display 10, 11, 14-17, 20-22 dual voltage 5, 7, 8, 10, 25 E EJECT button 15 ERASE 10, 13, 16 error message 15, 22 F FM antenna 5, 9, 25 ..., 22 house codes 10, 21 J Jewel CubeTM speakers 5, 6, 7, 22, 25 L laserdisc player 4, 8, 17 listening zone 4, 7, 12, 16, 19, 20 M magazine 5, 12, 14, 15, 22 music center 2-17, 12, 19-25 MUTE 11, 12, 22 MUTE ALL 11, 12 N NEXT DISC 12, ...
English Index A accessories 25 Acoustimass® module 2-8, 11, 18, 22 adapter plug 8 AM antenna 5, 9, 22, 25 AM/FM 4, 11, 12, 16, 17, 22... 11, 14 connections 7-9, 22-24 controls 2, 6, 12, 13, 18, 21, 25 customer service 7, 23 D display 10, 11, 14-17, 20-22 dual voltage 5, 7, 8, 10, 25 E EJECT button 15 ERASE 10, 13, 16 error message 15, 22 F FM antenna 5, 9, 25 ..., 22 house codes 10, 21 J Jewel CubeTM speakers 5, 6, 7, 22, 25 L laserdisc player 4, 8, 17 listening zone 4, 7, 12, 16, 19, 20 M magazine 5, 12, 14, 15, 22 music center 2-17, 12, 19-25 MUTE 11, 12, 22 MUTE ALL 11, 12 N NEXT DISC 12, ...


