
Owner's guide
Page 5
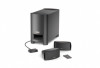
.... Rubber feet, large Acoustimass module 120V power cord Speakers Rubber feet, small Interface module Extra attachment strip © Remote control Stereo cable Speaker cable 5 AM267190_00_V_pdf • July 24, 2002 WARNING: To avoid danger of suffocation, keep the plastic bags out of the reach of children. Notify Bose or your system as needed. If any part of...
.... Rubber feet, large Acoustimass module 120V power cord Speakers Rubber feet, small Interface module Extra attachment strip © Remote control Stereo cable Speaker cable 5 AM267190_00_V_pdf • July 24, 2002 WARNING: To avoid danger of suffocation, keep the plastic bags out of the reach of children. Notify Bose or your system as needed. If any part of...
Owner's guide
Page 6
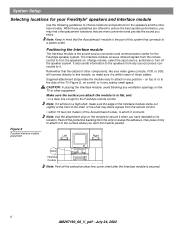
...to attach in mind that the Acoustimass® module is the sound-source connection and communication center for the FreeStyle speaker system. CAUTION: In placing the Interface module, avoid blocking any position - Remember that are more convenient and provide the sound you may block signals...8226; within reach of those cables. Make sure the surface you have decided on its location. Note: Keep in any ventilation openings on the TV or other components, like your FreeStyle® speakers and Interface module Use the following guidelines to the speakers from any nearby small space....
...to attach in mind that the Acoustimass® module is the sound-source connection and communication center for the FreeStyle speaker system. CAUTION: In placing the Interface module, avoid blocking any position - Remember that are more convenient and provide the sound you may block signals...8226; within reach of those cables. Make sure the surface you have decided on its location. Note: Keep in any ventilation openings on the TV or other components, like your FreeStyle® speakers and Interface module Use the following guidelines to the speakers from any nearby small space....
Owner's guide
Page 10
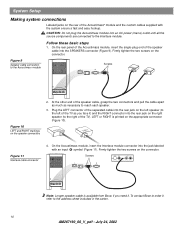
.... LEFT or RIGHT is available from Bose, if you face it , refer to order it ) and the RIGHT connector into the SPEAKERS connector (Figure 9). Firmly tighten the two screws on the connector. Screws SPEAKERS SPEAKERS Note: Longer speaker cable is printed on the appropriate connector (... end of the speaker cable into the rear jack on the left speaker (to the left of the separated cable into the rear jack on the right speaker (to the Interface module. Figure 9 Speaker cable connection to reach each speaker. 3. On the Acoustimass module, insert the Interface module connector into an...
.... LEFT or RIGHT is available from Bose, if you face it , refer to order it ) and the RIGHT connector into the SPEAKERS connector (Figure 9). Firmly tighten the two screws on the connector. Screws SPEAKERS SPEAKERS Note: Longer speaker cable is printed on the appropriate connector (... end of the speaker cable into the rear jack on the left speaker (to the left of the separated cable into the rear jack on the right speaker (to the Interface module. Figure 9 Speaker cable connection to reach each speaker. 3. On the Acoustimass module, insert the Interface module connector into an...
Owner's guide
Page 11
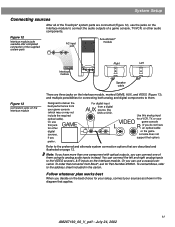
... Bose, refer to them using its analog audio inputs instead. Figure 12 Interface module jacks available after completed connection of the supplied system parts AC input jack Acoustimass® module Figure 13 Connection jacks on the Interface module Interface module Right Left SPEAKERS RIGHT LEFT Speaker cable ...from a digital source, like DSS or DVD. Follow whatever plan works best When you decide on the Interface module. System Setup Connecting sources After all of the FreeStyle® system parts are connected (Figure 12), use this analog input for a VCR, TV, or...
... Bose, refer to them using its analog audio inputs instead. Figure 12 Interface module jacks available after completed connection of the supplied system parts AC input jack Acoustimass® module Figure 13 Connection jacks on the Interface module Interface module Right Left SPEAKERS RIGHT LEFT Speaker cable ...from a digital source, like DSS or DVD. Follow whatever plan works best When you decide on the Interface module. System Setup Connecting sources After all of the FreeStyle® system parts are connected (Figure 12), use this analog input for a VCR, TV, or...
Owner's guide
Page 12
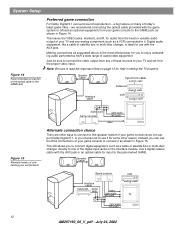
...some other ways to connect to this speaker system if your game console to use it as shown in setting the TV properly. Speaker . Just be sure to connect the video output from cable audio & video Cable/sat audio & video Interface cable VCR audio & video TV digital ... and R, for use the RCA connections of your game console to your components Alternate connection choice There are other reason. Speaker cable Game console Interface cable Cable/sat digital audio or video right audio left audio VCR audio & video TV right audio left audio video Figure 15 Alternate...
...some other ways to connect to this speaker system if your game console to use it as shown in setting the TV properly. Speaker . Just be sure to connect the video output from cable audio & video Cable/sat audio & video Interface cable VCR audio & video TV digital ... and R, for use the RCA connections of your game console to your components Alternate connection choice There are other reason. Speaker cable Game console Interface cable Cable/sat digital audio or video right audio left audio VCR audio & video TV right audio left audio video Figure 15 Alternate...
Owner's guide
Page 13
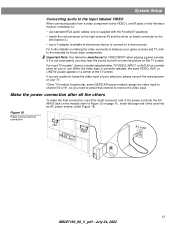
... to the input labeled VIDEO When connecting audio from a video component to the VIDEO L and R jacks on the Interface module, remember to: • use standard RCA audio cables (one is supplied with the FreeStyle® speakers) • match the red connector to the right channel (R) and the white (or black) connector to the left...
... to the input labeled VIDEO When connecting audio from a video component to the VIDEO L and R jacks on the Interface module, remember to: • use standard RCA audio cables (one is supplied with the FreeStyle® speakers) • match the red connector to the right channel (R) and the white (or black) connector to the left...
Owner's guide
Page 17
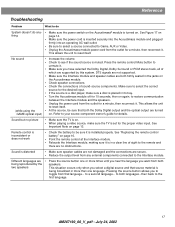
..., making sure it . Remote control is installed properly. DTS signals are not supported. • Make sure the Interface module and speaker cables are supported by the speakers. Sound but no obstructions. Press the remote control Mute button to reset itself . This allows the unit to unmute it. • Make sure ...you to Game, AUX or Video. • Unplug the Acoustimass module power cord from that source material is distorted • Make sure speaker cables are not damaged and the connections are • Press the source button one or more than one language.
..., making sure it . Remote control is installed properly. DTS signals are not supported. • Make sure the Interface module and speaker cables are supported by the speakers. Sound but no obstructions. Press the remote control Mute button to reset itself . This allows the unit to unmute it. • Make sure ...you to Game, AUX or Video. • Unplug the Acoustimass module power cord from that source material is distorted • Make sure speaker cables are not damaged and the connections are • Press the source button one or more than one language.


