Owner's guide
Page 5
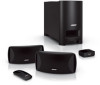
... Carefully unpack your authorized Bose dealer immediately. Notify Bose or your CineMate® system. As you identify them, you may want to the name of the Acoustimass® module. For Bose® contact information, ...; Cinemate series II speakers OR ❏ CineMate GS series II Gemstone® speakers ❏ Small rubber feet ❏ Acoustimass module ❏ Large rubber feet ❏ CineMate series II remote OR ❏ Interface module ❏ CineMate GS series II remote ❏ Speaker cable ❏ Power cord ❏ Stereo cable ❏ Optical cable ...
... Carefully unpack your authorized Bose dealer immediately. Notify Bose or your CineMate® system. As you identify them, you may want to the name of the Acoustimass® module. For Bose® contact information, ...; Cinemate series II speakers OR ❏ CineMate GS series II Gemstone® speakers ❏ Small rubber feet ❏ Acoustimass module ❏ Large rubber feet ❏ CineMate series II remote OR ❏ Interface module ❏ CineMate GS series II remote ❏ Speaker cable ❏ Power cord ❏ Stereo cable ❏ Optical cable ...
Owner's guide
Page 7
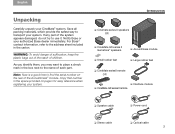
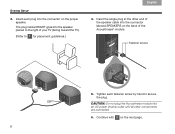
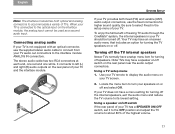
...or video tapes to prevent magnetic damage to them • within 3 feet (1 meter) of the TV screen • near the front edge of the cable from the interface module and an AC (mains) power outlet • with the front port aimed out from the TV to prevent interference with the...231;naois Nederlands Svenska 1. CAUTION: Do not block ventilation openings on a surface that connects to face the listening area. 3. On the bottom of each speaker, attach one set of the Acoustimass® module, attach the large rubber feet. Place the Acoustimass module: • at the same end of the room...
...or video tapes to prevent magnetic damage to them • within 3 feet (1 meter) of the TV screen • near the front edge of the cable from the interface module and an AC (mains) power outlet • with the front port aimed out from the TV to prevent interference with the...231;naois Nederlands Svenska 1. CAUTION: Do not block ventilation openings on a surface that connects to face the listening area. 3. On the bottom of each speaker, attach one set of the Acoustimass® module, attach the large rubber feet. Place the Acoustimass module: • at the same end of the room...
Owner's guide
Page 9
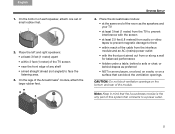
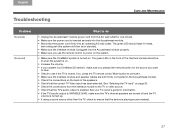
Separate the two plugs so each one end of the speaker cable. Acoustimass module 7 Speaker cable OR CineMate® GS series II Gemstone® speakers CineMate series II speakers 2. Notice the two plugs at one reaches a speaker. English DEsepuatsñcohl FItralniaçnaois Nederlands Svenska SYSTEM SETUP 2 Connecting the speakers to the Acoustimass® module What you need to use: 1.
Separate the two plugs so each one end of the speaker cable. Acoustimass module 7 Speaker cable OR CineMate® GS series II Gemstone® speakers CineMate series II speakers 2. Notice the two plugs at one reaches a speaker. English DEsepuatsñcohl FItralniaçnaois Nederlands Svenska SYSTEM SETUP 2 Connecting the speakers to the Acoustimass® module What you need to use: 1.
Owner's guide
Page 10
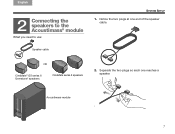
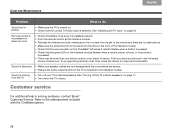
...of your TV (facing toward the TV). (Refer to secure the plug. Fastener screws 5. Continue with 3 on the back of the speaker cable into the connector on the proper speaker. Insert the single plug at the other components are connected. 6. CAUTION: Do not plug the Acoustimass module into an AC power (... end of the Acoustimass® module. Insert each fastener screw by hand to 1 for placement guidelines.) 4. Tighten each plug into the connector labeled SPEAKERS on the next page. 8 Svenska Nederlands FItralniaçnaois DEsepuatsñcohl English SYSTEM SETUP 3.
...of your TV (facing toward the TV). (Refer to secure the plug. Fastener screws 5. Continue with 3 on the back of the speaker cable into the connector on the proper speaker. Insert the single plug at the other components are connected. 6. CAUTION: Do not plug the Acoustimass module into an AC power (... end of the Acoustimass® module. Insert each fastener screw by hand to 1 for placement guidelines.) 4. Tighten each plug into the connector labeled SPEAKERS on the next page. 8 Svenska Nederlands FItralniaçnaois DEsepuatsñcohl English SYSTEM SETUP 3.
Owner's guide
Page 13
... near the audio output connectors. It connects to left (L) and right (R) audio outputs on the rear panel of hearing TV audio through the CineMate® system, the internal speakers in the setup menu of TVs. Be sure to select Fixed in your TV is not equipped with an optical connector, use the...turn your TV audio out connectors to the interface module ANALOG IN connectors. The stereo audio cable has two RCA connectors at each end, one red and one white. Turning off the TV internal speakers Newer TVs normally have an onscreen audio menu that includes an option for turning off and select...
... near the audio output connectors. It connects to left (L) and right (R) audio outputs on the rear panel of hearing TV audio through the CineMate® system, the internal speakers in the setup menu of TVs. Be sure to select Fixed in your TV is not equipped with an optical connector, use the...turn your TV audio out connectors to the interface module ANALOG IN connectors. The stereo audio cable has two RCA connectors at each end, one red and one white. Turning off the TV internal speakers Newer TVs normally have an onscreen audio menu that includes an option for turning off and select...
Owner's guide
Page 29
... remote control Mute button to unmute it. • Make sure the interface module and speaker cables are turned off and the TV volume is turned up. • If using a sound...to power on the system. • Make sure the CineMate® system is turned on. See your system is a CineMate GS series II, make sure the TV's internal speakers are both firmly connected to see if the TV is ...ensure that the correct TV Video input has been selected. The green LED on the front of the speakers. • Check that the device is inserted securely into the Acoustimass module. • Reconnect the ...
... remote control Mute button to unmute it. • Make sure the interface module and speaker cables are turned off and the TV volume is turned up. • If using a sound...to power on the system. • Make sure the CineMate® system is turned on. See your system is a CineMate GS series II, make sure the TV's internal speakers are both firmly connected to see if the TV is ...ensure that the correct TV Video input has been selected. The green LED on the front of the speakers. • Check that the device is inserted securely into the Acoustimass module. • Reconnect the ...
Owner's guide
Page 30
...device and brand in the Universal Device Codes book. Sound is distorted • Make sure speaker cables are not damaged and the connections are no picture • Make sure the TV is ...Find your brand of the interface module. • Check that the source button on the CineMate® GS series II remote flashes when a button is pressed. • Check that the correct TV/Video input ...module, making sure it is in solving problems, contact Bose® Customer Service. Refer to the address sheet included with the CineMate system. 28 CARE AND MAINTENANCE Svenska Nederlands FItralniaç...
...device and brand in the Universal Device Codes book. Sound is distorted • Make sure speaker cables are not damaged and the connections are no picture • Make sure the TV is ...Find your brand of the interface module. • Check that the source button on the CineMate® GS series II remote flashes when a button is pressed. • Check that the correct TV/Video input ...module, making sure it is in solving problems, contact Bose® Customer Service. Refer to the address sheet included with the CineMate system. 28 CARE AND MAINTENANCE Svenska Nederlands FItralniaç...


