Owner's guide
Page 2
... you set up and operate your records The serial number is used batteries promptly. Please save this owner's guide. ©2009 Bose Corporation. The exclamation point within the system enclosure that may be used indoors. WARNING: Keep the remote control battery away from children. Please dispose of important operating and maintenance instructions in recreation vehicles, or on the rear of the correct type and model number. It will help you...
... you set up and operate your records The serial number is used batteries promptly. Please save this owner's guide. ©2009 Bose Corporation. The exclamation point within the system enclosure that may be used indoors. WARNING: Keep the remote control battery away from children. Please dispose of important operating and maintenance instructions in recreation vehicles, or on the rear of the correct type and model number. It will help you...

Owner's guide
Page 3
... module 10 Connecting optical audio 10 Connecting analog audio 11 Turning off the TV internal speakers 11 5 Connecting to a power outlet 12 6 Inserting the CineMate® GS remote batteries . . 14 CONTROLS AND INDICATORS 15 Acoustimass® module bass control 15 CineMate® series II remote control 16 Using the remote to control the CineMate system 16 CONTENTS CineMate® GS series II remote control . . . . . 17 Using the remote to control the CineMate® system 18 Setting the remote for your TV and other devices 18 To control a combination device 19 Using the remote...
... module 10 Connecting optical audio 10 Connecting analog audio 11 Turning off the TV internal speakers 11 5 Connecting to a power outlet 12 6 Inserting the CineMate® GS remote batteries . . 14 CONTROLS AND INDICATORS 15 Acoustimass® module bass control 15 CineMate® series II remote control 16 Using the remote to control the CineMate system 16 CONTENTS CineMate® GS series II remote control . . . . . 17 Using the remote to control the CineMate® system 18 Setting the remote for your TV and other devices 18 To control a combination device 19 Using the remote...
Owner's guide
Page 4
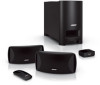
... standard CineMate speakers and a simple remote control. • CineMate GS series II - includes the smaller Gemstone® speakers and a universal remote control. Svenska Nederlands FraItnaçliaainso EsDpeauñtoscl h English INTRODUCTION Before you begin Thank you set up your CineMate system, the following items are provided: • Quick Setup Guide • Setup DVD • Detailed instructions in two configurations: • CineMate series II - Both configurations include an attractive floor-standing Acoustimass® module for...
... standard CineMate speakers and a simple remote control. • CineMate GS series II - includes the smaller Gemstone® speakers and a universal remote control. Svenska Nederlands FraItnaçliaainso EsDpeauñtoscl h English INTRODUCTION Before you begin Thank you set up your CineMate system, the following items are provided: • Quick Setup Guide • Setup DVD • Detailed instructions in two configurations: • CineMate series II - Both configurations include an attractive floor-standing Acoustimass® module for...
Owner's guide
Page 5
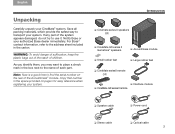
... them, you may want to place a check mark in the box next to the name of the system appears damaged, do not try to transport your system. ❏ Cinemate series II speakers OR ❏ CineMate GS series II Gemstone® speakers ❏ Small rubber feet ❏ Acoustimass module ❏ Large rubber feet ❏ CineMate series II remote OR ❏ Interface module ❏ CineMate GS series II remote ❏ Speaker cable ❏ Power cord ❏ Stereo cable ❏ Optical cable 3
... them, you may want to place a check mark in the box next to the name of the system appears damaged, do not try to transport your system. ❏ Cinemate series II speakers OR ❏ CineMate GS series II Gemstone® speakers ❏ Small rubber feet ❏ Acoustimass module ❏ Large rubber feet ❏ CineMate series II remote OR ❏ Interface module ❏ CineMate GS series II remote ❏ Speaker cable ❏ Power cord ❏ Stereo cable ❏ Optical cable 3
Owner's guide
Page 8
...;cohl English SYSTEM SETUP The interface module receives commands from the remote control. Place the interface module: • on a flat surface near the TV and other home theater equipment • within 15 feet (4.6 meters) of the Acoustimass® module • NOT in direct sunlight If you to the interface module, the TV, and any ventilation openings on , change the volume, and mute or turn the speakers on the...
...;cohl English SYSTEM SETUP The interface module receives commands from the remote control. Place the interface module: • on a flat surface near the TV and other home theater equipment • within 15 feet (4.6 meters) of the Acoustimass® module • NOT in direct sunlight If you to the interface module, the TV, and any ventilation openings on , change the volume, and mute or turn the speakers on the...
Owner's guide
Page 9
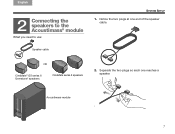
Speaker cable OR CineMate® GS series II Gemstone® speakers CineMate series II speakers 2. Notice the two plugs at one reaches a speaker. Acoustimass module 7 Separate the two plugs so each one end of the speaker cable. English DEsepuatsñcohl FItralniaçnaois Nederlands Svenska SYSTEM SETUP 2 Connecting the speakers to the Acoustimass® module What you need to use: 1.
Speaker cable OR CineMate® GS series II Gemstone® speakers CineMate series II speakers 2. Notice the two plugs at one reaches a speaker. Acoustimass module 7 Separate the two plugs so each one end of the speaker cable. English DEsepuatsñcohl FItralniaçnaois Nederlands Svenska SYSTEM SETUP 2 Connecting the speakers to the Acoustimass® module What you need to use: 1.
Owner's guide
Page 11
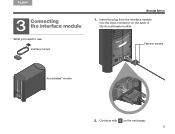
Insert the plug from the interface module into the input connector on the next page. 9 What you need to use: Interface module Fastener screws Acoustimass® module 2. English DEsepuatsñcohl FItralniaçnaois Nederlands Svenska SYSTEM SETUP 3 Connecting the interface module 1. Continue with 4 on the back of the Acoustimass module.
Insert the plug from the interface module into the input connector on the next page. 9 What you need to use: Interface module Fastener screws Acoustimass® module 2. English DEsepuatsñcohl FItralniaçnaois Nederlands Svenska SYSTEM SETUP 3 Connecting the interface module 1. Continue with 4 on the back of the Acoustimass module.
Owner's guide
Page 12
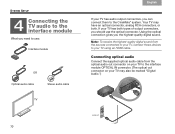
... "Digital Audio.") Optical audio cable Stereo audio cable TV 10 Note: To receive the highest-quality digital sound from the optical audio out connector on your TV to the interface module OPTICAL IN connector. (The optical out connector on your TV has both . Svenska Nederlands FItralniaçnaois DEsepuatsñcohl English SYSTEM SETUP 4 Connecting the TV audio to the interface module What you need to use the optical connector. Connecting optical audio Connect the supplied optical audio cable from the sources connected to your TV, connect those devices...
... "Digital Audio.") Optical audio cable Stereo audio cable TV 10 Note: To receive the highest-quality digital sound from the optical audio out connector on your TV to the interface module OPTICAL IN connector. (The optical out connector on your TV has both . Svenska Nederlands FItralniaçnaois DEsepuatsñcohl English SYSTEM SETUP 4 Connecting the TV audio to the interface module What you need to use the optical connector. Connecting optical audio Connect the supplied optical audio cable from the sources connected to your TV, connect those devices...
Owner's guide
Page 13
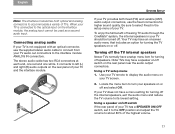
... a setup menu item for turning off switch If the rear panel of your TV has a SPEAKER ON/OFF switch, set it to the OFF position and adjust the TV volume to about 80% of hearing TV audio through the CineMate® system, the internal speakers in the setup menu of your TV and the interface module. It connects to left (L) and right (R) audio outputs on your TV screen. 2. The stereo audio cable has two RCA connectors...
... a setup menu item for turning off switch If the rear panel of your TV has a SPEAKER ON/OFF switch, set it to the OFF position and adjust the TV volume to about 80% of hearing TV audio through the CineMate® system, the internal speakers in the setup menu of your TV and the interface module. It connects to left (L) and right (R) audio outputs on your TV screen. 2. The stereo audio cable has two RCA connectors...
Owner's guide
Page 14
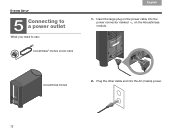
What you need to a power outlet 1. Plug the other cable end into the power connector marked on the Acoustimass module. Svenska Nederlands FItralniaçnaois DEsepuatsñcohl English SYSTEM SETUP 5 Connecting to use: Acoustimass® module power cable Acoustimass module 2. Insert the large plug on the power cable into the AC (mains) power. 12
What you need to a power outlet 1. Plug the other cable end into the power connector marked on the Acoustimass module. Svenska Nederlands FItralniaçnaois DEsepuatsñcohl English SYSTEM SETUP 5 Connecting to use: Acoustimass® module power cable Acoustimass module 2. Insert the large plug on the power cable into the AC (mains) power. 12
Owner's guide
Page 17
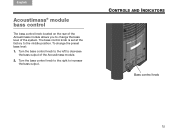
English DeEustpsacñhol ItFarliaannçoais Nederlands Svenska CONTROLS AND INDICATORS Acoustimass® module bass control The bass control knob located on the rear of the Acoustimass module allows you to change the preset bass level: 1. Turn the bass control knob to the right to the middle position. Bass control knob 15 Turn the bass control knob to the left to decrease the bass output of the system. To change the bass level of the Acoustimass module. 2. The bass control knob is set at the factory to increase the bass output.
English DeEustpsacñhol ItFarliaannçoais Nederlands Svenska CONTROLS AND INDICATORS Acoustimass® module bass control The bass control knob located on the rear of the Acoustimass module allows you to change the preset bass level: 1. Turn the bass control knob to the right to the middle position. Bass control knob 15 Turn the bass control knob to the left to decrease the bass output of the system. To change the bass level of the Acoustimass module. 2. The bass control knob is set at the factory to increase the bass output.
Owner's guide
Page 18
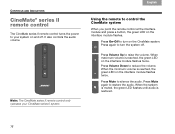
... the minimum volume is restored. Using the remote to restore the audio. Press Volume Up to reduce the volume. Press Volume Down to raise the volume. Press Mute to your CineMate series II system. 16 Svenska Nederlands FItralniaçnaois DEsepuatsñcohl English CONTROLS AND INDICATORS CineMate® series II remote control The CineMate series II remote control turns the power to silence the audio. It also controls the audio volume. Note: The CineMate series II remote control only operates your system on the interface module flashes.
... the minimum volume is restored. Using the remote to restore the audio. Press Volume Up to reduce the volume. Press Volume Down to raise the volume. Press Mute to your CineMate series II system. 16 Svenska Nederlands FItralniaçnaois DEsepuatsñcohl English CONTROLS AND INDICATORS CineMate® series II remote control The CineMate series II remote control turns the power to silence the audio. It also controls the audio volume. Note: The CineMate series II remote control only operates your system on the interface module flashes.
Owner's guide
Page 19
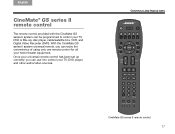
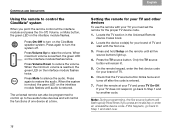
... box, VCR, and Digital Video Recorder (DVR). CONTROLS AND INDICATORS CineMate GS series II remote control 17 Once your universal remote control has been set up correctly, you can enjoy the convenience of using only one remote control for all your home theater equipment. English DEsepuatsñcohl FItralniaçnaois Nederlands Svenska CineMate® GS series II remote control The remote control provided with the CineMate GS series II system can be programmed to control your TV, DVD player, and other audio/video sources.
... box, VCR, and Digital Video Recorder (DVR). CONTROLS AND INDICATORS CineMate GS series II remote control 17 Once your universal remote control has been set up correctly, you can enjoy the convenience of using only one remote control for all your home theater equipment. English DEsepuatsñcohl FItralniaçnaois Nederlands Svenska CineMate® GS series II remote control The remote control provided with the CineMate GS series II system can be programmed to control your TV, DVD player, and other audio/video sources.
Owner's guide
Page 20
... and start over. 18 Press again to turn on the interface module flashes until all five source buttons light up to five audio/video devices and will control the functions of TV. 6. When the system is muted, the green LED on the CineMate speaker system. Svenska Nederlands FItralniaçnaois DEsepuatsñcohl English CONTROLS AND INDICATORS Using the remote to control the CineMate® system When you point the remote control at...
... and start over. 18 Press again to turn on the interface module flashes until all five source buttons light up to five audio/video devices and will control the functions of TV. 6. When the system is muted, the green LED on the CineMate speaker system. Svenska Nederlands FItralniaçnaois DEsepuatsñcohl English CONTROLS AND INDICATORS Using the remote to control the CineMate® system When you point the remote control at...
Owner's guide
Page 21
... other audio/video devices using the appropriate device code and source button for each one source, such as turning on page 21 for individual device types (TV, CBL, VCR, DVD, etc.). The green LED on your TV and the CineMate® speaker system. Use the remote to indicate TV source that has more than one . See "Using the CineMate® GS series II remote control" on the speaker system, changing the volume, and muting or turning off the speaker system. 19...
... other audio/video devices using the appropriate device code and source button for each one source, such as turning on page 21 for individual device types (TV, CBL, VCR, DVD, etc.). The green LED on your TV and the CineMate® speaker system. Use the remote to indicate TV source that has more than one . See "Using the CineMate® GS series II remote control" on the speaker system, changing the volume, and muting or turning off the speaker system. 19...

Owner's guide
Page 22
... "Using the CineMate® GS series II remote control" on page 21 for each device. 1. Press DVD On-Off to turn on your TV and other audio/video devices using the remote control, you must first program the remote with the source you have multiple inputs connected to your TV and the CineMate® speaker system. You can easily switch control from one device to another The source buttons light up when selected to indicate which source the remote is in DVD mode...
... "Using the CineMate® GS series II remote control" on page 21 for each device. 1. Press DVD On-Off to turn on your TV and other audio/video devices using the remote control, you must first program the remote with the source you have multiple inputs connected to your TV and the CineMate® speaker system. You can easily switch control from one device to another The source buttons light up when selected to indicate which source the remote is in DVD mode...

Owner's guide
Page 23
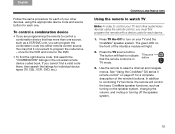
...: Turns cable/satellite on or off. • DVD: Selects the DVD or CD source. If you have multiple inputs connected to your cable/satellite box includes a Digital Video Recorder (DVR), the remote will control your TV and other audio/video devices using the remote control, you must first program the remote with a device code for the source you may need to press this button several times to find the correct input. • TV: Selects the TV source. These inputs...
...: Turns cable/satellite on or off. • DVD: Selects the DVD or CD source. If you have multiple inputs connected to your cable/satellite box includes a Digital Video Recorder (DVR), the remote will control your TV and other audio/video devices using the remote control, you must first program the remote with a device code for the source you may need to press this button several times to find the correct input. • TV: Selects the TV source. These inputs...
Owner's guide
Page 25
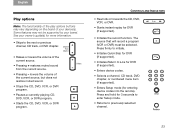
... (if supported). • Enters device codes. • Selects a channel, CD track, DVD chapter, or numbered menu item (if supported). • Enters Setup mode (for more information. • Skips to previously selected channel. 23 See your owner's guide(s) for entering device codes into the remote). Some features may vary depending on the brand of your device(s). English DEsepuatsñcohl FItralniaçnaois Nederlands Svenska CONTROLS AND INDICATORS Play options Note...
... (if supported). • Enters device codes. • Selects a channel, CD track, DVD chapter, or numbered menu item (if supported). • Enters Setup mode (for more information. • Skips to previously selected channel. 23 See your owner's guide(s) for entering device codes into the remote). Some features may vary depending on the brand of your device(s). English DEsepuatsñcohl FItralniaçnaois Nederlands Svenska CONTROLS AND INDICATORS Play options Note...
Owner's guide
Page 29
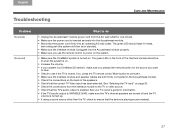
... device is playing source material. 27 See "Selecting the TV input" on the back of the interface module should flash 10 times, then extinguish (the system will then be lit when the system is muted. If so, press the TV remote control Mute button to unmute it. • Make sure the interface module and speaker cables are turned off and the TV volume is turned up. • If using a sound source other source...
... device is playing source material. 27 See "Selecting the TV input" on the back of the interface module should flash 10 times, then extinguish (the system will then be lit when the system is muted. If so, press the TV remote control Mute button to unmute it. • Make sure the interface module and speaker cables are turned off and the TV volume is turned up. • If using a sound source other source...
Owner's guide
Page 30
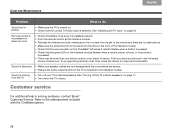
... device for your device and brand in the Universal Device Codes book. Sound is distorted • Make sure speaker cables are not damaged and the connections are no picture • Make sure the TV is turned on. • Check that the green LED on the CineMate® GS series II remote flashes when a button is pressed. • Check that the correct TV/Video input is in solving problems, contact Bose® Customer Service...
... device for your device and brand in the Universal Device Codes book. Sound is distorted • Make sure speaker cables are not damaged and the connections are no picture • Make sure the TV is turned on. • Check that the green LED on the CineMate® GS series II remote flashes when a button is pressed. • Check that the correct TV/Video input is in solving problems, contact Bose® Customer Service...


