Owner's guide
Page 5
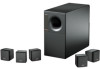
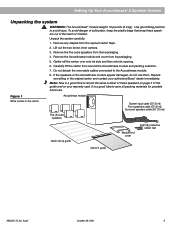
... Gently roll the carton over onto its side and then onto its packaging. 5. Repack everything in the carton Acoustimass module System input cable (20' [6 m]) Front speakers cable (20' [6 m]) Surround speakers cable (50' [15 m]) Five (5) cube speakers Quick set up guide Module end cover Eight (8) protective rubber feet.... Use good lifting practice to the Acoustimass module. 8. Carefully lift the carton from its opening. 6. Note: Now is a good idea to record the serial number of these speakers out of the reach of this guide and on your authorized Bose® dealer immediately.
... Gently roll the carton over onto its side and then onto its packaging. 5. Repack everything in the carton Acoustimass module System input cable (20' [6 m]) Front speakers cable (20' [6 m]) Surround speakers cable (50' [15 m]) Five (5) cube speakers Quick set up guide Module end cover Eight (8) protective rubber feet.... Use good lifting practice to the Acoustimass module. 8. Carefully lift the carton from its opening. 6. Note: Now is a good idea to record the serial number of these speakers out of the reach of this guide and on your authorized Bose® dealer immediately.
Owner's guide
Page 6
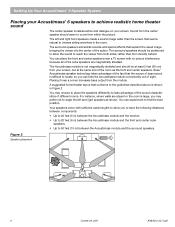
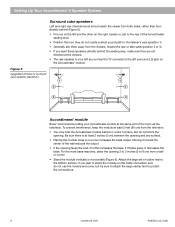
... (60 cm) from directly behind. Bose® Acoustimass speaker technology takes advantage of the fact that seems natural to viewers sitting anywhere in Figure 2. You can place the front and center speakers near a corner increases bass output from within the picture. The Acoustimass module is shown in the room. ...shielded and should seem to come with no picture interference, because all of the action. Placing it near a TV screen with sufficient cable lengths to allow the sound to reach the viewer from both sides, rather than the screen that the source of bass sound is ...
... (60 cm) from directly behind. Bose® Acoustimass speaker technology takes advantage of the fact that seems natural to viewers sitting anywhere in Figure 2. You can place the front and center speakers near a corner increases bass output from within the picture. The Acoustimass module is shown in the room. ...shielded and should seem to come with no picture interference, because all of the action. Placing it near a TV screen with sufficient cable lengths to allow the sound to reach the viewer from both sides, rather than the screen that the source of bass sound is ...
Owner's guide
Page 7
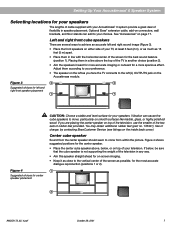
... Bose Customer Service (see listings on page 17. Adjust them according to your preference. • The speaker on smooth surfaces like marble, glass, or highly polished wood. English Setting Up Your Acoustimass® 6 Speaker System Selecting locations for your speakers The lengths of cable supplied with your Acoustimass&#...line with the horizontal center of your television. If you face the TV connects to your speakers. Optional Bose® extension cable, add-on connectors, wall brackets, and floor stands can cause the cube speakers to come from within the picture.
... Bose Customer Service (see listings on page 17. Adjust them according to your preference. • The speaker on smooth surfaces like marble, glass, or highly polished wood. English Setting Up Your Acoustimass® 6 Speaker System Selecting locations for your speakers The lengths of cable supplied with your Acoustimass&#...line with the horizontal center of your television. If you face the TV connects to your speakers. Optional Bose® extension cable, add-on connectors, wall brackets, and floor stands can cause the cube speakers to come from within the picture.
Owner's guide
Page 8
... connects to the left as the television. Figure 5 Suggested choices for surround (rear) speaker placement 1 1 2 2 3 3 Acoustimass® module Bose® recommends putting your Acoustimass module at the same end of the home theater seating area. • Position them so they are not directed at the viewers.... • The rear speaker to your left surround (LS) jack on the cable connection end, do not ...
... connects to the left as the television. Figure 5 Suggested choices for surround (rear) speaker placement 1 1 2 2 3 3 Acoustimass® module Bose® recommends putting your Acoustimass module at the same end of the home theater seating area. • Position them so they are not directed at the viewers.... • The rear speaker to your left surround (LS) jack on the cable connection end, do not ...
Owner's guide
Page 9
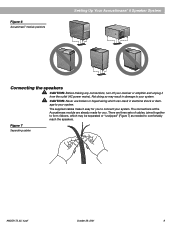
....pdf October 29, 2001 9 The supplied cables make it from the outlet (AC power mains). CAUTION: Never use broken or frayed wiring which may result in electrical shock or damage to your system. English Figure 6 Acoustimass® module positions Setting Up Your Acoustimass® 6 Speaker System Connecting the speakers CAUTION: Before making any...
....pdf October 29, 2001 9 The supplied cables make it from the outlet (AC power mains). CAUTION: Never use broken or frayed wiring which may result in electrical shock or damage to your system. English Figure 6 Acoustimass® module positions Setting Up Your Acoustimass® 6 Speaker System Connecting the speakers CAUTION: Before making any...
Owner's guide
Page 10
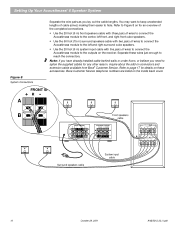
... on the inside back cover. You may want to keep unextended lengths of wires to connect the Acoustimass module to the outputs on connectors and extension cable available from Bose® Customer Service. Setting Up Your Acoustimass® 6 Speaker System Figure 8 System Connections Separate the wire pairs as you need to splice the supplied...
... on the inside back cover. You may want to keep unextended lengths of wires to connect the Acoustimass module to the outputs on connectors and extension cable available from Bose® Customer Service. Setting Up Your Acoustimass® 6 Speaker System Figure 8 System Connections Separate the wire pairs as you need to splice the supplied...
Owner's guide
Page 11
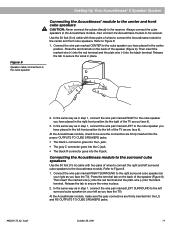
...and RS OUTPUTS TO CUBE SPEAKERS jacks. October 29, 2001 11 Connecting the Acoustimass module to the surround cube speakers Use the 50 foot (15 m) cable with three pairs of wires to connect the Acoustimass module to the right of the TV as you have placed in step ... connect the wire pair marked LEFT to the cube speaker you face it ). 3. English Setting Up Your Acoustimass® 6 Speaker System Figure 9 Speaker cable connections to the cube speaker Connecting the Acoustimass® module to the center and front cube speakers CAUTION: Never connect the cubes directly to Figure 8. ...
...and RS OUTPUTS TO CUBE SPEAKERS jacks. October 29, 2001 11 Connecting the Acoustimass module to the surround cube speakers Use the 50 foot (15 m) cable with three pairs of wires to connect the Acoustimass module to the right of the TV as you have placed in step ... connect the wire pair marked LEFT to the cube speaker you face it ). 3. English Setting Up Your Acoustimass® 6 Speaker System Figure 9 Speaker cable connections to the cube speaker Connecting the Acoustimass® module to the center and front cube speakers CAUTION: Never connect the cubes directly to Figure 8. ...

Owner's guide
Page 12
...receiver CAUTION: Do not connect the Acoustimass module directly to your television unless the television provides surround decoding circuitry and amplified outputs for all connectors are firmly inserted into the proper INPUTS FROM RECEIVER OR AMPLIFIER jacks. Use the 20 foot (6 m) cable with a red collar (+) to ...their position in a total loss of each other; b. Refer to brush against each wire pair to the SPEAKER OUTPUT label on . a. LEFT SURROUND wires go into L and R jacks. At the Acoustimass module, check to make sure ...
...receiver CAUTION: Do not connect the Acoustimass module directly to your television unless the television provides surround decoding circuitry and amplified outputs for all connectors are firmly inserted into the proper INPUTS FROM RECEIVER OR AMPLIFIER jacks. Use the 20 foot (6 m) cable with a red collar (+) to ...their position in a total loss of each other; b. Refer to brush against each wire pair to the SPEAKER OUTPUT label on . a. LEFT SURROUND wires go into L and R jacks. At the Acoustimass module, check to make sure ...
Owner's guide
Page 13
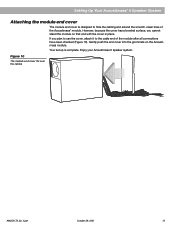
...you cannot stand the module on the Acoustimass module. Figure 10 The module end cover fits over the cables AM252172_02_V.pdf October 29, 2001 13 However, because the cover has a beveled surface, you plan to use the cover, attach it to hide the cabling and extend the smooth, clean lines of... the module after all connections have been checked (Figure 10). Your set up is designed to the cable end of the Acoustimass® module. Enjoy your Acoustimass 6 speaker system. Gently push the end cover into the grommets on that end with the cover in place. English Setting...
...you cannot stand the module on the Acoustimass module. Figure 10 The module end cover fits over the cables AM252172_02_V.pdf October 29, 2001 13 However, because the cover has a beveled surface, you plan to use the cover, attach it to hide the cabling and extend the smooth, clean lines of... the module after all connections have been checked (Figure 10). Your set up is designed to the cable end of the Acoustimass® module. Enjoy your Acoustimass 6 speaker system. Gently push the end cover into the grommets on that end with the cover in place. English Setting...
Owner's guide
Page 16
... is connected directly to arrange for stereo only. 16 October 29, 2001 AM25212_02_V.pdf Maintaining Your Acoustimass® 6 Speaker System Cleaning your speakers Wipe the cube speakers using RCA stereo cables as shown in the owner's guide. • On your TV, turn off enhanced surround sound...) by an RCA stereo cable. You may vacuum the grilles carefully; No sound No surround sound What to do • Make sure the power cord of this guide. Troubleshooting If you still have a problem with your Acoustimass 6 speaker system, turn off your Bose® dealer to a stereo...
... is connected directly to arrange for stereo only. 16 October 29, 2001 AM25212_02_V.pdf Maintaining Your Acoustimass® 6 Speaker System Cleaning your speakers Wipe the cube speakers using RCA stereo cables as shown in the owner's guide. • On your TV, turn off enhanced surround sound...) by an RCA stereo cable. You may vacuum the grilles carefully; No sound No surround sound What to do • Make sure the power cord of this guide. Troubleshooting If you still have a problem with your Acoustimass 6 speaker system, turn off your Bose® dealer to a stereo...
Owner's guide
Page 17
...warranty card that came with your speakers. Customer Service For help in ordering accessories or solving problems, contact Bose Customer Service. Warranty period The Bose Acoustimass 6 speaker system is not damaged. • Reduce the volume of the coverage are correct (+ to ...increase bass. AM252172_02_V.pdf October 29, 2001 17 English Maintaining Your Acoustimass® 6 Speaker System Problem What to do Sound is distorted • Make sure speaker cable...
...warranty card that came with your speakers. Customer Service For help in ordering accessories or solving problems, contact Bose Customer Service. Warranty period The Bose Acoustimass 6 speaker system is not damaged. • Reduce the volume of the coverage are correct (+ to ...increase bass. AM252172_02_V.pdf October 29, 2001 17 English Maintaining Your Acoustimass® 6 Speaker System Problem What to do Sound is distorted • Make sure speaker cable...
Owner's guide
Page 18
... circuitry Syncom® computer quality control Driver Complement Cube speakers: One 2.5" (6.4 cm) magnetically shielded wide-range driver per cube Acoustimass module: Two 5.25" (13.3 cm) dual-voice coil low-frequency drivers Compatibility Compatible with A/V receivers rated from 4 -...Acoustimass module: 14"H x 7.5"W x 16.5"D (35.5 cm x 19 cm x 41.9 cm) / 19 lb (8.6 kg) Packed system: 20.63"H x 11.13"W x 24.5"D (52.3 cm x 28.2 cm x 62.2 cm) Total shipping weight: 36 lb (16.4 kg) in shipping carton Accessories • AC-1 adapter (stripped wire to male RCA connector) • Extension cable...
... circuitry Syncom® computer quality control Driver Complement Cube speakers: One 2.5" (6.4 cm) magnetically shielded wide-range driver per cube Acoustimass module: Two 5.25" (13.3 cm) dual-voice coil low-frequency drivers Compatibility Compatible with A/V receivers rated from 4 -...Acoustimass module: 14"H x 7.5"W x 16.5"D (35.5 cm x 19 cm x 41.9 cm) / 19 lb (8.6 kg) Packed system: 20.63"H x 11.13"W x 24.5"D (52.3 cm x 28.2 cm x 62.2 cm) Total shipping weight: 36 lb (16.4 kg) in shipping carton Accessories • AC-1 adapter (stripped wire to male RCA connector) • Extension cable...

