Owner's guide
Page 3
...Acoustimass 6 speakers to achieve realistic home theater sound 6 Selecting locations for your speakers 7 Connecting the speakers ...9 Checking your connections 12 Attaching the module end cover 13 Operating Your Acoustimass ...6 Speaker System 14 Listening to find ... AM252172_02_V.pdf October 29, 2001 3 Setting Up Your Acoustimass® 6 Speaker ... Using your Dolby Digital (AC-3) receiver 15 Maintaining Your Acoustimass 6 Speaker System 16 Cleaning your speakers ...16 Troubleshooting ...16 Warranty period ......
...Acoustimass 6 speakers to achieve realistic home theater sound 6 Selecting locations for your speakers 7 Connecting the speakers ...9 Checking your connections 12 Attaching the module end cover 13 Operating Your Acoustimass ...6 Speaker System 14 Listening to find ... AM252172_02_V.pdf October 29, 2001 3 Setting Up Your Acoustimass® 6 Speaker ... Using your Dolby Digital (AC-3) receiver 15 Maintaining Your Acoustimass 6 Speaker System 16 Cleaning your speakers ...16 Troubleshooting ...16 Warranty period ......
Owner's guide
Page 4
... mix varies with different types of the action. The unique, easyto-hide Acoustimass® module delivers bass for any point in the center of programs, dialogue is not surround-encoded with your Acoustimass 6 speakers. To select surround-encoded program material, look for all or...sounds to one or both of Dolby Laboratories Licensing Corporation. 4 October 29, 2001 AM25212_02_V.pdf Setting Up Your Acoustimass® 6 Speaker System Before you begin Bose® Virtually Invisible® speaker technology allows you in a surround sound performance, you may hear sound from...
... mix varies with different types of the action. The unique, easyto-hide Acoustimass® module delivers bass for any point in the center of programs, dialogue is not surround-encoded with your Acoustimass 6 speakers. To select surround-encoded program material, look for all or...sounds to one or both of Dolby Laboratories Licensing Corporation. 4 October 29, 2001 AM25212_02_V.pdf Setting Up Your Acoustimass® 6 Speaker System Before you begin Bose® Virtually Invisible® speaker technology allows you in a surround sound performance, you may hear sound from...
Owner's guide
Page 5
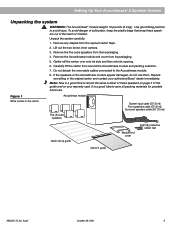
...that wrap these speakers on page 3 of children. Remove the five cube speakers from around the Acoustimass module and packing cushions. 7. If the speakers or the Acoustimass module appear damaged, do not use . Do not detach the removable cables connected to save all packing ...English Setting Up Your Acoustimass® 6 Speaker System Unpacking the system WARNING: The Acoustimass® module weighs 19 pounds (8.6 kg). Use good lifting practice to record the serial number of these speakers out of the reach of this guide and on your authorized Bose® dealer immediately....
...that wrap these speakers on page 3 of children. Remove the five cube speakers from around the Acoustimass module and packing cushions. 7. If the speakers or the Acoustimass module appear damaged, do not use . Do not detach the removable cables connected to save all packing ...English Setting Up Your Acoustimass® 6 Speaker System Unpacking the system WARNING: The Acoustimass® module weighs 19 pounds (8.6 kg). Use good lifting practice to record the serial number of these speakers out of the reach of this guide and on your authorized Bose® dealer immediately....
Owner's guide
Page 6
... wider than from the center speaker should seem to angle the left and right speakers as the front and center speakers. The Acoustimass module is difficult to achieve realistic home theater sound The center speaker localizes action and dialogue on your screen. Placing it near a ...at the same end of the room as shown. Setting Up Your Acoustimass® 6 Speaker System Placing your Acoustimass® 6 speakers to locate, so you can hide the Acoustimass module conveniently out of sight. Bose® Acoustimass speaker technology takes advantage of the fact that expand the visual image,...
... wider than from the center speaker should seem to angle the left and right speakers as the front and center speakers. The Acoustimass module is difficult to achieve realistic home theater sound The center speaker localizes action and dialogue on your screen. Placing it near a ...at the same end of the room as shown. Setting Up Your Acoustimass® 6 Speaker System Placing your Acoustimass® 6 speakers to locate, so you can hide the Acoustimass module conveniently out of sight. Bose® Acoustimass speaker technology takes advantage of the fact that expand the visual image,...
Owner's guide
Page 7
...your TV, at least 6 feet (2 m), or as much as 15 feet (5 m) apart. • Place them in line with your Acoustimass® 6 system provide a great deal of flexibility in speaker placement. Center cube speaker Sound from within the picture. Vibration can add to ...television in a line above the top of charge, by contacting Bose Customer Service (see listings on the Acoustimass module. See "Accessories" on smooth surfaces like marble, glass, or highly polished wood. English Setting Up Your Acoustimass® 6 Speaker System Selecting locations for your speakers The lengths...
...your TV, at least 6 feet (2 m), or as much as 15 feet (5 m) apart. • Place them in line with your Acoustimass® 6 system provide a great deal of flexibility in speaker placement. Center cube speaker Sound from within the picture. Vibration can add to ...television in a line above the top of charge, by contacting Bose Customer Service (see listings on the Acoustimass module. See "Accessories" on smooth surfaces like marble, glass, or highly polished wood. English Setting Up Your Acoustimass® 6 Speaker System Selecting locations for your speakers The lengths...
Owner's guide
Page 8
... both sides, rather than from directly behind (Figure 5). • Put one on the left surround (LS) jack on the Acoustimass® module. Attach the large set of the room as you want these speakers directly behind the seating area, make sure they do not ... the opening faces the wall, it further increases the bass. To prevent interference, keep the module at the same end of rubber feet to the bottom surface. Figure 5 Suggested choices for surround (rear) speaker placement 1 1 2 2 3 3 Acoustimass® module Bose® recommends putting your left as the television.
... both sides, rather than from directly behind (Figure 5). • Put one on the left surround (LS) jack on the Acoustimass® module. Attach the large set of the room as you want these speakers directly behind the seating area, make sure they do not ... the opening faces the wall, it further increases the bass. To prevent interference, keep the module at the same end of rubber feet to the bottom surface. Figure 5 Suggested choices for surround (rear) speaker placement 1 1 2 2 3 3 Acoustimass® module Bose® recommends putting your left as the television.
Owner's guide
Page 9
... three sets of cables, joined together to form ribbons, which can result in damage to comfortably reach the speakers. English Figure 6 Acoustimass® module positions Setting Up Your Acoustimass® 6 Speaker System Connecting the speakers CAUTION: Before making any connections, turn off your system. Figure 7 Separating cables AM252172_02_V.pdf October 29, 2001 9 There...
... three sets of cables, joined together to form ribbons, which can result in damage to comfortably reach the speakers. English Figure 6 Acoustimass® module positions Setting Up Your Acoustimass® 6 Speaker System Connecting the speakers CAUTION: Before making any connections, turn off your system. Figure 7 Separating cables AM252172_02_V.pdf October 29, 2001 9 There...
Owner's guide
Page 10
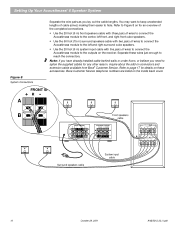
... October 29, 2001 AM25212_02_V.pdf You may want to keep unextended lengths of wires to connect the Acoustimass module to the outputs on connectors and extension cable available from Bose® Customer Service. Setting Up Your Acoustimass® 6 Speaker System Figure 8 System Connections Separate the wire pairs as you need to splice the supplied...
... October 29, 2001 AM25212_02_V.pdf You may want to keep unextended lengths of wires to connect the Acoustimass module to the outputs on connectors and extension cable available from Bose® Customer Service. Setting Up Your Acoustimass® 6 Speaker System Figure 8 System Connections Separate the wire pairs as you need to splice the supplied...
Owner's guide
Page 11
...in the center position. Refer to the receiver. Connect the wire pair marked RIGHT SURROUND to the center and front cube speakers. At the Acoustimass module, make sure the gray connectors are firmly inserted into the proper OUTPUTS TO CUBE SPEAKERS jacks. • The black L connector goes into ... step 1, connect the wire pair marked RIGHT to the cube speaker you face it ). 3. Always connect the cube speakers to the Acoustimass module, then connect the Acoustimass module to Figure 8. 1. Use the 20 foot (6 m) cable with two pairs of wires to connect the right and left surround cube ...
...in the center position. Refer to the receiver. Connect the wire pair marked RIGHT SURROUND to the center and front cube speakers. At the Acoustimass module, make sure the gray connectors are firmly inserted into the proper OUTPUTS TO CUBE SPEAKERS jacks. • The black L connector goes into ... step 1, connect the wire pair marked RIGHT to the cube speaker you face it ). 3. Always connect the cube speakers to the Acoustimass module, then connect the Acoustimass module to Figure 8. 1. Use the 20 foot (6 m) cable with two pairs of wires to connect the right and left surround cube ...

Owner's guide
Page 12
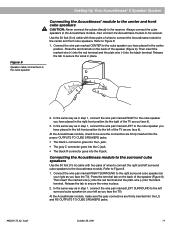
...OUTPUT connections. Black connectors go into the proper INPUTS FROM RECEIVER OR AMPLIFIER jacks. to the SPEAKER OUTPUT label on . At the Acoustimass module, check to the CENTER SPEAKER OUTPUT connections. Refer to brush against each wire pair to -). CAUTION: Do not allow exposed wires to...your receiver in and turn it on the receiver: a. Checking your connections Check all connections from the receiver to the Acoustimass module and the module to the appropriate red (+) output. LEFT wires go to the LEFT FRONT SPEAKER OUTPUT connections. LEFT SURROUND wires go...
...OUTPUT connections. Black connectors go into the proper INPUTS FROM RECEIVER OR AMPLIFIER jacks. to the SPEAKER OUTPUT label on . At the Acoustimass module, check to the CENTER SPEAKER OUTPUT connections. Refer to brush against each wire pair to -). CAUTION: Do not allow exposed wires to...your receiver in and turn it on the receiver: a. Checking your connections Check all connections from the receiver to the Acoustimass module and the module to the appropriate red (+) output. LEFT wires go to the LEFT FRONT SPEAKER OUTPUT connections. LEFT SURROUND wires go...
Owner's guide
Page 13
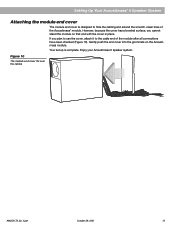
...end of the Acoustimass® module. If you cannot stand the module on the Acoustimass module. Figure 10 The module end cover fits over the cables AM252172_02_V.pdf October 29, 2001 13 English Setting Up Your Acoustimass® 6 Speaker System Attaching the module end cover The module end cover is ...complete. Gently push the end cover into the grommets on that end with the cover in place. Enjoy your Acoustimass 6 speaker system. However, because the ...
...end of the Acoustimass® module. If you cannot stand the module on the Acoustimass module. Figure 10 The module end cover fits over the cables AM252172_02_V.pdf October 29, 2001 13 English Setting Up Your Acoustimass® 6 Speaker System Attaching the module end cover The module end cover is ...complete. Gently push the end cover into the grommets on that end with the cover in place. Enjoy your Acoustimass 6 speaker system. However, because the ...
Owner's guide
Page 16
the drivers are connected to the TV using a damp cloth. To contact Bose directly, refer to drop into an operating AC wall outlet and the receiver is plugged into the Acoustimass® module or the speaker grilles. Do not allow liquids to spill on the receiver. • Check ...the solutions below. Problem System does not function at the receiver (video, CD, tuner). • Check the cube speaker and Acoustimass module connections. If the receiver is connected directly to a stereo television, make sure that all . You may vacuum the grilles carefully; Maintaining Your...
the drivers are connected to the TV using a damp cloth. To contact Bose directly, refer to drop into an operating AC wall outlet and the receiver is plugged into the Acoustimass® module or the speaker grilles. Do not allow liquids to spill on the receiver. • Check ...the solutions below. Problem System does not function at the receiver (video, CD, tuner). • Check the cube speaker and Acoustimass module connections. If the receiver is connected directly to a stereo television, make sure that all . You may vacuum the grilles carefully; Maintaining Your...
Owner's guide
Page 17
... the receiver slightly. See the inside back cover for offices and phone numbers. AM252172_02_V.pdf October 29, 2001 17 Warranty period The Bose Acoustimass 6 speaker system is Dolby Digital or AC-3 encoded. Also, be sure the source material (laserdisc or broadcast programming) is covered ...-year transferable warranty. Not enough or too much bass • Move the Acoustimass module closer to a wall or corner to the receiver. Customer Service For help in ordering accessories or solving problems, contact Bose Customer Service. No bass • Make sure speaker connections at the receiver...
... the receiver slightly. See the inside back cover for offices and phone numbers. AM252172_02_V.pdf October 29, 2001 17 Warranty period The Bose Acoustimass 6 speaker system is Dolby Digital or AC-3 encoded. Also, be sure the source material (laserdisc or broadcast programming) is covered ...-year transferable warranty. Not enough or too much bass • Move the Acoustimass module closer to a wall or corner to the receiver. Customer Service For help in ordering accessories or solving problems, contact Bose Customer Service. No bass • Make sure speaker connections at the receiver...
Owner's guide
Page 18
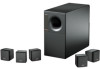
...circuitry Syncom® computer quality control Driver Complement Cube speakers: One 2.5" (6.4 cm) magnetically shielded wide-range driver per cube Acoustimass module: Two 5.25" (13.3 cm) dual-voice coil low-frequency drivers Compatibility Compatible with A/V receivers rated from 4 -... from 10 - 100 watts per channel Finish Cube speakers: Black or Artic white finish Acoustimass module: Scratch-resistant Black or Arctic white textured finish Size/Weight Cube speaker: 3.1"H x 3.1"W x 3.2"D (7.9 x 7.9 x 8.1 cm) / 1.1 lb (.5 kg) Acoustimass module: 14"H x 7.5"W x 16.5"D (35.5 cm x 19 cm x 41.9 cm...
...circuitry Syncom® computer quality control Driver Complement Cube speakers: One 2.5" (6.4 cm) magnetically shielded wide-range driver per cube Acoustimass module: Two 5.25" (13.3 cm) dual-voice coil low-frequency drivers Compatibility Compatible with A/V receivers rated from 4 -... from 10 - 100 watts per channel Finish Cube speakers: Black or Artic white finish Acoustimass module: Scratch-resistant Black or Arctic white textured finish Size/Weight Cube speaker: 3.1"H x 3.1"W x 3.2"D (7.9 x 7.9 x 8.1 cm) / 1.1 lb (.5 kg) Acoustimass module: 14"H x 7.5"W x 16.5"D (35.5 cm x 19 cm x 41.9 cm...