
Owner's guide
Page 1
The Bose® Acoustimass® 6 Series II Speaker System Owner's Guide October 29, 2001 AM252172_02_V.pdf
The Bose® Acoustimass® 6 Series II Speaker System Owner's Guide October 29, 2001 AM252172_02_V.pdf
Owner's guide
Page 2
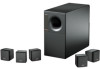
... 10(1) of the Directive, is significantly different from other speakers. Please Read This Owner's Guide The setup and operation of your owner's guide for future reference. Save your Acoustimass 6 home theater speaker system is in compliance with realistic sound, without a lot of equipment. With these Virtually Invisible® speakers you set up and operate your choice of the Bose® Acoustimass® 6 home theater speaker system. These cube speakers deliver more lifelike...
... 10(1) of the Directive, is significantly different from other speakers. Please Read This Owner's Guide The setup and operation of your owner's guide for future reference. Save your Acoustimass 6 home theater speaker system is in compliance with realistic sound, without a lot of equipment. With these Virtually Invisible® speakers you set up and operate your choice of the Bose® Acoustimass® 6 home theater speaker system. These cube speakers deliver more lifelike...
Owner's guide
Page 3
AM252172_02_V.pdf October 29, 2001 3 Setting Up Your Acoustimass® 6 Speaker System 4 Before you keep your sales slip and warranty card together with this owner's guide. English Dansk Contents Where to realistic home theater sound 14 Using your Dolby Pro-Logic receiver 14 Using your Dolby Digital (AC-3) receiver 15 Maintaining Your Acoustimass 6 Speaker System 16 Cleaning your speakers ...16 Troubleshooting ...16 Warranty period ...17 Customer Service ...17 Product Information ...18 Technical...
AM252172_02_V.pdf October 29, 2001 3 Setting Up Your Acoustimass® 6 Speaker System 4 Before you keep your sales slip and warranty card together with this owner's guide. English Dansk Contents Where to realistic home theater sound 14 Using your Dolby Pro-Logic receiver 14 Using your Dolby Digital (AC-3) receiver 15 Maintaining Your Acoustimass 6 Speaker System 16 Cleaning your speakers ...16 Troubleshooting ...16 Warranty period ...17 Customer Service ...17 Product Information ...18 Technical...
Owner's guide
Page 4
...-3)* receivers and program material. (Instructions on using your surround or digital receiver with the Acoustimass 6 speaker system are trademarks of the surround (rear) speakers. Setting Up Your Acoustimass® 6 Speaker System Before you begin Bose® Virtually Invisible® speaker technology allows you to enjoy lifelike home performances from all channels. Although the sound mix varies with your receiver as described on tapes and discs, and the word "surround" preceding a TV broadcast. Your video sound source (stereo...
...-3)* receivers and program material. (Instructions on using your surround or digital receiver with the Acoustimass 6 speaker system are trademarks of the surround (rear) speakers. Setting Up Your Acoustimass® 6 Speaker System Before you begin Bose® Virtually Invisible® speaker technology allows you to enjoy lifelike home performances from all channels. Although the sound mix varies with your receiver as described on tapes and discs, and the word "surround" preceding a TV broadcast. Your video sound source (stereo...
Owner's guide
Page 5
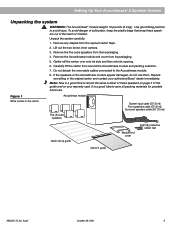
... pounds (8.6 kg). To avoid danger of suffocation, keep the plastic bags that wrap these speakers on page 3 of children. Lift out the two brown inner cartons. 3. Repack everything in the carton Acoustimass module System input cable (20' [6 m]) Front speakers cable (20' [6 m]) Surround speakers cable (50' [15 m]) Five (5) cube speakers Quick set up guide Module end cover Eight (8) protective rubber feet Owner's guide AM252172_02_V.pdf October 29, 2001 5
... pounds (8.6 kg). To avoid danger of suffocation, keep the plastic bags that wrap these speakers on page 3 of children. Lift out the two brown inner cartons. 3. Repack everything in the carton Acoustimass module System input cable (20' [6 m]) Front speakers cable (20' [6 m]) Surround speakers cable (50' [15 m]) Five (5) cube speakers Quick set up guide Module end cover Eight (8) protective rubber feet Owner's guide AM252172_02_V.pdf October 29, 2001 5
Owner's guide
Page 6
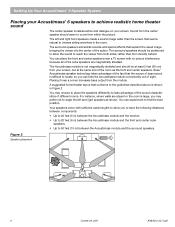
... instance, where walls are magnetically shielded. Setting Up Your Acoustimass® 6 Speaker System Placing your Acoustimass® 6 speakers to achieve realistic home theater sound The center speaker localizes action and dialogue on your screen, but at the same end of the room as shown. Your speakers come from within the picture. You can experiment to find the best position. Sound from directly behind. The surround speakers should seem to...
... instance, where walls are magnetically shielded. Setting Up Your Acoustimass® 6 Speaker System Placing your Acoustimass® 6 speakers to achieve realistic home theater sound The center speaker localizes action and dialogue on your screen, but at the same end of the room as shown. Your speakers come from within the picture. You can experiment to find the best position. Sound from directly behind. The surround speakers should seem to...
Owner's guide
Page 7
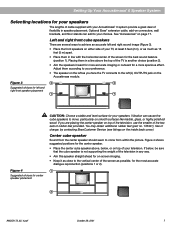
... center speaker placement CAUTION: Choose a stable and level surface for your television. Center cube speaker Sound from within the picture. If below , or on smooth surfaces like marble, glass, or highly polished wood. If you face the TV connects to your Acoustimass® 6 system provide a great deal of flexibility in line with your choices. Optional Bose® extension cable, add-on connectors, wall...
... center speaker placement CAUTION: Choose a stable and level surface for your television. Center cube speaker Sound from within the picture. If below , or on smooth surfaces like marble, glass, or highly polished wood. If you face the TV connects to your Acoustimass® 6 system provide a great deal of flexibility in line with your choices. Optional Bose® extension cable, add-on connectors, wall...
Owner's guide
Page 8
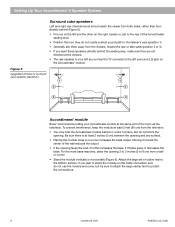
... to a corner increases the bass output. Attach the large set of rubber feet to 8 cm) from a wall or corner. • Stand the module vertically or horizontally (Figure 6). Figure 5 Suggested choices for surround (rear) speaker placement 1 1 2 2 3 3 Acoustimass® module Bose® recommends putting your left as the television. Setting Up Your Acoustimass® 6 Speaker System Surround cube speakers Left and right rear channel sound should reach the viewer...
... to a corner increases the bass output. Attach the large set of rubber feet to 8 cm) from a wall or corner. • Stand the module vertically or horizontally (Figure 6). Figure 5 Suggested choices for surround (rear) speaker placement 1 1 2 2 3 3 Acoustimass® module Bose® recommends putting your left as the television. Setting Up Your Acoustimass® 6 Speaker System Surround cube speakers Left and right rear channel sound should reach the viewer...
Owner's guide
Page 9
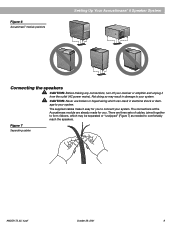
... (AC power mains). Not doing so may be separated or "unzipped" (Figure 7) as needed to your system. CAUTION: Never use broken or frayed wiring which may result in electrical shock or damage to comfortably reach the speakers. English Figure 6 Acoustimass® module positions Setting Up Your Acoustimass® 6 Speaker System Connecting the speakers CAUTION: Before making any connections, turn off your receiver or amplifier and unplug...
... (AC power mains). Not doing so may be separated or "unzipped" (Figure 7) as needed to your system. CAUTION: Never use broken or frayed wiring which may result in electrical shock or damage to comfortably reach the speakers. English Figure 6 Acoustimass® module positions Setting Up Your Acoustimass® 6 Speaker System Connecting the speakers CAUTION: Before making any connections, turn off your receiver or amplifier and unplug...
Owner's guide
Page 10
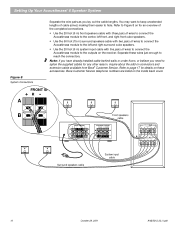
... m) surround speakers cable with two pairs of wires to connect the Acoustimass module to the left and right surround cube speakers. • Use the 20 foot (6 m) system input cable with five pairs of cable joined, making them easier to reach the connectors. Refer to Figure 8 on the receiver. FRONT SPEAKE R 3+ RIGHT +3 FRONT SPEAKERS R L Front speakers cable SURROUND SPEAKERS R REAR L CENTER OUTPUTS TO CUBE SPEAKERS L C R LS RS LEFT CENTER RIGHT LEFT RIGHT SURROUND SURROUND INPUTS FROM RECEIVER OR AMPLIFIER L C R LS RS Surround speakers cable...
... m) surround speakers cable with two pairs of wires to connect the Acoustimass module to the left and right surround cube speakers. • Use the 20 foot (6 m) system input cable with five pairs of cable joined, making them easier to reach the connectors. Refer to Figure 8 on the receiver. FRONT SPEAKE R 3+ RIGHT +3 FRONT SPEAKERS R L Front speakers cable SURROUND SPEAKERS R REAR L CENTER OUTPUTS TO CUBE SPEAKERS L C R LS RS LEFT CENTER RIGHT LEFT RIGHT SURROUND SURROUND INPUTS FROM RECEIVER OR AMPLIFIER L C R LS RS Surround speakers cable...
Owner's guide
Page 11
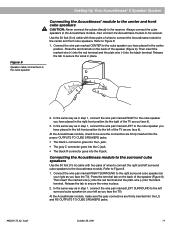
... proper OUTPUTS TO CUBE SPEAKERS jacks. • The black L connector goes into the L jack. • The gray C connector goes into the C jack. • The black R connector goes into the LS and RS OUTPUTS TO CUBE SPEAKERS jacks. English Setting Up Your Acoustimass® 6 Speaker System Figure 9 Speaker cable connections to the cube speaker Connecting the Acoustimass® module to the center and front cube speakers CAUTION: Never connect the cubes directly to secure the wires...
... proper OUTPUTS TO CUBE SPEAKERS jacks. • The black L connector goes into the L jack. • The gray C connector goes into the C jack. • The black R connector goes into the LS and RS OUTPUTS TO CUBE SPEAKERS jacks. English Setting Up Your Acoustimass® 6 Speaker System Figure 9 Speaker cable connections to the cube speaker Connecting the Acoustimass® module to the center and front cube speakers CAUTION: Never connect the cubes directly to secure the wires...

Owner's guide
Page 12
... the receiver, make sure all connectors are connected in a total loss of each plain wire (-) to Figure 8. 1. Refer to the appropriate black (-) output. 2. Check to + and - a. LEFT wires go to the appropriate red (+) output. Black connectors go into the proper INPUTS FROM RECEIVER OR AMPLIFIER jacks. Use the 20 foot (6 m) cable with a red collar (+) to the RIGHT FRONT SPEAKER OUTPUT connections. Incorrect wiring can result in phase (+ to be sure all channels.
... the receiver, make sure all connectors are connected in a total loss of each plain wire (-) to Figure 8. 1. Refer to the appropriate black (-) output. 2. Check to + and - a. LEFT wires go to the appropriate red (+) output. Black connectors go into the proper INPUTS FROM RECEIVER OR AMPLIFIER jacks. Use the 20 foot (6 m) cable with a red collar (+) to the RIGHT FRONT SPEAKER OUTPUT connections. Incorrect wiring can result in phase (+ to be sure all channels.
Owner's guide
Page 13
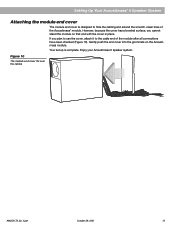
...connections have been checked (Figure 10). Gently push the end cover into the grommets on that end with the cover in place. Figure 10 The module end cover fits over the cables AM252172_02_V.pdf October 29, 2001 13 If you cannot stand the module on the Acoustimass module. Enjoy your Acoustimass 6 speaker system. English Setting Up Your Acoustimass...® 6 Speaker System Attaching ...
...connections have been checked (Figure 10). Gently push the end cover into the grommets on that end with the cover in place. Figure 10 The module end cover fits over the cables AM252172_02_V.pdf October 29, 2001 13 If you cannot stand the module on the Acoustimass module. Enjoy your Acoustimass 6 speaker system. English Setting Up Your Acoustimass...® 6 Speaker System Attaching ...
Owner's guide
Page 14
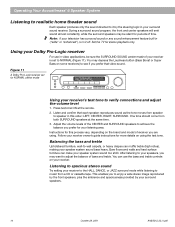
... 30 Using your receiver's test tone to verify connections and adjust the volume level 1. Follow your receiver owner's guide instructions for your listening area. Bare floors and walls and hard surface furniture can muffle treble (high notes), making your speaker system sound bass heavy. You may want to adjust the balance of the CENTER and SURROUND speakers to achieve the balance you are using the test tone. Set the TV for this order: LEFT, CENTER, RIGHT, SURROUND. Instructions for stereo...
... 30 Using your receiver's test tone to verify connections and adjust the volume level 1. Follow your receiver owner's guide instructions for your listening area. Bare floors and walls and hard surface furniture can muffle treble (high notes), making your speaker system sound bass heavy. You may want to adjust the balance of the CENTER and SURROUND speakers to achieve the balance you are using the test tone. Set the TV for this order: LEFT, CENTER, RIGHT, SURROUND. Instructions for stereo...
Owner's guide
Page 15
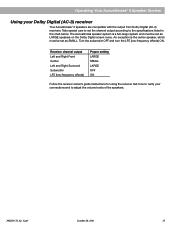
... OFF ON Follow the receiver owner's guide instructions for using the receiver test tone to verify your Dolby Digital (AC-3) receiver Your Acoustimass® 6 speakers are compatible with the output from Dolby Digital (AC-3) receivers. The Acoustimass speaker system is the center speaker, which must be set the channel output according to the specifications listed in the chart below. Turn the subwoofer OFF and turn the LFE (low-frequency effects) ON. English Operating Your Acoustimass® 6 Speaker System Using your connections and to adjust the volume levels of the...
... OFF ON Follow the receiver owner's guide instructions for using the receiver test tone to verify your Dolby Digital (AC-3) receiver Your Acoustimass® 6 speakers are compatible with the output from Dolby Digital (AC-3) receivers. The Acoustimass speaker system is the center speaker, which must be set the channel output according to the specifications listed in the chart below. Turn the subwoofer OFF and turn the LFE (low-frequency effects) ON. English Operating Your Acoustimass® 6 Speaker System Using your connections and to adjust the volume levels of the...
Owner's guide
Page 16
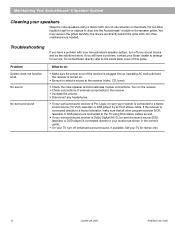
... sure the sound source (DSS, laserdisc or DVD player) is connected to your receiver as shown in the owner's guide. • On your TV, turn off enhanced surround sound, if available. You may vacuum the grilles carefully; Maintaining Your Acoustimass® 6 Speaker System Cleaning your speakers Wipe the cube speakers using RCA stereo cables as well. • If your surround sound receiver is Dolby Digital (AC-3), be sure your receiver is connected directly to a stereo sound source (TV, VCR...
... sure the sound source (DSS, laserdisc or DVD player) is connected to your receiver as shown in the owner's guide. • On your TV, turn off enhanced surround sound, if available. You may vacuum the grilles carefully; Maintaining Your Acoustimass® 6 Speaker System Cleaning your speakers Wipe the cube speakers using RCA stereo cables as well. • If your surround sound receiver is Dolby Digital (AC-3), be sure your receiver is connected directly to a stereo sound source (TV, VCR...
Owner's guide
Page 17
... decrease bass. • Adjust the bass or treble control on and the center channel is turned on the receiver slightly. Details of any external components connected to -). • If you are using the Dolby Pro-Logic mode, make sure surround sound is set to NORMAL. • If you are correct (+ to increase bass. See the inside back cover for offices and phone numbers. Warranty period The Bose Acoustimass 6 speaker system is Dolby Digital or...
... decrease bass. • Adjust the bass or treble control on and the center channel is turned on the receiver slightly. Details of any external components connected to -). • If you are using the Dolby Pro-Logic mode, make sure surround sound is set to NORMAL. • If you are correct (+ to increase bass. See the inside back cover for offices and phone numbers. Warranty period The Bose Acoustimass 6 speaker system is Dolby Digital or...
Owner's guide
Page 18
... Features Acoustimass® speaker technology combined with Adaptive Energy SummingTM speaker design Virtually Invisible® speaker design Magnetically shielded cube speakers Automatic system protection circuitry Syncom® computer quality control Driver Complement Cube speakers: One 2.5" (6.4 cm) magnetically shielded wide-range driver per cube Acoustimass module: Two 5.25" (13.3 cm) dual-voice coil low-frequency drivers Compatibility Compatible with A/V receivers rated from 4 - 8 ohms Compatible with A/V receivers rated from 10 - 100 watts per channel...
... Features Acoustimass® speaker technology combined with Adaptive Energy SummingTM speaker design Virtually Invisible® speaker design Magnetically shielded cube speakers Automatic system protection circuitry Syncom® computer quality control Driver Complement Cube speakers: One 2.5" (6.4 cm) magnetically shielded wide-range driver per cube Acoustimass module: Two 5.25" (13.3 cm) dual-voice coil low-frequency drivers Compatibility Compatible with A/V receivers rated from 4 - 8 ohms Compatible with A/V receivers rated from 10 - 100 watts per channel...

Owner's guide
Page 22
...01-30616363 FAX 01-30614105 India Bose Corporation India Private Limited W-16, Greater Kailash-II New Delhi 110 048 TEL (011) 648 4462 FAX (011) 648 4463 Ireland Bose Corporation Carrickmacross, Co Monaghan TEL 042-9661988 FAX 042-9661998 Italia Bose S.p.A., Via della Magliana 876 ...lndal TEL 31-878850 FAX 31-274891 United Kingdom Bose Limited 1 Ambley Green Gillingham Business Park Gillingham, Kent ME8 0NJ TEL 0870-741-4500 FAX 0870-741-4545 From other locations Bose Customer Service, 1 New York Ave. Bose® Corporation USA Bose Corporation, The Mountain Framingham, MA 01701-9168 ...
...01-30616363 FAX 01-30614105 India Bose Corporation India Private Limited W-16, Greater Kailash-II New Delhi 110 048 TEL (011) 648 4462 FAX (011) 648 4463 Ireland Bose Corporation Carrickmacross, Co Monaghan TEL 042-9661988 FAX 042-9661998 Italia Bose S.p.A., Via della Magliana 876 ...lndal TEL 31-878850 FAX 31-274891 United Kingdom Bose Limited 1 Ambley Green Gillingham Business Park Gillingham, Kent ME8 0NJ TEL 0870-741-4500 FAX 0870-741-4545 From other locations Bose Customer Service, 1 New York Ave. Bose® Corporation USA Bose Corporation, The Mountain Framingham, MA 01701-9168 ...

Owner's guide
Page 23
© 1999 Bose Corporation The Mountain, Framingham, MA 01701-9168 USA 252172 AM Rev.02 JN99820
© 1999 Bose Corporation The Mountain, Framingham, MA 01701-9168 USA 252172 AM Rev.02 JN99820


