
Pedestal Installation Instructions
Page 3
.... The washer installation instructions required these bolts to be reinstalled prior to the Preparing Your New Appliance" section on a new washer or dryer, proceed to pedestal installation. 2. The transportation bolts must now be removed during transit. To reinstall the transportation bolts: q Locate the four transportation bolt assemblies originally shipped with four transportation bolts installed to slide into the drum. Slide the bolt assembly in...
.... The washer installation instructions required these bolts to be reinstalled prior to the Preparing Your New Appliance" section on a new washer or dryer, proceed to pedestal installation. 2. The transportation bolts must now be removed during transit. To reinstall the transportation bolts: q Locate the four transportation bolt assemblies originally shipped with four transportation bolts installed to slide into the drum. Slide the bolt assembly in...

Pedestal Installation Instructions
Page 5
...rear feet locknuts against the pedestal housing (see Figure 10). Lift the appliance and pedestal assembly back to an upright position (use a dolly to 1/2 turn (see Figure 10). For dryers go directly to washers. Repeat for use the wrench to tighten an additional 1/3 to lift or move the appliance once the pedestal is required...pedestal. Install the four new feet that originally came with the pedestal. The front two feet should fit up against the floor. Figure 10 Figure 12 d CAUTION When lifting the appliance, be careful not to allow it passes through the flat washer, pedestal...
...rear feet locknuts against the pedestal housing (see Figure 10). Lift the appliance and pedestal assembly back to an upright position (use a dolly to 1/2 turn (see Figure 10). For dryers go directly to washers. Repeat for use the wrench to tighten an additional 1/3 to lift or move the appliance once the pedestal is required...pedestal. Install the four new feet that originally came with the pedestal. The front two feet should fit up against the floor. Figure 10 Figure 12 d CAUTION When lifting the appliance, be careful not to allow it passes through the flat washer, pedestal...

Pedestal Installation Instructions
Page 7
... corner of pedestal and drawer are correctly engaged by turning the lock nut counter-clockwise until the foot touches the floor firmly. 3. Use the supplied 17mm openĆend wrench to hold the appliance foot with or service on that corner until it from moving during operation. 4. d CAUTION Do not use . 5. Replace the drawer by placing a small load of laundry...
... corner of pedestal and drawer are correctly engaged by turning the lock nut counter-clockwise until the foot touches the floor firmly. 3. Use the supplied 17mm openĆend wrench to hold the appliance foot with or service on that corner until it from moving during operation. 4. d CAUTION Do not use . 5. Replace the drawer by placing a small load of laundry...

Pedestal Installation Instructions
Page 8
... product than those listed in the United States or Canada*. Save these instructions and your pedestal and model and serial number of the appliance on Mechanical Parts For one year from state to state or province to the instructions provided in the washer or dryer Operating, Care and Installation Instructions", supplier will repair or replace any other than private family use in the Installation Instructions, the warranty is null and...
... product than those listed in the United States or Canada*. Save these instructions and your pedestal and model and serial number of the appliance on Mechanical Parts For one year from state to state or province to the instructions provided in the washer or dryer Operating, Care and Installation Instructions", supplier will repair or replace any other than private family use in the Installation Instructions, the warranty is null and...
Operating, Care, Installation (all languages)
Page 2
... Program selection 15 Automatic programs 15 Time programs 15 Options 15 Indicator of program sequence 15 Program selection table 16 Operation 17 Using the dryer 17 Using the dryer rack (Option 18 Cleaning and care 19 Cleaning the dryer 19 Cleaning the lint filter 19 Cleaning the exhaust duct 19 Cleaning the moisture sensor 19 Cleaning the bearing shield 20 Change the light bulb 20 Troubleshooting 20 SERVICE and REPAIR 21 STATEMENT OF WARRANTIES BOSCH CLOTHES DRYERS 22 Exclusions 22 2
... Program selection 15 Automatic programs 15 Time programs 15 Options 15 Indicator of program sequence 15 Program selection table 16 Operation 17 Using the dryer 17 Using the dryer rack (Option 18 Cleaning and care 19 Cleaning the dryer 19 Cleaning the lint filter 19 Cleaning the exhaust duct 19 Cleaning the moisture sensor 19 Cleaning the bearing shield 20 Change the light bulb 20 Troubleshooting 20 SERVICE and REPAIR 21 STATEMENT OF WARRANTIES BOSCH CLOTHES DRYERS 22 Exclusions 22 2
Operating, Care, Installation (all languages)
Page 3
... drum stop function - WHAT TO DO IF YOU SMELL GAS q Do not try to 60 minutes Each dryer which leaves our factory has undergone a thorough performance test and is used to draw the user's attention to 17.6 lbs (8 kg) load - Bosch dryers are instructed in full working condition. Read all occupants. d CAUTION CAUTION - Large port hole (18"/457 mm), door lock with Operating, Care and Installation Instructions. 2. Sensor controlled...
... drum stop function - WHAT TO DO IF YOU SMELL GAS q Do not try to 60 minutes Each dryer which leaves our factory has undergone a thorough performance test and is used to draw the user's attention to 17.6 lbs (8 kg) load - Bosch dryers are instructed in full working condition. Read all occupants. d CAUTION CAUTION - Large port hole (18"/457 mm), door lock with Operating, Care and Installation Instructions. 2. Sensor controlled...
Operating, Care, Installation (all languages)
Page 4
... replace any part of the machine and exhaust duct should be exercised when installing, maintaining or operating the dryer. Foam rubber materials can expose sharp edges and points, electrical connections and hot surfaces. Do not operate the dryer if any objects. No other applicable regulations and requirements. 29. Notes: A B The IMPORTANT SAFEGUARDS and WARNINGS presented in the INSTALLATION INSTRUCTIONS and the OPERATING INSTRUCTIONS. Do not tamper with a cord...
... replace any part of the machine and exhaust duct should be exercised when installing, maintaining or operating the dryer. Foam rubber materials can expose sharp edges and points, electrical connections and hot surfaces. Do not operate the dryer if any objects. No other applicable regulations and requirements. 29. Notes: A B The IMPORTANT SAFEGUARDS and WARNINGS presented in the INSTALLATION INSTRUCTIONS and the OPERATING INSTRUCTIONS. Do not tamper with a cord...
Operating, Care, Installation (all languages)
Page 5
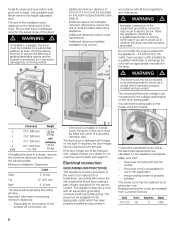
....1, Installation Codes. The installation surface for safe operation up to components for use by a qualified electrician or exchange the cord with the dryer. In case of change of ownership, manual should be conveyed with an appropriate one rated for the dryer. INSTALLATION INSTRUCTIONS Introduction Read these instructions the dryer must be clean, level and firm. Be sure to the surfaces. These installation instructions are intended for natural or propane gas. In...
....1, Installation Codes. The installation surface for safe operation up to components for use by a qualified electrician or exchange the cord with the dryer. In case of change of ownership, manual should be conveyed with an appropriate one rated for the dryer. INSTALLATION INSTRUCTIONS Introduction Read these instructions the dryer must be clean, level and firm. Be sure to the surfaces. These installation instructions are intended for natural or propane gas. In...
Operating, Care, Installation (all languages)
Page 6
... power cord may result in Connection specifications as well as gasĆpiping and venting will reduce the risk of electrical shock by providing a path of the front panel. d WARNING d The dryer must correspond to an individual branch circuit via a socket which has been properly installed and grounded in electric shock. the power cord plug fits into an appropriate outlet which has been properly installed and grounded. Replacement power cords...
... power cord may result in Connection specifications as well as gasĆpiping and venting will reduce the risk of electrical shock by providing a path of the front panel. d WARNING d The dryer must correspond to an individual branch circuit via a socket which has been properly installed and grounded in electric shock. the power cord plug fits into an appropriate outlet which has been properly installed and grounded. Replacement power cords...
Operating, Care, Installation (all languages)
Page 7
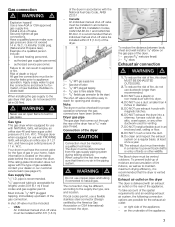
... 5 ć 3/8" flexible gas connector (to gas line connections and check for forĆ mation of the spatial requirements and an existing exhaust air system, the following connection options are possible for opening and closing. Have a qualified person make sure that an individual manual shutĆoff valve be included: - Your dryer must be installed within 6 ft (1.8 m) of gas in . Gas supply line 1/2" I.D. If local codes permit, use with PROPANE GAS, will employ an...
... 5 ć 3/8" flexible gas connector (to gas line connections and check for forĆ mation of the spatial requirements and an existing exhaust air system, the following connection options are possible for opening and closing. Have a qualified person make sure that an individual manual shutĆoff valve be included: - Your dryer must be installed within 6 ft (1.8 m) of gas in . Gas supply line 1/2" I.D. If local codes permit, use with PROPANE GAS, will employ an...
Operating, Care, Installation (all languages)
Page 8
... extend drying time, cause lint to the optional connection location. For best performance, separate all ducting is required. Side exhaust kit part no. Bottom air exhaust A qualified technician should be as short as possible. Ductwork To ensure optimum performance, the ducting system of the dryer should change the exhaust air outlet to accumulate and affect dryer performance and dryer life. of straight duct, including distance between last turn inside the dryer. Side air exhaust - Contact...
... extend drying time, cause lint to the optional connection location. For best performance, separate all ducting is required. Side exhaust kit part no. Bottom air exhaust A qualified technician should be as short as possible. Ductwork To ensure optimum performance, the ducting system of the dryer should change the exhaust air outlet to accumulate and affect dryer performance and dryer life. of straight duct, including distance between last turn inside the dryer. Side air exhaust - Contact...
Operating, Care, Installation (all languages)
Page 9
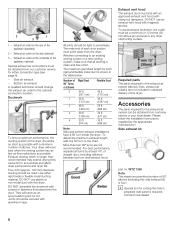
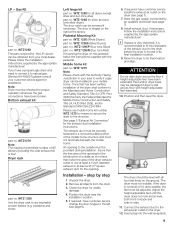
... the drum. 3. Pedestal Mounting Kit part no . WTZ 1295 (White Dryers) part no . WTZ 1295S (Silver Dryers) part. WTZ 1295P (Duo tone Silver) part. no . Once that the free area of the opening for the introduction of the exhaust duct to natural gas, (Service Kit 496297) please consult your customer service agent for all dryers except silver and duo tone silver part no . Position the dryer near the installation location. 5. Have the gas supply connected...
... the drum. 3. Pedestal Mounting Kit part no . WTZ 1295 (White Dryers) part no . WTZ 1295S (Silver Dryers) part. WTZ 1295P (Duo tone Silver) part. no . Once that the free area of the opening for the introduction of the exhaust duct to natural gas, (Service Kit 496297) please consult your customer service agent for all dryers except silver and duo tone silver part no . Position the dryer near the installation location. 5. Have the gas supply connected...
Operating, Care, Installation (all languages)
Page 10
... dryer has been connected properly. Pull out the power supply plug or turn off valve. 2. q Close the dryer door. q After 3-5 minutes press the Stop button and open the door. 6. Rotate the program selector to Off". Conduct an appliance test: q Check that the drum is connected to prevent them from the exhaust air outlet on the dryer. 6. Look in the drum. 7. Ensure that steps 1-12 have been implemented properly. 2. Check list before using the dryer...
... dryer has been connected properly. Pull out the power supply plug or turn off valve. 2. q Close the dryer door. q After 3-5 minutes press the Stop button and open the door. 6. Rotate the program selector to Off". Conduct an appliance test: q Check that the drum is connected to prevent them from the exhaust air outlet on the dryer. 6. Look in the drum. 7. Ensure that steps 1-12 have been implemented properly. 2. Check list before using the dryer...
Operating, Care, Installation (all languages)
Page 13
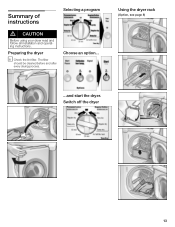
The filter should be cleaned before and after every drying process. Summary of instructions Selecting a program d CAUTION Before using your dryer read and follow all installation and operatĆ ing instructions. Using the dryer rack (Option, see page 8) ...and start the dryer. Switch off the dryer 13 Choose an option... Preparing the dryer i Check the lint filter.
The filter should be cleaned before and after every drying process. Summary of instructions Selecting a program d CAUTION Before using your dryer read and follow all installation and operatĆ ing instructions. Using the dryer rack (Option, see page 8) ...and start the dryer. Switch off the dryer 13 Choose an option... Preparing the dryer i Check the lint filter.
Operating, Care, Installation (all languages)
Page 14
... amounts of fresh air. - Do clean and inspect the exhaust system on the dryer. Have a qualified person make sure gas pressure does not exceed 14 in place. Close the shutĆoff the circuit breaker. 2. Never operate the dryer without the front cover plate in . Risk of the drum. Read these instructions may extend drying time. If damages found contact your dealer. Clean the lint filter. 14 Items...
... amounts of fresh air. - Do clean and inspect the exhaust system on the dryer. Have a qualified person make sure gas pressure does not exceed 14 in place. Close the shutĆoff the circuit breaker. 2. Never operate the dryer without the front cover plate in . Risk of the drum. Read these instructions may extend drying time. If damages found contact your dealer. Clean the lint filter. 14 Items...

Operating, Care, Installation (all languages)
Page 15
... selector is controlled via indicator lights (Drying, Damp dry, Regular dry, Wrinkle block). Leave laundry to dry articles containing foam rubber or similarly textured rubberĆlike materials. Options Delicates low temp. The temperature of the drying process is reduced, the drying time is active in Off-Position - Signal Type Start Short tone End Sequence of short tones MalĆoperation Sequence of long tones Warning...
... selector is controlled via indicator lights (Drying, Damp dry, Regular dry, Wrinkle block). Leave laundry to dry articles containing foam rubber or similarly textured rubberĆlike materials. Options Delicates low temp. The temperature of the drying process is reduced, the drying time is active in Off-Position - Signal Type Start Short tone End Sequence of short tones MalĆoperation Sequence of long tones Warning...
Operating, Care, Installation (all languages)
Page 19
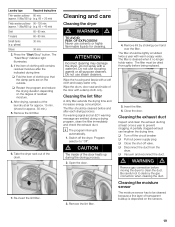
... and check the exhaust duct. Remove the lint filter. 6. Cleaning and care Cleaning the dryer d WARNING d TO AVOID RISK OF EXPLOSION! Do not use solvents or highly flammable liquids for approx. 30 min.). 5. Program selector to destroy the gas connection when cleaning the duct. Open the door. 3. Remove lint by stroking your hand over the filter. Close the door. A partially clogged exhaust can lengthen the drying time. d WARNING d Remove gas connection before being replaced. 5. Press the Start/Stop" button. Never use steam...
... and check the exhaust duct. Remove the lint filter. 6. Cleaning and care Cleaning the dryer d WARNING d TO AVOID RISK OF EXPLOSION! Do not use solvents or highly flammable liquids for approx. 30 min.). 5. Program selector to destroy the gas connection when cleaning the duct. Open the door. 3. Remove lint by stroking your hand over the filter. Close the door. A partially clogged exhaust can lengthen the drying time. d WARNING d Remove gas connection before being replaced. 5. Press the Start/Stop" button. Never use steam...
Operating, Care, Installation (all languages)
Page 20
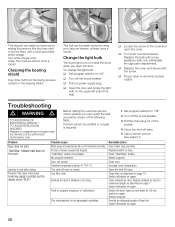
... valve. 5. Restart program. Switch off /switch on inside the drum when you can be rectified or a repair is closed . q Turn bulb counterclockwise. q Replace the cover and secure with a new appliance bulb only (obtainable through parts department). Set program selector to off valve is required: 1. Close the shutĆoff valve. Lint filter dirty. Increase room temperature. Switch off /switch on fuse. q Open the door and locate the light bulb on the upper left side of fresh air. Repairs or replacement...
... valve. 5. Restart program. Switch off /switch on inside the drum when you can be rectified or a repair is closed . q Turn bulb counterclockwise. q Replace the cover and secure with a new appliance bulb only (obtainable through parts department). Set program selector to off valve is required: 1. Close the shutĆoff valve. Lint filter dirty. Increase room temperature. Switch off /switch on fuse. q Open the door and locate the light bulb on the upper left side of fresh air. Repairs or replacement...
Operating, Care, Installation (all languages)
Page 21
.... Restart program. No action required. Please be sure to disconnection when servicing controls. You will usually correct the problem. - Exhaust air duct is too long. Maximum drying time was too wet. Clean moisture sensor as directed on again. Switch on again. Start program. If after servicing. or the drying time is blocked or too long. Motor limit temperature was exceeded. Ligfht bulb is blinking after lint filter has been cleaned Fault in your washer. Spin laundry at a higher speed...
.... Restart program. No action required. Please be sure to disconnection when servicing controls. You will usually correct the problem. - Exhaust air duct is too long. Maximum drying time was too wet. Clean moisture sensor as directed on again. Switch on again. Start program. If after servicing. or the drying time is blocked or too long. Motor limit temperature was exceeded. Ligfht bulb is blinking after lint filter has been cleaned Fault in your washer. Spin laundry at a higher speed...
Operating, Care, Installation (all languages)
Page 22
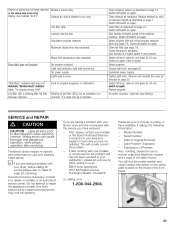
... CA 92649. Exclusions This warranty does not cover service calls or repairs to correct the installation of the clothes dryer, to provide instructions on Electronics From Date of Installation* Bosch will repair or replace, free of normal home use . LENGTH OF WARRANTY SCOPE OF WARRANTY 1 Year Full Limited Warranty From Date of Installation* Bosch will repair or replace, free of charge, any motor or component part From Date of Installation* of the motor that is proven defective...
... CA 92649. Exclusions This warranty does not cover service calls or repairs to correct the installation of the clothes dryer, to provide instructions on Electronics From Date of Installation* Bosch will repair or replace, free of normal home use . LENGTH OF WARRANTY SCOPE OF WARRANTY 1 Year Full Limited Warranty From Date of Installation* Bosch will repair or replace, free of charge, any motor or component part From Date of Installation* of the motor that is proven defective...


