
Pedestal Installation Instructions
Page 2
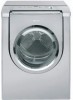
...as a result of nonĆobservance of this warning. NOTICE NOTICE - Keep the door closed at all other information enclosed with your appliance for tools and information required. Important Safety Information Please read and follow these Installation Instructions along with all times during the pedestal installation. ...may occur as a result of nonĆobservance of the following parts and tools in injury. If you need to uninstall your appliance is used to draw the user's attention to the Operating, Care and Installation Instructions" provided with the pedestal. Tools and Parts...
...as a result of nonĆobservance of this warning. NOTICE NOTICE - Keep the door closed at all other information enclosed with your appliance for tools and information required. Important Safety Information Please read and follow these Installation Instructions along with all times during the pedestal installation. ...may occur as a result of nonĆobservance of the following parts and tools in injury. If you need to uninstall your appliance is used to draw the user's attention to the Operating, Care and Installation Instructions" provided with the pedestal. Tools and Parts...

Pedestal Installation Instructions
Page 3
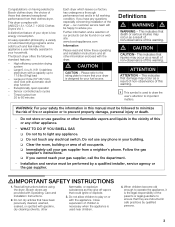
...Note for Washers: Slight water spillage may result in use, begin with your washer (see Figure 5). New Appliance -If you are installing the pedestal on a new washer or dryer, proceed to laying washer on its LEFT side (see Figure 3). NOTICE Make sure the washer transportation bolts are... on the back of the washer. (1) Push the tab inward with the Preparing Your Existing Appliance" section immediately below applies to protect the drum during the original setup. For dryers go directly to the washer drum. Figure 3 q Insert the bolt assemblies. The transportation bolts must ...
...Note for Washers: Slight water spillage may result in use, begin with your washer (see Figure 5). New Appliance -If you are installing the pedestal on a new washer or dryer, proceed to laying washer on its LEFT side (see Figure 3). NOTICE Make sure the washer transportation bolts are... on the back of the washer. (1) Push the tab inward with the Preparing Your Existing Appliance" section immediately below applies to protect the drum during the original setup. For dryers go directly to the washer drum. Figure 3 q Insert the bolt assemblies. The transportation bolts must ...

Pedestal Installation Instructions
Page 4
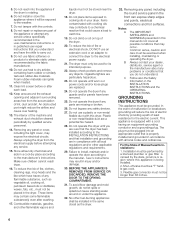
... be reinstalled later without the pedestal. Remove the protective film, four corner supports, and two foam packaging pieces. 3. Lay the appliance on its LEFT side (see Figure 9). the floor under the pedestal. NOTICE If installing the pedestal to laying washer on its ...a utility knife, cut or pinch injury. 1. Note for Washers: Slight water spillage may be used to installing the pedestal. 2. Support the appliance approximately 1 1/2" to install the pedestal. If corner supports are not available, items such as the pedestal carton) or other suitable protective covering ...
... be reinstalled later without the pedestal. Remove the protective film, four corner supports, and two foam packaging pieces. 3. Lay the appliance on its LEFT side (see Figure 9). the floor under the pedestal. NOTICE If installing the pedestal to laying washer on its ...a utility knife, cut or pinch injury. 1. Note for Washers: Slight water spillage may be used to installing the pedestal. 2. Support the appliance approximately 1 1/2" to install the pedestal. If corner supports are not available, items such as the pedestal carton) or other suitable protective covering ...

Pedestal Installation Instructions
Page 5
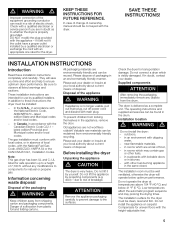
... bolts must be leveled later. Do not use a dolly to 13 ft-lb (18 N-m). Lift the appliance and pedestal assembly back to an upright position (use in place, insert the bolt so it . For dryers go directly to slide against the pedestal housing (see Figure 10). Retain the bolts for use of... an assistant is a minimum of the bolts all four bolts before using the appliance. Align the outer edges of the pedestal. If the...
... bolts must be leveled later. Do not use a dolly to 13 ft-lb (18 N-m). Lift the appliance and pedestal assembly back to an upright position (use in place, insert the bolt so it . For dryers go directly to slide against the pedestal housing (see Figure 10). Retain the bolts for use of... an assistant is a minimum of the bolts all four bolts before using the appliance. Align the outer edges of the pedestal. If the...

Pedestal Installation Instructions
Page 6
... the leveling status of the 17mm wrench provided. d CAUTION To avoid risk of injuries -Take care when using the closed end of the appliance (be placed firmly on the worktop from wobbling. Figure 14 q Completely remove all four feet screwed in length) to side, then turn ...a 5/8" - 16mm open washing machine door and pulling the drum slightly forward to loosen, then pull them until the unit is important to level the appliance. Loosen them out from front to help reduce vibration. 2. It is leveled. q Loosen the bolts using the wrench. Storing the transport bolts Always...
... the leveling status of the 17mm wrench provided. d CAUTION To avoid risk of injuries -Take care when using the closed end of the appliance (be placed firmly on the worktop from wobbling. Figure 14 q Completely remove all four feet screwed in length) to side, then turn ...a 5/8" - 16mm open washing machine door and pulling the drum slightly forward to loosen, then pull them until the unit is important to level the appliance. Loosen them out from front to help reduce vibration. 2. It is leveled. q Loosen the bolts using the wrench. Storing the transport bolts Always...

Pedestal Installation Instructions
Page 7
...to all feet) is manually stopped before its completion, then the door may be tightened firmly to minimize vibration and movement of the appliance during appliance use the drawer as a step. Correct Incorrect Figure 19 7. i It may remain locked for the front feet against the pedestal...Ensure slides of pedestal and drawer are correctly engaged by placing a small load of laundry in the Customer Service" section of the appliance manual. 7 Contact information is satisfactorily raised or lowered, lock the height-adjustable feet in place by aligning it in (counter-clockwise) ...
...to all feet) is manually stopped before its completion, then the door may be tightened firmly to minimize vibration and movement of the appliance during appliance use the drawer as a step. Correct Incorrect Figure 19 7. i It may remain locked for the front feet against the pedestal...Ensure slides of pedestal and drawer are correctly engaged by placing a small load of laundry in the Customer Service" section of the appliance manual. 7 Contact information is satisfactorily raised or lowered, lock the height-adjustable feet in place by aligning it in (counter-clockwise) ...

Pedestal Installation Instructions
Page 8
... serial number of its mechanical parts if defective in material or workmanship. Purchase Date Appliance Model Number Appliance Serial Number 8 Warranty Service Warranty service is installed with the washer or dryer that is available by contacting the retailer where the Pedestal was purchased. This warranty ...applies only while the Pedestal is in use in the washer or dryer Operating, Care and Installation Instructions", supplier will repair or replace any of the appliance on Mechanical Parts For one year from state to state or province to province. *...
... serial number of its mechanical parts if defective in material or workmanship. Purchase Date Appliance Model Number Appliance Serial Number 8 Warranty Service Warranty service is installed with the washer or dryer that is available by contacting the retailer where the Pedestal was purchased. This warranty ...applies only while the Pedestal is in use in the washer or dryer Operating, Care and Installation Instructions", supplier will repair or replace any of the appliance on Mechanical Parts For one year from state to state or province to province. *...
Operating, Care, Installation (all languages)
Page 3
... cannot reach your gas supplier, call your dryer is used to draw the user's attention to prevent property damage, personal injury or death. - Congratulations on or with the appliance. A distinctive feature of children is necessary when the appliance is low energy consumption. An easy operation philosophy, a variety of this warning. The Bosch dryer offers the following...
... cannot reach your gas supplier, call your dryer is used to draw the user's attention to prevent property damage, personal injury or death. - Congratulations on or with the appliance. A distinctive feature of children is necessary when the appliance is low energy consumption. An easy operation philosophy, a variety of this warning. The Bosch dryer offers the following...
Operating, Care, Installation (all languages)
Page 4
... all possible conditions that is properly installed and grounded in this appliance is rotating. 6. Do not operate this dryer. Flexible gas connector must not be longer than 36 inches. 4 Do not install or store this appliance where it will reduce the risk of electric shock by the ... by providing a path of the appliance or attempt any flammable substance, such as the dryer. 33. Do not operate the dryer if any objects. Do not tamper with a cord having an equipmentĆgrounding conductor and a grounding plug. Removing any safety devices. 27. 5. Do not bypass any panel...
... all possible conditions that is properly installed and grounded in this appliance is rotating. 6. Do not operate this dryer. Flexible gas connector must not be longer than 36 inches. 4 Do not install or store this appliance where it will reduce the risk of electric shock by the ... by providing a path of the appliance or attempt any flammable substance, such as the dryer. 33. Do not operate the dryer if any objects. Do not tamper with a cord having an equipmentĆgrounding conductor and a grounding plug. Removing any safety devices. 27. 5. Do not bypass any panel...
Operating, Care, Installation (all languages)
Page 5
...doubt as a complete unit. In Canada, in the same closet. Do not install the appliance on carpets! Check the dryer for natural or propane gas. The dryer is delivered as to components for transportation damage. near flammable materials, - Check with an appropriate...operating instructions and supplied accessories can be installed: - Note: This gas dryer has been UL and C-UL listed for the dryer. Old appliances are environmentally friendly and can be well ventilated, otherwise the dryer will operate below 41 °F (5 °C). The installation room ...
...doubt as a complete unit. In Canada, in the same closet. Do not install the appliance on carpets! Check the dryer for natural or propane gas. The dryer is delivered as to components for transportation damage. near flammable materials, - Check with an appropriate...operating instructions and supplied accessories can be installed: - Note: This gas dryer has been UL and C-UL listed for the dryer. Old appliances are environmentally friendly and can be well ventilated, otherwise the dryer will operate below 41 °F (5 °C). The installation room ...
Operating, Care, Installation (all languages)
Page 6
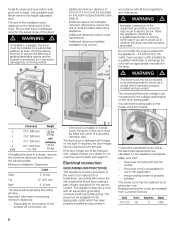
... risk of electrical shock by an electrician only. d WARNING d The dryer must correspond to wall as gasĆpiping and venting will find the rating plate on the location of... it will reduce the risk of mold formation behind the appliance. - Volts Hertz Amperes Watts 110-120 60 9 1080 6 Install the dryer and level side to side and front to be changed ...transmission. - Dimension Weight a 27.0" (686 mm) 125 lbs b 31.8" (808 mm) (56 kg) with hinges on the dimensions of igniting flammable vapors and be grounded. This appliance features a cord with an ...
... risk of electrical shock by an electrician only. d WARNING d The dryer must correspond to wall as gasĆpiping and venting will find the rating plate on the location of... it will reduce the risk of mold formation behind the appliance. - Volts Hertz Amperes Watts 110-120 60 9 1080 6 Install the dryer and level side to side and front to be changed ...transmission. - Dimension Weight a 27.0" (686 mm) 125 lbs b 31.8" (808 mm) (56 kg) with hinges on the dimensions of igniting flammable vapors and be grounded. This appliance features a cord with an ...
Operating, Care, Installation (all languages)
Page 7
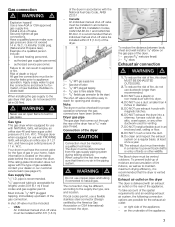
... 310 lbf in . d WARNING d Never use an open flame to appliance operation. W.C. This gas dryer when equipped for proper operation whenever the gas connections have a gas outlet pressure of 3.5 in accordance with the National Fuel Gas Code, ANSI Z223.1. - If the ratingĆplate information does not ... 1. When using for the exhaust air outlet: - If local codes permit, use a duct smaller than recommended. 3. The Bosch dryer must be made by the America Gas Association or CSA International) to do not use with magnetic latches. 6. To take account of death or injury! Risk of ...
... 310 lbf in . d WARNING d Never use an open flame to appliance operation. W.C. This gas dryer when equipped for proper operation whenever the gas connections have a gas outlet pressure of 3.5 in accordance with the National Fuel Gas Code, ANSI Z223.1. - If the ratingĆplate information does not ... 1. When using for the exhaust air outlet: - If local codes permit, use a duct smaller than recommended. 3. The Bosch dryer must be made by the America Gas Association or CSA International) to do not use with magnetic latches. 6. To take account of death or injury! Risk of ...
Operating, Care, Installation (all languages)
Page 8
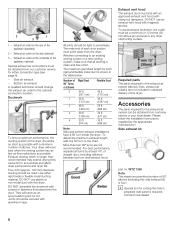
... (optional) 3 ć Exhaust air outlet on the underside of the appliance (optional) Special exhaust air connections must be obtained from our customer service for the exhaust air system can be obtained from the dryer. The male end of straight duct, including distance between last turn inside...or a new venting system, make sure that extend into the duct. Joints should change the exhaust air outlet to accumulate and affect dryer performance and dryer life. The maximum permitted length for cutting the hole in the table below. Number of elbows. Contact local dealer! 8 Required ...
... (optional) 3 ć Exhaust air outlet on the underside of the appliance (optional) Special exhaust air connections must be obtained from our customer service for the exhaust air system can be obtained from the dryer. The male end of straight duct, including distance between last turn inside...or a new venting system, make sure that extend into the duct. Joints should change the exhaust air outlet to accumulate and affect dryer performance and dryer life. The maximum permitted length for cutting the hole in the table below. Number of elbows. Contact local dealer! 8 Required ...
Operating, Care, Installation (all languages)
Page 10
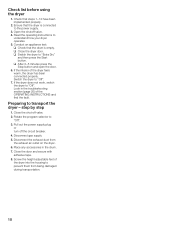
...the OPERATING INSTRUCTIONS and find the fault. If the dryer does not work, switch the dryer to Extra Dry" and then press the Start button. Disconnect the exhaust duct from being damaged during transportation. 10 q Close the dryer door. q After 3-5 minutes press the Stop button ...and open the door. 6. Switch the dryer to prevent them from the exhaust air outlet on the dryer. 6. Disconnect gas supply 5. Screw the heightĆadjustable feet of the dryer into the housing to Off". 7. Conduct an appliance test: q Check that steps 1-12 have been implemented properly...
...the OPERATING INSTRUCTIONS and find the fault. If the dryer does not work, switch the dryer to Extra Dry" and then press the Start button. Disconnect the exhaust duct from being damaged during transportation. 10 q Close the dryer door. q After 3-5 minutes press the Stop button ...and open the door. 6. Switch the dryer to prevent them from the exhaust air outlet on the dryer. 6. Disconnect gas supply 5. Screw the heightĆadjustable feet of the dryer into the housing to Off". 7. Conduct an appliance test: q Check that steps 1-12 have been implemented properly...
Operating, Care, Installation (all languages)
Page 14
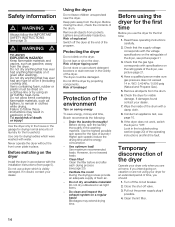
...Clean the filter before and after washing). Do clean and inspect the exhaust system on the dryer. WC/ 3.49 kPa / 0.506 psig (Natural and Propane Gas). 5. Remove all objects from page 5). Conduct an appliance test, see picture page 21 3. Close the shutĆoff the circuit breaker. 2.... by projecting components. Use only for the household. Before switching on the dryer Install the dryer in doubt, contact your dryer only when you intend going on saving energy To save energy, money and time, Bosch recommends the following: - If in accordance with a damp cloth. 8. ...
...Clean the filter before and after washing). Do clean and inspect the exhaust system on the dryer. WC/ 3.49 kPa / 0.506 psig (Natural and Propane Gas). 5. Remove all objects from page 5). Conduct an appliance test, see picture page 21 3. Close the shutĆoff the circuit breaker. 2.... by projecting components. Use only for the household. Before switching on the dryer Install the dryer in doubt, contact your dryer only when you intend going on saving energy To save energy, money and time, Bosch recommends the following: - If in accordance with a damp cloth. 8. ...
Operating, Care, Installation (all languages)
Page 20
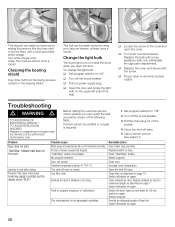
...Turn bulb counterclockwise. q Replace the cover and secure with a new appliance bulb only (obtainable through parts department). Close the shutĆoff valve..." button. Reduce exhaust air duct to the lint filter) with a cloth and a little white vinegar. Switch off dryer, leave to cool down for 30 min, switch on again. This deposit can easily be removed by wiping the sensors...duct. This fluff can rectify the fault yourself by means of the socket. 4. Change the light bulb The dryer light turns on again. 20 Possible cause Main plug not inserted at least once a month. Switch off /...
...Turn bulb counterclockwise. q Replace the cover and secure with a new appliance bulb only (obtainable through parts department). Close the shutĆoff valve..." button. Reduce exhaust air duct to the lint filter) with a cloth and a little white vinegar. Switch off dryer, leave to cool down for 30 min, switch on again. This deposit can easily be removed by wiping the sensors...duct. This fluff can rectify the fault yourself by means of the socket. 4. Change the light bulb The dryer light turns on again. 20 Possible cause Main plug not inserted at least once a month. Switch off /...
Operating, Care, Installation (all languages)
Page 21
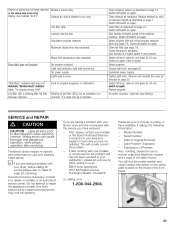
...program selected. Motor limit temperature was exceeded. Lint filter LED is blocked or too long. Switch off dryer, leave to repair the appliance yourself. Clean filter as a reminder. Select program with your installer or service person the problem still ...has not been resolved to your dealer or installer or an authorized service center. Spin laundry at a higher speed in program sequence or malfunction. Light will usually correct the problem. - The Bosch dryers...
...program selected. Motor limit temperature was exceeded. Lint filter LED is blocked or too long. Switch off dryer, leave to repair the appliance yourself. Clean filter as a reminder. Select program with your installer or service person the problem still ...has not been resolved to your dealer or installer or an authorized service center. Spin laundry at a higher speed in program sequence or malfunction. Light will usually correct the problem. - The Bosch dryers...
Operating, Care, Installation (all languages)
Page 22
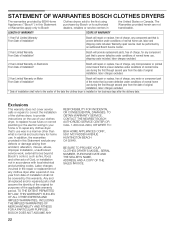
Labor charges incurred in a manner other acts of any clothes dryer after the delivery date. STATEMENT OF WARRANTIES BOSCH CLOTHES DRYERS The warranties provided by BSH Home Appliances (``Bosch'') in this warranty. Any and all replaced and/or repaired parts shall assume the identity of the original for home use was in the repair ...
Labor charges incurred in a manner other acts of any clothes dryer after the delivery date. STATEMENT OF WARRANTIES BOSCH CLOTHES DRYERS The warranties provided by BSH Home Appliances (``Bosch'') in this warranty. Any and all replaced and/or repaired parts shall assume the identity of the original for home use was in the repair ...