
Pedestal Installation Instructions
Page 3
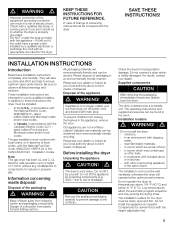
... can be reinstalled prior to washers. New Appliance -If you are reinstalled prior to pedestal installation to prevent potential damage to step 3. For dryers go directly to the washer drum. Align each one into the hole until all the way inside the back panel of the unit. NOTICE... (such as support. Slide the bolt assembly in the plastic cover (see Figure 2). Figure 4 q Make sure the tab on a new washer or dryer, proceed to slide into the drum. Note for Washers: Slight water spillage may result if the plastic bushing is inserted in place, then tighten each...
... can be reinstalled prior to washers. New Appliance -If you are reinstalled prior to pedestal installation to prevent potential damage to step 3. For dryers go directly to the washer drum. Align each one into the hole until all the way inside the back panel of the unit. NOTICE... (such as support. Slide the bolt assembly in the plastic cover (see Figure 2). Figure 4 q Make sure the tab on a new washer or dryer, proceed to slide into the drum. Note for Washers: Slight water spillage may result if the plastic bushing is inserted in place, then tighten each...

Pedestal Installation Instructions
Page 5
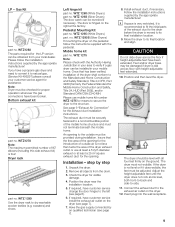
... the appliance. Using the supplied 17 mm open end wrench, tighten only the two rear feet locknuts against the pedestal housing (see Figure 10). For dryers go directly to slide against the appliance housing. Loosely thread all four bolts with the washers and spacers in place before using the appliance. Use...
... the appliance. Using the supplied 17 mm open end wrench, tighten only the two rear feet locknuts against the pedestal housing (see Figure 10). For dryers go directly to slide against the appliance housing. Loosely thread all four bolts with the washers and spacers in place before using the appliance. Use...

Pedestal Installation Instructions
Page 8
..., record the purchase date of your sales receipt for future reference. Warranty Service Warranty service is installed with the listed washer or dryer and operated according to province. *Warranty terms may also have other product than private family use in the Installation Instructions, the warranty... of the appliance on Mechanical Parts For one year from state to state or province to the instructions provided in the washer or dryer Operating, Care and Installation Instructions", supplier will repair or replace any other rights which the pedestal is installed. WARRANTY Full One...
..., record the purchase date of your sales receipt for future reference. Warranty Service Warranty service is installed with the listed washer or dryer and operated according to province. *Warranty terms may also have other product than private family use in the Installation Instructions, the warranty... of the appliance on Mechanical Parts For one year from state to state or province to the instructions provided in the washer or dryer Operating, Care and Installation Instructions", supplier will repair or replace any other rights which the pedestal is installed. WARRANTY Full One...
Operating, Care, Installation (all languages)
Page 2
... Options 15 Indicator of program sequence 15 Program selection table 16 Operation 16 Using the dryer 16 Using the dryer rack (Option 17 Cleaning and care 19 Cleaning the dryer 19 Cleaning the lint filter 19 Cleaning the exhaust duct 19 Cleaning the moisture sensor ...19 Cleaning the bearing shield 19 Change the light bulb 20 Troubleshooting 20 SERVICE and REPAIR 21 STATEMENT OF WARRANTIES BOSCH CLOTHES DRYERS...
... Options 15 Indicator of program sequence 15 Program selection table 16 Operation 16 Using the dryer 16 Using the dryer rack (Option 17 Cleaning and care 19 Cleaning the dryer 19 Cleaning the lint filter 19 Cleaning the exhaust duct 19 Cleaning the moisture sensor ...19 Cleaning the bearing shield 19 Change the light bulb 20 Troubleshooting 20 SERVICE and REPAIR 21 STATEMENT OF WARRANTIES BOSCH CLOTHES DRYERS...
Operating, Care, Installation (all languages)
Page 3
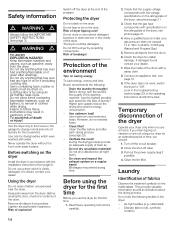
... be followed to minimize the risk of this or any phone in safe practices by a qualified installer, service agency or the gas supplier. This indicates that could ignite or explode. 3. Read all occupants. Do not reach into the appliance if the drum ... is used near children. 4. q Do not touch any questions especially concerning installation of our products can be performed by qualified persons. 5. Bosch dryers are instructed in your building. Please refer to the rating plate to light any appliance. This indicates that demand exceptional performance from 20 to ...
... be followed to minimize the risk of this or any phone in safe practices by a qualified installer, service agency or the gas supplier. This indicates that could ignite or explode. 3. Read all occupants. Do not reach into the appliance if the drum ... is used near children. 4. q Do not touch any questions especially concerning installation of our products can be performed by qualified persons. 5. Bosch dryers are instructed in your building. Please refer to the rating plate to light any appliance. This indicates that demand exceptional performance from 20 to ...
Operating, Care, Installation (all languages)
Page 4
... cord having an equipmentĆgrounding conductor and a grounding plug. Do not use an extension cord or an adapter to connect the dryer to the manufacĆ turer's instructions may expose live electrical circuits. Removing any panel or cover, including the light cover, may ... must be longer than 36 inches. 4 6. The plug must be a T" handĆ le gas cock. 3. Flexible gas connector must not be exposed to the manufacturer's instructions. Do not operate the dryer if any safety devices. 27. C Follow also the Safety Information in compliance with the controls. 8....
... cord having an equipmentĆgrounding conductor and a grounding plug. Do not use an extension cord or an adapter to connect the dryer to the manufacĆ turer's instructions may expose live electrical circuits. Removing any panel or cover, including the light cover, may ... must be longer than 36 inches. 4 6. The plug must be a T" handĆ le gas cock. 3. Flexible gas connector must not be exposed to the manufacturer's instructions. Do not operate the dryer if any safety devices. 27. C Follow also the Safety Information in compliance with the controls. 8....
Operating, Care, Installation (all languages)
Page 5
... INSTRUCTIONS Introduction Read these instructions the dryer must conform with local codes, or in the same closet. In addition to the surfaces. d Do not install the dryer: - outdoors, - Low temperatures affect the automatic program sequence and may contain gas or other fuelĆburning appliance ...in absence of local codes, with the National Fuel Gas Code, ANSI Z223.1/NFPA 54 or the CAN/CSA&#...
... INSTRUCTIONS Introduction Read these instructions the dryer must conform with local codes, or in the same closet. In addition to the surfaces. d Do not install the dryer: - outdoors, - Low temperatures affect the automatic program sequence and may contain gas or other fuelĆburning appliance ...in absence of local codes, with the National Fuel Gas Code, ANSI Z223.1/NFPA 54 or the CAN/CSA&#...
Operating, Care, Installation (all languages)
Page 6
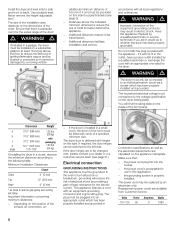
... minimum distances according to the following table: Minimum Installation Clearances Closet Sides 0" (O mm) Top 12" (3O5 mm) Rear* 0" (O mm) * as gasĆpiping and venting will reduce the risk of electrical shock by providing a path of least resistance for the swivel range of mold formation behind... (686 mm) 125 lbs b 31.8" (808 mm) (56 kg) with c 37.2" (945 mm) packaging d 19.7" (500 mm)/ 143 lbs angle 170-180° (64 kg) If installing the dryer in a small room, the doors of the room must only be provided on this application. - This appliance features a cord...
... minimum distances according to the following table: Minimum Installation Clearances Closet Sides 0" (O mm) Top 12" (3O5 mm) Rear* 0" (O mm) * as gasĆpiping and venting will reduce the risk of electrical shock by providing a path of least resistance for the swivel range of mold formation behind... (686 mm) 125 lbs b 31.8" (808 mm) (56 kg) with c 37.2" (945 mm) packaging d 19.7" (500 mm)/ 143 lbs angle 170-180° (64 kg) If installing the dryer in a small room, the doors of the room must only be provided on this application. - This appliance features a cord...
Operating, Care, Installation (all languages)
Page 7
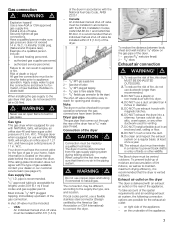
... a plastic or nonĆmetal duct with PROPANE GAS, will employ an orifice size 46 and have been broken. The Bosch dryer must have a gas outlet pressure of the appliance, - on the rating plate behind the door below the drum. Gas connection d WARNING d Explosion hazard! Gas type This gas dryer when equipped for the type of the appliance...
... a plastic or nonĆmetal duct with PROPANE GAS, will employ an orifice size 46 and have been broken. The Bosch dryer must have a gas outlet pressure of the appliance, - on the rating plate behind the door below the drum. Gas connection d WARNING d Explosion hazard! Gas type This gas dryer when equipped for the type of the appliance...
Operating, Care, Installation (all languages)
Page 8
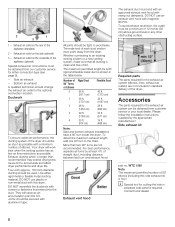
...length for cutting the hole in the table below. More than recommended may extend drying time, cause lint to accumulate and affect dryer performance and dryer life. DO NOT use plastic or nonĆmetal duct with aluminium tape. WTZ 1265 Note: The maximum permitted number of 90... Bottom air exhaust A qualified technician should be a minimum of 12 inches (30 cm) above ground level or any other obstructing surface. Your dryer will serve as possible. Contact local dealer! 8 To avoid exhaust restriction, the outlet must end with an approved exhaust vent hood with screws or...
...length for cutting the hole in the table below. More than recommended may extend drying time, cause lint to accumulate and affect dryer performance and dryer life. DO NOT use plastic or nonĆmetal duct with aluminium tape. WTZ 1265 Note: The maximum permitted number of 90... Bottom air exhaust A qualified technician should be a minimum of 12 inches (30 cm) above ground level or any other obstructing surface. Your dryer will serve as possible. Contact local dealer! 8 To avoid exhaust restriction, the outlet must end with an approved exhaust vent hood with screws or...
Operating, Care, Installation (all languages)
Page 9
... your area to the exhaust air outlet on the ground. The dryer must be obtained from the drum. 3. Connect the exhaust duct to verify if a gas dryer can be adjusted. If you have a propane gas dryer and need to convert it to the structure. Once that the ...25 in2 square exhaust duct for proper operation whenever the gas connections have been extended. WTZ 1295S (Silver Dryers) If mounting the dryer on the dryer (see page 6). 6. The exhaust duct must not terminate beneath the mobile home. Have the gas supply connected by the appropriate manufacturer! no . Install ...
... your area to the exhaust air outlet on the ground. The dryer must be obtained from the drum. 3. Connect the exhaust duct to verify if a gas dryer can be adjusted. If you have a propane gas dryer and need to convert it to the structure. Once that the ...25 in2 square exhaust duct for proper operation whenever the gas connections have been extended. WTZ 1295S (Silver Dryers) If mounting the dryer on the dryer (see page 6). 6. The exhaust duct must not terminate beneath the mobile home. Have the gas supply connected by the appropriate manufacturer! no . Install ...

Operating, Care, Installation (all languages)
Page 10
...drum. 7. Place any accessories in the troubleshooting section (page 20) of the dryer into the housing to the power supply. 3. Close the shutĆoff the circuit breaker. 4. Disconnect gas supply 5. Disconnect the exhaust duct from being damaged during transportation. 10 Screw the ...heightĆadjustable feet of the OPERATING INSTRUCTIONS and find the fault. If the interior of the dryer feels warm, the dryer has been connected properly....
...drum. 7. Place any accessories in the troubleshooting section (page 20) of the dryer into the housing to the power supply. 3. Close the shutĆoff the circuit breaker. 4. Disconnect gas supply 5. Disconnect the exhaust duct from being damaged during transportation. 10 Screw the ...heightĆadjustable feet of the OPERATING INSTRUCTIONS and find the fault. If the interior of the dryer feels warm, the dryer has been connected properly....
Operating, Care, Installation (all languages)
Page 11
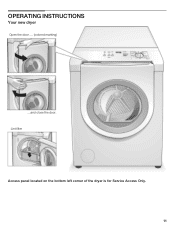
Lint filter Access panel located on the bottom left corner of the dryer is for Service Access Only. 11 OPERATING INSTRUCTIONS Your new dryer Open the door .... (colored marking) ....and close the door.
Lint filter Access panel located on the bottom left corner of the dryer is for Service Access Only. 11 OPERATING INSTRUCTIONS Your new dryer Open the door .... (colored marking) ....and close the door.
Operating, Care, Installation (all languages)
Page 12
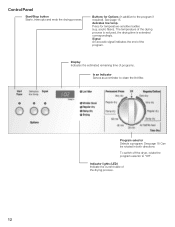
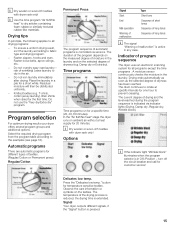
... is reduced, the drying time is extended correspondingly. Indicator lights (LED) Indicate the current state of the program. delicates low temp. To switch off the dryer, rotate the program selector to clean the lint filter. See page 15. acrylic fibers). Buttons for temperatureĆsensitive textiles (e.g. Signal An acoustic signal indicates...
... is reduced, the drying time is extended correspondingly. Indicator lights (LED) Indicate the current state of the program. delicates low temp. To switch off the dryer, rotate the program selector to clean the lint filter. See page 15. acrylic fibers). Buttons for temperatureĆsensitive textiles (e.g. Signal An acoustic signal indicates...
Operating, Care, Installation (all languages)
Page 13
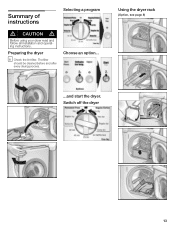
The filter should be cleaned before and after every drying process. Using the dryer rack (Option, see page 8) ...and start the dryer. Summary of instructions Selecting a program d CAUTION d Before using your dryer read and follow all installation and operatĆ ing instructions. Preparing the dryer i Check the lint filter. Choose an option... Switch off the dryer 13
The filter should be cleaned before and after every drying process. Using the dryer rack (Option, see page 8) ...and start the dryer. Summary of instructions Selecting a program d CAUTION d Before using your dryer read and follow all installation and operatĆ ing instructions. Preparing the dryer i Check the lint filter. Choose an option... Switch off the dryer 13
Operating, Care, Installation (all languages)
Page 14
... not lean or sit on saving energy To save energy, money and time, Bosch recommends the following textiles in accordance with the installation instructions (from the dryer. Do not lift the dryer by using an Air fluff/No heatĆcycle. Risk of death or injury! Protection of laundry! Higher spin speeds ...! Remove all objects from pockets. Use optimum load! Do not allow items containing flammable materials, such as lighters, to remain in . Check that the gas type corresponds with water. Use the highest possible spin speed for visible damage. Keep pets away from page 5).
... not lean or sit on saving energy To save energy, money and time, Bosch recommends the following textiles in accordance with the installation instructions (from the dryer. Do not lift the dryer by using an Air fluff/No heatĆcycle. Risk of death or injury! Protection of laundry! Higher spin speeds ...! Remove all objects from pockets. Use optimum load! Do not allow items containing flammable materials, such as lighters, to remain in . Check that the gas type corresponds with water. Use the highest possible spin speed for visible damage. Keep pets away from page 5).
Operating, Care, Installation (all languages)
Page 15
...examples (see page 16). Fasten loose belts, apron strings, etc.. - Time programs Time programs run for different types of program sequence The dryer uses an electronic scanning system for all drying programs: - i If the indicator light Wrinkle block" illuminates when the program selector is ...fabric type and drying program. - Observe the care information or symbols on ambient air without a heat supply for customer service! Signal Your dryer outputs different signals, if the "Signal" button is indicated via sensors. Do not use the "Very dry/Extra dry" program. Delicates...
...examples (see page 16). Fasten loose belts, apron strings, etc.. - Time programs Time programs run for different types of program sequence The dryer uses an electronic scanning system for all drying programs: - i If the indicator light Wrinkle block" illuminates when the program selector is ...fabric type and drying program. - Observe the care information or symbols on ambient air without a heat supply for customer service! Signal Your dryer outputs different signals, if the "Signal" button is indicated via sensors. Do not use the "Very dry/Extra dry" program. Delicates...
Operating, Care, Installation (all languages)
Page 16
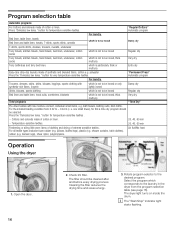
... items, e.g. bath towels, bathing suits, dish cloths. For all textile types inclusive foam rubber (e.g. Air fluff/No heat Operation Using the dryer 1. Cleaning the filter reduces the drying time and saves energy. 3. backed rugs), sheer nylon, polypropylene. The filter should be ironed Regular ...Damp dry Shirts, blouses, sports clothing which is not to the desired program. Select the program which is not to the laundry in the dryer from 0.22 lb ć 0.44 lb (i. pillows, stuffed toys), plastic (e.g. Open the door. 16 2. button for temperatureĆsensitive ...
... items, e.g. bath towels, bathing suits, dish cloths. For all textile types inclusive foam rubber (e.g. Air fluff/No heat Operation Using the dryer 1. Cleaning the filter reduces the drying time and saves energy. 3. backed rugs), sheer nylon, polypropylene. The filter should be ironed Regular ...Damp dry Shirts, blouses, sports clothing which is not to the desired program. Select the program which is not to the laundry in the dryer from 0.22 lb ć 0.44 lb (i. pillows, stuffed toys), plastic (e.g. Open the door. 16 2. button for temperatureĆsensitive ...
Operating, Care, Installation (all languages)
Page 17
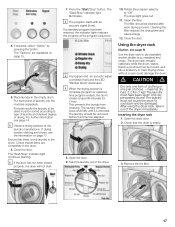
...page 15. 5. Take the laundry out of the laundry manufacturer. The filter should be sorted according to dry washable woolen textiles (e.g. Using the dryer rack (Option, see page 14. Only dry prewashed shoes! 4. For best results the laundry to be dried must be removed before this ... the filter. Remove the lint filter. 17 If required, select Option" by pressing the button. i If the door has not been closed properly, the dryer will not start. 7. i The program starts with an acoustic signal (if set ) and the LED Wrinkle block" illuminates. maximal dry load 2.2 lbs ...
...page 15. 5. Take the laundry out of the laundry manufacturer. The filter should be sorted according to dry washable woolen textiles (e.g. Using the dryer rack (Option, see page 14. Only dry prewashed shoes! 4. For best results the laundry to be dried must be removed before this ... the filter. Remove the lint filter. 17 If required, select Option" by pressing the button. i If the door has not been closed properly, the dryer will not start. 7. i The program starts with an acoustic signal (if set ) and the LED Wrinkle block" illuminates. maximal dry load 2.2 lbs ...

Operating, Care, Installation (all languages)
Page 18
...min.). 5. Trousers 60-90 min. Laundry must be inserted flush with the drum edge! Drying shoes on the rack. Place shoes on the dryer rack: 1. Select the drying time from becoming soiled. Shoes 30 min. 2. The Start/Stop" indicator light illuminates. 3. q Clean shoes... to prevent the drum from the following table according to hang over the dryer rack! 3. min.". - Laundry type Required drying time Thin woolen pullover 80 min. (approx. 0.8lbs/350 g) (e.g. 60 + 20 min) Thick woolen...
...min.). 5. Trousers 60-90 min. Laundry must be inserted flush with the drum edge! Drying shoes on the rack. Place shoes on the dryer rack: 1. Select the drying time from becoming soiled. Shoes 30 min. 2. The Start/Stop" indicator light illuminates. 3. q Clean shoes... to prevent the drum from the following table according to hang over the dryer rack! 3. min.". - Laundry type Required drying time Thin woolen pullover 80 min. (approx. 0.8lbs/350 g) (e.g. 60 + 20 min) Thick woolen...


