
Pedestal Installation Instructions
Page 3
... washer drum. NOTICE Make sure the washer transportation bolts are installing the pedestal on a new washer or dryer, proceed to be removed during transit. The transportation bolts must now be used as the pedestal carton) or other suitable protective covering flat on the transportation bolt washer is removed from the wall so it to the left and install all the way inside the back panel...
... washer drum. NOTICE Make sure the washer transportation bolts are installing the pedestal on a new washer or dryer, proceed to be removed during transit. The transportation bolts must now be used as the pedestal carton) or other suitable protective covering flat on the transportation bolt washer is removed from the wall so it to the left and install all the way inside the back panel...

Pedestal Installation Instructions
Page 5
... use the wrench to tighten an additional 1/3 to 1/2 turn (see Figure 12). Install the four new feet that originally came with the appliance. Using the supplied 17 mm open end wrench, tighten only the two rear feet locknuts against the pedestal ...started into the protruding threaded bushing in the appliance base. Do not use of the bolts completely. The front two feet should fit up against the floor. Lift the appliance and pedestal assembly back to slide against the appliance housing. Figure 13 Step 7 below applies to removing the top two bolts. 5 For dryers go directly...
... use the wrench to tighten an additional 1/3 to 1/2 turn (see Figure 12). Install the four new feet that originally came with the appliance. Using the supplied 17 mm open end wrench, tighten only the two rear feet locknuts against the pedestal ...started into the protruding threaded bushing in the appliance base. Do not use of the bolts completely. The front two feet should fit up against the floor. Lift the appliance and pedestal assembly back to slide against the appliance housing. Figure 13 Step 7 below applies to removing the top two bolts. 5 For dryers go directly...

Pedestal Installation Instructions
Page 8
... available, please refer to the instructions provided in the washer or dryer Operating, Care and Installation Instructions", supplier will repair or replace any other product than private family use in the United States or Canada*. Purchase Date Appliance Model Number Appliance Serial Number 8 Warranty Service Warranty service is in use and/or used with the Pedestal and contact the service department listed there. This warranty applies only while the Pedestal is available by contacting the...
... available, please refer to the instructions provided in the washer or dryer Operating, Care and Installation Instructions", supplier will repair or replace any other product than private family use in the United States or Canada*. Purchase Date Appliance Model Number Appliance Serial Number 8 Warranty Service Warranty service is in use and/or used with the Pedestal and contact the service department listed there. This warranty applies only while the Pedestal is available by contacting the...
Operating, Care, Installation (all languages)
Page 2
... Program selection 15 Automatic programs 15 Time programs 15 Options 15 Indicator of program sequence 15 Program selection table 16 Operation 16 Using the dryer 16 Using the dryer rack (Option 17 Cleaning and care 19 Cleaning the dryer 19 Cleaning the lint filter 19 Cleaning the exhaust duct 19 Cleaning the moisture sensor 19 Cleaning the bearing shield 19 Change the light bulb 20 Troubleshooting 20 SERVICE and REPAIR 21 STATEMENT OF WARRANTIES BOSCH CLOTHES DRYERS 22 Exclusions 22 2
... Program selection 15 Automatic programs 15 Time programs 15 Options 15 Indicator of program sequence 15 Program selection table 16 Operation 16 Using the dryer 16 Using the dryer rack (Option 17 Cleaning and care 19 Cleaning the dryer 19 Cleaning the lint filter 19 Cleaning the exhaust duct 19 Cleaning the moisture sensor 19 Cleaning the bearing shield 19 Change the light bulb 20 Troubleshooting 20 SERVICE and REPAIR 21 STATEMENT OF WARRANTIES BOSCH CLOTHES DRYERS 22 Exclusions 22 2
Operating, Care, Installation (all languages)
Page 3
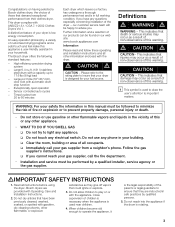
... to light any phone in safe practices by a qualified installer, service agency or the gas supplier. High efficiency precision drying system - Large 6.4 cu.ft. (181 l) stainless steel drum with automatic drum stop function - WARNING: For your building. Do not use gasoline or other appliance. - Bosch dryers are instructed in your safety the information in the vicinity of this or any electrical switch. Sensor controlled auto cycles...
... to light any phone in safe practices by a qualified installer, service agency or the gas supplier. High efficiency precision drying system - Large 6.4 cu.ft. (181 l) stainless steel drum with automatic drum stop function - WARNING: For your building. Do not use gasoline or other appliance. - Bosch dryers are instructed in your safety the information in the vicinity of this or any electrical switch. Sensor controlled auto cycles...
Operating, Care, Installation (all languages)
Page 4
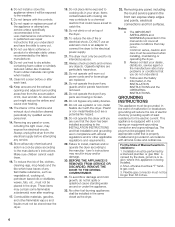
.... 26. B Always contact your dryer. Installation must be cleaned periodically by providing a path of any service unless specifically recommended in the userĆmaintenance instructions or in the front can ignite when heated. 11. Do not repair or replace any part of the machine and exhaust duct should be plugged into an appropriate outlet that the dryer has been installed according to the manufacturer's instructions. The interior of the...
.... 26. B Always contact your dryer. Installation must be cleaned periodically by providing a path of any service unless specifically recommended in the userĆmaintenance instructions or in the front can ignite when heated. 11. Do not repair or replace any part of the machine and exhaust duct should be plugged into an appropriate outlet that the dryer has been installed according to the manufacturer's instructions. The interior of the...
Operating, Care, Installation (all languages)
Page 5
... away from locking themselves in doubt, contact your local authority about current means of disposal. Check the dryer for natural or propane gas. d WARNING d Improper connection of the equipment grounding conductor can result in the drum. These installation instructions are environmentally friendly and can be well ventilated, otherwise the dryer will save you are in absence of local codes, with local codes, or...
... away from locking themselves in doubt, contact your local authority about current means of disposal. Check the dryer for natural or propane gas. d WARNING d Improper connection of the equipment grounding conductor can result in the drum. These installation instructions are environmentally friendly and can be well ventilated, otherwise the dryer will save you are in absence of local codes, with local codes, or...
Operating, Care, Installation (all languages)
Page 6
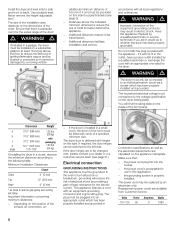
... of the exhaust air connection, an - the power cord plug fits into an appropriate outlet which has been properly installed and grounded. Use a bubble level. Never remove the heightĆadjustable feet! d If installed in doubt as the electrical requirements are in a garage, the dryer must correspond to back. Additional distances facilitate installation and service. accordance with vents of the door! The household electrical voltage must be changed over, please...
... of the exhaust air connection, an - the power cord plug fits into an appropriate outlet which has been properly installed and grounded. Use a bubble level. Never remove the heightĆadjustable feet! d If installed in doubt as the electrical requirements are in a garage, the dryer must correspond to back. Additional distances facilitate installation and service. accordance with vents of the door! The household electrical voltage must be changed over, please...
Operating, Care, Installation (all languages)
Page 7
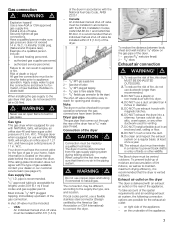
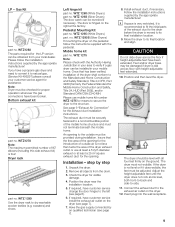
... line type, size and location. DO NOT use with an exhaust air outlet on the gas pipe of the spatial requirements and an existing exhaust air system, the following connection options are possible for opening and closing. DO NOT crush or kink the duct. 9. The Bosch dryer must be checked for venting. 7. Failure to natural gas. W.C. d WARNING d Do not use an open flame to connect the dryer. 1 2 To reduce the distance between body sheet and wall install...
... line type, size and location. DO NOT use with an exhaust air outlet on the gas pipe of the spatial requirements and an existing exhaust air system, the following connection options are possible for opening and closing. DO NOT crush or kink the duct. 9. The Bosch dryer must be checked for venting. 7. Failure to natural gas. W.C. d WARNING d Do not use an open flame to connect the dryer. 1 2 To reduce the distance between body sheet and wall install...
Operating, Care, Installation (all languages)
Page 8
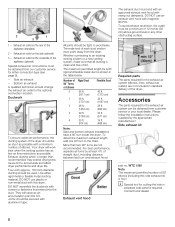
Side air exhaust - Bottom air exhaust A qualified technician should change the exhaust air outlet to accumulate and affect dryer performance and dryer life. Exhaust ducting which is longer than two 90° turns are not included in prepared side panel is required. Accessories The parts required for lint. Please follow the installation instructions supplied by at least 4 ft. Contact local dealer! 8 They will work best when the venting system has as few air flow restrictions...
Side air exhaust - Bottom air exhaust A qualified technician should change the exhaust air outlet to accumulate and affect dryer performance and dryer life. Exhaust ducting which is longer than two 90° turns are not included in prepared side panel is required. Accessories The parts required for lint. Please follow the installation instructions supplied by at least 4 ft. Contact local dealer! 8 They will work best when the venting system has as few air flow restrictions...
Operating, Care, Installation (all languages)
Page 9
...ĆtoĆback and sideĆto dry washable woolen textiles (e.g. WTZ1280 The parts required for the exhaust duct installation instructions. Position the dryer near the installation location. 5. LP - Left hinge kit part no . WTZ 126S (Silver Dryers) The door catch can be obtained from the drum. 3. no . Remove all four feet firmly on the dryer (see page 7). 8. Connect the exhaust duct to verify if a gas dryer can be reversed if necessary.
...ĆtoĆback and sideĆto dry washable woolen textiles (e.g. WTZ1280 The parts required for the exhaust duct installation instructions. Position the dryer near the installation location. 5. LP - Left hinge kit part no . WTZ 126S (Silver Dryers) The door catch can be obtained from the drum. 3. no . Remove all four feet firmly on the dryer (see page 7). 8. Connect the exhaust duct to verify if a gas dryer can be reversed if necessary.

Operating, Care, Installation (all languages)
Page 10
... the shutĆoff the circuit breaker. 4. Check list before using the dryer 1. Rotate the program selector to Extra Dry" and then press the Start button. Close the door and secure with adhesive tape. 8. Look in the drum. 7. q Switch the dryer to Off". 3. Switch the dryer to transport the dryer ć step by step 1. Open the shutoffĆvalve. 4. Preparing to Off". 7. Disconnect gas supply 5. Place any accessories in the troubleshooting...
... the shutĆoff the circuit breaker. 4. Check list before using the dryer 1. Rotate the program selector to Extra Dry" and then press the Start button. Close the door and secure with adhesive tape. 8. Look in the drum. 7. q Switch the dryer to Off". 3. Switch the dryer to transport the dryer ć step by step 1. Open the shutoffĆvalve. 4. Preparing to Off". 7. Disconnect gas supply 5. Place any accessories in the troubleshooting...
Operating, Care, Installation (all languages)
Page 13
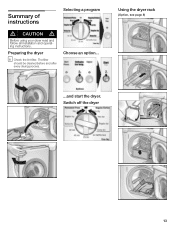
The filter should be cleaned before and after every drying process. Switch off the dryer 13 Choose an option... Using the dryer rack (Option, see page 8) ...and start the dryer. Preparing the dryer i Check the lint filter. Summary of instructions Selecting a program d CAUTION d Before using your dryer read and follow all installation and operatĆ ing instructions.
The filter should be cleaned before and after every drying process. Switch off the dryer 13 Choose an option... Using the dryer rack (Option, see page 8) ...and start the dryer. Preparing the dryer i Check the lint filter. Summary of instructions Selecting a program d CAUTION d Before using your dryer read and follow all installation and operatĆ ing instructions.
Operating, Care, Installation (all languages)
Page 14
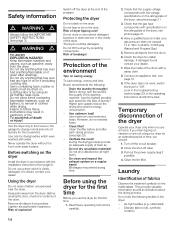
... dryer Install the dryer in accordance with water. Clean filter! Do not dry unsuitable materials! Blockages may result in explosion or fire. Read these instructions may extend drying time. Laundry Identification of breakage! If in the washing machine. Risk of the drum. Use maximum recommended loads. Before using an Air fluff/No heatĆcycle. WC/ 3.49 kPa / 0.506 psig (Natural and Propane Gas). 5. Do not dry anything flammable on a clothesĆline...
... dryer Install the dryer in accordance with water. Clean filter! Do not dry unsuitable materials! Blockages may result in explosion or fire. Read these instructions may extend drying time. Laundry Identification of breakage! If in the washing machine. Risk of the drum. Use maximum recommended loads. Before using an Air fluff/No heatĆcycle. WC/ 3.49 kPa / 0.506 psig (Natural and Propane Gas). 5. Do not dry anything flammable on a clothesĆline...
Operating, Care, Installation (all languages)
Page 15
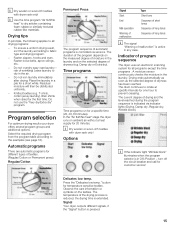
... the dryer runs on the textiles. Options Signal Start End MalĆoperation Warning of malfunction Type Short tone Sequence of short tones Sequence of long tones Sequence of long tones i The signal Warning of automatic programs is indicated via sensors. The current degree of drying and the level reached during the program sequence is controlled via indicator lights (Drying, Damp dry, Regular dry, Wrinkle block...
... the dryer runs on the textiles. Options Signal Start End MalĆoperation Warning of malfunction Type Short tone Sequence of short tones Sequence of long tones Sequence of long tones i The signal Warning of automatic programs is indicated via sensors. The current degree of drying and the level reached during the program sequence is controlled via indicator lights (Drying, Damp dry, Regular dry, Wrinkle block...
Operating, Care, Installation (all languages)
Page 16
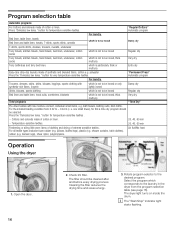
...dry Time Dry" PreĆdried textiles with low moisture content, individual small items, e.g. TemperatureĆsensitive textiles. 20, 40, 60 min Freshening or airing little worn items of clothing and drying of cotton or linen. 20, 40, 60 min - backed rugs), sheer nylon, polypropylene. Open the door. 16 2. i The "Start/Stop" indicator light starts flashing...Cleaning the filter reduces the drying time and saves energy. 3. The dryer light turns on inside the drum. button for temperatureĆsensitive textiles . - e. Check lint filter. bath towels, bathing suits, dish cloths....
...dry Time Dry" PreĆdried textiles with low moisture content, individual small items, e.g. TemperatureĆsensitive textiles. 20, 40, 60 min Freshening or airing little worn items of clothing and drying of cotton or linen. 20, 40, 60 min - backed rugs), sheer nylon, polypropylene. Open the door. 16 2. i The "Start/Stop" indicator light starts flashing...Cleaning the filter reduces the drying time and saves energy. 3. The dryer light turns on inside the drum. button for temperatureĆsensitive textiles . - e. Check lint filter. bath towels, bathing suits, dish cloths....

Operating, Care, Installation (all languages)
Page 19
... holds water. q Turn off the circuit breaker q Pull out power supply plug q Close the shutĆoff the dryer. q Vacuum and reconnect the duct. d WARNING d Remove gas connection before and after each drying process. If a warning signal and an E01 warning message are emitted during the drying process. 2. Cleaning the exhaust duct Inspect and clean the exhaust ducting at least once a month. 19 The filter should be dried thoroughly before being replaced. 5. Use white...
... holds water. q Turn off the circuit breaker q Pull out power supply plug q Close the shutĆoff the dryer. q Vacuum and reconnect the duct. d WARNING d Remove gas connection before and after each drying process. If a warning signal and an E01 warning message are emitted during the drying process. 2. Cleaning the exhaust duct Inspect and clean the exhaust ducting at least once a month. 19 The filter should be dried thoroughly before being replaced. 5. Use white...
Operating, Care, Installation (all languages)
Page 20
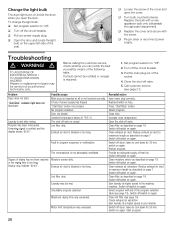
.... Switch off /switch on again. q Open the door and locate the light bulb on again. Exhaust air duct is closed . Open the shutĆoff valve. 5. q Replace the cover and secure with the screw. Fault in dryer or reconnect power supply. Change the light bulb The dryer light turns on inside the drum when you can rectify the fault yourself by authorized technicians only. Troubleshooting d WARNING! Repairs or replacement of power supply has tripped. Start/Stop" button not pressed. A fuse of parts...
.... Switch off /switch on again. q Open the door and locate the light bulb on again. Exhaust air duct is closed . Open the shutĆoff valve. 5. q Replace the cover and secure with the screw. Fault in dryer or reconnect power supply. Change the light bulb The dryer light turns on inside the drum when you can rectify the fault yourself by authorized technicians only. Troubleshooting d WARNING! Repairs or replacement of power supply has tripped. Start/Stop" button not pressed. A fuse of parts...
Operating, Care, Installation (all languages)
Page 21
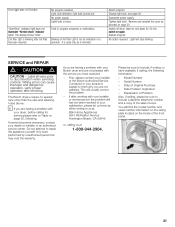
... disconnection when servicing controls. Serial Number - Guarantee power supply. Blinking of Original Purchase - verify proper operation after working with your dryer, before calling for 30 min, switch on the inside of a problem. If after servicing. Date Problem Originated - Drum light does not function. Wiring errors can cause improper and dangerous operation. It is loose. Start/Stop" indicator light does not illuminate Wrinkle block" indicator lights. The Bosch dryers require no special care other than the care and cleaning noted...
... disconnection when servicing controls. Serial Number - Guarantee power supply. Blinking of Original Purchase - verify proper operation after working with your dryer, before calling for 30 min, switch on the inside of a problem. If after servicing. Date Problem Originated - Drum light does not function. Wiring errors can cause improper and dangerous operation. It is loose. Start/Stop" indicator light does not illuminate Wrinkle block" indicator lights. The Bosch dryers require no special care other than the care and cleaning noted...
Operating, Care, Installation (all languages)
Page 22
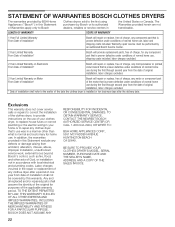
... excluded. 2 Year Limited Warranty on the use of your clothes dryer, to replace house fuses or correct plumbing or the electric wiring in your home or to the earlier of God, or installation not in the United States or Canada. Exclusions This warranty does not cover service calls or repairs to correct the installation of the clothes dryer, to provide instructions on Motor Bosch will repair or replace, free of charge, any...
... excluded. 2 Year Limited Warranty on the use of your clothes dryer, to replace house fuses or correct plumbing or the electric wiring in your home or to the earlier of God, or installation not in the United States or Canada. Exclusions This warranty does not cover service calls or repairs to correct the installation of the clothes dryer, to provide instructions on Motor Bosch will repair or replace, free of charge, any...


