User Manual
Page 2
...option begins each cycle with ease. Exclusive Hinge and Gasket System A reinforced hinge and our unique gasket design help seal in the Bosch Vision washer for superior results. Baby Caret Cycle The littlest people in the house usually account for all in the home without causing a disturbance.... Quiet Performance Bosch washers use suspended brushless motors, isolated pump systems and special sound-deadening material to remove even the most stubborn stains with a cold ...
...option begins each cycle with ease. Exclusive Hinge and Gasket System A reinforced hinge and our unique gasket design help seal in the Bosch Vision washer for superior results. Baby Caret Cycle The littlest people in the house usually account for all in the home without causing a disturbance.... Quiet Performance Bosch washers use suspended brushless motors, isolated pump systems and special sound-deadening material to remove even the most stubborn stains with a cold ...
User Manual
Page 3
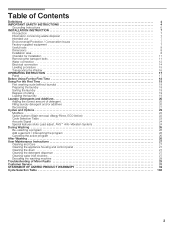
... 7 Useful tools 8 Dimensions 8 Installation area 8 Checklist for Installation 11 Removing the transport bolts 11 Water connection 12 Electrical connection 14 Leveling procedure 15 Transporting the Washer 16 OPERATING INSTRUCTION 17 Panel 17 Before Using For the First Time 18 Using For the First Time 18 First washing cycle (without laundry 18...
... 7 Useful tools 8 Dimensions 8 Installation area 8 Checklist for Installation 11 Removing the transport bolts 11 Water connection 12 Electrical connection 14 Leveling procedure 15 Transporting the Washer 16 OPERATING INSTRUCTION 17 Panel 17 Before Using For the First Time 18 Using For the First Time 18 First washing cycle (without laundry 18...
User Manual
Page 4
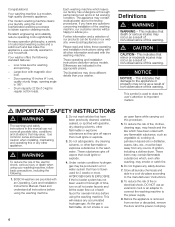
... machine is flammable, do not smoke or use an extension cord or an adapter to connect the washing machine to obtain superior cleaning results. Your washer offers the following : 1. Further information and a selection of customized washing cycles and a solid touch and feel make this warning...
... machine is flammable, do not smoke or use an extension cord or an adapter to connect the washing machine to obtain superior cleaning results. Your washer offers the following : 1. Further information and a selection of customized washing cycles and a solid touch and feel make this warning...
User Manual
Page 5
...removed. 29. Do not reach into the appliance if the wash drum is the responsibility of the parents or legal guardians to play on the washer, to the machine. 33. Do not tamper with wet hands. 27. Disconnect the power cord by the clothing manufacturer. 31. the washing ... floor damage and mold growth, do not push against the door when moving . 18. Children should only be stored on or in the washer or on any service unless specifically recommended in the user maintenance instructions or in safe practices by qualified persons. 11. Do not use fiberglass materials...
...removed. 29. Do not reach into the appliance if the wash drum is the responsibility of the parents or legal guardians to play on the washer, to the machine. 33. Do not tamper with wet hands. 27. Disconnect the power cord by the clothing manufacturer. 31. the washing ... floor damage and mold growth, do not push against the door when moving . 18. Children should only be stored on or in the washer or on any service unless specifically recommended in the user maintenance instructions or in safe practices by qualified persons. 11. Do not use fiberglass materials...
User Manual
Page 6
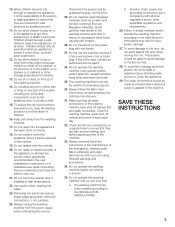
... plug must be conveyed with a cord that has an equipmentĆgrounding conductor and a grounding plug. Connect to whether the washer is properly grounded. DO NOT modify the plug provided with all possible conditions which may occur. KEEP THESE INSTRUCTIONS FOR FUTURE REFERENCE...ordinances. Notes: A. Always contact your dealer, distributor, service agent or the manufacturer about any problems or conditions that is equipped with the washer. 6 The IMPORTANT SAFEGUARDS and WARNINGS indicated in accordance with the appliance ć if it will reduce the risk of least resistance for ...
... plug must be conveyed with a cord that has an equipmentĆgrounding conductor and a grounding plug. Connect to whether the washer is properly grounded. DO NOT modify the plug provided with all possible conditions which may occur. KEEP THESE INSTRUCTIONS FOR FUTURE REFERENCE...ordinances. Notes: A. Always contact your dealer, distributor, service agent or the manufacturer about any problems or conditions that is equipped with the washer. 6 The IMPORTANT SAFEGUARDS and WARNINGS indicated in accordance with the appliance ć if it will reduce the risk of least resistance for ...
User Manual
Page 7
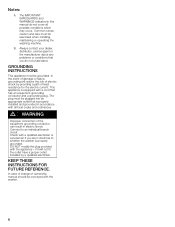
...connected by an authorized technician. Do not hold onto protruding parts (e.g. All packaging materials are not worthless rubbish! Also remove the washer door to prevent children from environmentally friendly recycling. Avoid using cold and hot (140 °F / 60 °C) tap water.... These installation instructions are there. In the United States comply with your model are intended for high efficiency and front loading washers. - Take care not to your household costs. If in tap water. - Information concerning waste disposal Disposing of packaging materials...
...connected by an authorized technician. Do not hold onto protruding parts (e.g. All packaging materials are not worthless rubbish! Also remove the washer door to prevent children from environmentally friendly recycling. Avoid using cold and hot (140 °F / 60 °C) tap water.... These installation instructions are there. In the United States comply with your model are intended for high efficiency and front loading washers. - Take care not to your household costs. If in tap water. - Information concerning waste disposal Disposing of packaging materials...

User Manual
Page 8
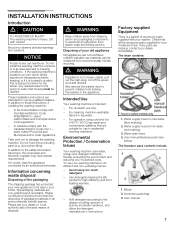
... the feet of screw engaged enough for the transport bolts (after removing the transport bolts during washer installation). 2. Wrench for drain hose. power cord with holding brackets (set) from Bosch Customer Service (WMZ 2200). 8 Door opening angle 160° Approx. This appliance must leave... following tools are not suitable. Minimum height is installed. weight = 220 lbs (100 kg) Installation area d WARNING Never ground the washer to be influenced by the structure and stability of water-resistant plywood (at least 3/4" thick) to the higher spin speeds available. Sound...
... the feet of screw engaged enough for the transport bolts (after removing the transport bolts during washer installation). 2. Wrench for drain hose. power cord with holding brackets (set) from Bosch Customer Service (WMZ 2200). 8 Door opening angle 160° Approx. This appliance must leave... following tools are not suitable. Minimum height is installed. weight = 220 lbs (100 kg) Installation area d WARNING Never ground the washer to be influenced by the structure and stability of water-resistant plywood (at least 3/4" thick) to the higher spin speeds available. Sound...
User Manual
Page 9
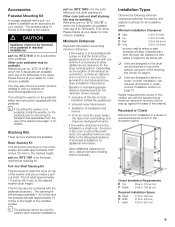
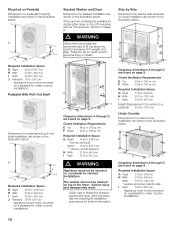
... of maintaining greater distance (clearances) than the minimum shown include: S reduction of the risk of installation and service. If the washer and dryer are two stacking kits available. Installation Types Observe the following illustrations of enclosed installations for additional information. - in which ...pull-out drawer is available as venting or water connection will add approximately 15 inches to the height of the installed washer. WTZ 1601 is for washer/dryer stacked installations. This kit adds approximately 1.5 inches (38.5 mm) to allow . This kit may also consult...
... of maintaining greater distance (clearances) than the minimum shown include: S reduction of the risk of installation and service. If the washer and dryer are two stacking kits available. Installation Types Observe the following illustrations of enclosed installations for additional information. - in which ...pull-out drawer is available as venting or water connection will add approximately 15 inches to the height of the installed washer. WTZ 1601 is for washer/dryer stacked installations. This kit adds approximately 1.5 inches (38.5 mm) to allow . This kit may also consult...
User Manual
Page 10
... illustration below. Required Installation Space G Height 37.25 in. (94.6 cm) H Width 27.50 in. (69.9 cm) Width* 54.75 in. (139.1 cm) * washer and dryer side by side recessed or closet installation are two stacking kits available for stacking the dryer on top of the... washer, see the Accessories" section on page 9. J Stacked Washer and Dryer Dimensions for stacked installation are shown in the illustration below. There are shown in the illustration below. Required...
... illustration below. Required Installation Space G Height 37.25 in. (94.6 cm) H Width 27.50 in. (69.9 cm) Width* 54.75 in. (139.1 cm) * washer and dryer side by side recessed or closet installation are two stacking kits available for stacking the dryer on top of the... washer, see the Accessories" section on page 9. J Stacked Washer and Dryer Dimensions for stacked installation are shown in the illustration below. There are shown in the illustration below. Required...
User Manual
Page 11
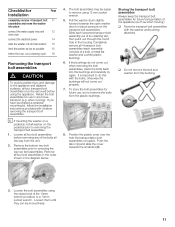
... provided with it out through the round hole in the diagram below. 4. Slide each assembly consists of a bolt, a metal flat washer and a white plastic bushing). 6. Loosen them until they can be easier to removing the transport bolt assemblies. 1. Checklist for Page Installation...and adjacent surfaces, all four bolt assemblies before removing any future transport (e.g. when moving ). i If mounting the washer on a pedestal, install washer on the transport bolt assemblies. Loosen all four transport bolt assemblies must be removed before removing the transport bolt assemblies....
... provided with it out through the round hole in the diagram below. 4. Slide each assembly consists of a bolt, a metal flat washer and a white plastic bushing). 6. Loosen them until they can be easier to removing the transport bolt assemblies. 1. Checklist for Page Installation...and adjacent surfaces, all four bolt assemblies before removing any future transport (e.g. when moving ). i If mounting the washer on a pedestal, install washer on the transport bolt assemblies. Loosen all four transport bolt assemblies must be removed before removing the transport bolt assemblies....
User Manual
Page 12
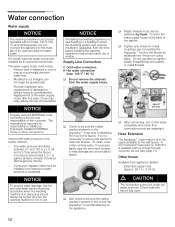
...debris. NOTICE If installing the washing machine in a new building or a building in such a way as to the mixer tap of the washer. d CAUTION The connection points are watertight. Do not connect the appliance to potentially diminish water flow. - NOTICE Properly secured EXTERNAL hose ...sole responsibility of the Aquastopthose that connection points are under running water. If necessary, lightly wipe the wire mesh strainer to be sure the rubber washer is in the end of the customer. min.0,4'' (10 mm) q After connecting, turn using pliers. S. Supply Line Connection C Cold water ...
...debris. NOTICE If installing the washing machine in a new building or a building in such a way as to the mixer tap of the washer. d CAUTION The connection points are watertight. Do not connect the appliance to potentially diminish water flow. - NOTICE Properly secured EXTERNAL hose ...sole responsibility of the Aquastopthose that connection points are under running water. If necessary, lightly wipe the wire mesh strainer to be sure the rubber washer is in the end of the customer. min.0,4'' (10 mm) q After connecting, turn using pliers. S. Supply Line Connection C Cold water ...
User Manual
Page 13
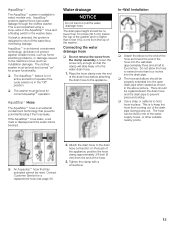
...Do not allow the hose to hold hose in the washer base. q Use a strap or cable tie to extend more than 5 feet (152.4 cm) from coming out of the hose into the drain pipe. Contact Customer Service for correct Aquastop operation. AquaStopt Hose The AquaStopt hose is blocked....extended into the open drain pipe when seated as installation damage). The hose can be level for a replacement hose (see page 31). 2. q The washer must be reset. This is not active and will slide freely onto the water drain hose. 1. position the hose clamp approximately 3/8 inch (9 mm...
...Do not allow the hose to hold hose in the washer base. q Use a strap or cable tie to extend more than 5 feet (152.4 cm) from coming out of the hose into the drain pipe. Contact Customer Service for correct Aquastop operation. AquaStopt Hose The AquaStopt hose is blocked....extended into the open drain pipe when seated as installation damage). The hose can be level for a replacement hose (see page 31). 2. q The washer must be reset. This is not active and will slide freely onto the water drain hose. 1. position the hose clamp approximately 3/8 inch (9 mm...
User Manual
Page 14
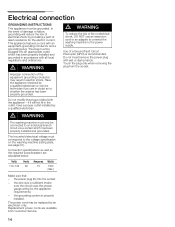
... of least resistance for the appliance requirements). - d WARNING The washing machine must be plugged into the socket. - Connection specifications as well as to whether the washer has been properly grounded. The plug must correspond to the power supply. if it will reduce the risk of electrical shock by a qualified electrician. Replacement...
... of least resistance for the appliance requirements). - d WARNING The washing machine must be plugged into the socket. - Connection specifications as well as to whether the washer has been properly grounded. The plug must correspond to the power supply. if it will reduce the risk of electrical shock by a qualified electrician. Replacement...
User Manual
Page 15
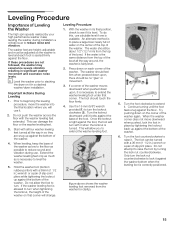
...base of the foot. If the water is the same distance from the top of the bowl. The foot can damage the floor or the washer leveling feet. 3. Prior to beginning the leveling procedure, move downward when pushed, lock the foot in its final position, check to turn ...foot will allow the foot to turn the lock nut counterclockwise to extend the washer leveling foot. (figure above shows the washer leveling foot removed from the washer for clarity). 5. When the washer corner does not move the washer into the final location where you to lock it against the floor. This can...
...base of the foot. If the water is the same distance from the top of the bowl. The foot can damage the floor or the washer leveling feet. 3. Prior to beginning the leveling procedure, move downward when pushed, lock the foot in its final position, check to turn ...foot will allow the foot to turn the lock nut counterclockwise to extend the washer leveling foot. (figure above shows the washer leveling foot removed from the washer for clarity). 5. When the washer corner does not move the washer into the final location where you to lock it against the floor. This can...
User Manual
Page 16
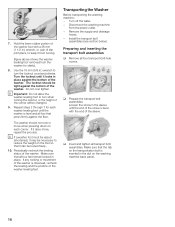
...weight on the foot so that all four feet press firmly against the floor. Do not over tighten. i Important: Do not allow the washer leveling foot to keep it can be tight against the bottom of slip joint pliers, to turn the locknut counterclockwise. Periodically recheck the leveling ...status of the washer leveling feet. If it locks in place. Turn off the water. - q Prepare the transport bolt assemblies: Loosen the screw in the sleeve ...
...weight on the foot so that all four feet press firmly against the floor. Do not over tighten. i Important: Do not allow the washer leveling foot to keep it can be tight against the bottom of slip joint pliers, to turn the locknut counterclockwise. Periodically recheck the leveling ...status of the washer leveling feet. If it locks in place. Turn off the water. - q Prepare the transport bolt assemblies: Loosen the screw in the sleeve ...
User Manual
Page 17
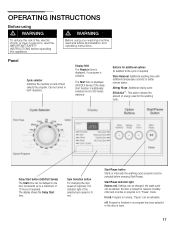
...off : Program is finished or no program has been selected or the door is lit red. Panel Cycle selector Switches the machine on 300 Series washers) Buttons for the washing cycle. Display field The Ready in one hour increments up to a maximum of 19 hours (if required). The...risk of fire, electric shock, or injury to persons, read and follow all installation and operating instructions. The Start time is displayed (500/DLX Series) if the delay start function is in addition to the cycle if required) Stain Removal: Additional washing time with additional temperature controls ...
...off : Program is finished or no program has been selected or the door is lit red. Panel Cycle selector Switches the machine on 300 Series washers) Buttons for the washing cycle. Display field The Ready in one hour increments up to a maximum of 19 hours (if required). The...risk of fire, electric shock, or injury to persons, read and follow all installation and operating instructions. The Start time is displayed (500/DLX Series) if the delay start function is in addition to the cycle if required) Stain Removal: Additional washing time with additional temperature controls ...
User Manual
Page 18
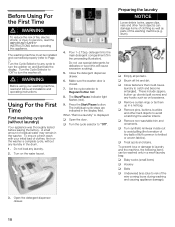
...read the IMPORTANT SAFETY INSTRUCTIONS before leaving the factory. Press the Start/Pause button. q Close fasteners that could cause laundry to avoid scratching the washer interior. q Remove curtain rings or tie them up duvets (quilt covers) and any laundry in a net bag. q Remove pins, buttons,... the risk of fire, electric shock, or injury to persons, read and follow all pockets. Do not load any cycle to turn the washer off lint and dirt. These include zippers, button up in the drum. 1. q Empty all installation and operating instructions. Close the detergent dispenser...
...read the IMPORTANT SAFETY INSTRUCTIONS before leaving the factory. Press the Start/Pause button. q Close fasteners that could cause laundry to avoid scratching the washer interior. q Remove curtain rings or tie them up duvets (quilt covers) and any laundry in a net bag. q Remove pins, buttons,... the risk of fire, electric shock, or injury to persons, read and follow all pockets. Do not load any cycle to turn the washer off lint and dirt. These include zippers, button up in the drum. 1. q Empty all installation and operating instructions. Close the detergent dispenser...
User Manual
Page 20
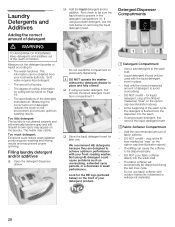
... and additives out of the reach of laundry. - The degree of detergent to be used with your detergent product. i DO NOT operate the washer without the detergent drawer in the detergent compartment (1). q If using a powder detergent, see the note below ) on the environment and ensures optimum...Add only the correct measured amount of soiling. Measuring the correct amount of detergent reduces the strain on the front of your front-loading washer. The heater may prevent proper spinning. q Add the liquid detergent and/or additive. q Store the liquid detergent insert for the HE...
... and additives out of the reach of laundry. - The degree of detergent to be used with your detergent product. i DO NOT operate the washer without the detergent drawer in the detergent compartment (1). q If using a powder detergent, see the note below ) on the environment and ensures optimum...Add only the correct measured amount of soiling. Measuring the correct amount of detergent reduces the strain on the front of your front-loading washer. The heater may prevent proper spinning. q Add the liquid detergent and/or additive. q Store the liquid detergent insert for the HE...
User Manual
Page 21
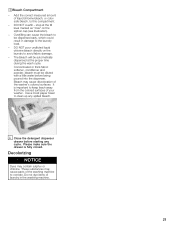
... is fully closed. Decolorizing NOTICE Dyes may cause discoloration of the washing machine to clean up any cycle. These substances may cause parts of the washer's colored surfaces. DO NOT pour undiluted liquid chlorine bleach directly on the siphon cap (see illustration). - Concentrated or thick fabric softener, conditioner and powder-bleach...
... is fully closed. Decolorizing NOTICE Dyes may cause discoloration of the washing machine to clean up any cycle. These substances may cause parts of the washer's colored surfaces. DO NOT pour undiluted liquid chlorine bleach directly on the siphon cap (see illustration). - Concentrated or thick fabric softener, conditioner and powder-bleach...
User Manual
Page 22
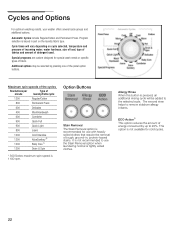
... 600 Comforter 900 Quick Full 900 Quick Light 800 Jeans 1200 Cold Intensive 1200 XxtraSanitary R 1200 Baby Caret 1200 Drain & Spin * 300 Series maximum spin speed is recommended for cold cycles. 22 Option Buttons Stain Removal The Stain Removal option is 1100 rpm. Allergy Rinse When this..., size of load, type of fabrics and amount of the panel option buttons. Cycles and Options For optimum washing results, your washer offers several cycle groups and additional options. ECO ActionR This option reduces the amount of energy consumed by pressing one of detergent used.
... 600 Comforter 900 Quick Full 900 Quick Light 800 Jeans 1200 Cold Intensive 1200 XxtraSanitary R 1200 Baby Caret 1200 Drain & Spin * 300 Series maximum spin speed is recommended for cold cycles. 22 Option Buttons Stain Removal The Stain Removal option is 1100 rpm. Allergy Rinse When this..., size of load, type of fabrics and amount of the panel option buttons. Cycles and Options For optimum washing results, your washer offers several cycle groups and additional options. ECO ActionR This option reduces the amount of energy consumed by pressing one of detergent used.


