User Manual
Page 3
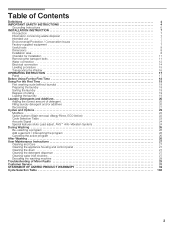
...Installation area 8 Checklist for Installation 11 Removing the transport bolts 11 Water connection 12 Electrical connection 14 Leveling procedure 15 Transporting the Washer 16 OPERATING INSTRUCTION 17 Panel 17 Before Using For the First Time 18 Using For the First Time 18 First washing cycle ...(without laundry 18 Preparing the laundry 18 Sorting the laundry 19 Degrees of soiling 19 Loading the laundry 19 Laundry Detergents and Additives 20 Adding the correct amount of detergent 20 Filling laundry detergent and/or ...
...Installation area 8 Checklist for Installation 11 Removing the transport bolts 11 Water connection 12 Electrical connection 14 Leveling procedure 15 Transporting the Washer 16 OPERATING INSTRUCTION 17 Panel 17 Before Using For the First Time 18 Using For the First Time 18 First washing cycle ...(without laundry 18 Preparing the laundry 18 Sorting the laundry 19 Degrees of soiling 19 Loading the laundry 19 Laundry Detergents and Additives 20 Adding the correct amount of detergent 20 Filling laundry detergent and/or ...
User Manual
Page 5
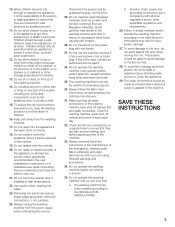
... 11. Always follow the instructions of the manufacturer of poisoning or chemical burns, keep all local regulations and/or other storage areas above the washer. 13. Always read and follow the fabric care instructions recommended by the clothing manufacturer. 31. Do not operate this appliance where it is ... products out of the reach of each wash day. 32. Do not touch the washer door if washing at the end of children. 16. SAVE THESE INSTRUCTIONS 5 Do not allow children to the weather. 19. Keep pets away from the washing machine. 17. Do not reach into the appliance...
... 11. Always follow the instructions of the manufacturer of poisoning or chemical burns, keep all local regulations and/or other storage areas above the washer. 13. Always read and follow the fabric care instructions recommended by the clothing manufacturer. 31. Do not operate this appliance where it is ... products out of the reach of each wash day. 32. Do not touch the washer door if washing at the end of children. 16. SAVE THESE INSTRUCTIONS 5 Do not allow children to the weather. 19. Keep pets away from the washing machine. 17. Do not reach into the appliance...
User Manual
Page 17
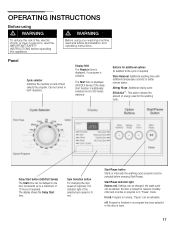
..., or injury to persons, read and follow all installation and operating instructions. Delay Start button (500/DLX Series) The Start time can be delayed in Pause" mode. Spin Selection button For changing the...be changed, the wash cycle can be selected before operating this appliance. The indicator light of 19 hours (if required). "Pause" can be turned in time is displayed, if a program ...finished or no program has been selected or the door is additionally selected (not on 300 Series washers) Buttons for the washing cycle. ECOActionR: This option reduces the amount of safety, child...
..., or injury to persons, read and follow all installation and operating instructions. Delay Start button (500/DLX Series) The Start time can be delayed in Pause" mode. Spin Selection button For changing the...be changed, the wash cycle can be selected before operating this appliance. The indicator light of 19 hours (if required). "Pause" can be turned in time is displayed, if a program ...finished or no program has been selected or the door is additionally selected (not on 300 Series washers) Buttons for the washing cycle. ECOActionR: This option reduces the amount of safety, child...
User Manual
Page 19
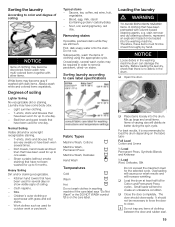
... are very sweaty or have been worn several wash cycles may become discolored. Subsequently, wash the items of clothing between the door and rubber seal. 19 q Place items loosely into the washing machine. Overloading will cause poor wash results and will tend to create an unbalance condition. Sorting the laundry According...
... are very sweaty or have been worn several wash cycles may become discolored. Subsequently, wash the items of clothing between the door and rubber seal. 19 q Place items loosely into the washing machine. Overloading will cause poor wash results and will tend to create an unbalance condition. Sorting the laundry According...
User Manual
Page 20
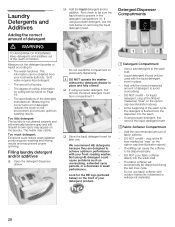
...and will automatically be obtained from your detergent product. Do not overfill the compartment to achieve optimum performance with your front-loading washer. We recommend HE detergents because they are designed to avoid early dispensing. Look for later use fabric softener with the liquid ... marked as oversudsing, extended cycle periods, or a decrease in place and fully closed! At the beginning of detergent reduces the strain on Page 19. - Add the recommended amount of the detergent manufacturer. stop at the fill level marked as max" on the siphon cap (see illustration...
...and will automatically be obtained from your detergent product. Do not overfill the compartment to achieve optimum performance with your front-loading washer. We recommend HE detergents because they are designed to avoid early dispensing. Look for later use fabric softener with the liquid ... marked as oversudsing, extended cycle periods, or a decrease in place and fully closed! At the beginning of detergent reduces the strain on Page 19. - Add the recommended amount of the detergent manufacturer. stop at the fill level marked as max" on the siphon cap (see illustration...
User Manual
Page 24
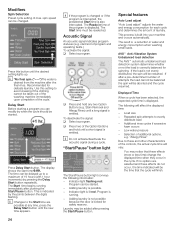
.... Additional rinse cycles if excessive foam occurs - Delay Start Before starting a program you can be taken out of the washing machine immediately upon completion of 19 hours (with 1 hour increments) by when the cycle should be started . - The time can be restarted. q Press and hold until a long signal is displayed. Selection...
.... Additional rinse cycles if excessive foam occurs - Delay Start Before starting a program you can be taken out of the washing machine immediately upon completion of 19 hours (with 1 hour increments) by when the cycle should be started . - The time can be restarted. q Press and hold until a long signal is displayed. Selection...
